

Project Summary
In this project we'll be building a weather app that allows users to search for the current weather anywhere in the world. We'll make use of the OpenWeatherMap API and Redux Promise Middleware to accomplish this in a user friendly fashion.
Setup
Get started with the usual steps, as well as a new one:
- Fork and clone this repository
cdinto the project directorynpm ito install dependenciesnpm startto spin up the development server- Go to OpenWeatherMap and create an account. You'll need an API key to complete this project.
Summary
In this first step we will be installing new dependencies, customizing the store to handle promises, and adding new actions and handlers to the reducer.
Detailed Instructions
Begin by npm installing the following dependencies:
redux-promise-middleware- A module that changes how redux handles promises.axios- A module that allows us to make HTTP requests
Once those complete, open up src/store.js and import promiseMiddleware from Redux Promise Middleware and applyMiddleware from Redux. To let our store make use of this middleware we need to change how we call createStore. Pass two new arguments after the reducer:
undefined- This could be an initial state, but we handle that in our reducer, so we aren't worried about it.applyMiddleware- Invoke this, and passpromiseMiddleware()as the only argument. This will tell Redux that we want the middleware called on every action that isdispatched.
The store is set up! Let's go add some actions to our reducer in src/ducks/weather.js. First off create a new action type of SET_WEATHER at the top of the file. Now we need a corresponding action creator, create and export a function setWeather which takes a single parameter weatherPromise. This function should return an object where type is FETCH_WEATHER and payload is weatherPromise.
We need to update the reducer to handle the new action, but because Redux Promise Middleware adjusts the action type we have to do it a little differently than normal. The first case should check if action.type is equal to SET_WEATHER + "_PENDING", the middleware will add _PENDING for us while we wait for the promise to resolve. When this case is true, return a new object that looks something like this:
return {
	  error: false // We can't have an error yet because we're still waiting on the promise
	, loading: true // We're now waiting on data, so we should indicate to the user that something is loading
	, search: false // The use has just entered their search, so we can hide the search box now
	, weather: {} // This is where the data will live once it comes back to us
};
The next case needs to check for SET_WEATHER + "_FULFILLED", the type dispatched by the middleware when our promise succesfully completed. In this case, return an object that looks like this:
return {
	  error: false // Fulfilled only fires on succesfull completion
	, loading: false // We've now finished fetching the data
	, search: false // We'll be displaying the weather data instead of the search box
	, weather: action.payload // Once the promise completes the middleware will place the returned data onto `action.payload`
};
The final case to check is SET_WEATHER + "_REJECTED", rejected means something went wrong with the promise and we have an error instead of data.
return {
	  error: true
	, loading: false
	, search: false
	, weather: {}
};
That's it for this step! Next up we'll make use of our new actions.
Code Solution
src/store.js
import { applyMiddleware, createStore } from "redux";
import promiseMiddleware from "redux-promise-middleware";

import weather from "./ducks/weather";

export default createStore( weather, {}, applyMiddleware( promiseMiddleware() ) );
src/ducks/weather.js
const RESET = "RESET";
const SET_WEATHER = "SET_WEATHER";

const initialState = {
	  error: false
	, loading: false
	, search: true
	, weather: {}
};

export default function weather( state = initialState, action ) {
	switch ( action.type ) {
		case SET_WEATHER + "_PENDING":
			return {
				  error: false
				, loading: true
				, search: false
				, weather: {}
			};
		case SET_WEATHER + "_FULFILLED":
			return {
				  error: false
				, loading: false
				, search: false
				, weather: action.payload
			};
		case SET_WEATHER + "_REJECTED":
			return {
				  error: true
				, loading: false
				, search: false
				, weather: {}
			};
		case RESET: return initialState;
		default: return state;
	}
}

export function reset() {
	return { type: RESET };
}

export function setWeather( weatherPromise ) {
	return { payload: weatherPromise, type: SET_WEATHER };
}Summary
In this step we will fetch the weather data and place it on application state.
Detailed Instructions
To start this step, create a new file in src named apiKey.js. You might note that apiKey.js is in the .gitignore, this is because API keys are something that should be kept secret! If your API key ends up on GitHub anyone could use it! src/apiKey.js should simply export default "YOUR_API_KEY_HERE". You can find your API key on the OpenWeatherMap account page under the "API keys" tab.
Next, open up src/utils/weatherUtils.js. This file contains a handful of helper functions for formatting data. Go ahead and import API_KEY from src/apiKey.js. Create a new variable named BASE_URL and set it equal to the string http://api.openweathermap.org/data/2.5/weather?APPID=${ API_KEY }&units=imperial&. It's good practice to set up a base URL like this, now we don't have to worry about changing it in a dozen places if the URL ever changes!
Near the bottom of the file there is an incomplete buildUrl function, let's update it to actually do things. We want users to be able to search by zip code or by city name but they require different URL's. Using the (rudimentary) isZip function check whether the location parameter is a zip code. If location is a zip code return BASE_URL + `zip=${ location }` otherwise return BASE_URL + `q=${ location }` .
Now that we are ready to build a URL, open up src/services/weatherService.js and import setWeather from src/ducks/weather.js. Inside of the getWeather function create a variable named weatherPromise and set it equal to the following:
const weatherPromise = axios.get( buildUrl )
	.then( response => {
		console.log( response );

		const formattedData = formatWeatherData( response.data );
		console.log( formattedData );

		return formattedData;
	} );
Here we make a request to get some data, and use .then to run a callback function at some point in the future when the data comes back. In the callback function we log out the response to get an idea of what the data looks like by default, then we adjust it to match the structure we need using the formatWeatherData function from src/utils/weatherUtils.js, finally we return the data.
Now that we have our promise of data we can dispatch it to the middleware and reducer. Invoke store.dispatch passing setWeather( weatherPromise ). Let's pause and take a look at how the data will be flowing here.
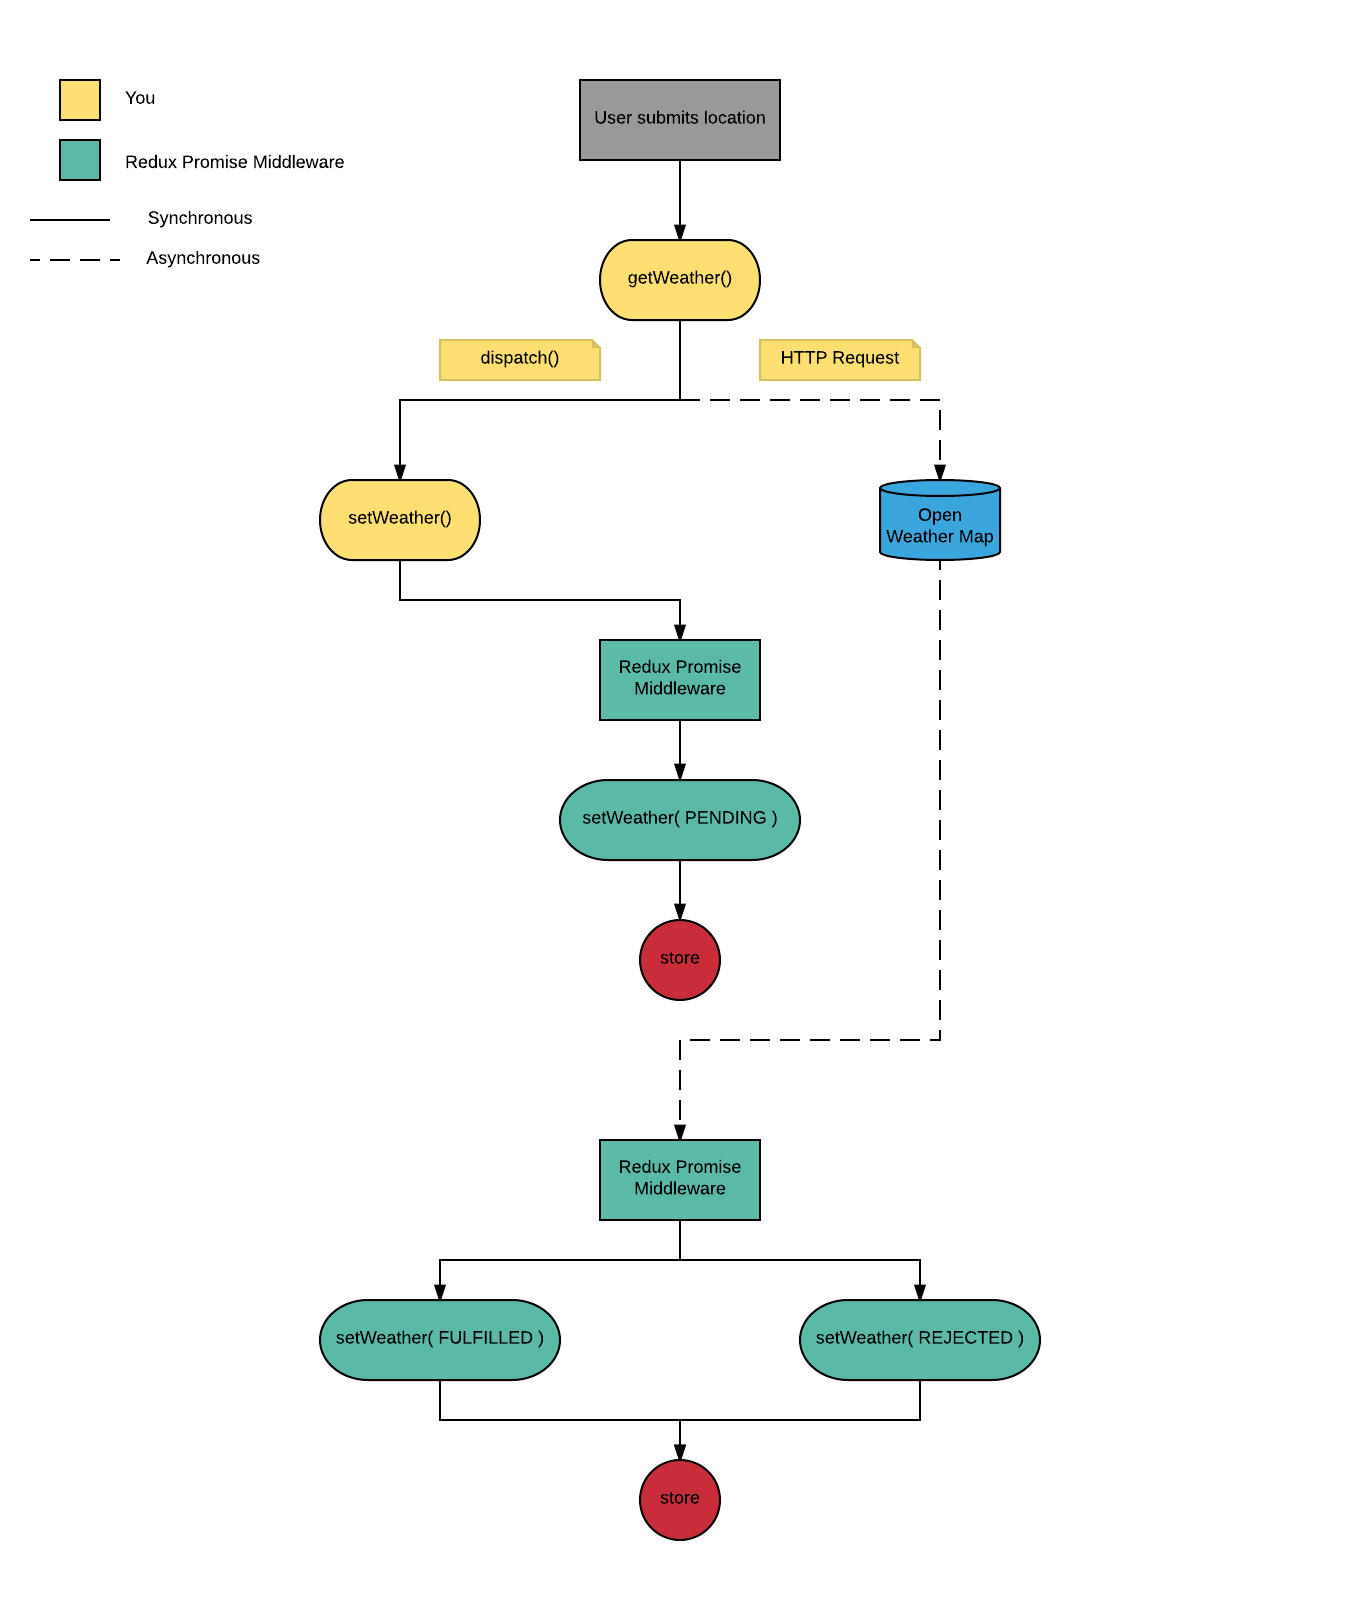
A user will enter their location via the EnterLocation component and we will call getWeather. getWeather makes a request to get some data and dispatches a setWeather action. The action is intercepted by the middleware which will instead dispatch an action type of "SET_WEATHER_PENDING". After the data comes back from the API the middleware will dispatch either SET_WEATHER_FULFILLED or SET_WEATHER_REJECTED depending on whether the request was succesful.
Lastly for this step we'll connect this functionality to the interface. Open up src/components/EnterLocation/EnterLocation.js and import getWeather from src/services/weatherService.js. Alter the handleSubmit method so that it calls getWeather passing in this.state.location.
You should now be able to submit a location and see the console.log's of the weather data!
Code Solution
src/apiKey.js
export default "YOUR_API_KEY_HERE";src/utils/weatherUtils
import cloudy from "../assets/cloudy.svg";
import partlyCloudy from "../assets/partly-cloudy.svg";
import rainy from "../assets/rainy.svg";
import snowy from "../assets/snowy.svg";
import sunny from "../assets/sunny.svg";
import unknownIcon from "../assets/unknown-icon.svg";

import API_KEY from "../apiKey";

const BASE_URL = `http://api.openweathermap.org/data/2.5/weather?APPID=${ API_KEY }&units=imperial&`;

function isZipCode( location ) {
	return !isNaN( parseInt( location ) );
}

function getWeatherIcon( conditionCode ) {
	if ( conditionCode === 800 ) {
		return sunny;
	}

	if ( conditionCode >= 200 && conditionCode < 600 ) {
		return rainy;
	}

	if ( conditionCode >= 600 && conditionCode < 700 ) {
		return snowy;
	}

	if ( conditionCode >= 801 && conditionCode <= 803 ) {
		return partlyCloudy;
	}

	if ( conditionCode === 804 ) {
		return cloudy;
	}

	return unknownIcon;
}

export function formatWeatherData( weatherData ) {
	return {
		  icon: getWeatherIcon( weatherData.weather[ 0 ].id )
		, currentTemperature: weatherData.main.temp
		, location: weatherData.name
		, maxTemperature: weatherData.main.temp_max
		, minTemperature: weatherData.main.temp_min
		, humidity: weatherData.main.humidity
		, wind: weatherData.wind.speed
	};
}

export function buildUrl( location ) {
	if ( isZipCode( location ) ) {
		return BASE_URL + `zip=${ location }`;
	}

	return BASE_URL + `q=${ location }`;
}
src/services/weatherService
import axios from "axios";

import store from "../store";

import {
	  formatWeatherData
	, buildUrl
} from "../utils/weatherUtils";
import { setWeather } from "../ducks/weather";

export function getWeather( location ) {
	const weatherPromise = axios.get( buildUrl( location ) )
		.then( response => {
			console.log( response );

			const formattedData = formatWeatherData( response.data );
			console.log( formattedData );

			return formattedData;
		} );

	store.dispatch( setWeather( weatherPromise ) );
}
src/components/EnterLocation/EnterLocation.js
import React, { Component } from "react";

import "./EnterLocation.css";

import { getWeather } from "../../services/weatherService";

export default class EnterLocation extends Component {
	constructor( props ) {
		super( props );

		this.state = { location: "" };

		this.handleChange = this.handleChange.bind( this );
		this.handleSubmit = this.handleSubmit.bind( this );
	}

	handleChange( event ) {
		this.setState( { location: event.target.value } );
	}

	handleSubmit( event ) {
		event.preventDefault();

		getWeather( this.state.location );

		this.setState( { location: "" } );
	}

	render() {
		return (
			<form
				className="enter-location"
				onSubmit={ this.handleSubmit }
			>
				<input
					className="enter-location__input"
					onChange={ this.handleChange }
					placeholder="London / 84601"
					type="text"
					value={ this.state.location }
				/>
				<button
					className="enter-location__submit"
				>
					Submit
				</button>
			</form>
		);
	}
}Summary
In this step we will be displaying all the different child components based on application state.
Detailed Instructions
This step will take place in src/App.js. Once the project is complete the App component will conditionally render one of four components, let's break this out into a new method to keep render clean. Create a method renderChildren which takes no parameters. This method will look at application state to determine what to render:
- If
props.erroris truthy, return theErrorMessagecomponent, passingprops.resetas a prop. - If
props.loadingis truthy return an image with asrcprop ofhourglass.hourglassis an animated loading indicator. - If
props.searchis truthy return theEnterLocationcomponent - Otherwise, return the
CurrentWeathercomponent.
In render replace the EnterLocation component with { this.renderChildren() }. App should now display different components based on the user input. Try entering some valid and invalid locations to ensure everything is displaying as expected.
Code Solution
// src/App.js
import React, { Component } from "react";
import { connect } from "react-redux";

import "./App.css";

import hourglass from "./assets/hourglass.svg";

import { reset } from "./ducks/weather";

import CurrentWeather from "./components/CurrentWeather/CurrentWeather";
import EnterLocation from "./components/EnterLocation/EnterLocation";
import ErrorMessage from "./components/ErrorMessage/ErrorMessage";

class App extends Component {
	renderChildren() {
		const {
			  error
			, loading
			, search
			, weather
			, reset
		} = this.props;

		if ( error ) {
			return <ErrorMessage reset={ reset } />;
		}

		if ( loading ) {
			return (
				<img
					alt="loading indicator"
					src={ hourglass }
				/>
			);
		}

		if ( search ) {
			return <EnterLocation />;
		}

		return (
			<CurrentWeather />;
		);
	}

	render() {
		return (
			<div className="app">
				<h1 className="app__title">WEATHERMAN</h1>
				{ this.renderChildren() }
			</div>
		);
	}
}

export default connect( state => state, { reset } )( App );Summary
In this step we will update CurrentWeather to display an icon and the actual weather information.
Detailed Instructions
Start this step in src/App.js. For CurrentWeather to work it needs data from the application state! In renderChildren pass props.reset and props.weather as props to CurrentWeather.
All that is left now is to open up src/components/CurrentWeather/CurrentWeather.js and make it dynamic! Update the static data for location, icon, current temp, max temp, min temp, wind, and humidity to take their data from props.
You should now have a functioning weather app that handles asynchronous application state!
Code Solution
src/App.js
import React, { Component } from "react";
import { connect } from "react-redux";

import "./App.css";

import hourglass from "./assets/hourglass.svg";

import { reset } from "./ducks/weather";

import CurrentWeather from "./components/CurrentWeather/CurrentWeather";
import EnterLocation from "./components/EnterLocation/EnterLocation";
import ErrorMessage from "./components/ErrorMessage/ErrorMessage";

class App extends Component {
	renderChildren() {
		const {
			  error
			, loading
			, search
			, weather
			, reset
		} = this.props;

		if ( error ) {
			return <ErrorMessage reset={ reset } />
		}

		if ( loading ) {
			return (
				<img
					alt="loading indicator"
					src={ hourglass }
				/>
			);
		}

		if ( search ) {
			return <EnterLocation />;
		}

		return (
			<CurrentWeather
				reset={ reset }
				weather={ weather }
			/>
		);
	}

	render() {
		return (
			<div className="app">
				<h1 className="app__title">WEATHERMAN</h1>
				{ this.renderChildren() }
			</div>
		);
	}
}

export default connect( state => state, { reset } )( App );
src/components/CurrentWeather/CurrentWeather.js
import React, { PropTypes } from "react";

import "./CurrentWeather.css";

export default function CurrentWeather( { weather, reset } ) {
	const {
		  currentTemperature
		, humidity
		, icon
		, location
		, maxTemperature
		, minTemperature
		, wind
	} = weather;

	return (
		<div className="current-weather">
			<div className="current-weather__weather">
				<h3 className="current-weather__location">{ location }</h3>
				<img
					alt="sunny"
					className="current-weather__icon"
					src={ icon }
				/>
				<h3 className="current-weather__temp">{ currentTemperature }°</h3>

				<div className="current-weather__separator" />

				<ul className="current-weather__stats">
					<li className="current-weather__stat">Max: { maxTemperature }°</li>
					<li className="current-weather__stat">Min: { minTemperature }°</li>
					<li className="current-weather__stat">Wind: { wind } MPH</li>
					<li className="current-weather__stat">Humidity: { humidity }%</li>
				</ul>
			</div>
			<button
				className="current-weather__search-again"
				onClick={ reset }
			>
				Search Again
			</button>
		</div>
	);
}

CurrentWeather.propTypes = {
	  reset: PropTypes.func.isRequired
	, weather: PropTypes.shape( {
		  icon: PropTypes.string.isRequired
		, currentTemperature: PropTypes.number.isRequired
		, maxTemperature: PropTypes.number.isRequired
		, minTemperature: PropTypes.number.isRequired
		, wind: PropTypes.number.isRequired
		, humidity: PropTypes.number.isRequired
	} ).isRequired
};If you see a problem or a typo, please fork, make the necessary changes, and create a pull request so we can review your changes and merge them into the master repo and branch.
© DevMountain LLC, 2017. Unauthorized use and/or duplication of this material without express and written permission from DevMountain, LLC is strictly prohibited. Excerpts and links may be used, provided that full and clear credit is given to DevMountain with appropriate and specific direction to the original content.