This project has been done to our Introduction to Computer Graphics’ class teached by Professor Christian Pagot. In order to do this activity, we have implemented algorithms to rasterize pixels and lines. Thus, we were able to create triangles by combining these primitives. In addition, a framework was provided by the professor so we could simulate the access into the video memory.
- OpenGL
- GLUT (OpenGL Utility Toolkit)
Note: In terms of environment, we have used both Windows and Ubuntu operating systems and Microsoft’s Visual Studio IDE.
As we were attempting to elaborate this project, we found out that it would be easier if a header that could provide us a Pixel class was included. Here is its constructor:
class Pixel
{
public:
    int x, y;
    int r, g, b, a;

    Pixel( int x, int y, int r, int g, int b, int a ) : x( x ),
                                                        y( y ),
                                                        r( r ),
                                                        g( g ),
                                                        b( b ),
                                                        a( a )
    { }

};
This class’ constructor creates an object containing as parameters integer values with all the information we needed to create a pixel:
- x and y represent its coordinates in the Cartesian plane.
- r, g, b, a represent its color in the RGBA color scheme.
This function rasterizes a point in video memory and receives as parameter a pixel. For this to be possible, the received framework allows a pixel memory position to be simulated by the FBptr pointer. The first position pointed is the origin of the XY axis which is at the window’s top-left corner. But how do we move from one pixel to another?
Considering only the color buffer, each pixel has one byte allocated for each color channel (component) of the RGBA scheme. Hence, it is necessary four bytes to store a pixel in this buffer.
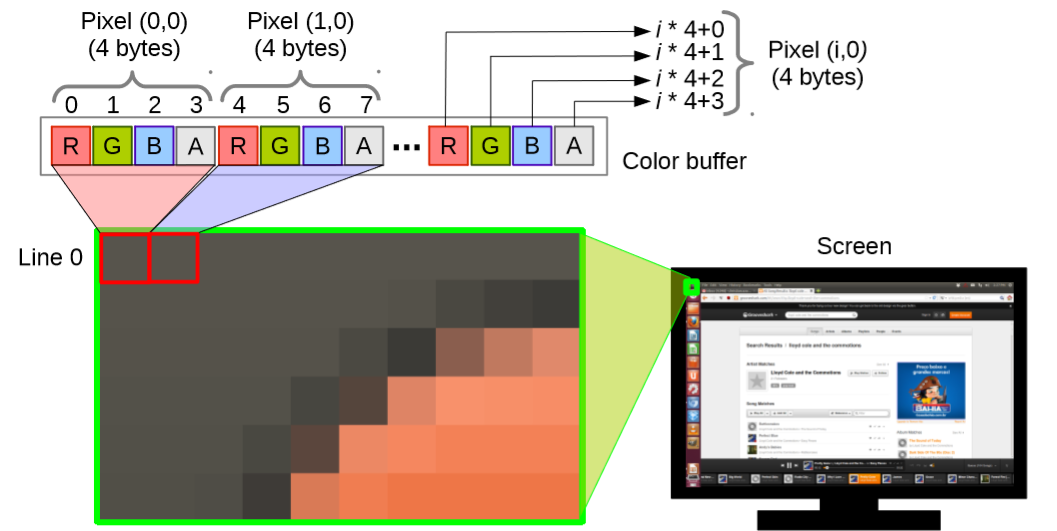
So, in order to access the pixel’s first position of the image our function is:
void PutPixel(Pixel* pixel)
{
	FBptr[(pixel->x * 4) + (pixel->y * IMAGE_WIDTH * 4)] = pixel
}
However, this approach does not allow to make changes in a specific channel. We have to increment the position by one if we want to make it possible:
void PutPixel(Pixel* pixel)
{
	FBptr[(pixel->x * 4) + (pixel->y * IMAGE_WIDTH * 4) + 0] = pixel->r;
	FBptr[(pixel->x * 4) + (pixel->y * IMAGE_WIDTH * 4) + 1] = pixel->g;
	FBptr[(pixel->x * 4) + (pixel->y * IMAGE_WIDTH * 4) + 2] = pixel->b;
	FBptr[(pixel->x * 4) + (pixel->y * IMAGE_WIDTH * 4) + 3] = pixel->a;
}
A possible output for this function is a single pixel in the center of the image with white color:

This function receives as parameters two pixels and rasterizes a line between them using the Bresenham Algorithm. Based on the midpoint technique, it calculates the position where the next pixel should be drawn to create the line. The following image illustrates it:

The drawn line intersects the central column between pixels NE and E. However, it clearly is closer to the NE pixel and the algorithm is able to identify this. It also avoids multiplications and roundings which are two factors that would make the program run slower. Here is the algorithm:
void DrawLine(Pixel *ipixel, Pixel *fpixel)
{
    int dx, dy, d, incr_e, incr_ne;

    dx = fpixel->x - ipixel->x;
    dy = fpixel->y - ipixel->y;
    d = 2 * dy - dx;
    incr_e = 2 * dy;
    incr_ne = 2 * (dy - dx);

    Pixel newPixel = *ipixel;
    PutPixel(&newPixel);

    while(newPixel.x != fpixel->x){
        if(d <= 0) {
            d += incr_e;
            newPixel.x++;
        }
        else {
            d += incr_ne;
            newPixel.x++;
            newPixel.y++;
        }
        PutPixel(&newPixel);
    }
}
Where d is the decision variable that will determine our choice between E and NE.
It has a problem, though. It will only plot lines in the first octant (between 0º and 45º). The following image gives us a clear view about it:

As we can see, dx and dy will not be greater than zero every time. Therefore, we needed to update our code to get these issues covered. We added the abs function to get the absolute value for dx and dy. In addition, if dx and/or dy is supposed to be negative, we have to decrement their respective coordinate instead of incrementing. The code:
void DrawLine(Pixel* iPixel, Pixel* fPixel)
{
	int dx, dy, d, incr_e, incr_ne;
	Pixel newPixel = *iPixel;
	dx = abs(fPixel->x - iPixel->x);
	dy = abs(fPixel->y - iPixel->y);
	PutPixel(&newPixel);

  ## dx >= dy condition will cover the first, fourth, fifth and eighth octants
	if (dx >= dy) {
		incr_e = 2 * dy;
		incr_ne = 2 * (dy - dx);
		d = 2 * dy - dx;
		while (newPixel.x != fPixel->x) {
			if (d <= 0) {
				d += incr_e;
			}
			else {
				d += incr_ne;
				if (fPixel->y >= iPixel->y) {
					newPixel.y++;
				}
				else {
					newPixel.y--;
				}
			}
			if (fPixel->x >= iPixel->x) {
				newPixel.x++;
			}
			else {
				newPixel.x--;
			}
			PutPixel(&newPixel);
		}
	}
  ## dy >= dx condition will cover the second, third, sixth and seventh octants
	else {
		incr_e = 2 * dx;
		incr_ne = 2 * (dx - dy);
		d = 2 * (dx - dy);
		while (newPixel.y != fPixel->y) {
			if (d <= 0) {
				d += incr_e;
			}
			else {
				d += incr_ne;
				if (fPixel->x >= iPixel->x) {
					newPixel.x++;
				}
				else {
					newPixel.x--;
				}
			}
			if (fPixel->y >= iPixel->y) {
				newPixel.y++;
			}
			else {
				newPixel.y--;
			}
			PutPixel(&newPixel);
		}
	}
}
Now we can draw lines in the eight octants:
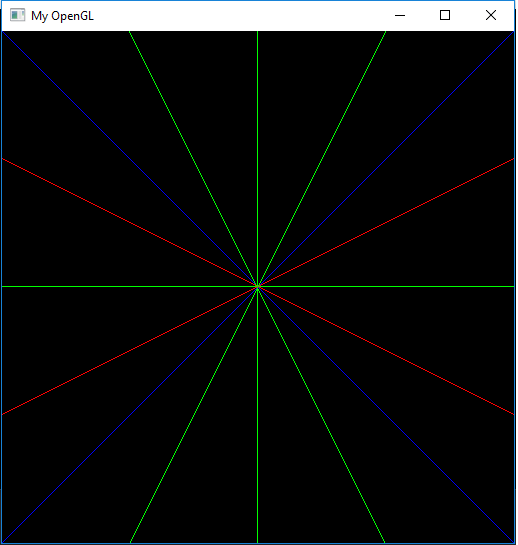
The lines we were able to draw with “DrawLine” all have the same color from start to finish. Now, we want them to change colors along their lengths to match the starting and ending pixels colors.
In order to make this possible, we have to get the initial and ending pixel colors for each RGBA component and use the following formula on the pixel we are currently plotting:
   final->r = (end->r - start->r) * t + start->r;
   final->g = (end->g - start->g) * t + start->g;
   final->b = (end->b - start->b) * t + start->b;
   final->a = (end->a - start->a) * t + start->a;
t is a variable that determines how close we are to the starting pixel or the final pixel. Here is how we calculate it:
t = (currentStep / finalStep);Where finalStep is the number of steps we will have taken when the line is fully rasterized and currentStep is a counter of how many steps we have already taken. So, if ‘t’ is closer to 1 it means that we are reaching the end of the line. And if it is closer to 0 it means that we are at the beginning of the line.
Applying this to DrawLine, our lines now will look like this:
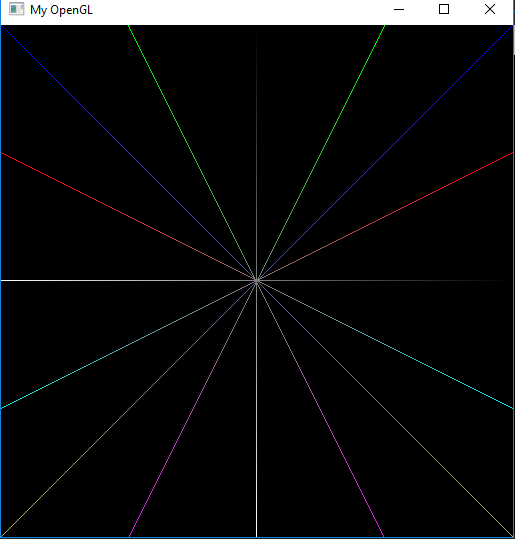
This function receives as parameters three pixels and each one will be one vertex of the triangle. If the pixels are not collinear, we will be able to create a triangle by drawing three lines using the DrawLine function:
void DrawTriangle(Pixel* a, Pixel* b, Pixel* c)
{
	DrawLine(a, b);
	DrawLine(a, c);
	DrawLine(b, c);
}
The output:
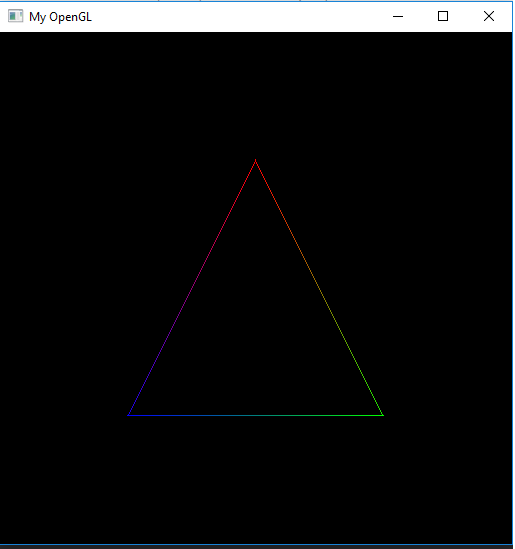
After finishing all the requested tasks, we also wanted to do an extra. It is about rasterizing the whole triangle itself. In the beginning, we attempted to build our own algorithm. It consists about drawing lines until the triangle is completely filled. Here is the code:
void DrawFilledTriangle(Pixel* a, Pixel* b, Pixel* c)
{
	if (a->x < b->x) {
		while (b->x != a->x) {
			DrawLine(c, b);
			b->x--;
		}
	}
	else {
		while (b->x != a->x) {
			DrawLine(c, b);
			b->x++;
		}
	}
}
However, it would only draw triangles with two vertices on the same Y axis. For example:
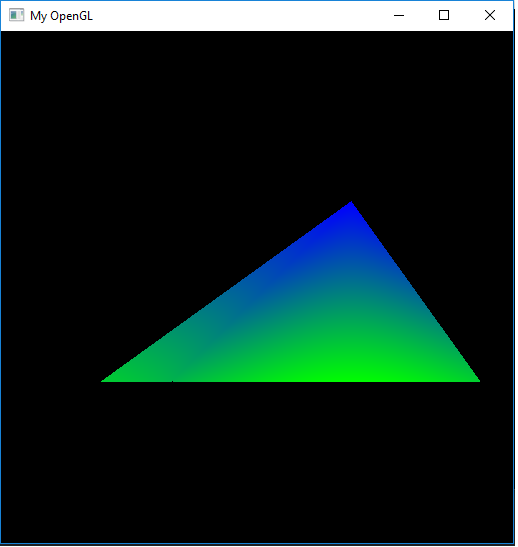
Then, we started looking on the internet for an algorithm that could be able to draw any generic triangle. We were able to find this article, which contains three algorithms for triangles rasterization. After reading it, we chose to use the Barycentric Algorithm. It consists about deciding if a pixel is inside or outside the triangle. If so, all we needed to do was calling function PutPixel for every pixel inside the triangle.
But how to determine if a pixel is inside or outside the triangle? Let’s take a look at the following triangle:
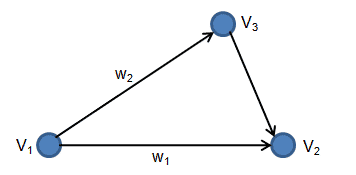
W1 can be written as V2 - V1 and W2 can be written as V3 - V1 and V1 is the intersection between them. This give us the ability to determine a plane, so we are now able to determine any point P inside a triangle with
P(s,t) = V1 + s * w1 + t * w2 s,t e R
by limiting s and t by s >= 0, t >= 0 and (s + t) <= 1. In order to calculate s and t, we can rearrange this in vector notation:
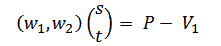
Which can be solved by applying the following formula:
float s = (float)crossProduct(P, w2) / crossProduct(w1, w2);
float t = (float)crossProduct(w1, P) / crossProduct(w1, w2);
If s and t match their limiting conditions, we can plot the pixels inside the triangle. Here is the code:
void DrawFilledTriangle(Pixel* a, Pixel* b, Pixel* c, Pixel* color)
{

## Getting the bounding box of the triangle
	int maxX = max (a->x, max(b->x, c->x));
	int minX = min (a->x, min(b->x, c->x));
	int maxY = max (a->y, max(b->y, c->y));
	int minY = min (a->y, min(b->y, c->y));

## vectors of edge (a, b) and (a, c)
	Pixel vs1 = Pixel((b->x - a->x), (b->y - a->y), 1, 1, 1, 1);
	Pixel vs2 = Pixel((c->x - a->x), (c->y - a->y), 1, 1, 1, 1);

	for (int x = minX; x <= maxX; ++x) {
		for (int y = minY; y <= maxY; ++y) {
			Pixel q = Pixel((x - a->x), (y - a->y), color->r, color->g, color->b, color->a);

			float s = (float)((q.x * vs2.y) - (vs2.x * q.y)) / (float)((vs1.x * vs2.y) - (vs2.x * vs1.y));
			float t = (float)((vs1.x * q.y) - (q.x * vs1.y)) / (float)((vs1.x * vs2.y) - (vs2.x * vs1.y));

			if ((s >= 0) && (t >= 0) && (s + t <= 1)) {
				color->x = x;
				color->y = y;
				PutPixel(color);
			}
		}
	}
}
Here is a generic triangle as an output:
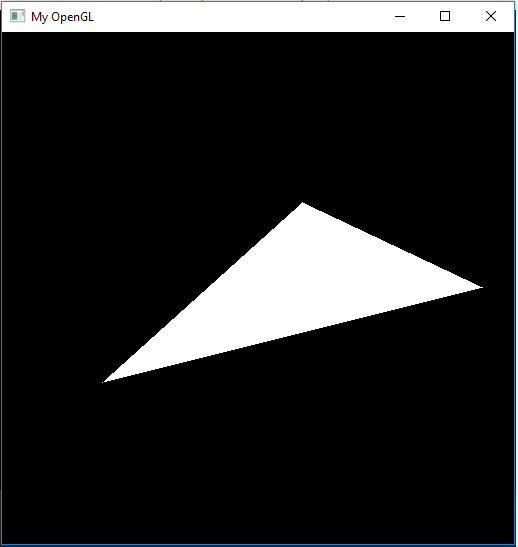
Although this approach provided us a bugless generic triangle rasterized, we were not able to input color interpolation in this algorithm so it is only filled by solid colors.
By the end of this project, we were able to have a better understanding about pixels and lines rasterization algorithms and get some nice results. However, we had to deal with some trouble before accomplishing this. The task we needed to spend most time was the DrawLine function due to its very specific restriction for all eight octants. This project also gave us an important introduction to OpenGL as we initially had some issues to deal with the API specially on Windows OS.
About the extra, we were satisfied with our results even without being able to interpolate the triangle’s colors which is something that is open for improvement. It was the only step that we have not seen class so we needed to deal with more bugs and spend more time doing research than usual.
- The Bresenham Line-Drawing Algorithm
- Foley, Van Dam, Feiner, and Hughes, "Computer Graphics - Principles and Practice", Section 3.2
- Software Rasterization Algorithms for Filling Triangles
- Point in Triangle Algorithms
- Class lectures (Professor Christian Azambuja)
- Luan Barbosa (LuanQBarbosa)
- Túlio Souza (tuliosouza99)