

A Convex component that auto-generates, caches, and serves llms.txt, agents.md, and llms-full.txt from your Convex backend. Register it with app.use(agentReady), drop the widget into your React or Svelte frontend, and your app is discoverable by AI agents. No external hosting required.
Ships with React and Svelte widgets, dynamic cron scheduling via @convex-dev/crons, opt-in agent analytics, AI-assisted description generation, a CLI with an interactive setup wizard, and both demo apps fully hosted on Convex via @convex-dev/static-hosting.
| Human view | Machine view |
|---|---|
 |
 |
LLMs and coding agents read your app through standard discovery files. llms.txt tells an agent what your product is and which pages matter. agents.md documents your API. llms-full.txt ships your long-form docs. Today most teams hand-write these, forget to update them, or never ship them at all.
@waynesutton/agent-ready is a Convex component that keeps these files in sync with your Convex backend, caches the output, serves it over HTTP with ETag support, and ships React and Svelte widgets so humans can see what machines see. It runs inside the Convex component boundary with its own isolated tables, so your app schema stays clean.
Use this guide when you are adding @waynesutton/agent-ready to an existing Convex React or Svelte app.
If you are new to Convex, follow the steps in order. If you already ship Convex apps, the whole flow is: install the package, register the component, mount routes, add the widget, run the setup wizard, then verify the files.
You need:
- A Convex app with
convex/convex.config.ts - Node 20 or newer
- Convex CLI 1.36 or newer
- A public app URL for your generated files
npm install @waynesutton/agent-ready @convex-dev/crons @convex-dev/workpoolIf you only need the Agent Ready package:
npm install @waynesutton/agent-readyTo upgrade Agent Ready to the latest published npm version:
npm install @waynesutton/agent-ready@latestIf Convex will host your frontend too, install static hosting:
npm install @convex-dev/static-hostingRemove only Agent Ready:
npm uninstall @waynesutton/agent-readyIf you installed the full set from this guide and no other code uses those packages, remove them together:
npm uninstall @waynesutton/agent-ready @convex-dev/crons @convex-dev/workpoolIf you installed Convex static hosting only for this integration, remove it too:
npm uninstall @convex-dev/static-hostingThen remove the related code from your app:
- Delete
app.use(agentReady)fromconvex/convex.config.ts - Delete
registerRoutes(http, components.agentReady)fromconvex/http.ts - Remove
AgentReadyWidget,UpdateBanner, and any@waynesutton/agent-readyimports from your frontend - Remove generated wrapper files under
convex/agentReady/if you are no longer using them - Delete
agent-ready.config.jsonif you do not plan to reinstall
For more context on removing or changing component wiring, see the Convex docs for Using Components and Understanding Components.
Add the component to convex/convex.config.ts:
// convex/convex.config.ts
import { defineApp } from "convex/server";
import agentReady from "@waynesutton/agent-ready/convex.config.js";
import crons from "@convex-dev/crons/convex.config.js";
import workpool from "@convex-dev/workpool/convex.config.js";

const app = defineApp();
app.use(crons);
app.use(workpool);
app.use(agentReady);
export default app;
If you installed static hosting, register it in the same file:
import staticHosting from "@convex-dev/static-hosting/convex.config.js";

app.use(staticHosting);Add the routes in convex/http.ts:
// convex/http.ts
import { httpRouter } from "convex/server";
import { registerRoutes } from "@waynesutton/agent-ready";
import { components } from "./_generated/api";

const http = httpRouter();

registerRoutes(http, components.agentReady);

export default http;
This serves the generated files and status routes:
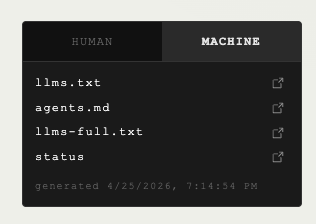
https://your-deployment.convex.site/llms.txthttps://your-deployment.convex.site/agents.mdhttps://your-deployment.convex.site/llms-full.txthttps://your-deployment.convex.site/llms-statushttps://your-deployment.convex.site/llms-analyticshttps://your-deployment.convex.site/robots.txtwhen enabledhttps://your-deployment.convex.site/sitemap.xmlwhen enabledhttps://your-deployment.convex.site/.well-known/agent-skillswhen enabledhttps://your-deployment.convex.site/llms-readinesswhen enabled
You can add callbacks later:
registerRoutes(http, components.agentReady, {
  onEvent: async (ctx, req, route) => {
    console.log(`[agent-ready] ${route} requested`);
  },
});
If your app already defines /sitemap.xml or /robots.txt, skip those routes to avoid conflicts:
registerRoutes(http, components.agentReady, {
  skipRoutes: ["/sitemap.xml", "/robots.txt"],
});
The setup wizard detects existing routes automatically and prints the right skipRoutes snippet.
React:
// src/App.tsx
import { AgentReadyWidget, UpdateBanner } from "@waynesutton/agent-ready/react";

export default function App() {
  // Convex deployment URL. Used to fetch /llms-status and /llms-readiness.
  const appUrl = import.meta.env.VITE_CONVEX_SITE_URL as string;
  // Public production domain. Used for visible file links and AI chat prompts.
  // Optional. When omitted, the widget falls back to status.appUrl, then window.location.origin.
  const publicAppUrl = import.meta.env.VITE_SITE_URL as string | undefined;

  return (
    <>
      <UpdateBanner appUrl={appUrl} />
      <AgentReadyWidget
        appUrl={appUrl}
        publicAppUrl={publicAppUrl}
        position="floating-bottom-right"
        theme="dark"
      />
    </>
  );
}
Svelte:
<script lang="ts">
  import { AgentReadyWidget } from "@waynesutton/agent-ready/svelte";

  const appUrl = import.meta.env.VITE_CONVEX_SITE_URL as string;
  const publicAppUrl = import.meta.env.VITE_SITE_URL as string | undefined;
</script>

<AgentReadyWidget {appUrl} {publicAppUrl} position="floating-bottom-right" theme="dark" />
Vite tip: set VITE_CONVEX_SITE_URL to your .convex.site deployment URL and VITE_SITE_URL to your production domain. Without VITE_SITE_URL, a dev .convex.site URL can leak into your production bundle.
npx agent-ready setupThe wizard asks for your app name, URL, description, cron interval, analytics preference, AI description preference, test mode preference, and widget display preference. Choose hidden when you want files like llms.txt, agents.md, llms-full.txt, robots.txt, and sitemap.xml to keep generating without showing the widget. If you choose visible, the wizard can print React or Svelte install code for your root layout. It writes agent-ready.config.json, scaffolds Convex wrapper files at convex/agentReady/, syncs the config to your deployment, and schedules the cron.
Start Convex and your frontend in two terminals:
npx convex devnpm run devOr run both from one command:
npx convex dev --start 'npm run dev'Then check the component:
curl -i http://127.0.0.1:3210/llms.txt
npx agent-ready status
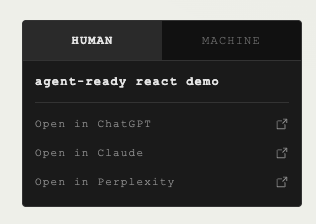
npx agent-ready linksOpen your app. The widget should show HUMAN and MACHINE tabs plus a TEST MODE badge.
Deploy your Convex backend:
npx convex deployIf you host the frontend on Convex static hosting:
export VITE_CONVEX_URL="https://your-deployment.convex.cloud"
export VITE_CONVEX_SITE_URL="https://your-deployment.convex.site"
npx @convex-dev/static-hosting deploy
Then sync your config and generate production files:
npx agent-ready sync --prod
npx agent-ready regenerate --prodtestMode blocks public access until you are ready. When the files should be public, run:
npx agent-ready go-live --prodVerify the public files:
curl -i https://your-deployment.convex.site/llms.txt
curl -i https://your-deployment.convex.site/agents.md
curl -i https://your-deployment.convex.site/llms-status
Expect 200 OK.
Check production status at any time:
npx agent-ready status --prodIf you want the older standalone guide, docs/install.md and docs/install.html now point back to this README.
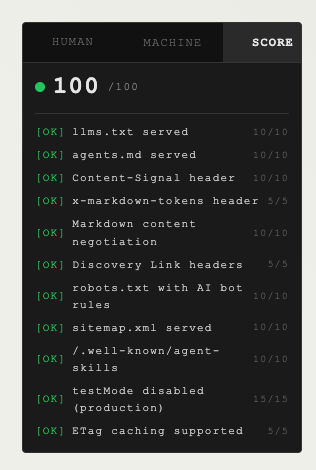
Make your app pass the isitagentready.com scan with one command:
npx agent-ready agent-readyThis enables all Cloudflare agent readiness features: Content-Signal headers, x-markdown-tokens, discovery Link headers, robots.txt with AI bot rules, sitemap.xml, /.well-known/agent-skills, the /llms-readiness self-score endpoint, and markdown content negotiation.
Scan your deployment to verify:
npx agent-ready scan --url https://your-deployment.convex.siteThe SCORE tab in the widget shows your readiness score in real time.
Add an admin page to manage pages, cache, and actions. The panel ships as a React component you can mount on any route. It takes your Convex query results and mutation callbacks as props, so it works with any app layout.
// src/pages/Settings.tsx (or wherever you want it)
import { useQuery, useMutation, useAction } from "convex/react";
import { api } from "../convex/_generated/api";
import { AgentReadySettingsPanel } from "@waynesutton/agent-ready/react";

export default function Settings() {
  const status = useQuery(api.agentReady.content.getCacheStatus);
  const pages = useQuery(api.agentReady.content.listPages, { includeAllStatuses: true });
  const regenerate = useAction(api.agentReady.content.regenerateAll);
  const rollback = useMutation(api.agentReady.content.rollbackCache);
  const publish = useMutation(api.agentReady.content.publishPage);
  const draft = useMutation(api.agentReady.content.draftPage);
  const archive = useMutation(api.agentReady.content.archivePage);

  return (
    <AgentReadySettingsPanel
      cacheStatus={status}
      pages={pages}
      onRegenerate={() => regenerate({})}
      onRollback={(fileType) => rollback({ fileType })}
      onPublishPage={(path) => publish({ path })}
      onDraftPage={(path) => draft({ path })}
      onArchivePage={(path) => archive({ path })}
    />
  );
}
The wrapper functions at convex/agentReady/content.ts and convex/agentReady/analytics.ts are scaffolded automatically by npx agent-ready setup. They bridge the component API to your browser clients. If you skipped the wizard, see the wrapper code in INTEGRATION.md.
Not using React? The Convex wrapper functions work with any framework. Build your own settings UI using useQuery/useMutation equivalents for Svelte, Vue, or vanilla JS.
- Convex component with isolated tables: your app schema stays untouched
testMode: trueby default so nothing serves publicly before you runnpx agent-ready go-live- ETag-aware HTTP handlers return
304 Not Modifiedwhen content is unchanged - Durable workpool-backed generation with retries
- Runtime cron interval updates via
@convex-dev/crons - Optional agent analytics with threshold callbacks
- AI description generation via Claude or OpenAI, opt-in, 100 item cap, rate-limited
- Drop-in React and Svelte widgets with HUMAN, MACHINE, and SCORE tabs. Live staleness detection,
useAgentReadyStatus()hook, config-driven visibility - SCORE tab shows readiness score with color-coded checks from
/llms-readiness Content-Signal,x-markdown-tokens,Linkdiscovery headers on every content response- Auto-generated
robots.txtwith AI bot directives,sitemap.xml, and/.well-known/agent-skills - Readiness self-score endpoint (
/llms-readiness) with 11 checks across discoverability, content, bots, and protocol npx agent-ready agent-readyenables all readiness flags in one commandnpx agent-ready scanaudits your deployment (CI-friendly, exits non-zero below 80)npx agent-ready linksprints copyable discovery and AI chat URLs, useful when the widget is hidden- Config-driven widget visibility:
widgetVisible,widgetShowFiles,widgetShowAppName,widgetShowDescription,widgetShowMeta,widgetShowScoreTab,widgetStatusVisible,widgetCleanMode,widgetDesktopCollapse,widgetShowHumanTab,widgetShowMachineTab,widgetShowChatLinks,widgetShowChatGPT,widgetShowClaude, andwidgetShowPerplexityinagent-ready.config.jsoncontrol the widget without code changes. Props still work as overrides - CLI covering setup, sync, status, links, regenerate, rollback, go-live, agent-ready, scan, analytics, cleanup, versions, and per-page state transitions
- Both demo apps hosted entirely on Convex via
@convex-dev/static-hosting
Control which tabs, content sections, and AI chat links the widget shows. Set these in agent-ready.config.json under settings, or pass them as props directly on the widget component. Props override config values.
| Setting | Default | Effect |
|---|---|---|
widgetVisible |
true |
Show or hide the entire widget. Set false to keep generating files and serving routes while rendering no widget |
widgetCleanMode |
false |
Strips app name and description, keeps tabs and links functional |
widgetShowHumanTab |
true |
Show or hide the HUMAN tab |
widgetShowMachineTab |
true |
Show or hide the MACHINE tab |
widgetShowScoreTab |
false |
Show or hide the SCORE tab |
widgetDesktopCollapse |
true |
Show the Phosphor caret toggle and start collapsed on desktop. Set false to keep the widget always expanded on desktop. CLI npx agent-ready setup prompts for this with a true default |
widgetShowChatLinks |
true |
Show or hide all three AI chat links on the HUMAN tab |
widgetShowChatGPT |
true |
Show or hide the "Open in ChatGPT" link |
widgetShowClaude |
true |
Show or hide the "Open in Claude" link |
widgetShowPerplexity |
true |
Show or hide the "Open in Perplexity" link |
When all tabs are hidden, the widget renders nothing. When only one tab is visible, its tab button still renders so the label shows, but there is nothing to toggle.
To hide the widget while keeping generated files live:
{
  "settings": {
    "widgetVisible": false
  }
}
Then run:
npx agent-ready sync
npx agent-ready linksBelow 480px the widget renders a compact tab strip with a Phosphor caret toggle and starts collapsed. Tapping HUMAN, MACHINE, or SCORE switches the active tab without expanding. Tapping the caret expands or collapses the active panel. All three behaviors are tunable per widget instance:
| React prop | Svelte prop | Default | Notes |
|---|---|---|---|
mobileCollapse |
mobileCollapse |
true |
Set to false to keep the widget always expanded on mobile. |
mobileBreakpoint |
mobileBreakpoint |
480 |
Pixel width that triggers the mobile presentation. |
defaultMobileCollapsed |
defaultMobileCollapsed |
true |
Initial collapsed state when the widget first enters the collapsed presentation. |
desktopCollapse |
desktopCollapse |
true |
Show the Phosphor caret toggle on desktop too. Resolves from prop, then widgetDesktopCollapse in agent-ready.config.json, then true. Width and insets stay at desktop values; only the toggle and panel show/hide behavior is enabled. Pass false to keep the widget always expanded on desktop. |
Example config for a minimal MACHINE-only widget with no chat links:
{
  "settings": {
    "widgetShowHumanTab": false,
    "widgetShowMachineTab": true,
    "widgetShowScoreTab": false,
    "widgetShowChatLinks": false
  }
}
Example React props override:
<AgentReadyWidget
  appUrl={appUrl}
  showHumanTab={true}
  showMachineTab={true}
  showChatGPT={false}
  showPerplexity={false}
  cleanMode={true}
/>After editing agent-ready.config.json, push the changes to your deployment:
npx agent-ready sync
npx agent-ready regenerateAdd --prod to any command to target your production deployment instead of dev. The full production lifecycle looks like this:
npx convex deploy
npx agent-ready sync --prod
npx agent-ready regenerate --prod
npx agent-ready go-live --prod
Verify production status and files:
npx agent-ready status --prod
npx agent-ready scan --url https://your-deployment.convex.site --prod
curl -i https://your-deployment.convex.site/llms.txt| Command | What it does |
|---|---|
setup |
Interactive first-run wizard, writes agent-ready.config.json, calls sync |
sync |
Reads agent-ready.config.json and applies it to the deployment |
status |
Prints cache status, current versions, and test mode state |
links [--url <url>] |
Prints copyable discovery file URLs and AI chat links |
regenerate |
Builds fresh llms.txt, agents.md, and llms-full.txt |
rollback --file <name> |
Swaps the active cache entry for the previous version |
go-live |
Flips testMode off with a confirmation prompt |
agent-ready |
Enables all readiness flags, syncs, and regenerates |
scan --url <url> |
Audits deployment endpoints, exits non-zero below 80 |
generate-descriptions |
Fills empty page descriptions when AI descriptions are enabled |
publish-page --path <p> |
Sets page status to published |
draft-page --path <p> |
Sets page status to draft |
archive-page --path <p> |
Sets page status to archived |
restore-page --path <p> |
Clears deletedAt on a soft-deleted page |
analytics |
Prints agent request summary for the last 30 days |
cleanup |
Trims expired analytics rows and orphan cache entries |
versions --path <p> |
Lists version history for one page |
Add --prod to any command to target your production deployment. For example: npx agent-ready go-live --prod, npx agent-ready status --prod, npx agent-ready scan --url https://your-deployment.convex.site --prod.
Both demos are full Convex apps that show how the component and widget work together. They run on Convex with GitHub OAuth for admin access. Pick React or Svelte.
Before running either demo, create a GitHub OAuth app at github.com/settings/applications/new. Set the Authorization callback URL to your Convex HTTP Actions URL plus /api/auth/callback/github (for example, https://your-deployment.convex.site/api/auth/callback/github). The callback points to Convex, not localhost. Set the Homepage URL to http://localhost:5173 for local dev.
Then set the GitHub secrets on your Convex deployment:
npx convex env set AUTH_GITHUB_ID "your-github-client-id"
npx convex env set AUTH_GITHUB_SECRET "your-github-client-secret"
npx convex env set SITE_URL "http://localhost:5173"
npx convex env set ADMIN_EMAILS "your-email@example.com"
For production, set the same values with --prod and use your deployed frontend URL for SITE_URL.
Run the React demo:
cd example-react
npm install
npm run dev
Run the Svelte demo:
cd example-svelte
npm install
npm run dev
The demo URL becomes https://your-deployment.convex.site. The widget, the files, and the host app live on the same domain. See SETUP.md for full production deploy instructions.
README.md#installis the canonical install guide for adding this Convex component to your React or Svelte appdocs/install.mdpoints package readers back to the README install guidedocs/install.htmlis the same redirect-style install entry point as a standalone HTML pageSETUP.mdis the author release guide for shipping this package to GitHub, npm, and Convex static hostingINTEGRATION.mdcovers every integration path in a format optimized for AI coding agentsCONTRIBUTING.mddocuments the widget contract for community ports (Vue, Solid, Angular)prds/agent-readiness-v1.mdis the canonical design spec
Apache 2.0. See LICENSE.