Repository navigation
Internet cloud
Drag Internet from the device library onto the map and cable its eth0 to a lab device. Clicking the cloud opens a movable, resizable settings window. The gateway provides IPv4 routing, outbound NAT, a DNS forwarder, outbound firewall rules and TCP/UDP port forwarding to lab nodes. It uses a dedicated Docker bridge for its uplink; no physical NIC is bridged.
Settings are grouped into Network, Port forwards, Firewall and SSH access tabs. Network contains the gateway address, return routes and Docker uplink. Switching tabs preserves your edits; Apply settings stays visible and saves edits across all tabs. While the gateway runs, only Firewall can be applied. See SSH setup for the optional lab shell and its separate public-key grants.
Firewall editing, live policy updates and port forwarding require Weblab 0.11.0 or later, with matching core and helper versions. The v0.10.x core/helper source provides the original outbound policy and requires a local helper build.
The separate Network cloud library item is a customizable drawing of an unmanaged network. It has no forwarding or Internet access. See network clouds for diagrams.
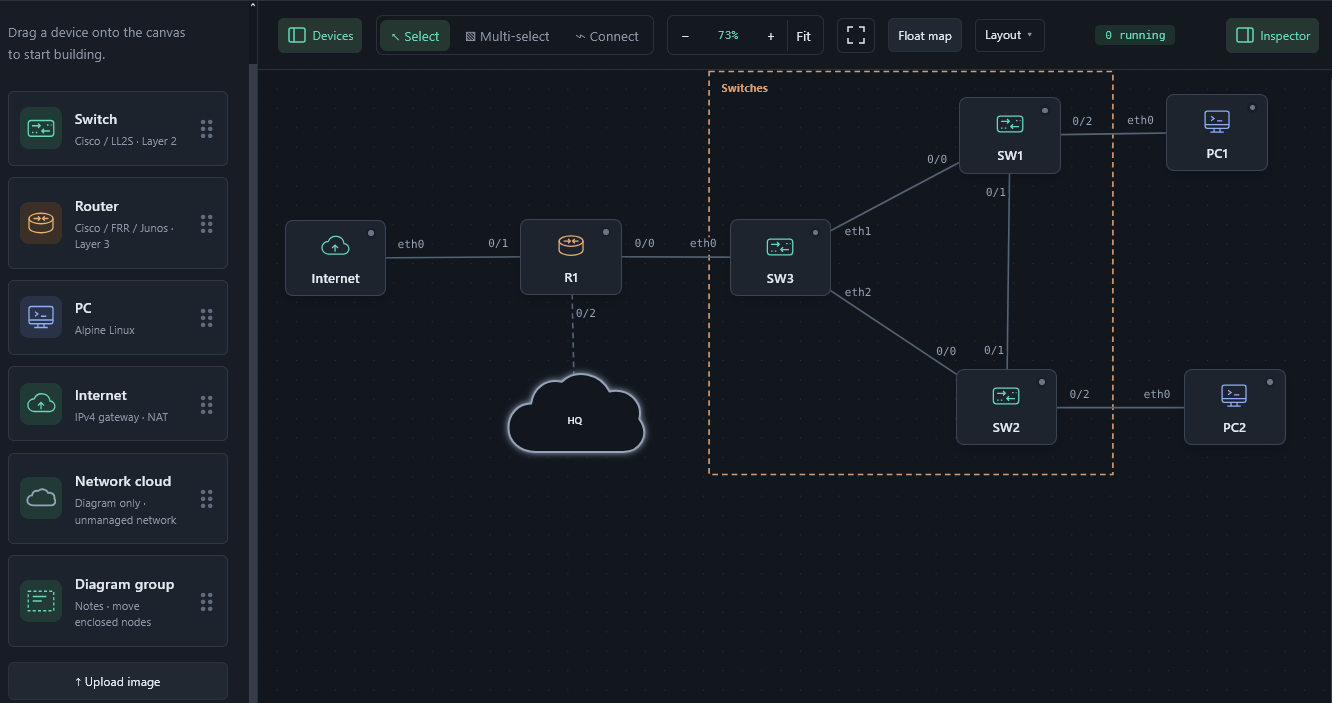
Internet gateway on the left; HQ is a diagram-only cloud. The Switches rectangle groups devices visually. All nodes are stopped in this screenshot.
Starting with 0.11.0, pull the helper on the Docker host, separately from core:
docker pull ghcr.io/weblab-network/weblab-internet:0.12.0Set WL_INTERNET_IMAGE=ghcr.io/weblab-network/weblab-internet:0.12.0 in the
deployment's .env before creating/recreating core. The matching prebuilt Compose
file uses that image by default. For a fresh installation, weblab-install.sh --with-internet pulls it and sets the variable. Source builds remain available
below. Versioned tags are available after their release is published; older
releases still require a local helper build.
The helper is not a standalone Compose service. Weblab creates its containers when Internet nodes start. Pulling an image does not change running gateways; stop/start only the Internet node to adopt the new helper. Changing core's environment requires its normal recreation, which stops guests; save and stop the lab first. Keep core/helper release versions matched and use the same Docker daemon/context. Published releases include the exact binary, corresponding source, notices, inventory and checksums; see distribution details.
Use Weblab 0.10.0 or later. The gateway is a separate, locally built image;
the installer pulls it only with --with-internet and does not build it. Build it on the same Docker host
that runs Weblab's lab devices, using the same Docker daemon/context. Building
on your browser's computer or inside the Agent container will not make the
image available to Weblab. The host needs Internet access to download the base
image and Alpine packages during this build.
If you installed Weblab using the installer or a prebuilt image, install Git if necessary, then fetch the matching release source into a new directory:
git clone --depth 1 --branch v0.12.0 https://github.com/weblab-network/weblab.git weblab-0.12.0
docker build -f weblab-0.12.0/packaging/internet/Dockerfile \
  -t weblab-internet:dev weblab-0.12.0
These commands build the gateway with firewall and forwarding support. If you already have the matching Weblab source checkout, run this from its root:
docker build -f packaging/internet/Dockerfile -t weblab-internet:dev .Use sudo docker if your account requires it. Verify the resulting image:
docker image inspect weblab-internet:dev --format '{{index .Config.Labels "network.weblab.internet"}}'The command should print 1. Source deployments use weblab-internet:dev by
default. Prebuilt Compose and installer deployments can select a registry image
instead: building the local tag does not change that selection.
To switch to the local build, set WL_INTERNET_IMAGE=weblab-internet:dev in
your deployment configuration. For Compose, set it in .env; for a direct
docker run, change the corresponding -e WL_INTERNET_IMAGE=... option.
Save and stop the lab, then recreate core with the same volumes and other
settings. Do not rerun the fresh-install script over an existing installation.
If core already selects weblab-internet:dev, only stop/start the Internet node
after rebuilding; core recreation is unnecessary.
Do not run the helper yourself or add a Compose service. Weblab creates and removes gateway containers when you start and stop Internet nodes. Continue with Direct PC access or A network behind FRR.
If your core is older than 0.10.0, follow the
upgrade instructions first. Source installations
must rebuild/recreate the core using their normal Compose command and overlays
(Agent/KVM), project name and volumes. Use docker-compose if that is the
installed command, or docker compose for the plugin. Recreating Weblab stops
its lab; save and stop your work first.
Native Python deployments can also use the helper image. Docker, Linux TAP
support and the existing host-network/NET_ADMIN requirements apply. An operator
can set WL_INTERNET_IMAGE to another locally built tag of this gateway image;
it must carry the gateway compatibility label. This is a server setting, not
an image name accepted from topology imports.
When upgrading a helper built before firewall support, rebuild it from the updated
checkout. Its network.weblab.internet.firewall image label must be 1 to use
custom rules or an unmatched Deny action. Weblab refuses to start a restrictive
policy with an older helper before creating networks. Older helpers remain usable
with an empty rule list and the original Allow action.
Live firewall updates additionally require the
network.weblab.internet.firewall.live=1 label on the running helper container.
After rebuilding core and helper, stop/start only the Internet node to use the
new helper; other lab devices can keep running. Rebuilding an image alone does
not change a container that is already running.
Port forwarding requires the updated helper's
network.weblab.internet.port-forwards=1 image label. An older helper can still
start with no forwards configured; it refuses nonempty forwards before creating
gateway resources. Build core and helper from the same updated checkout.
- Add a cloud and an Alpine PC; connect their eth0 ports.
- Leave the PC's IPv4 and gateway fields blank.
- Choose Start lab. Weblab starts the gateway before the PC.
By default the cloud is 192.0.2.1/24. The directly connected PC receives 192.0.2.2/24, a default route via 192.0.2.1, and that address as its DNS resolver. These are startup settings, not DHCP. Changing the cloud's address changes the automatic PC address accordingly. Explicit PC addressing and its chosen default gateway are preserved; select an address on the cloud subnet.
Verify in the PC console:
ip route
ping -c 3 1.1.1.1
nslookup dl-cdn.alpinelinux.org
apk updateConnect PC → FRR → Internet. Example addressing:
| Device/interface | IPv4 | Purpose |
|---|---|---|
| PC eth0 | 10.44.0.10/24 | Gateway 10.44.0.1 |
| FRR eth0 | 10.44.0.1/24 | Lab LAN |
| FRR eth1 | 192.0.2.2/24 | Cloud-facing interface |
| Cloud eth0 | 192.0.2.1/24 | Internet gateway and DNS |
Configure FRR through its normal CLI:
configure terminal
interface eth0
 ip address 10.44.0.1/24
exit
interface eth1
 ip address 192.0.2.2/24
exit
ip route 0.0.0.0/0 192.0.2.1
end
write memory
In the cloud settings, add a Return route with destination 10.44.0.0/24 and next hop 192.0.2.2. The cloud both routes replies to that network and performs NAT for it. Add other routed lab prefixes individually. Weblab does not replace FRR routes or silently assume that all private networks belong to your lab. Stop only the Internet node before changing its address, return routes or Docker uplink subnet. Other devices can keep running; adjust their addressing or routing separately if the gateway network changes. Stopping the Internet node also leaves a directly attached PC running; gateway access is interrupted until the Internet node starts again.
A PC behind FRR can query the cloud explicitly:
nslookup dl-cdn.alpinelinux.org 192.0.2.1
printf 'nameserver 192.0.2.1\n' > /etc/resolv.conf
The last command configures this running PC's resolver; PC filesystem changes do not survive recreation. Automatic cloud DNS setup applies only to a PC connected directly to the cloud.
Open the Internet cloud and edit Outbound firewall, including while it runs. Add rules, choose their action and protocol, then use the arrows to set their order. Click Apply firewall to update a running gateway immediately, or Apply settings to save settings for a stopped gateway's next start. Other lab devices can keep running in either case. With authentication enabled, only an administrator can edit this policy.
Live updates replace the outbound rules without restarting devices or resetting NAT/connection tracking. The new policy checks subsequent outbound packets, including established connections; a new deny can therefore interrupt an active connection. Reply traffic keeps its existing stateful handling. The policy is also saved with the topology and used on future starts and exports. A failed apply or save attempts to restore the previous policy and reports any recovery failure. If another browser changed the settings, close and reopen the window before applying again.
Rules match IPv4 traffic forwarded from the lab to the Docker uplink, before source NAT. This includes reachable host/LAN destinations. The first matching rule decides whether a packet is allowed or dropped. When no rule matches selects Allow or Deny. Existing topologies default to Allow with no rules, preserving their previous behavior. Choose Deny to create an allow list.
Each cloud supports up to 64 rules:
| Field | Accepted value |
|---|---|
| Action | Allow or Deny (silently drop) |
| Protocol | Any IPv4, TCP, UDP or ICMP |
| Source / destination | An IPv4 host or aligned CIDR network; blank matches any |
| Source / destination port | TCP/UDP only: one port from 1–65535 or an inclusive range such as 1024-65535; blank matches any |
An allow rule does not authorize extra source networks: packets must still come from the cloud subnet or a listed return network. To limit host/LAN access, add deny rules for the actual destination addresses/prefixes you want to exclude. Place any narrower allow exceptions above them. Private-address blocks alone do not describe every possible host/LAN address.
The rules cover forwarded traffic. DNS and ping to the gateway itself remain available to authorized lab networks, including with unmatched Deny. The DNS forwarder's own upstream queries do not pass through these forwarding rules. Replies to forwarded connections are accepted; other inbound forwarding requires an explicit port forward. Each restart creates fresh connection state.
The optional internet.firewall object in topology JSON stores the same policy.
For example, this allows HTTPS to one example destination and drops other
forwarded traffic:
"firewall": {
  "default_action": "deny",
  "rules": [
    {
      "action": "allow",
      "protocol": "tcp",
      "source": "",
      "destination": "203.0.113.7/32",
      "source_port": "1024-65535",
      "destination_port": "443"
    }
  ]
}
Replace the documentation address with your intended destination. Omitted
firewall normalizes to {"default_action":"allow","rules":[]}. Rule action
and protocol are required; omitted address/port fields normalize to empty strings.
Hosts normalize to /32. Unsupported fields, IPv6, invalid ports and unaligned
networks are rejected when saving or importing.
Open the Internet node and use Inbound port forwarding → Add port forward.
For example, map TCP, bind 127.0.0.1, host port 22022, target node
192.0.2.2, target service port 22. After Apply settings and starting
the Internet node, connect to 127.0.0.1:22022 on the Docker host to reach
that node's SSH service. The target must already have SSH enabled; Weblab does
not install or configure guest services.
The target can be a router, switch management address or PC. It must be a usable IPv4 address on the Internet node's lab subnet or one of its configured return networks. Add the return route first for targets behind a router. Addresses are explicit: moving a node or changing its guest IP does not rewrite its forwards.
Each gateway supports up to 32 mappings:
| Field | Meaning |
|---|---|
| Protocol | TCP or UDP |
| Host bind IPv4 | Defaults to 127.0.0.1; use an address assigned to the Docker host for LAN access, or explicitly 0.0.0.0 for all host IPv4 interfaces |
| Host port | One port, 1–65535 |
| Target node IPv4 | Reachable lab node address |
| Target service port | One port, 1–65535 |
| Allowed source IPv4 / network | Optional client host/CIDR for LAN bindings; blank allows any client reaching that binding |
Localhost refers to the Docker host, including when your browser is on another
computer. For remote use while keeping a localhost binding, an SSH tunnel can
reach it, for example ssh -N -L 22022:127.0.0.1:22022 user@lab-host.
For a LAN binding, clients connect to that host IP and port. Their access uses
the target service's authentication; Weblab's browser login does not authenticate
connections to forwarded services. Upstream routers/firewalls must also permit
the chosen host address and port if clients are outside that LAN.
Stop only the Internet node before adding, changing or removing forwards. Docker publishes host ports when the gateway container is created; the next start applies them. Other nodes and their consoles can keep running. Duplicate host bindings are rejected across the topology, including wildcard overlaps. Ports occupied by another host service or lab cause gateway startup to fail; choose a different port. Stopping/removing the gateway removes its publications.
These explicit inbound connections and their replies are independent of the outbound firewall's unmatched action. A default-deny outbound policy still permits replies to an admitted port forward. The gateway translates inbound client addresses to its lab IP, so targets see that address as the client. Routed targets must be able to reply to the gateway's lab address through their router. Source restrictions run before this translation, against the address seen on the Docker uplink. Docker can translate host/proxy traffic before it reaches the helper, so leave Allowed source blank for localhost bindings.
Localhost forwards also have a helper-side source guard against direct uplink peers. This complements the bind address on Docker versions affected by its documented localhost publication behavior. Docker's host routing and publication rules otherwise apply. Docker port publishing reference.
Mappings are saved as internet.port_forwards in JSON and ZIP:
"port_forwards": [
  {
    "protocol": "tcp",
    "bind_address": "127.0.0.1",
    "external_port": 22022,
    "target_address": "192.0.2.2",
    "target_port": 22,
    "source": ""
  }
]
Omitting the list means no inbound ports are published. Port ranges, IPv6 forwarding and automatic public-router configuration are not included.
- Only administrators can create/change clouds or start their Internet access when authentication is enabled. Writers can operate the rest of a lab after its cloud is started by an administrator, and can stop it.
- The gateway applies its outbound policy to IPv4 sourced from its attached subnet and configured return networks. It accepts reply traffic and blocks unsolicited inbound forwarding except explicitly configured port forwards. DNS and ping to the gateway are allowed from authorized lab networks.
- The default allows reachable host/LAN destinations. Use the ordered firewall rules to control those destinations explicitly.
- One cloud has one lab cable. Connect it to a router or switch to serve multiple devices. Direct Alpine PC and routed Weblab FRR are the initial tested cases; other Ethernet devices require their usual addressing/routing configuration.
- IPv6 Internet forwarding, DHCP and physical-interface bridging are not included. The cloud has settings rather than a shell console.
- Cloud settings survive JSON and saved ZIP export/import; runtime connections, DNS cache and firewall connection state do not. Stop/Start recreates the gateway.
- The cloud cable uses the usual link relay: Monitor traffic and directional frame blocking work on its lab side. Captures show traffic before outbound NAT.
Docker allocates the uplink subnet. If it overlaps the cloud subnet or a return network, startup fails with a message. Use Docker uplink → Subnet to choose a different unused subnet. No changes are made to unrelated Docker networks, the host's default route or the Agent companion's networking. Docker manages the normal NAT/firewall rules for the dedicated uplink bridge; the gateway's lab-facing firewall and NAT live inside its own container namespace.
Version 0.12.0 adds an SSH access tab in the existing Internet node settings. It provides a non-root shell with SSH/Telnet and supports ProxyJump, with separate local public-key grants. See setup, destination limits and saved state. Use matching 0.12.0 core/helper images, or build both from the same updated checkout. Older helpers do not include this capability.