Read from a Maverick BLE Candy Thermometer.
Updated: Apr 29 2023
A quick and dirty ble thermometer & barometer reader for Android 7+ in Kotlin. For a specific series of Maverick thermometers.
This markdown will serve as a loose walk-through on coding this functionality from scratch for those who have never before coded in Kotlin, Android development, or mobile development in general. (Like me!) Plus it'll help me get my bearings when future me inevitably comes back to extend this. I will, however, assume the reader has general programming knowledge throughout.
This is just about the why, if you're only interested in the what & how, skip to here
When the snow melts and the sun once more dares to peek from beyond the clouds, we rejoice. Not because Spring is coming, Spring is the harbinger of ticks and allergies and is to be feared. It is the dwindling weeks at the end of Winter we look forward to. That narrow window where the nights freeze and the days are warm, when the syrup on your pancakes comes not from the store, but a bucket, a spigot, and an old mighty Maple. Of course the sap you get from the tree is naught but sticky water, you must boil it down, concentrate it into syrup and filter out the sediment that falls from solution. How concentrated? For a Vermont sugar maple 40 Units of sap may yield 1 Unit of syrup. For a random hobbyist like my father, saddled with whichever Maples you happen to live with, yields are around 60:1 (and in my experience they've seemed closer to 70:1).
Of course we need to be more particular when the exact ratio can change from tree-to-tree, year-to-year. So we use physical properties as our target values in some fairly narrow ranges. Boil too much and your syrup will crystallize, too little and it will be vulnerable to spoilage.
My favorite, but least practical method is with a polarimeter. They use the fact that different chiral molecules (like the different sugars in maple syrup) rotate plane-polarized light at different rates to tease out the concentrations of those molecules. Their my favorite because you can fashion one out of a pair of old dollar 3-D glasses and an empty spice cylinder. To-date my most practical application of Organic Chemistry.
The standard measure is density. Some measure in Brix°(this is just sugar% in solution), some in Baume, I hope someone out there is doing it in metric. There are a few drawbacks with this method, whether you use a hydrometer or a refractometer(which tests on an entirely different property of light-sugar interaction from the polarimeter) you have to transfer some testable amount out of your batch. Not only is every drop precious to a hobbyist, but the density of the syrup is dependent on its temperature and the syrup cools off while you measure it. You won't ruin your batch, but taking multiple density measurements as you close in is just plain inconvenient.
Our best measure is the boiling point. Water boils at 212°F, maple syrup boils 7°F higher. Except depending on the weather here water boils at 210.3°F, or 209.2°F and thus maple syrup at 217.3°F or 216.2°F. Boiling down 60-120 gallons of sap can last 12 hours to a couple days, plenty of time for the weather to change. So I got my father a BLE candy thermometer for Christmas, specifically a Maverick CT-10. But the problem is the app that comes with it is grossly inadequate. You have to pick a category of recipes before the app even displays temperature, it is locked to portrait mode, it uses white text on an orange background, it uses 80% of its screen real estate to present useless information from the aforementioned recipes, maple syrup isn't even on the list. You also have to separately measure the atmospheric pressure and calculate the expected boiling point of water.
In this project, we'll fix that with our own app that reads directly from the thermometer, displays it as large and easy on the eyes as possible, and accounts for the current pressure using the phone's own onboard sensor.
- Project Details
- Setup
- Jetpack Compose and UI
- Navigation
- Senors
- Handlers & Messages
- Understanding the Device
- Permissions
- Bluetooth
- Read and display a Bluetooth thermometer
- Read and display atmospheric pressure from onboard sensor
- Calculate and display the boiling points of Water and Maple Syrup for the current atmospheric pressure
- Maintain connection/state through Activity changes(e.g. rotations)
- Display just the necessary information at any given time using Jetpack Compose
- Figure out how the Maverick thermometer reports its data.
This won't be a full tutorial, I'll link to codelabs for that part, but higher perspective walk-through on the steps required.
- You'll need the latest copy of Android Studio
- Possibly a separate install of JDK if your target API <24 (Android 7)
- A BLE thermometer. Mine is a Maverick CT-10.
- Start a new project -> Activity template.
Kotlin is a high-level language that works on top on Java. Stylistically it is much like C#. Unfortunately, my bread and butter is C++ and Python and not C#/Java so I had to take some time to get used to Kotlin. But, as we'll see the Google Android codelabs are a good way to gain that familiarity.
In brief, Jetpack Compose is a UI toolkit for UI development directly in your code. Whereas with XML UI, you might use a GUI to layout your UI and then make some adjustments in the XML, with Compose you plan your layout using the familiar language of functions.
This codelab will prepare you if you're unfamiliar, it's also a good exercize to familiarize with Kotlin.
First we want to start out with a UI <-> ViewModel skeleton. What do we want on screen when, and how does it hook into the data. We're going to have three main packages to organize this.
app: where only a minimal MainActivity will live.core: where the logic and data of our app will live.ui: where the display functions, themes and nav controls will live.
In ui, set up a package called screens. The composable functions that generate our display will go here.
- ConnectionScreen.kt: to toggle scanning for device and to connect to devices from.
- PressureScreen.kt: report the detected pressure and predicted boiling points of water and syrup.
- TemperatureScreen.kt: to display the temperature from the connected BLE device.
Using Compose each of these screens begins as a simple annotated function passed its corresponding ViewModel.
@Composable
fun ConnectionScreen(connectionViewModel: ConnectionViewModel = viewModel()) {
    // Just ViewModel things, collect state information from here
    val connectionUiState by connectionViewModel.uiState.collectAsState()

    Column(horizontalAlignment = Alignment.CenterHorizontally) {
        // another composable function defining the scan toggle
        ScanButton(
            isScanning = connectionUiState.isScanning,
            onScanClick = { connectionViewModel.toggleScan() })

        // the composable that scrolls through all discovered devices - starts out with simple list of Ints instead of ScanCallback for ease of configuring layout.
        DiscoveredTherms(discoveredTherms = listOf(1, 2, 3, 3, 5, 6, 7, 8), orientation)
    }
}
Using literals as placeholders for state values, layout the UI. In my case I wanted the ConnectionScreen to sit on top of the PressureScreen, and for the TemperatureScreen to replace the ConnectionScreen upon connecting to a device.
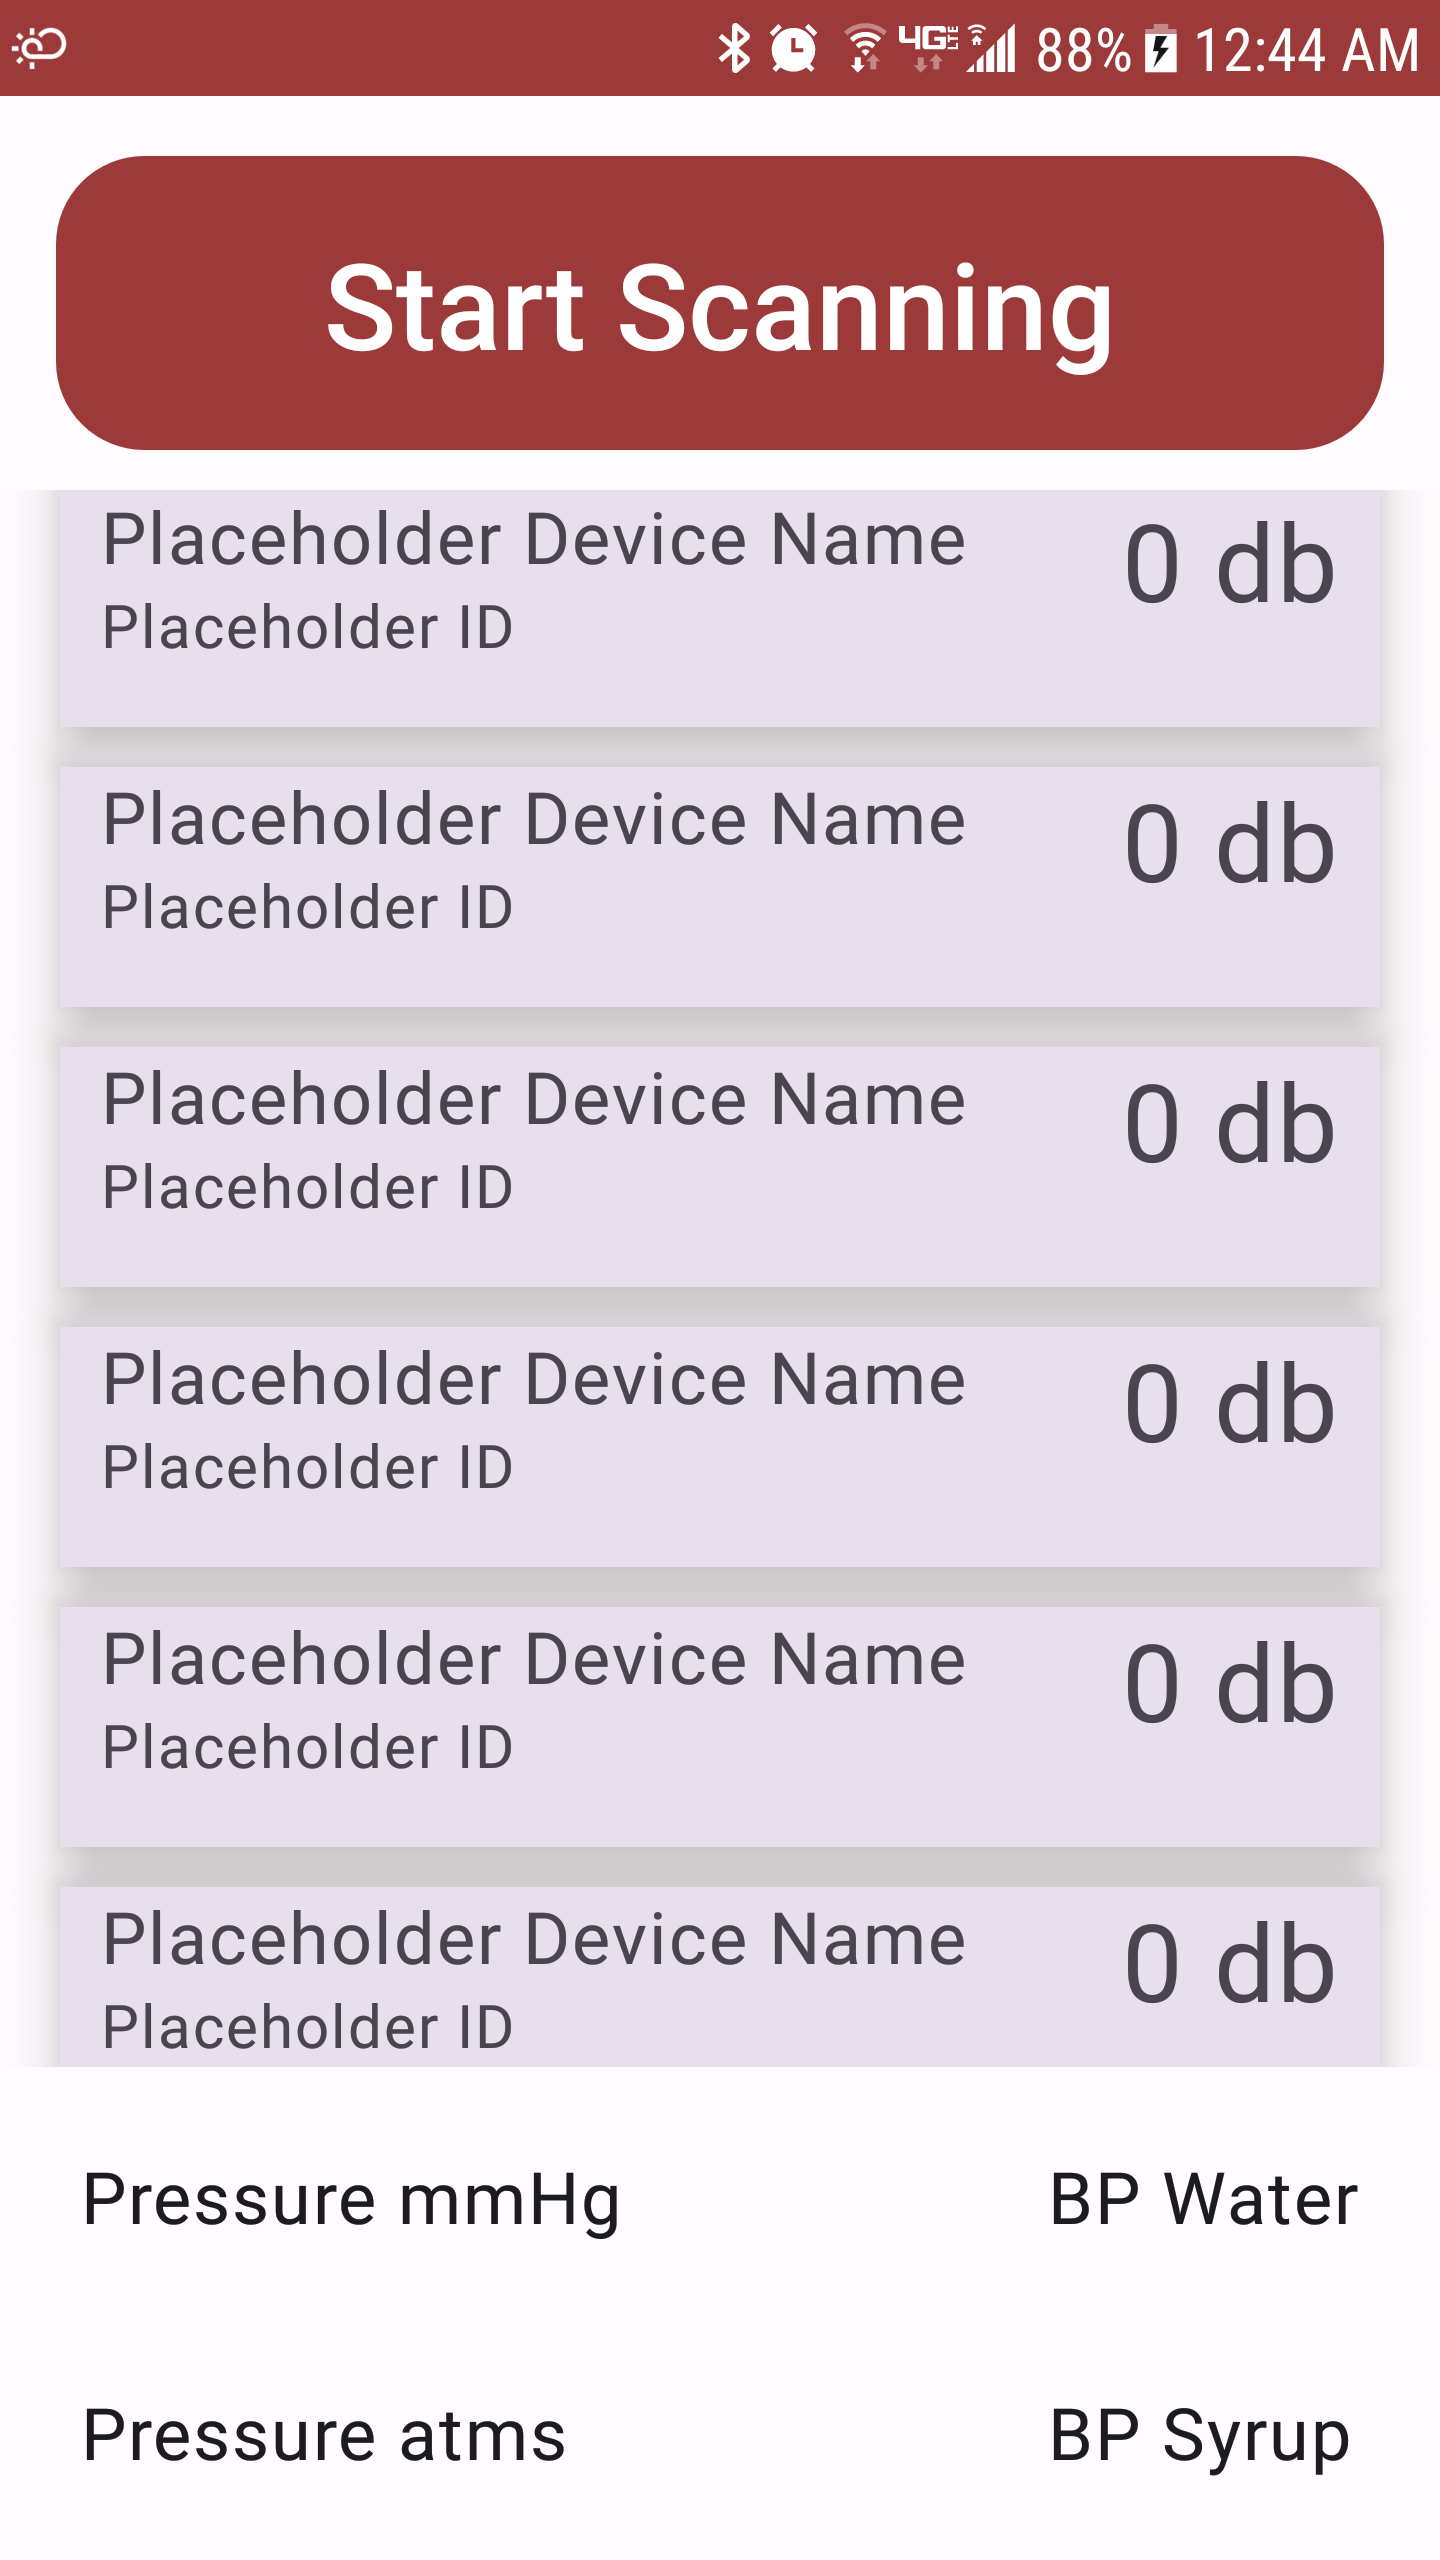
For this, make a new file directly in ui. I called it MapleScaffold.kt, this will just be a composable that will define the basic relationship of screens to each other. So the screens are arranged in a column, and PressureScreen is always present. For a complete example of this stage, look at commit "pre Navigation".
@Composable
fun MapleScaffold() {
    Column {
        val width = 0.8f
        Box(
            modifier = Modifier
                .fillMaxWidth()
                .fillMaxHeight(width)
        ) {
        ConnectionScreen() // will be replaced by navHost later
    }
    Box(modifier = Modifier.fillMaxSize()) {
            PressureScreen()
        }
    }
}
The viewModel, as you should know or have learned from the codelab, is where the management of our state happens. Each screen has one, and using viewModels allows us to preserve state even when the Activity restarts, like upon rotation. Make a new package in core, called viewmodel, and place the viewModels and their corresponding UiStates there. These will get busy over time, but will start simple. We'll just add a quick button toggle function to prove that on click effects work and persist rotations.
// In ConnectionViewModel.kt
class ConnectionViewModel : ViewModel() {
    private val _uiState = MutableStateFlow(ConnectionUiState())
    val uiState: StateFlow<ConnectionUiState> = _uiState.asStateFlow()

    fun toggleScan() {
        _uiState.update { currentState -> currentState.copy( isScanning = !currentState.isScanning) }
    }
}

// In ConnectionScreen.kt
@Composable
fun ScanButton(orientation: Int, isScanning: Boolean, onScanClick: () -> Unit) {
    var scanButtonText = getScanText(isScanning)

    Button(
        onClick = onScanClick,
        modifier = Modifier
            .fillMaxWidth(0.95f)
            .fillMaxHeight(0.20f)
            .padding(horizontal = 5.dp)
            .padding(top = 15.dp, bottom = 10.dp),
        shape = RoundedCornerShape(30)
    ) {
        Text(
            text = scanButtonText,
            fontSize = 10.em,
            color = Color.White
        )
    }
}
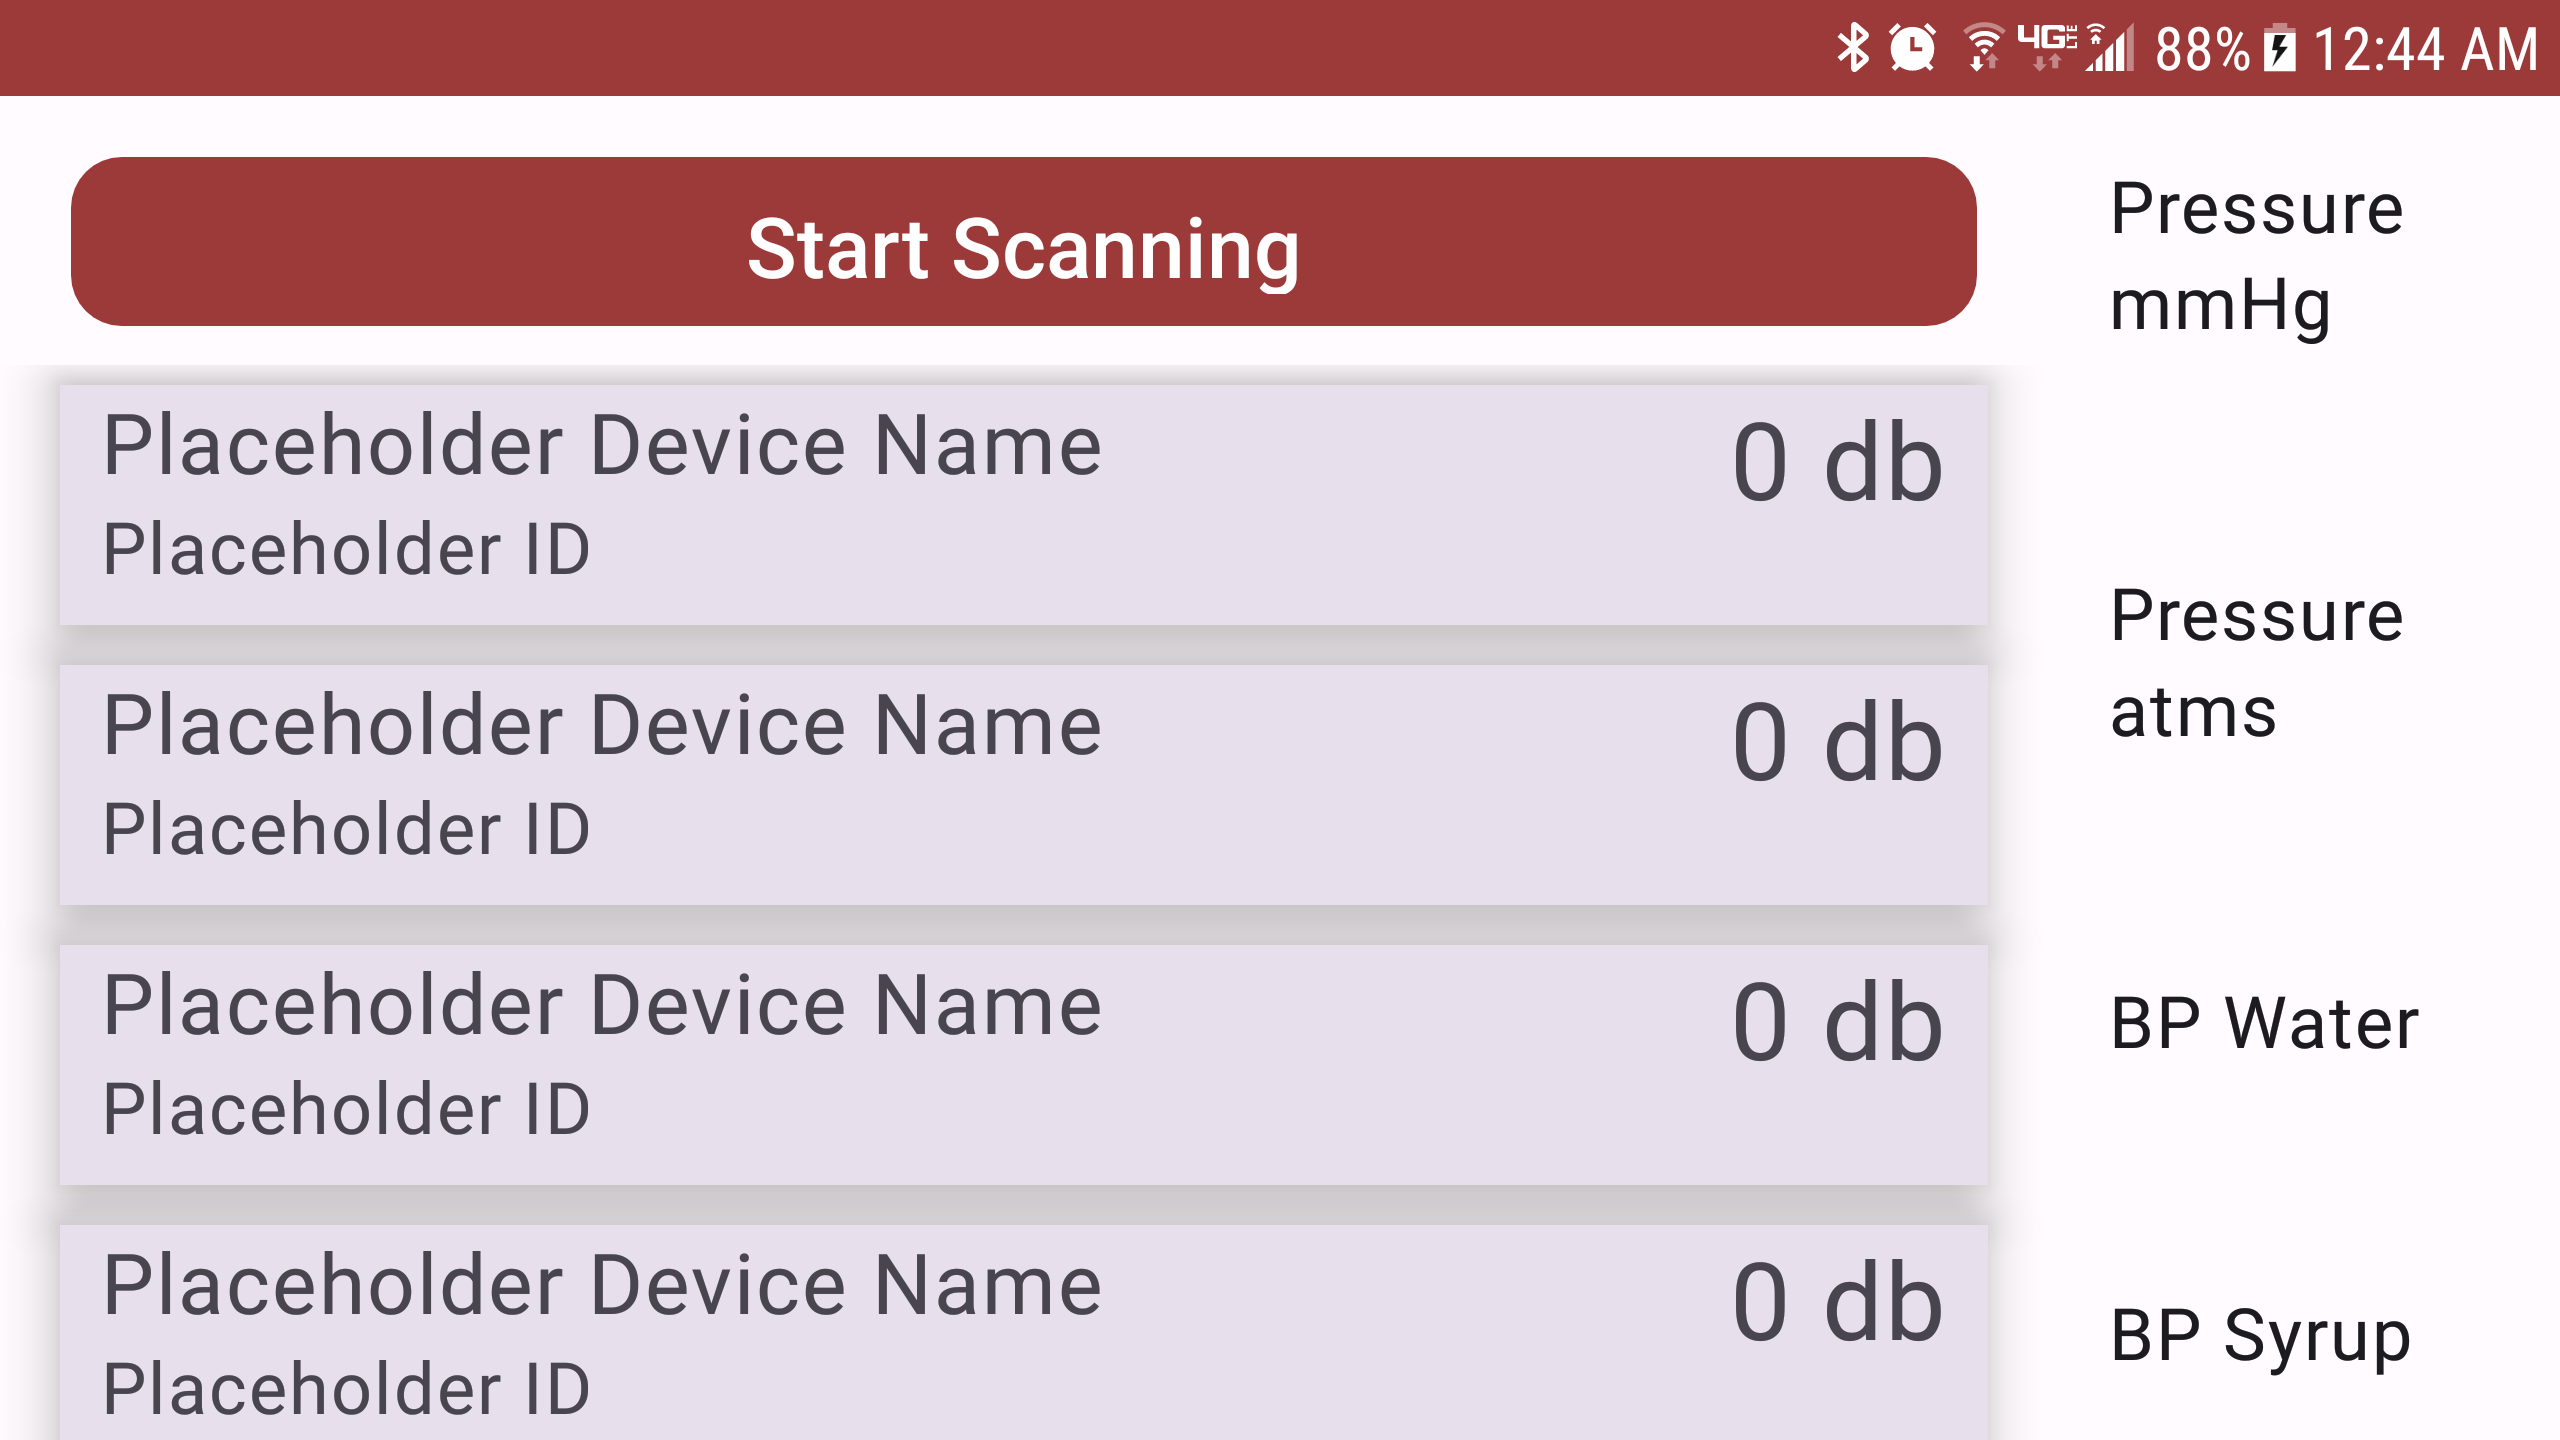
Speaking of rotations, we'll want the app to behave very differently if it's in portrait or landscape. Text sizes should change to fill up reasonable space, and the PressureScreen would fit better in a Row, rather than a Column with the main screen. The orientation can be found in any Composable function using the following.
LocalContext.current.resources.configuration.orientation // 1 = PORTRAIT
We can then apply this to the scaffold and font sizes, crafting different layouts depending on orientation.
@Composable
fun MapleScaffold() {
    if (LocalContext.current.resources.configuration.orientation == PORTRAIT) {
        PortraitScaffold()
    } else {
        LandscapeScaffold()
    }
}
This is very easy in Android studio if you want to get rid of the cheeky droid starting at you. In the project view just right-click the res folder and make a new image asset. You can also add in your own in app icons.
Navigation is how the user moves throughout your app. How the back button behaves, and how the user get between screens. In our case, we want to navigate between the Connection and Temperature Screens.
Another handy codelab covers this.
NavHost will now replace ConnectionScreen in the scaffold. The commit "Navigation" demonstrates most of this. Keep in mind that the TemperatureScreen will be associated with a specific thermometer and therefor need an argument passed like in the codelab's SingleAccountScreen
// The final Thermometer destination
object Thermometer : MapleDestination {
    override val route = "thermometer"
    const val deviceAddressArg = "device_address"
    val routeWithArgs = "${route}/{${deviceAddressArg}}"
    val arguments = listOf(navArgument(deviceAddressArg) { type = NavType.StringType })
}
At this point, if you are planning anything of scale, I would recommend this testing codelab before moving on.
Reading the onboard sensors of the device. No codelabs for this. Just the API & docs
The first thing to note is detecting the sensor. Many tablets don't have pressure sensors and we'll want to (1) not crash and (2) hide the pressure screen and use its real estate in such cases.
// Anywhere with Context
var sensorManager: SensorManager = context.getSystemService(Context.SENSOR_SERVICE) as SensorManager
val hasSensor = sensorManager.getDefaultSensor(Sensor.TYPE_PRESSURE) != null

// In MapleScaffold.kt
// Use full width (a.k.a. 1) if there is no sensor, otherwise use the provided width.
fun setWidthIfSensor(width: Float, hasPressureSensor: Boolean): Float {
    if (hasPressureSensor) {
        return width
    }
    return 1.0f
}
Make a new package in core called sensor. Make a new class called PressureSensor in a new file that extends SensorEventListener.
class PressureSensor(context: Context) : SensorEventListener {
    private var sensorManager: SensorManager =
        context.getSystemService(Context.SENSOR_SERVICE) as SensorManager
    private var mPressure: Sensor? = null

    private val sensorExistsOnDevice: Boolean
        get() = sensorManager.getDefaultSensor(Sensor.TYPE_PRESSURE) != null

    init {
        mPressure = sensorManager.getDefaultSensor(Sensor.TYPE_PRESSURE)
        startListening()
    }

    fun startListening() {
        if (!sensorExistsOnDevice) {
            Log.i("PressureSenor", "No pressure sensor detected, will not register listener.")
            return
        }
        // register the listener
    }

    fun stopListening() { // In a single activity setup, call this when navigating away
        sensorManager.unregisterListener(this)
    }

    override fun onAccuracyChanged(sensor: Sensor?, accuracy: Int) = Unit // For Now

    override fun onSensorChanged(event: SensorEvent?) {
        if (event != null && event.values.isNotEmpty()) {
            // Send message to Pressure ViewModel
        }
    }
}
The pressure sensor is one few things that will require us to touch the MainActivity. We want the sensor's lifecycle to last only as long as the Activity does, because if the user isn't looking at the Activity why bother updating it.
class MainActivity : ComponentActivity() {
    private lateinit var pressureSensor: PressureSensor
    override fun onCreate(savedInstanceState: Bundle?) {
        super.onCreate(savedInstanceState)
        setContent {
            MapleThermApp()
        }
        // Lifecycle of pressure sensor should be tied to lifecycle of the activity
        pressureSensor = PressureSensor(this)
    }

    override fun onResume() {
        super.onResume()
        pressureSensor.startListening()
    }

    override fun onPause() {
        super.onPause()
        pressureSensor.stopListening()
    }
}
Great, now you can log pressure changes in the Activity. The hard part is injecting the live data into the UI through our preferred viewModel method. For that we'll need Handlers.
Handlers are listeners that allow you to send messages between disparate parts of code and process queues from multiple sources. WARNING My implementation here is almost certainly not to be emulated architecturally; there is nothing preventing two classes from fighting over the same handler.
This codebase from justmobiledev will provide a good example for us. From there you can see 2 important types of Handlers. One in the main activity that listens for incoming messages, and another for each sensor that handles running the thread that the sensor itself listens on.
The main difference between my use-case and his is that I used a class, he used an object. An object is a single static instance and thus has no constructor. A class has instances, but can have static fields by using a companion object.
class PressureSensor(context: Context) : SensorEventListener {
    ...
    companion object {
        private var handler: Handler? = null
        fun setHandler(handler: Handler) {
            this.handler = handler
        }
    }
    ...
}
This way, the sensor can send messages and anywhere in the codebase can grab that message pipeline by setting the static field of the handler. You can only ever send messages to one location (whichever Handler is currently set via setHandler in the companion object.) The same Handler can receive messages from multiple locations and utilizes a message ID number to differentiate classes of messages, regardless of their source.
// In PressureViewModel class in PressureViewModel.kt
// Looper comes from main thread
private val handler: Handler = object: Handler(Looper.getMainLooper()) {
    override fun handleMessage(msg: Message) {
        if (msg.what == MsgTypes.PRESSURE_DATA.ordinal) { // MsgTypes is an enum to gauruntee the uniqueness of each message ID
            val sensorData = msg.obj as Float
            calcPressureDerivatives(sensorData)
        }
    }
}

init {
    PressureSensor.setHandler(handler)
}
If we needed to listen in more places, we could pass the same handler into more setHandler() functions. We can also handle different message types in the same Handler.
override fun handleMessage(msg: Message) {
    if (msg.what == MsgTypes.PRESSURE_DATA.ordinal) { // MsgTypes is an enum to gauruntee the uniqueness of each message ID
        val sensorData = msg.obj as Float
        calcPressureDerivatives(sensorData)
    }
    if (msg.what == MsgTypes.ANOTHER_TYPE.ordinal) {
        val someData = msg.obj as DataType
        // process the message
    }
}
Before we get into Bluetooth, we need to know what we want from the device. Here I recommend a BLE scanner app like punchthrough's LightBlue This will let you view all the internal characteristics of the device so you can see what you're working with. A sensor reporting temperatures will have a Notifiable characteristic as opposed to a Read. Notifiable allows you to subscribe to the characteristic and receive events anytime the value changes. In my case there are two Notifiable characteristics but only one is listed as advertised: 0000fff1-0000-1000-8000-00805f9b34fb. Catchy. If we subscribe to it, we can indeed see that it updates as I change the temperature.
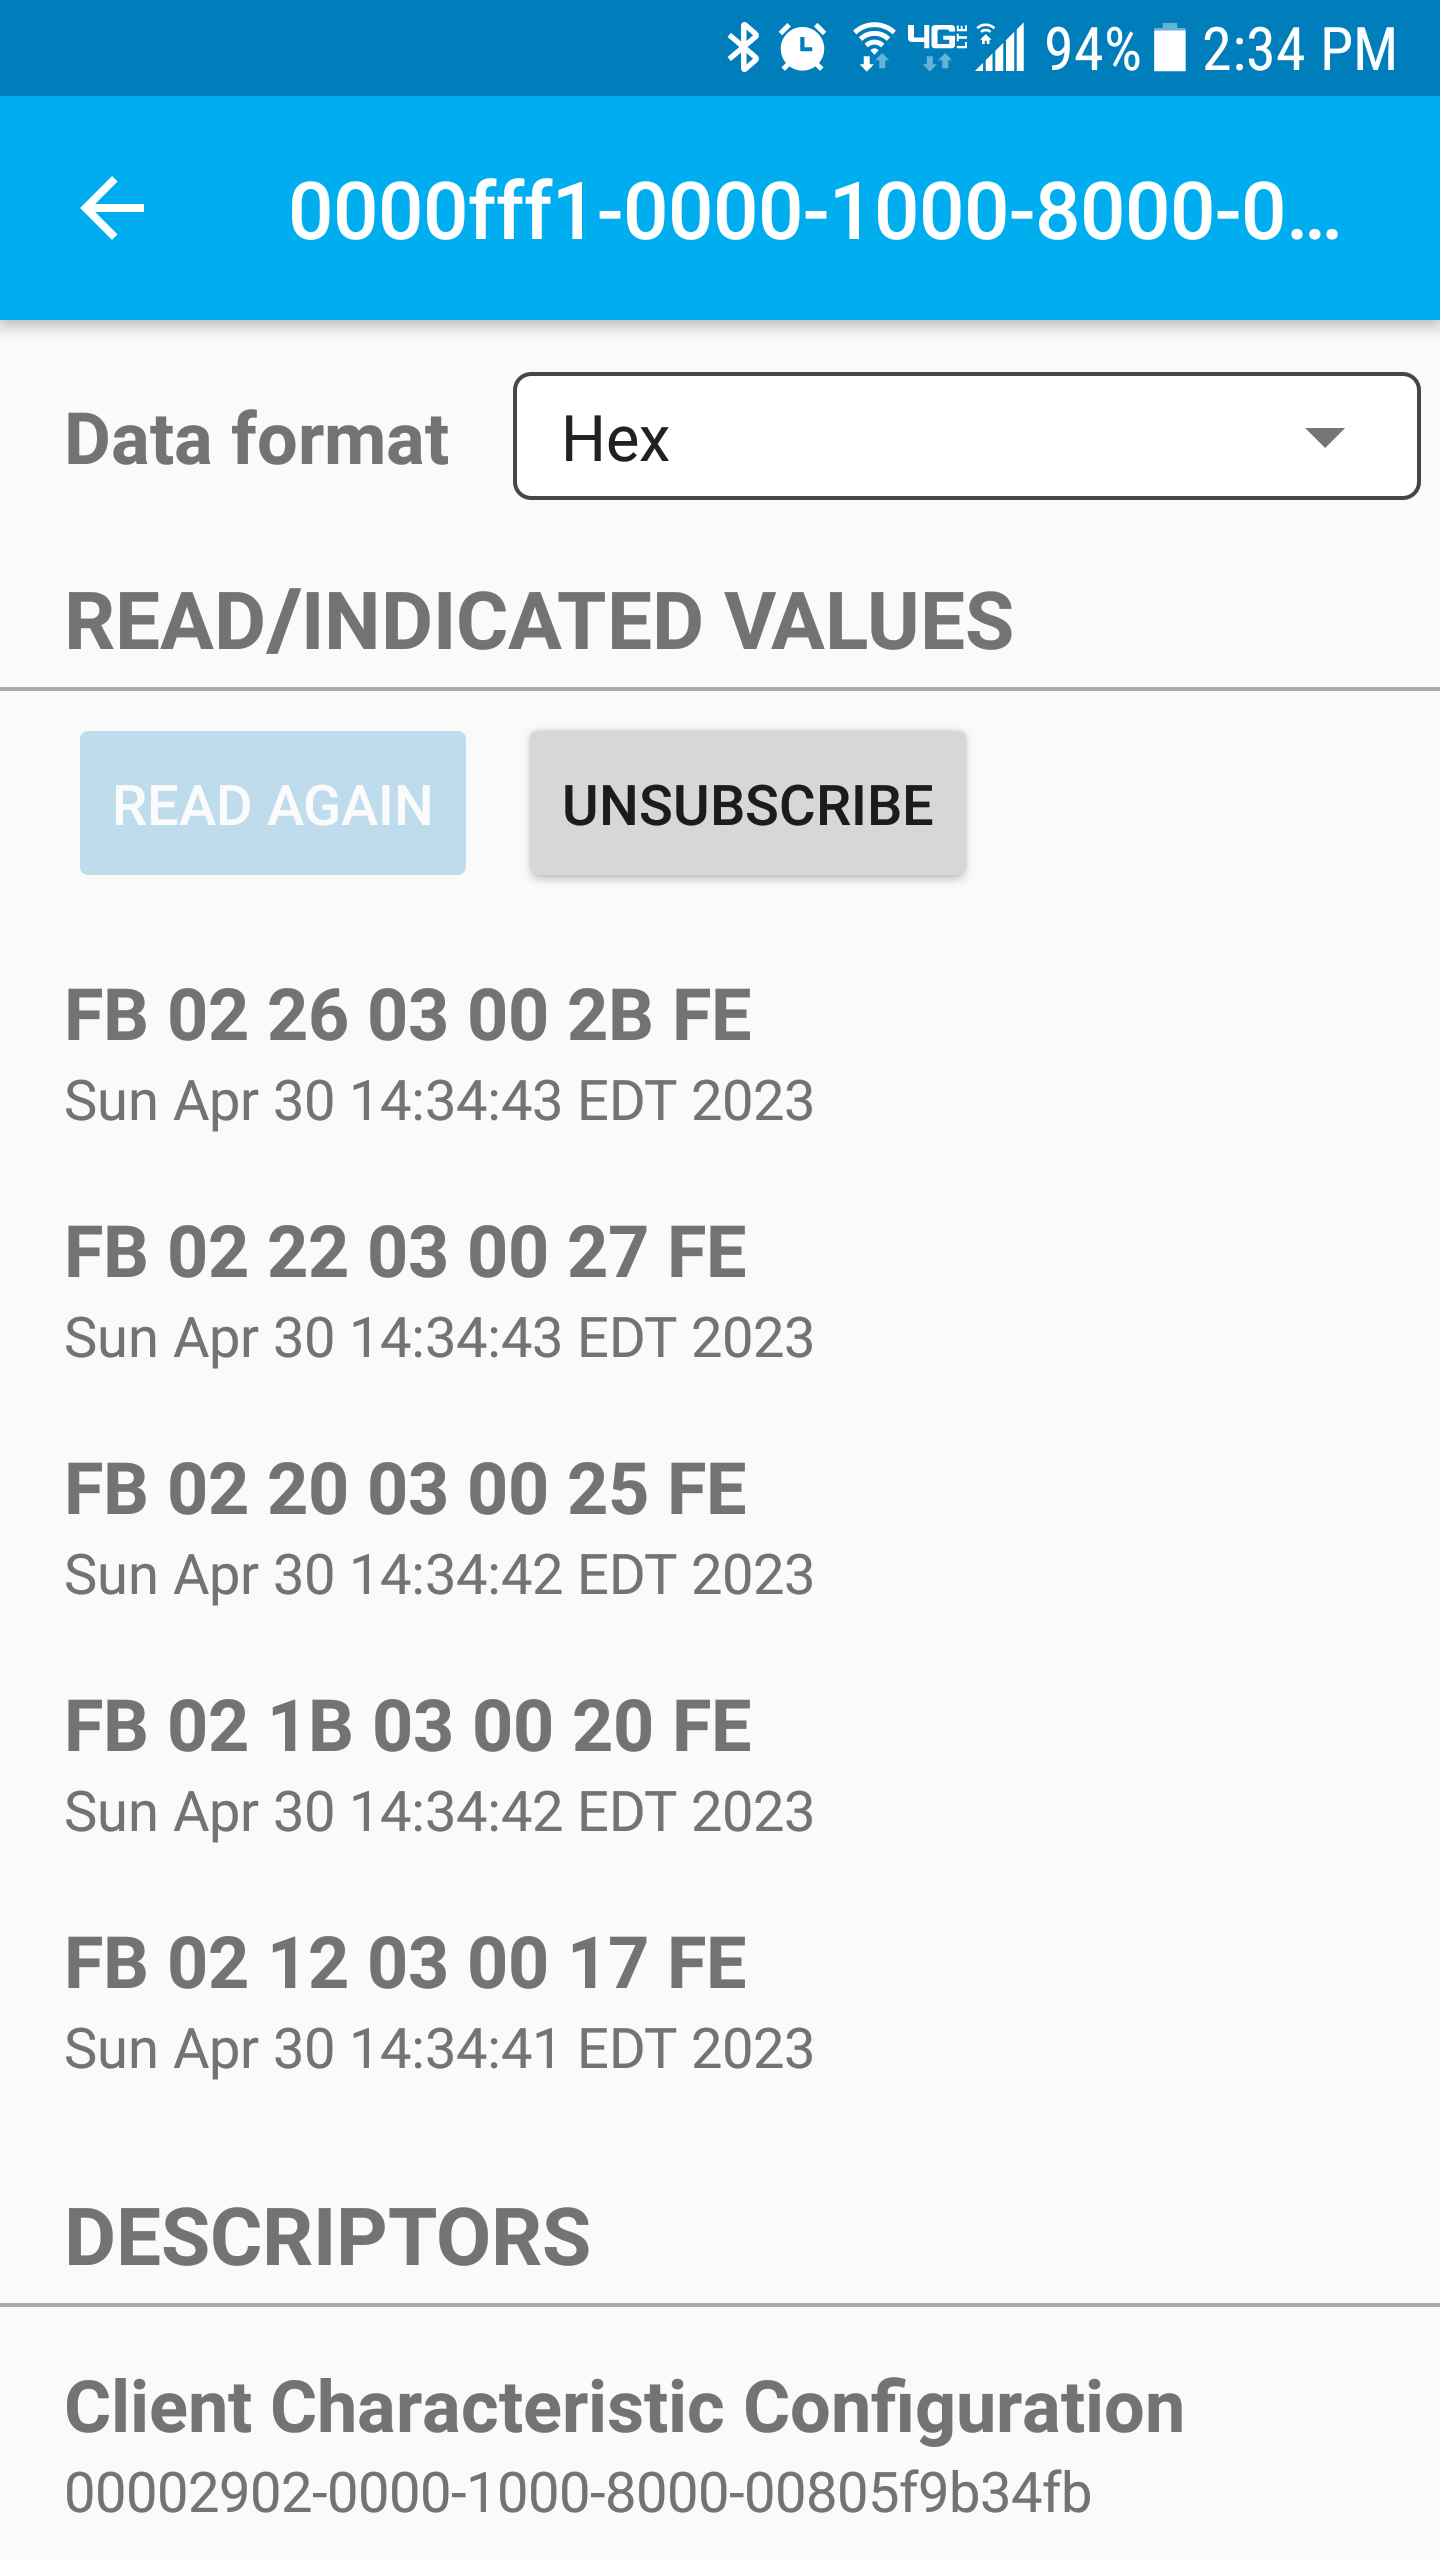
Note that the datastream is actaully reported as a ByteArray.
So we have the reported data, how do we get the temperature? Well it's not reported cleanly as an Int or a Float, so we'll have to get some ice water and get data collecting.
| Byte 0 | B 1 | B 2 | B 3 | B 4 | B 5 | B 6 | °F |
|---|---|---|---|---|---|---|---|
| FB | 02 | 4E | 01 | 00 | 51 | FE | 33.4 |
| FB | 02 | 50 | 01 | 00 | 53 | FE | 33.6 |
| FB | 02 | 52 | 01 | 00 | 55 | FE | 33.8 |
| FB | 02 | 92 | 01 | 00 | 95 | FE | 40.2 |
| FB | 02 | EC | 01 | 00 | EF | FE | 49.2 |
| FB | 02 | FD | 01 | 00 | 01 | FE | 50.9 |
| FB | 02 | 8B | 02 | 00 | 8F | FE | 64.7 |
| FB | 02 | B4 | 02 | 00 | B8 | FE | 69.2 |
| FB | 02 | B6 | 02 | 00 | BA | FE | 69.4 |
| FB | 02 | BA | 02 | 00 | BE | FE | 69.8 |
| FB | 02 | 5F | 03 | 00 | 64 | FE | 86.3 |
Only 3 bytes ever change (2, 3 and 5). The 5th byte looks promising at first, as temperature increases 0.2 degrees the 5th byte increases by 2 in the 33°F range, but this breaks down. If you ignore the 5th byte, it becomes obvious that bytes 2 & 3 completely describe the temperature in a little-endian-esque fashion. Byte 3 is more significant than Byte 2 and together they describe an integer 10x the temperature in Fahrenheit.
| Byte 3 | Byte 2 | Decimal | °F |
|---|---|---|---|
| 03 | 5F | 863 | 86.3 |
WARNING. Do not emulate my permission requests. At this point I was running out of time for this project and just needed it to work on my father's device.
The practices for this are described here.
The types of permissions you request for Bluetooth have changed quite a bit over the years. You'll want to look up the permission list for all API ranges you support. You can then conditionally specify which APIs the permissions are meant for in the AndroidManifest.xml.
<uses-permission
    android:name="android.permission.BLUETOOTH"
    android:maxSdkVersion="30" />
You'll then need to gracefully request permissions during runtime as described in the link above.
There is a great comprehensive guide by Chee Ti Ong on BLE connection and management. Use this and not my code once you have a basic understanding.
For this, I used just the docs for a simple, yet ungraceful method to practice it from scratch. I made a new package in core, called network/bluetooth. There are three phases to the BLE connection. I separated the functionality between two classes. BluetoothLeScanner and BluetoothLeReader.
- Scanning: detect the device, filter for what you want.
- Connecting: establish a connection and read the services of the device
- Interacting: read/write data from the underlying characteristics of the device.
Most important detail with scanning, make sure it stops. The docs example uses a handler to queue a stop every time a start is called. I provide a manual stop button and send a stop message when a device is selected.
If you're searching for a specific device or type of device, be sure to utilize the ScanFilter.
private val scanFilters = listOf<ScanFilter>(
    ScanFilter.Builder().setDeviceName("MAVERICK").build()
) // Very specific to my case

private val scanSettings = ScanSettings.Builder()
    .setScanMode(ScanSettings.SCAN_MODE_LOW_LATENCY)
    .build()
It's a good idea to use something like a Service or Bound Service for the connection itself, in order to maintain the connection regardless of activity state in a clean manner. I did not take that step in this app.
BluetoothGattCallback is the main driver of the connection code, define actions to take on successful connect and disconnect. The characteristics are bundled in Services, so once you discover services, characteristics may be accessed.
private val bluetoothGattCallback = object : BluetoothGattCallback() {
    override fun onConnectionStateChange(gatt: BluetoothGatt?, status: Int, newState: Int) {
        if (newState == BluetoothProfile.STATE_CONNECTED && !_isConnected) { // check newState and only act if it differs from previous state
            // successfully connected to the GATT Server
            _isConnected = true
            // Log.d(TAG, "Connected to BLE GATT server")
            _bluetoothLeGatt?.discoverServices()
        } else if (newState == BluetoothProfile.STATE_DISCONNECTED && _isConnected) {
            // disconnected from the GATT Server
            _isConnected = false
            _subscribed = false
            Log.d(TAG, "Disconnected from BLE GATT server")
        }
    }

    override fun onServicesDiscovered(gatt: BluetoothGatt?, status: Int) {
        if (status == BluetoothGatt.GATT_SUCCESS) {
            if(!_subscribed)
            {
                subscribeToNotifications() // Acutal reading of the device data
            }
            // Log.d(TAG, "Services discovered")
        } else {
            Log.w(TAG, "onServicesDiscovered received: $status")
        }
    }

    ...
}
If you plan on using the Read/Write characteristics, it's important you implement some form of scheduler. Wait for the callback of one action before performing the next. I only want to read a single Notify characteristic, so there are only two things I need to do.
-
Set notification: locally subscribe to the notification on the Gatt.
// Obtain temperature characteristic fun subscribeToNotifications() { val temperatureField = _bluetoothLeGatt!!.findCharacteristic(fahrenheitCharacteristic) if (temperatureField != null) { setCharacteristicNotification(temperatureField, true) ... } else Log.w(TAG, "Could not find temperature field on Bluetooth device.") } -
Write descriptor: tell the device(by setting a flag on the device end) that we would like it to report its notifications.
 // Obtain temperature characteristic
 fun subscribeToNotifications() {
     ...
     if (temperatureField != null) {
         ...
         val descriptor = temperatureField.getDescriptor(
             CHARACTERISTIC_UPDATE_NOTIFICATION_DESCRIPTOR_UUID
         )
         descriptor.value = BluetoothGattDescriptor.ENABLE_NOTIFICATION_VALUE // Might have to do non-deprecated version as well for Android 13+
         _bluetoothLeGatt!!.writeDescriptor(descriptor)
         _subscribed = true
     } else Log.w(TAG, "Could not find temperature field on Bluetooth device.")
 }
You can then implement onCharacteristicChanged() in your BluetoothGattCallback to grab the data and send it wherever needed.
override fun onCharacteristicChanged( // For Android 13+
    gatt: BluetoothGatt,
    characteristic: BluetoothGattCharacteristic,
    value: ByteArray
) {
    sendMessage(sliceHexToTemp(value.toHexString()))
}

@Deprecated("Deprecated in Java")
override fun onCharacteristicChanged(
    // For Android 12-
    gatt: BluetoothGatt,
    characteristic: BluetoothGattCharacteristic,
) {
    sendMessage(sliceHexToTemp(characteristic.value.toHexString()))
}
We did the work above in understanding what is reported, but the actual value is a ByteArray, not a HexString. I like to convert the array to a HexString first anyways for debugging human-readability purposes. So all we need to do is slice out the bytes we need from the string and keep in mind the most significant byte is to the right in the HexString. Convert to decimal and we have our temperature.
// Parsing the data
private fun sliceHexToTemp(message: String): String {
    if (message.length != 22)
        return 0.0.toString()
    val hex = message.subSequence(12, 13).toString() + message.subSequence(8, 10).toString()
    return hexToF(hex).toString()
}

private fun hexToF(hex: String): Double {
    return (hexMap[hex[0]]!! * 16 * 16 + hexMap[hex[1]]!! * 16 + hexMap[hex[2]]!!) * 1 / 10.0
}