DataDownload Tab
The Download page is an optional component providing Extract Data and Email Task functionality for datasets. The data download interfaces with an ArcGIS for Server Map Service and Geoprocessing service to provide the functionality to clip layers and download them. The data download customization does not come standard as part of the default geoportal implementation. The sample discussed in this topic should be used as a starting point to create a customized task that suits your organization's needs.
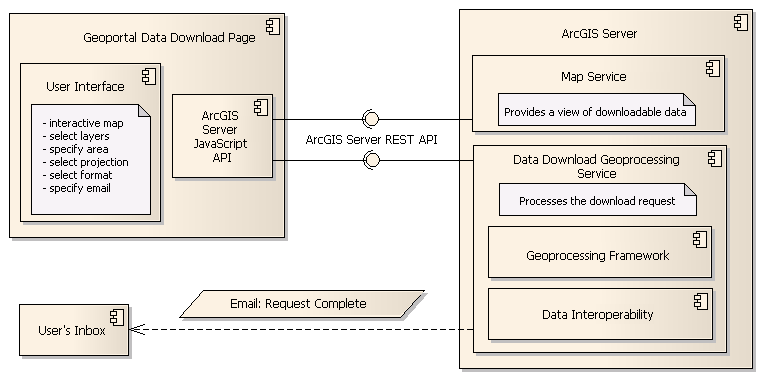
When downloading data, a user will draw the area they wish to download, select layers for download, select an output format for the data, and supply their E-Mail address. The geoportal data download page will then use the input information as inputs to the data download geoprocessing service. When the request has been completed, an E-Mail message will be sent to the user with an attached ZIP file of their data. See How to Use the Data Download Feature for more details.
The figure below shows the primary components of the Data Download functionality and the communication interfaces among them.
For Data Download to be functional in the geoportal, the following must be present and configured:
- A map service to provide the view of the downloadable data
- A geoprocessing service to extract and process the selected data
- A mail server to send the clipped and zipped data to the requesting user via email
- The ArcGIS SOC account must have access to the data sources used in your map and geoprocessing services. Access must be Full Control (Read, Write, and Execute). If your data is in SDE, then the ArcSOC account must have these same privileges to the data. The ArcSOC account must also have Full Control privileges to the folder where the interim clipped output file is stored, and the arcgisserver folder.
- The ArcGIS for Server machine must have access to the JavaScript API referenced in your gpt.xml file at the interactiveMap jsapiUrl parameter. By default, this refers to the JavaScript API hosted on ArcGIS.com. If your geoportal will not have external internet access, you may have to deploy a local instance of the JavaScript API. Instructions for installing the JavaScript API locally are part of the ArcGIS JavaScript API product.
- Optional: Fully licensed Data Interoperability extension for ArcGIS Desktop and ArcGIS Server to provide certain additional output formats.
This section describes how to configure the geoportal to enable data download from a custom map document using the ArcGIS 10.1 Extract Data and Email Task. This is a sample, and may require customization and testing by your organization to suit your organization's needs. Configuring Data Download for the geoportal entails three steps, each described in a section below:
- Prepare the geoprocessing task (Extract Data and Email Task)
- Prepare and publish the map service and geoprocessing services
- Configure the geoportal to use these services in the Download tab
The geoprocessing task used for the geoprocessing service is created by following instructions from the webhelp topic http://resources.arcgis.com/en/help/main/10.1/index.html#//00540000000v000000 Extract Data and Email Task. After configuration according to this help topic, you should have your custom toolbox with the Extract Data and Email Task. A brief summary of the necessary steps to prepare the custom toolbox are below.
- Open ArcMap with a blank document, to which you will add the layers that will be downloadable and your Extract Data and Email Task.
- Enable the ArcToolbox window. Right click on the ArcToolbox icon and select Add Toolbox from the menu.
- In the Add Toolbox dialog, click on either My Toolboxes or System Toolboxes, and select the new toolbox icon at the top right to create a new toolbox. Name this toolbox geoportal_data_download.
- Navigate to the Server Tools toolbox in the ArcGIS Toolbox window. Within the Server Tools toolbox, expand the Data Extraction toolbox.
- Copy the following three items from Data Extraction toolbox and paste them into your new toolbox:
- Extract Data
- Extract Data and Email Task
- Send Email With Zip File Attachment
- Now you will configure the email server settings in the Extract Data and Email Task. Right-click the Task from your geoportal_data_download toolbox and select Edit. The model window should appear.
- Doubleclick the Send Email With Zip File Attachment box in the model. The input dialog box for the Send Email With Zip File Attachment tool should appear.
- Enter values for From, Subject, Text, Max File Size, and SMTP Email Server. Click OK to persist the values you entered in the model.
- Save and exit the model.
- Save the map document - In this example, we save it as DataDownload.mxd.
From one map document will come both the map service and the geoprocessing service that will be used by the geoportal. The geoprocessing service will be used to clip and deliver the data to the end user. Before proceeding with this step, verify that you had publish or administrator privelages to the ArcGIS for Server endpoint to which you will publish these services. Also, this service endpoint should also be accessible to your geoportal web application.
Caution: : In the step below where you add data to your mxd, do not use groups within a group layer. The geoportal Download page can only display layers within one level of a Group layer in the Map Service. For example, in the screenshots below, the sample on the right would not display the layers in the second Group layer, because they are a Group within a Group.

To prepare the DataDownload.mxd document do the following:
- Add feature layers and/or raster layers that you want users to be able to clip and download.
- Save the mxd
- Open your configured Extract Data and Email Task model from your geoportal_data_download toolbox. In the first field “Layers to Clip”, select from the dropdown the layers that appear in your map. Important: any layers you do not add to this parameter will not be able to be downloaded by the geoprocessing service.
- Fill out the rest of the parameters to the model. It is a good idea to use your own email address as the target, so you will know if the model completed successfully. Click OK to run the model.
- The model runs. If it doesn’t complete successfully, then you should troubleshoot the way you’ve configured the Extract Data and Email Task model, or how your mail server handles incoming attachments. Do not proceed to the next step if you see errors from running the model.
- After the model runs successfully, you should she no errors in the geoprocessing dialog and you should have received a .zip file in your email. The .zip file may be empty – that is okay.
- Now, open the geoprocessing results view in ArcMap (Geoprocessing menu > Results), and expand your current session. Right click on the last results set when you ran the Email Extract and Download model (should have been a successful run).
- Select "Share As…" and then “Geoprocessing Service” to begin the process of publishing a geoprocessing service (see http://resources.arcgis.com/en/help/main/10.1/index.html#//005700000042000000 for additional information). This will open the “Share as Service” dialog.
- Select the Publish a Service option. Complete the publish service dialog to finish publishing your geoprocessing service.
- Now to publish your map service, first make sure the symbology, layer ordering, and scales are all as you want them for your map service. Then save the mxd.
- Go to the File menu and select “Share as…”, then “Service”
- Publish the mxd as a map service.
The Extract Data and Email Task configuration is located in the downloadData element in your gpt.xml file. To configure this element, do the following:
- Navigate to the \\geoportal\WEB-INF\classes\gpt\config folder and open the gpt.xml file in a text editor.
- Scroll to the downloadData element.
- Find the taskUrl attribute, and update it with the ArcGIS Server REST URL to your published DataDownload geoprocessing service. To get the REST URL to the ExtractDataTool, open a web browser and enter the following address (substituting your ArcGIS Server):
http://yourArcGISServer/rest/services/. The DataDownload geoprocessing service should be listed in this list. Click on the Extract Data and Email Task link on that page. When the page redirects, copy the URL that is in the web browser and paste it in the taskUrl attribute, as shown below.taskUrl="http://yourArcGISServer/rest/services/DataDownload/GPServer/Extract%20Data%20and%20Email%20Task" - Find the mapServiceUrl attribute and update it with the ArcGIS Server REST URL to the published DataDownload map service. You can get the REST URL to the map service by going to the same ArcGIS REST services link as you did for the geoprocessing service (http://yourArcGISServer/rest/services/) and clicking on the link to your map service. In this example:
mapServiceUrl="http://yourArcGISServer/rest/services/DataDownload/MapServer"
- Find the mapServiceType attribute and update it with the value dynamic. This represents your data download map service's type, usually tiled or dynamic. Even if your map is a tiled map, enter dynamic as the value, as the display map will not display correctly if this value reads tiled.
- (Optional) Add a mapInitialExtent attribute to the downloadData node: Starting with Geoportal Server 1.2, it is possible to define an initial extent of the map and therefore override the initial extent of the service. The value of that attribute is a JSON complaint definition of the Esri JavaScript API extent (http://help.arcgis.com/en/webapi/javascript/arcgis/help/jsapi/extent.htm#webprint). An example would be: downloadData mapInitialExtent="xmin:0,ymin:0,xmax:90,ymax:45,spatialReference:{wkid:4326}"
- Save the gpt.xml file.
- Restart your geoportal web application.
Tip: If you think the geoprocessing task is not working correctly, you can look at the ArcGIS for Server log files for insight.
You will likely want to configure the geoportal to offer different output file formats for the feature or raster layers in the Data Download interface. Feature output file formats are defined in the features tag in the gpt.xml file, and raster output file formats are defined in the rasters tag. Instructions for parameters within each feature and raster entry are described below. Note: For some output formats, the Esri Data Interoperability extension must be installed and enabled in ArcGIS Desktop for the map service basemap and geoprocessing task basemap, and the Data Interoperability extension for ArcGIS for Server must also be installed on the machine hosting ArcGIS for Server. You may also need to adjust the Extract Data and Email ArcGIS Desktop task to handle the specified format. Because this customization is not included in the Geoportal Server general documentation, the Geoportal Server User Forum is a good place to find out how other users may have added additional data types for download.
The Data Interoperability extension uses Feature Manipulation Engine (FME) technology from SafeSoftware. To get the information that you will need to update the list of output formats, you will need to reference the FME website. The example below shows adding the ESRI ArcInfo format to the list of features feature output formats. Use a similar process to add a format to the rasters raster output formats.
- Obtain the format identifier and file extension information by accessing the FEM website and clicking the link next to the format in which you are interested. This will redirect to a .pdf file giving additional details.
- Find Format Identifier and Typical File Extensions. For ESRI ArcInfo Export, format identifier is "E00" and typical file extension is ".e00".
- In gpt.xml, insert an additional feature element with the following attributes into the features element to include the supported output format.
- key: {Format Identifier} - ({typical file extension}). In the ArcInfo example, it should be E00 - (.e00)
- alias: optional - repeat the file extension.
- resKey: assigns the key for referencing the display name as defined in gpt.properties for this format. Should be unique. In this example, resKey is catalog.download.feature.e00.
- The new E00 entry has been added to the default list in the example below:
<features>
  <feature key="File Geodatabase - GDB - .gdb" alias="gdb" resKey="catalog.download.feature.gdb"/>
  <feature key="Shapefile - SHP - .shp" alias="shp" resKey="catalog.download.feature.shp"/>
  <feature key="Autodesk AutoCAD - ACAD - .dxf" alias="dxf" resKey="catalog.download.feature.dxf"/>
  <feature key="Autodesk AutoCAD - ACAD - .dwg" alias="dwg"  resKey="catalog.download.feature.dwg"/>
  <feature key="Bentley Microstation Design (V8) - DGN_V8 - .dgn" alias="dgn"
           resKey="catalog.download.feature.dgn"/>
  <feature key="E00 - (.e00) " alias = "e00" resKey="catalog.download.feature.e00"/>
</features>
Now you need to add the resource key from the new <feature> to gpt.properties.
- Open gpt.properties from /geoportal/WEB-INF/classes/gpt/resources.
- Add the display names for the added format in the download data section, using your resKey described above as a guide. For example, we could add the key below to match the resKey in gpt.xml: catalog.download.feature.e00= E00 - (.e00).
- Save gpt.properties and gpt.xml. Restart the geoportal web application for you changes to take effect.