Geoportal Facets using Apache Solr
The Geoportal Facets Customization (GFC) is a prototype component that can be deployed standalone or in conjunction with the Esri Geoportal Server. It is downloadable from this page: https://github.com/Esri/geoportal-server/wiki/Geoportal-Server-Downloads. This topic describes the GFC as used with the Esri Geoportal Server, and provides an overview of the GFC, how to setup the GFC, how to use the sample user interface, and how to further configure it.
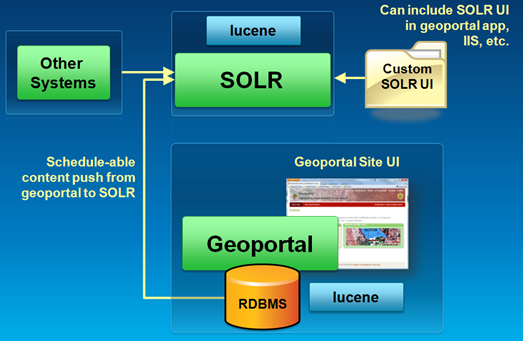
The GFC consists of a backend component and a user interface component, both of which leverage an Apache solr index (solr versions 4.1.0 and 4.6.1 have been tested and are supported). The backend component parses XML into the solr index according to customizable rules, and also writes documents from a Geoportal Server database to the solr index. The user interface interacts with the solr indices through a faceting and filtering display. Architecture for the GFC is shown below. You can see that solr is deployed separately from the Esri Geoportal Server, and maintains a separate lucene index. Records can be pushed into this index from the Esri Geoportal Server or from other systems. The Custom solr UI exposes the solr index; this UI can be placed into the Esri Geoportal Server page structure, or can be maintained outside of the Esri Geoportal Server.
To setup the GFC, you’ll first set up solr. Then you will deploy a custom web application that will connect your geoportal to the solr instance. Then you will configure the web application and the user interface for viewing the solr index.
To setup the GFC, you must first have an Apache solr instance deployed. This can – but does not have to – be deployed in the same web server instance as your geoportal. Download and install Apache solr (http://lucene.apache.org/solr).
In this example, the provided Jetty servlet container is used, following the solr tutorial examples. It is possible to run solr in another servlet container – e.g., Tomcat, GlassFish, etc. – but specific java properties in your solr instance will need to be defined. See Apache solr documentation for configuring solr in other servlet containers.
You can customize this deployment to put the solr documents in the default collection, or a new collection. Each collection is an independent Lucene index; collections are also referred to as 'cores' in the Solr administrative interface. In this example, we put them in the default collection , called ‘collection1’,
A couple small modifications to the solr schema.xml in your collection location are necessary to support the geoportal integration. Open the schema.xml file from the collection location, for example: \\solr-4.6.1\example\solr\collection1\conf\schema.xml
The changes are in 2 sections:
- Find the section where the fields are defined. Just before the closing fields/ tag, enter the following:
<!-- CUSTOMIZATION -->
   <dynamicField name="*_geo"  type="geo"  indexed="true"  stored="true" multiValued="true"/>
   <dynamicField name="*_xml"  type="string"  indexed="false"  stored="true" multiValued="false"/>
   <dynamicField name="*_json"  type="string"  indexed="false"  stored="true" multiValued="false"/>
   <dynamicField name="*_clob"  type="string"  indexed="false"  stored="true" multiValued="false"/>
<dynamicField name="*_blob" type="binary" indexed="false" stored="true" multiValued="false"/>- Now, find this section:
<fieldType name="location_rpt" class="solr.SpatialRecursivePrefixTreeFieldType" geo="true" distErrPct="0.025" maxDistErr="0.000009" units="degrees"/>- Just after that element, paste the following:
<!-- CUSTOMIZATION -->
    <!-- we had trouble with the default distErrPct="0.025", changed to distErrPct="0.25", may no longer be necesary -->
    <fieldType name="geo" class="solr.SpatialRecursivePrefixTreeFieldType"
geo="true" distErrPct="0.25" maxDistErr="0.000009" units="degrees" /> - Save the schema.xml file, and then restart the solr service
Deploy the included GcService.war file to Tomcat or GlassFish. The GcService.war file is available for download at https://github.com/Esri/geoportal-server/wiki/Geoportal-Server-Downloads. You can deploy it into the same Tomcat or GlassFish as your geoportal web application.
After the GcService web application is deployed, open the //[GcService]/WEB-INF/classes/gc-config/gptdb2solr.xml file. You will now configure this file to auto-copy your Geoportal documents to solr from your geoportal database. This copy process runs just after making the change and restarting Tomcat, and then will run again once every 24 hours.
Update the following section in gptdb2solr.xml as described in the table below - note, this is information about your geoportal database, so use the geoportal's database JDBC configuration (e.g, Tomcat\conf\Catalina\localhost\geoportal.xml file) for values as described :
<property name="gptdb2solr.instance.id" value="gptinstance.mygeoportal">
  <property name="gpt.instance.url" value="http://mygeoportal:8080/geoportal"/>
  <property name="gpt.include.collections" value="false"/>
  <property name="solr.collection.url" value="http://test.esri.com:8983/solr/collection1/"/>
  <property name="sql.database">
    <property name="driver" value="jdbcDriverClassnameHere"/>
    <property name="url" value="jdbcDatabaseUrlHere"/>
    <property name="username" value="username"/>
    <property name="password" value="password"/>
  </property>
</property>| property name | description | example |
|---|---|---|
| gptdb2solr.instance.id | A unique identifier for this solr collection instance. If you have multiple instances defined in this file, this value should always be unique. | gptinstance.geoportal.1 |
| gpt.instance.url | The URL to the Esri Geoportal Server instance from which you want to push records into solr. | http://mygeoportal:8080/geoportal |
| gpt.include.collections | If you've enabled the Collections feature on your geoportal and want to have a facet for those collections, set this to "true"; the default is "false". | false |
| solr.collection.url | The URL to your solr collection. Note, when you look at your solr collection through a browser, this URL may have a ‘#’ in the URL; leave this out in this configuration. Also, the final backslash is important to include. | http://test.esri.com:8983/solr/collection1/ |
| driver | The driver you enter here is dependent on the driver used to connect your geoportal to its database. You can copy this setting from the \\Tomcat\conf\Catalina\localhost\geoportal.xml jdbc connection file. | Oracle: oracle.jdbc.driver.OracleDriver SQL Server: com.microsoft.sqlserver.jdbc.SQLServerDriver PostgreSQL: org.postgresql.Driver MySQL: driverClassName="com.mysql.jdbc.Driver" |
| url | This is the jdbc connection URL, and should also be the same as the jdbc connection information from your Geoportal instance to its database, see the note in the sql.database/driver section above. | Oracle: jdbc:oracle:thin:@serverName:1521:oracleSID SQL Server: jdbc:sqlserver://serverName:1433;databaseNa me=geoportal PostgreSQL: jdbc:postgresql://serverName:5432/postgres MySQL: jdbc:mysql://serverName:3306/geoportal |
| username | The database user configured to access the Esri Geoportal Server database. Also configured in \\Tomcat\conf\Catalina\localhost\geoportal.xml. | a username |
| password | The password of the database user configured to access the Esri Geoportal Server database. Also configured in \\Tomcat\conf\Catalina\localhost\geoportal.xml. | user's password |
After configuring this section, save the file. Do not restart Tomcat yet, there are two more changes, Step 5 & 6.
The \\GcService\WEB-INF\web.xml file should be updated to point to your solr location. Open the \\GcService\WEB-INF\web.xml file, and find the param-name element with the value of targetUri. In the param-value element below it, enter the URL to your solr instance, e.g., http://test.esri.com:8983/solr/collection1. Then save the file. Do not restart Tomcat yet, there is one more change, Step 6.
Open the //[GcService]/g.html file, and find this section:
data-dojo-id="solrClient" data-dojo-type="g/solr/base/SolrClient"
   	  data-dojo-props='
	      collectionUrl:"http://test.esri.com:8983/solr/collection1",
	      filters:[{viewable:true, removable:false, urlParameterName:"fq",
	                urlParameterValue:"id.table_s:table.docindex"}]'
Update the collectionUrl to match the URL to your solr collection. Then save the g.html file.
After configuring the g.html file, restart Tomcat or whatever servlet application software is hosting your GcService web application.
Note: The time it takes for your solr index to be updated with the geoportal records will depend on the number of records you have in your geoportal database. When you launch the Geoportal Facets Customization user interface, it may be slow at first because the user interface is showing an index that is growing by the minute initially. You can view and interact with the index by launching the html page, e.g., http://yourserver:8080/GcService/g.html
The sample user interface provides a view into the solr index. When you first deploy the sample user interface, you will see something like the following (note, you will have to click on the Map filter to show the map):

The categories on the left correspond to facets and filters. See the section below on Changing the GFC Configurations for how these can be customized. If you click on a category within a facet, that facet is applied to the list of results on the right, and the counts in the categories are updated.
The list on the right shows indexed records that meet the criteria defined by the facets and filters. There is a section at the very top called Filters. This lists the current facets that are applied to the list of results. To remove a facet from affecting the list, click the red X next to it in the Filters list. Each result has three links associated with it - xml, solrxml, and solrjson. When each link is clicked, the following occurs:
- xml: the originating metadata xml will be accessed from its host Geoportal Server instance.
- solrxml: the view of the record from the solr index is shown. Here, you can see the name of the solr indices and what value is indexed for each of them from the originating metadata.
- solrjson: a JSON view of the records information as indexed by solr.
The difference between facets and filters is that a facet provides count information about the documents – how many documents have that value for a field when zero or more facets are applied whereas filters do not provide such information but filter out results that do not match the filter query. In this default interface all the categories are facets except the Map and Temporal Extent, which are filters. To apply the Map filter, check the box next to the map. The map can be zoomed in or out using the + or – buttons, and recentered by dragging a spot on the map. The Temporal Extent is defined by entering in a start and/or end date in a YYYY-MM-DD format, or picking a recent date from the calendar that appears if you click the dropdown arrow on the right of the date field.
Each facet has a tool icon to the right of it (this example is the Organizations facet):

If you click this icon, a popup like the following displays:

This popup is a developer tool, included in the release for this version. It can be used to manipulate how the facets display information, as described below. When you click the OK button, your new settings are applied to the facet in the user interface.
| property | description |
|---|---|
| Field | Corresponds to the solr index that you want to associate with this facet |
| Alias Key | Used for faceting on the same field multiple times with different exclusions |
| Minimum Count | Minimum number of records that should be available for this facet to appear in the list; e.g., setting to ‘10’ means there must be at least 10 records for this facet to appear |
| Limit (rows) | How many categories should be shown in the list (e.g., ‘10’ = ten categories can be shown) |
| Value Prefix | If you want to constrain the values by including a case sensitive prefix, designate the prefix here. For example, you could limit the organizations in this list to those that begin with ‘US’ |
| Show Missing | Yes = show the facet category even when no records meet the other facet criteria; No = only show facet categories that have results associated with them |
| Sort By | Count = the facet categories with the highest number of results will be at the top of the list, and ordered by descending number of results; Index = the facet categories will be ordered alphabetically |
For more about how the facet options work, see the solr documentation available at http://wiki.apache.org/solr/#Search_and_Indexing and http://wiki.apache.org/solr/SimpleFacetParameters
This initial version of the GFC supports the following metadata schemas for parsing into the solr index: ISO 19115, ISO 19115-2, FGDC CSDGM, and Dublin Core. Which xpaths are associated with which index is defined in the requisite metadata schema’s xslt:
- ISO 19115 and ISO 19115-2: \\GcService\WEB-INF\classes\gc-config\xmltypes\iso19115-base-toSolr.xslt
- FGDC CSDGM: \\GcService\WEB-INF\classes\gc-config\xmltypes\fgdc-base-toSolr.xslt
- Dublin Core: \\GcService\WEB-INF\classes\gc-config\xmltypes\dc-base-toSolr.xslt
These instructions are for adding a simple facet – e.g., one that facets on text. Configuring a facet on numbers, dates, or mixed content is not yet documented.
To show additional indices on the facet user interface page, you will add content to the \\GcService\g.html page. Open the g.html file and find the section below:
<div data-dojo-type="dijit/layout/ContentPane" data-dojo-props="splitter:true, region:'leading'" class="gPanel gLeadingContentPane"><div data-dojo-type="g/solr/SimpleFacetPane" data-dojo-props="facet:{field:’placeholder.s', mincount:1, limit:10}"> </div>Note: you can also keep all the strings for your g.html user interface decoupled by adding the facet name and text you'd like to display to the \\GcService\g\solr\nls\resources.js file. Add the mapping in the "Fields" section towards the end of the resources.js file. For example:
 Fields: {
      "title": "Title",
      "keywords": "Keywords (terms)",
      "keywords_ss": "Keywords (values)",
      "contact.organizations_ss": "Organizations (contact)",
      "contact.people_ss": "People (contact)",
      "placeholder.s": "Placeholder facet"
    }