HowToInstallTheFirmware
https://github.com/mist-devel/mist-binaries/tree/master/firmware
The firmware comes in two formats:
- firmware.bin is the raw binary of the firmware. This can be uploaded to the MIST board using special flashers
- firmware.upg is the same firmware in a format suited for self-update via the on-screen-display (OSD)
These are required for the various ways to update the firmware. There are three methods to update the firmware:
- Update via OSD: This is the easiest way and is recommended. But this requires a working firmware to be already present
- Update via Sam-BA: This requires a micro USB cable and is a little bit more tricky, but it even works if there's no working firmware present. This can thus be used for emergency flashing--e.g. after an unsuccessful flash attempt.
- Update via JTAG: This is the fastest approach, but it needs a special JTAG interface. This is mainly used during development, but this can also be used for emergency flashing.
No, with a flash update you cannot bring the MIST into a state where it cannot be flashed with a working firmware again. If you broke the firmware (by e.g. unplugging the board while flashing it) you can always use the Sam-Ba approach. No further hardware (besides a USB cable) is required for that.
The easiest way to update the IO controller is via the OSD menu of the Minimig or Atari/MIST core. This requires a working Minimig setup. In order to update via the OSD the following steps are required:
- Place the firmware.upg on the SD card
- Boot into Minimig or Atari MIST
- Open the OSD (F12)
- On the Minimig go into the Misc menu (press right key two times) and select "Firmware"
- On the Atari/MIST select the Firmware & Core submenu
- Make sure the Version numbers displayed are the ones you want to flash
- Press Update and select Yes
- The update will take about 5 seconds
- The new firmware will reboot automatically
Alternally the SAM.BA self programming capabilities of the AT91SAM7 based IO controller can be used. This does not require a working Minimig setup and can even be used to flash an IO controller with broken firmware after e.g. a failed update attempt or the like.
The following steps are necessary to update the MIST firmware under Windows:
- Install Atmel SAM-BA for Windows on your PC
- Switch the board off and remove the SD card
- Close the JP1 jumper
- on early dev boards: next to the three push buttons
- on the series boards: next to the Atmel ARM controller
- be careful not to confuse it with switch DIP 1 (which will have no effect)
- on most boards JP1 is not wired - it needs to be bridged with a wire
- Switch the board on, wait 10 seconds and switch it off again. The SAM-BA boot loader is now installed
- Remove the jumper and connect the board to the PC using a USB cable
- on early dev boards: use a normal cable connected to the square USB plug next to the three push buttons
- on the series boards: use a micro USB cable connected to the micro USB power input (the PC will then also power the board)
- Power the board on. The PC should recognize the board and install install a COM port for it (it will display the COM port number)
- Start SAM.BA on the PC. Select the COM device and set board type to at91sam7s256-ek as depicted below
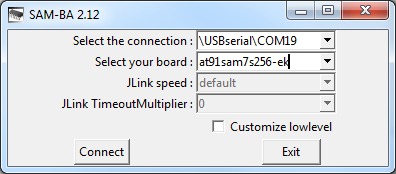
- Select Connect
- In the SAM-BA main screen under Scripts select Erase all flash and hit the Execute button
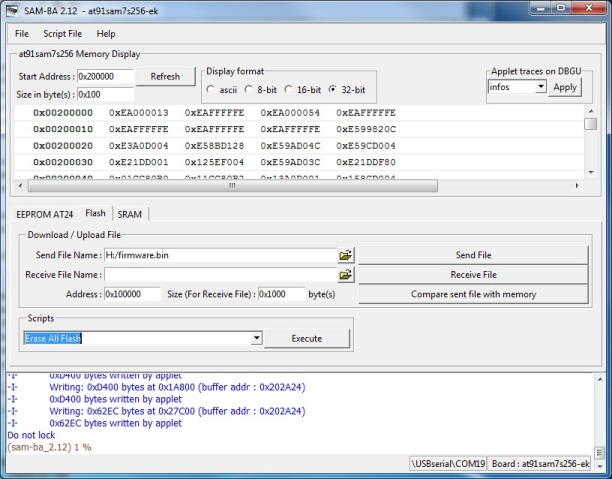
- Select yes when being asked if you want to unlock the flash regions
- Select the MIST firmware file firmware.bin under Send File Name and hit the Send File button
- The new firmware will now be flashed
- Say No when being asked whether you want lock the involved flash regions
- Power the board off, disconnect the USB cable, insert the SD card
- Power the board on. The new firmware should load.
Some people have problems to get the Linux version of SAM-BA to work. Instead Sam_I_Am under Linux works fine. The firmware source archive comes with a matching Makefile entry. Install the SAM-BA boot loader as explained above in the Windows section. Then just type make flash_sam to flash the new firmware. The installation of Sam_I_Am on a recent Ubuntu machine required some moving around of files which I don't exactly remember. If in doubt use the windows installer as explained above. See this post for more information on using Sam_I_Am.
SAM-BA does not yet work with Win10, but the Linux method works by setting up a VirtualBox virtual machine and configuring it to access the physical USB port connected to the MiST. It should appear in the USB device list as "Atmel Corp. at91sam SAMBA bootloader". If successful the device should be visible in Linux; you can verify it by typing "dmesg | grep tty", and it should appear as something like "ttyACM0: USB ACM device". The rest of the process is identical to the Linux approach above.
Another way to flash the IO controller is via an ARM JTAG cable connected to the 20 pin JTAG header. You need an ARM JTAG cable and the appropriate software. The Makefile in the firmware source code comes with a flash target, so a simple make flash will use the ARM JTAG interface to flash the IO controller. No manual interaction is required besides connecting the JTAG cable.
This is primarily intended for developers or for bulk flashing several devices.
Two types of ARM JTAG adapters have so far been tested. The Olimex arm-usb-tiny-h and the Bus Blaster, both depicted below.
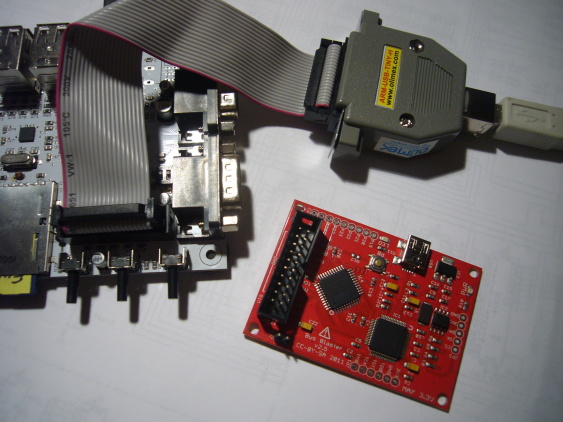
The arm-usb-tiny-h (in the grey db25 case) worked out of the box. The Bus Blaster (the red pcb in the front) needed some tweaking as explained in the dangerous prototypes forum. Once successfully setup both devices perform equally well. The Bus Blaster is a little cheaper but doesn't come with a case and without the 20 pin ribbon cable required to connect to the MIST.
Under Linux the tool openocd can be used to flash the board. This is also used by the Makefile when using the target make flash.
Under Ubuntu or Debian this tool can be installed via the command:
sudo apt-get install openocd
The command to flash the firmware from file firmware.bin is:
openocd -f interface/olimex-arm-usb-tiny-h.cfg -f target/at91sam7sx.cfg --command "adapter_khz 10000; init; reset init; flash protect 0 0 7 off; sleep 1; arm7_9 fast_memory_access enable; flash write_bank 0 firmware.bin 0x0; resume; shutdown"
If you encounter an error message like Error: The specified debug interface was not found (ft2232) it may be necessary to use a different version of the config script:
sudo cp /usr/share/openocd/scripts/interface/ftdi/olimex-arm-usb-tiny-h.cfg /usr/share/openocd/scripts/interface/
The command to flash the firmware from firmware.bin via Bus Blaster under Linux is:
openocd -f interface/busblaster.cfg -f target/at91sam7sx.cfg --command "adapter_khz 10000; init; reset init; flash protect 0 0 7 off; sleep 1; arm7_9 fast_memory_access enable; flash write_bank 0 firmware.bin 0x0; resume; shutdown"