Getting Started
Here I will show you basic usage of the framework so you can grasp some sort of workflow.
At the core of Evolve is the module loader. You should require it at the beginning of every script.
local require = require(game:GetService("ReplicatedStorage"):WaitForChild("Evolve"))It's not the prettiest line of code but it allows us to then require our modules very easily.
local CO = require("CustomObjects")The first thing you need to do is make a class. You can easily do this by using the Create Class button in the plugin.
With this opened, we can see a field to name our class and designate specific modules to be visible on Server, Client or have both share the same class(Shared). Parent to selection can be used for creating subclasses.
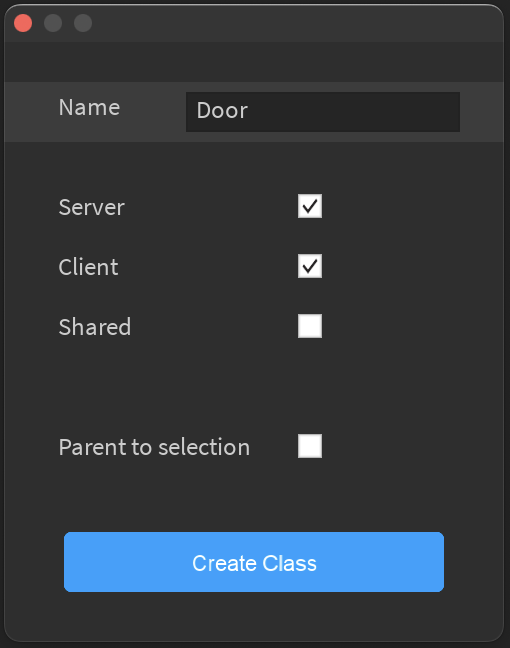
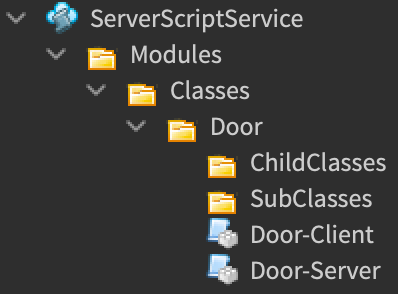
Once clicking Create Class, your selection will be automatically placed on the new class. This operation will create a new Folder and two modules(since we only selected two of the three types).

--Door Class Server Module Script
local Door = {}

local require = require(game:GetService("ReplicatedStorage"):WaitForChild("Evolve")) --Require module loader

local Events = require("Events")

function Door.new(self, Color) --Called every time Custom Object is created.
   self:Initialize() --Schedules `Initialize` function to be called after `new` function returns.
   local newDoor = Instance.new("Part")
   newDoor.BrickColor = Color --Parameters are passed through to this constructor.
   return newDoor --Returns an Instance of which wrapper will be applied to.
end

function Door:Initialize() --Called every time CustomObject is created using this class after 'new' function
                           --if `Initialize` function is called in `new` function or whenever called manually.
   self.OpenStatus = false
end


--Below are user defined properties of the class--

Door.Opened = Events.new("Signal") --Create new Custom Signal

function Door:Open()
   self.OpenStatus = true
   self.Opened:Fire()
end

function Door:Close()
   self.OpenStatus = false
end

function Door:IsOpen()
   return self.OpenStatus
end

return Door--Door Class Client Module Script
local Door = {}
local require = require(game:GetService("ReplicatedStorage"):WaitForChild("Evolve")) --Require module loader
function Door.new(self)
self:Initialize() --Make sure object is automatically initialized after this function.
end
function Door:Initialize() --Called every time CustomObject is created using this class after 'new' function
--if `Initialize` function is called in `new` function or whenever called manually.
print("Door client initialized")
end
function Door:ClientFunction()
print("Door client function called")
end
return DoorYou are half way there! Now we just need to create our Door using the class module we created.
--Some script

local require = require(game:GetService("ReplicatedStorage"):WaitForChild("Evolve")) --Require module loader
local CO = require("CustomObjects") --Require "CustomObjects" module

local redDoor = CO.new("Door",BrickColor.new("Bright Red")) --Returns new Part that is red wrapped with our class!
--This is when 'Initialize' within our class is called.

print(redDoor:IsOpen()) --prints 'false' since we initialized the variable as false in our class.

redDoor:Open()

print(redDoor:IsOpen()) --prints 'true' since variable is set to true in code above.

redDoor.OpenStatus = false --since the variable is assigned as a property of the Door we can skip using the function and set the value ourselves.

print(redDoor:IsOpen()) --prints 'false'Since the above code creates a new CustomObject with our Door class currently parented to nil. Thus, we must parent it to a replicated directory such as workspace to allow the client to synchronize with its state.
--Continuation of script block above

redDoor.Parent = workspace --Parenting Door to workspace(replicated directory) will trigger replication of state to the client

wait(1)
redDoor.Test = true
Now let's get into how we reference our replicated CustomObject on clients.
--Some localscript

local require = require(game:GetService("ReplicatedStorage"):WaitForChild("Evolve")) --Require module loader
local CO = require("CustomObjects") --Require "CustomObjects" module

local redDoor = CO.Wrap(workspace:WaitForChild("Door")) --Without a specific class specified as the second argument, yields-
					                --until Custom Object finished replicating onto client.
                                                        --prints 'Door client initialized'

Door:ClientFunction() --prints 'Door client function called'


print(Door:Await("Test")) --after yield, prints 'true'
Effectively cleaning up CustomObjects on removal is important to avoid memory leaks.
We can do this using a Maid provided through our Initialize function. A fresh Maid is provided whenever the CustomObject is streamed in/created.
Alongside Destroy() and Remove() being called on a CustomObject, it's important to note that parenting a CustomObject to nil also triggers removal related processes(this happens either manually or more commonly when an CustomObject is streamed out).
Here is a simple example preparing a CustomObject for removal:
--Door Class Client Module Script

...

function Door:Initialize(maid)
    ...

    maid:GiveTask(self.Opened:Connect(function() --Giving maid Signal to later clean
       ...
    end)) --Connection will be cleaned when `CustomObject` is streamed out / Destroy()'ed

end