In this project, I set up a complete infrastructure using Docker Compose, creating and managing multiple containerized services including NGINX with SSL/TLS, WordPress with php-fpm, and MariaDB. I learned about containerization, networking, volume management, and secure web service deployment within my own personal virtual machine.
This project allowed me to greatly improve the following skills:
- Functional Documentation
- Container Networking
- Data Persistence Strategies
- Web Stack Deployment
- Containerization
- Web Server Configuration
- Secrets Management
- Container Orchestration
Developers may face a major problem: creating a brilliant programme on their computer, only to realize that it only works on their own computer. To use it elsewhere, they will need to install the necessary dependencies. It’s possible to provide a great script that will install these dependencies, but you can’t assume that the user is on a Mac or Linux, or that they’re running a version of the OS so old that it doesn’t even recognize your dependencies. Containerisation helps to overcome this problem.
Containers are lightweight virtualized environments that package all the dependencies and code an application needs to run into a single text file, which can run the same way on any machine. A container is like a virtual machine but without a kernel (the entire system that enables the virtual machine to run, including the OS, graphics, networking, etc.). In other words, a container contains only the application and its dependencies.
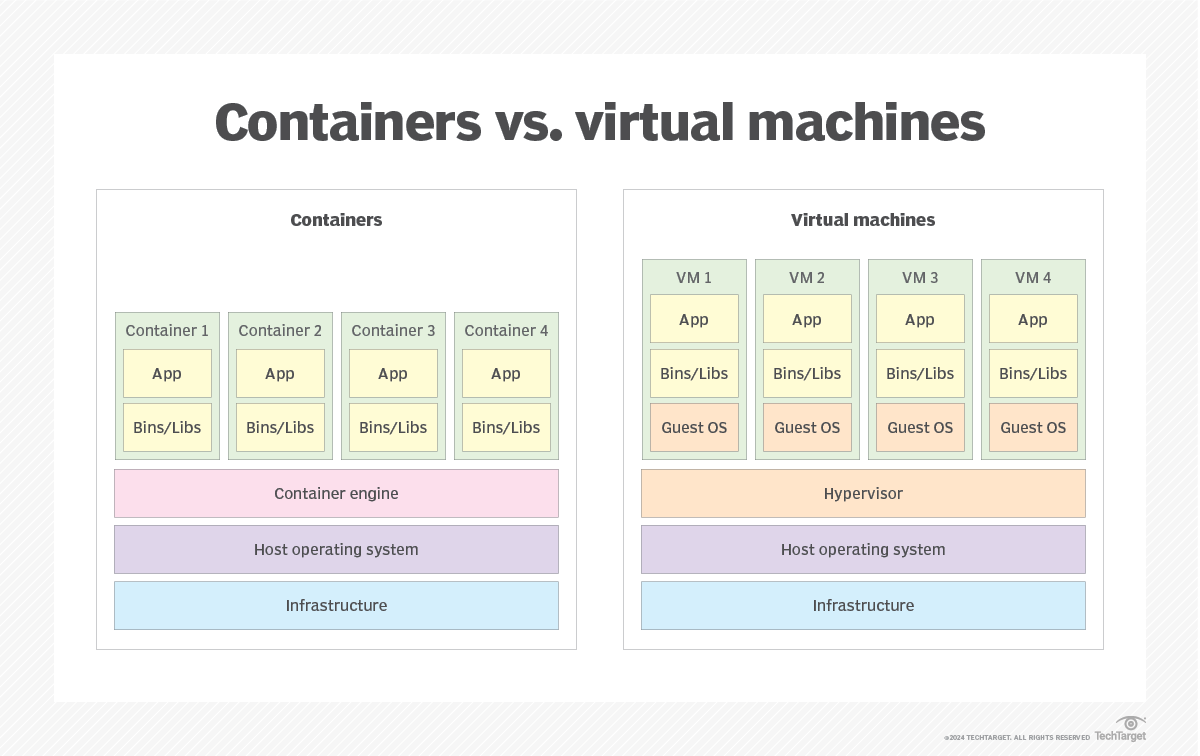
Containers and Virtual machines have similar resource isolation and allocation benefits but function differently because containers virtualise the operating system instead of the hardware. Containers are more portable and efficient. Virtualisation and containerisation are based on different approaches: the former focuses on the infrastructure, whilst the latter focuses on the application. Containerisation does not always replace virtualisation, but it has clearly supplanted it in many modern use cases.
Containers are a simulation at the app layer that packages code and dependencies together. Multiple containers can run on the same machine and share the OS kernel with other containers, each running as isolated processes in user space. Containers take up less space than VMs (talking about tens of MBs in size), can handle more applications, and require fewer VMs and Operating Systems. They are particularly useful when you want to:
- Deploy applications quickly
- Work with microservices
- Automate your environments
- Streamline the transition from dev to prod
Virtual Machines (VMs) are a simulation of physical hardware turning one server into many servers. The hypervisor allows multiple VMs to run on a single machine. Each machine includes a full copy of an operating system, the application, necessary binaries, and libraries. VMs take more space compared to containers (talking about tens of GBs in size), and they can be slow to boot. This approach is suitable for complex or heterogeneous environments, such as:
- Testing multiple versions of an operating system
- Running ‘legacy’ applications in their native environment
- Isolating environments with high security requirements
The effectiveness of containers rely on several key features of the Linux kernel, including namespaces (isolation of resources: network, PID, users...), capabilities (privileges control of root) and cgroups (resources limitation: CPU, memory, I/O...). The combination of namespaces, capabilities and cgroups enables containers to run in an isolated, secure and efficient manner. Namespaces ensure resource isolation, capabilities control process privileges and cgroups manage resource allocation. This combination provides a robust platform for running applications in controlled environments, whilst optimising the use of host resources.
Namespaces are mechanisms in the Linux kernel that create isolated environments for processes. For example, a network namespace provides each container with its own network stack, including interfaces and firewall rules. This isolation ensures that processes within one container cannot see or affect those in another container or on the host.
The namespace mechanism did not originate with containers. The first namespace appeared as early as 2002 in kernel version 2.4.19. The arrival of Docker in 2013 did not, therefore, introduce anything new at the kernel level. Its contribution was to bring together existing building blocks and the image format into a usable tool, whereas previous technologies required considerable system expertise.
Namespaces types The kernel does not provide a single isolation mechanism but rather eight independent namespaces, each of which isolates a specific resource. They can be combined: for example, to isolate the network without isolating the processes. It is this level of granularity that distinguishes a namespace from a virtual machine.
Historically, a Linux process was either run as root (with full privileges) or as a normal user (with no privileges). This binary model presented a simple problem: a web server only needs to open port 80, but to do so it had to start as root, and therefore with the right to do everything – including things it would never actually need to do.
Capabilities break this monolithic block down into around forty independent privileges. On the machine used to write this page, the kernel exposes 41 of them, ranging from CAP_CHOWN to CAP_CHECKPOINT_RESTORE. Each corresponds to a specific check within the kernel: CAP_NET_BIND_SERVICE allows a socket to be bound to a port below 1024, CAP_SYS_TIME allows the system clock to be modified, and CAP_SYS_MODULE allows a kernel module to be loaded.
The benefit can be directly measured in terms of the attack surface. A process that holds only CAP_NET_BIND_SERVICE and is compromised grants the attacker just one additional capability: to open a low-numbered port. The same process run as root would grant the attacker all 41.
A process enters an infinite loop and overloads a core. A service is leaking and consuming all the RAM. Cgroups (control groups) are the mechanism in the Linux kernel that prevents this: they group processes together and set limits on what each group is allowed to consume in terms of CPU, memory, disk I/O and the number of processes. Using cgroups, it is possible to control the amount of CPU, memory or network bandwidth that a container can use, thereby ensuring a fair allocation of resources and preventing any single container from monopolizing the host’s resources.
A container image is a kind of snapshot of an application, ready to be launched in an isolated environment. It contains everything needed for the application to run: code, dependencies, environment variables, configuration files, etc.
These images are built using a recipe file called a Dockerfile. It describes, step by step, how to build your image. This Dockerfile is a simple text file. Each instruction in the Dockerfile creates a layer in the image. These layers are stacked on top of one another and cached, which makes the process:
- Fast (only modified layers are rebuilt)
- Lightweight (layers can be shared across multiple images)
This layer-based approach also saves space and makes updates easier. To optimise the layers, it is recommended to place instructions that rarely change (installing dependencies) at the top of the Dockerfile, and those that change frequently (copying code) at the bottom. This ensures that the cache is reused as much as possible.
To turn a Dockerfile into a runnable container image, we need to use a build tool.
Historically, docker build was used to turn Dockerfile into runnable image, but nowadays there are other, more flexible and modern solutions available. Here are the main tools used:
- Buildah: Developed by Red Hat, it allows you to create daemonless images
- Docker: Widely used in secure or automated environments.
- Kaniko: A tool developed by Google, ideal for building images in non-privileged environments.
- BuildKit: A modern reimplementation of Docker’s build engine. It offers improved parallelism, advanced cache management, support for secret volumes, and much more.
The contribution of these tool was to bring together existing building blocks of contenairisation (namespaces, cgroups, capabilities) and the image format into a usable tool, whereas previous technologies required considerable system expertise. Each tool has its own advantages depending on your context: security, performance, compatibility with CI/CD, etc. For this project, Docker is the tool being used which is ideal for development and learning.
Solomon Hykes launched Docker on 20 March 2013. It was developed for an internal project at dotCloud, a French company and has been distributed as an open-source project since March 2013 and is currently the most widely used containerization engine.
The main advantage of Docker is therefore the ability to model each container as an image that can be stored locally. A container is like a virtual machine but without a kernel (the entire system that enables the virtual machine to run, including the OS, graphics, networking, etc.). In other words, a container contains only the application and its dependencies.
Features of Docker:
- The most popular choice for application containerisation (lot of documentation)
- Uses
containerdin the background to run containers - Works with a central daemon (
dockerd) - Very well integrated into the DevOps ecosystem
- Easy to get started with, even for beginners
Containers have revolutionized application deployment, but they also introduce specific security concerns. Containers share the host's kernel, unlike virtual machines which have their own kernel. A vulnerability in the kernel or an overly privileged container can therefore potentially affect the host and other containers.
Security must therefore be considered at several levels: the host system, the container runtime, the images, the network, the volumes, and the data handled by the applications.
One particularly important aspect is secret management.
A secret is sensitive information that an application needs in order to operate.
Typical examples include:
- Database passwords
- API keys
- SSH private keys
- TLS certificates
- Authentication tokens
There are several ways to provide this information to a container. The simplest one is to use environment variables, but this is not always the safest solution.
The important distinction is that an environment variable is primarily a configuration mechanism, while a secret is sensitive data that should not be exposed : not be stored directly in a Dockerfile, committed to a Git repository, or unnecessarily exposed to containers.
Environment variables are commonly used to configure containers. Inside the container, the application can access these values through its environment. This approach is convenient and perfectly appropriate for many non-sensitive configuration value.
However, using environment variables for passwords and other sensitive information is dangerous. The value becomes part of the container's environment and may potentially be exposed through debugging tools, application diagnostics, process inspection, or other mechanisms.
Another important point is that putting a secret in a Dockerfile is particularly dangerous because the password will be part of the image configuration. Anyone with access to the resulting image may be able to retrieve it. Even if the file is deleted in a later Dockerfile instruction, the previous filesystem layer may still contain the file. Docker images are built from multiple layers, so deleting a secret in a later layer does not necessarily remove it from the image history.
A .env file can contain sensitive data and the Compose file can reference these variables. This is more convenient than hard-coding the values directly in the Compose file, but a .env file is not a secret management system.
Process with variable in .env is a bit more secure than just puting potential sensitive data in environement variable, if the .env file is excluded from Git inside a .gitignore. This is more convenient than hard-coding the values directly in the Compose file, but a .env file is not a secret management system.
For local development, this can be acceptable, however, for sensitive production credentials, a dedicated secret mechanism is preferable.
Docker provides a dedicated mechanism called Docker Secrets. The main idea is simple: instead of putting a password directly into an environment variable or inside an image, Docker provides the secret to the container as a file.
For example, a secret named db_password can be made available inside a container at /run/secrets/db_password. The application can then read the content of this file when it needs the password.
This is safer than baking the password into the image because the secret is not part of the image itself. The access to a secret is also explicitly granted to the services that need it.
Docker's BuildKit also provides a mechanism for handling secrets during the image build process. This is useful when a build needs temporary access to something sensitive, such as a private package repository or authentication token.
The important point is that the secret can be provided temporarily during the build without being written into the resulting image layer.
BuildKit secrets are therefore useful for build-time secrets, while Docker Secrets are primarily intended for runtime secrets.
For this project, Docker Secrets are the more relevant mechanism because the database credentials are needed by running services rather than by the image-building process.
Containers are isolated from each other by default. This isolation also applies to networking.
Each container normally has its own network namespace, which means that it has its own network interfaces, IP addresses, routing table, and network configuration.
Docker provides several network drivers to control how containers communicate with each other and with the host.
For most applications, the default Docker networking model is preferable because it provides a good balance between isolation, simplicity, and performance.
Host networking can be useful for applications that need very direct access to the host network or where avoiding network translation is important, but it reduces network isolation.
A Docker network provides an isolated virtual network that containers can join.
When several containers are connected to the same Docker network, they can communicate with each other without exposing their ports directly to the host.
One of the advantages of a Docker network is Docker's internal DNS. Instead of using an IP address, containers can communicate using the service name defined in Docker Compose. This is important because container IP addresses can change when containers are recreated. The service name remains stable even if the underlying container changes.
A container can communicate with another container through a Docker network without publishing its port to the host. You can only expose the ports that actually need to be accessible from outside the container network.
Docker networking should not be considered a complete security boundary. A network configuration can reduce the attack surface, but it does not replace authentication, encryption, firewalls, or application-level security.
The host network works differently. Instead of giving the container its own isolated network namespace, Docker makes the container use the host's network stack directly. Port publishing is therefore unnecessary for this container.
Containers are designed to be temporary and replaceable. If a container is deleted, the data stored inside is normally deleted with it. This becomes a problem for stateful applications such as MariaDB or WordPress, where data must survive container restarts and recreation.
Docker provides several mechanisms to persist data outside the container's writable layer. Two of the most common are Docker volumes and bind mounts.
A Docker volume is storage managed by Docker itself. The important point is that the application sees: /var/lib/mysql (for a sql database for exemple) as a normal directory, while Docker manages where the data is physically stored on the host.
On a typical Linux installation, Docker-managed volumes are stored somewhere under Docker's data directory, commonly: /var/lib/docker/volumes/.
Volumes are particularly useful when Docker should manage the storage lifecycle. Volumes are well suited for databases and other persistent application data.
A bind mount works differently.
Instead of asking Docker to manage the storage location, we explicitly choose a directory or file on the host and mount it into the container. Docker makes it available inside the container.
Changes made on the host are visible inside the container, and depending on the mount mode, changes made inside the container can also affect the host files.
Bind mounts are useful when the files need to be directly controlled by the host. They are particularly convenient for:
- Development
- Configuration files
- Source code
- Custom NGINX configuration
- Files that need to be edited directly from the host
The configuration can be edited directly on the host without rebuilding the Docker image.
Bind mounts can also be made read-only. This can improve security because the container does not need write access to the host directory. For better security, we have to give a container only the filesystem permissions it actually needs.
~ Come back here later ~
Network: For this project, a regular Docker network is the appropriate choice.
NGINX needs to communicate with WordPress, and WordPress needs to communicate with MariaDB. These services can therefore be placed on dedicated Docker networks.
The host network would provide less isolation and would not bring any significant benefit to this web stack.
MariaDB does not need to be directly accessible from the Internet.
This separation limits the number of services exposed to the outside world and therefore reduces the attack surface.
Volume: In this project, different services have different storage requirements.
MariaDB contains persistent database data, so a Docker volume is appropriate.
NGINX configuration, on the other hand, may benefit from a bind mount during development.
The host owns and edits the NGINX configuration, while Docker manages the database volume.
This gives each type of data an appropriate storage mechanism.
- https://medium.com/@imyzf/inception-3979046d90a0
- https://tuto.grademe.fr/inception/
- https://www.techtarget.com/searchitoperations/definition/application-containerization-app-containerization
- https://devabdilah.medium.com/inception-42-a-comprehensive-guide-to-dockerizing-your-first-infrastructure-part-iii-a10e93e9d922
- A big thanks to Stephane, again: https://blog.stephane-robert.info/docs/conteneurisation/
- https://semaphore.io/blog/docker-secrets-management