Manual Playing the Game
Original 1996 manual, converted verbatim from the game's manual.doc.
When the game windows appear, your first task is to land your space ship on the planet. Find a clearing and click the left mouse button. Your space ship will appear, and your initial vehicles will roll out of it. Your space ship, from now on, serves as your first warehouse, containing all the initial materials (RESOURCES, see below) you will need to get started.
Notes On Placement:
- Before landing, you will notice that your colony has an assigned "area" on the planet surface. This area is diamond shaped and is lit. You cannot land outside of this assigned area (the darker areas). Once you land, you will see that your visibility is reduced to the area surrounding your space ship (see Visibility, below).
- As you get deeper into Enemy Nations™, you will find that the placement of your space ship is critical. You want to put the ship as near to the primary resources as possible. These resources include trees, coal, iron, and oil. Trees are easy to spot. Underground resources can be illuminated by using the SHOW RESOURCES toggle button on the Global Tool Bar (see below).
- The rocket, as all buildings, shows a rectangle where it will be placed/built as well as a single square sticking out which shows where vehicles will exit the building. You can rotate the building placement by pressing the CTRL key and clicking the Right Mouse Button (CTRL-RMB) before placing the building.
To build a strong economy, you will need to harvest many materials from the planet throughout the course of the game, and then convert some of these materials to useable resources.
Lumber
Lumber is needed, among other things, to create buildings. Lumber is harvested by building Lumber Mills near forests. As the Lumber Mill generates lumber, you will see the amount of lumber in the building increase. Trucks will then route the lumber to the appropriate buildings.
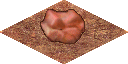
Iron
Iron is harvested from the ground by building an Iron Mine. When transported to a Smelter, Iron will be converted (with Coal) into Steel.
Coal
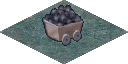
Coal is harvested from the ground by building a Coal Mine. When transported to a Smelter, Coal can be converted (with Iron) into Steel. Coal should also be transported to Coal Power Plants to keep them functional.
Steel
Formed in a Smelter from Iron and Coal, Steel is necessary for creating buildings and vehicles. Steel must be transported to your various factories before it can be used to construction.
Oil
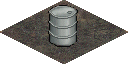
Harvested from the ground with an Oil Well, Oil is converted to gasoline when transported to a Refinery. Oil should also be transported to Oil Power Plants to keep them functional.
Xilitium
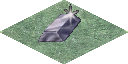
The most precious of minerals, Xilitium is harvested from the ground by building a Xilitium Mine, then used for construction of advanced vehicles. You must conduct extensive research before you will be able to mine or use Xilitium.
The toolbar lies across the bottom of the screen and looks like this. This task bar can be hidden at anytime by pressing CTRL-H and unhidden by pressing CTRL-U.

We will break this into pieces and discuss those pieces. First is the task button bar:

These buttons bring up various windows within the game. For each button it brings it’s window to the top on the screen.
The first button brings up the main map. If you have several main maps open it will bring up the one that most recently had the focus.
The second button brings up the World Map/Radar. (It is the world map until you build a Command Center and then it becomes the Radar.)
The third button brings up your e-mail system. This button is only enabled for multi-player games.
The fourth button brings up the relations window. This button is only enabled if you have an Embassy built. You can also bring up this window by double-clicking on the Embassy.
The fifth button brings up the Current Vehicles window, which is a list of all vehicles that currently exist in your colony. By double clicking on vehicles in this list, you can immediately locate the vehicles and the Area Map will center on your selection. You can also select vehicles with a single click.
The sixth button brings up the Current Buildings window, which is a list of all buildings that currently exist in your colony. By double clicking on buildings in this list, you can immediately locate the buildings and the Area Map will center on your selection. You can also select buildings with a single click.
The seventh button brings up the research window. This window can also be brought up by double-clicking on any Research Institute.
The last button brings up the file dialog. This dialog is where you can save or exit the game, set options, etc.
Next, the global status and clock bars:
The four resource bars in the lower right portion of the Global Tool Bar give you a graphical read-out of your four primary resources. By rolling the cursor (mouse) over a given resource bar, you will receive a text read-out (in the Global status bars) of the current state of that resource. If your colony is in desperate need of a given resource, the appropriate resource bar will begin flashing red.

Good resource management is the key to establishing a successful economy.
Gasoline
Increase gasoline supply to your vehicles by harvesting oil from the ground (with an Oil Well) and routing it (with a Truck) to an Oil Refinery. The Refinery will automatically convert the oil to gasoline. Gasoline is a global resource -- you do not need to manually fuel your vehicles. If you run low on gasoline, your vehicles will move more slowly (Trucks and Cranes a little more slowly; other vehicles a lot more slowly. Ground troops are unaffected by gasoline.)
In addition to powering your vehicles, gasoline is also used to build roads. If you have no gasoline you cannot build roads.
Power
Increase power by building Power Plants. Each Power Plant supplies a fixed amount of power. Your need for power will increase as you create more and more buildings. Power is a global resource -- you do not need to manually supply power to buildings.
Population
The population of your colony will increase automatically over time, and will be reflected by the apartment and office buildings which will become available to you for building. The primary purpose of population is allocation for things like research and driving. In order to maintain a steady increase in population, you will need to make sure adequate housing, office space, and food are provided. By checking the populations of individual apartments and offices, you will know when you need to create additional buildings.
Food
Increase food supply to your colony by building Farms. The larger your population, the more Farms you will need to feed your people.
Clock
The clock gives the elapsed game time. If the game speed is set to normal this will match seconds you have been playing the game.
Message Window
Next is the message window.

This will list messages from the game. Most messages will not remain in this bar for over 30 seconds. All voice messages from the game will also generate a more detailed message here.
Help Window
This window provides information about whatever the cursor is presently over. Examples include;
The cursor over the World Map button:

The cursor over a building (the Spaceship):

This shows the type of unit, the damage level (undamaged here) and the resources it is holding. For a factory it will also show what it is building. For an enemy unit it will show the type of unit, the player that owns it, and the damage level.
The cursor over a global status bar (people):

The cursor over a selected building status bar in the main map (the Spaceship):

The game action takes place in the Main Map.
NOTE: In the early stages of the game, you will see only one large Main Map. The exciting technology of Enemy Nations™ allows you to open additional Main Map windows by holding down CTRL and double-clicking the LMB (left mouse button) on a unit (building or vehicle). The new window, as with all windows, can be re-sized, brought to the front, sent to the back, or closed, allowing you to customize your screen to suit your particular command style. For instance, open a window and center it on your enemy's home base. Shrink the window and put it in the corner, and you have a constant, real-time update of your enemy's progress, without having to scroll rapidly half-way across the planet.
The ability to have these multiple windows is not granted at the beginning of a game, but must be researched by your colony.
Scroll across any Main Map by clicking and holding down the RMB (right mouse button) and moving the mouse to the edges of the Area Map. You will see arrows indicating the direction of the scroll. You can scroll vertically, horizontally, or diagonally. The closer you are to the map edge the faster it will scroll.
You can also center on a location in the main map by a RMB-DBLCLK (DouBLe CLicK) at the location you wish centered.
After landing on the planet, you will be able to see the terrain of the entire planet, but only when you send out scouts will you be able to see activity on the planet -- other colonies' buildings and vehicles. Visibility range (spotting) varies from vehicle to vehicle, and is indicated by a lightening and darkening of the planet's surface. Spotting may also be affected by the type of terrain your vehicles and buildings occupy.
Notes on visibility:
- Visibility is occluded by trees and terrain peaks.
- When an enemy building is no longer visible, it will remain on the screen in its last known state. Even if a building has been destroyed, it will remain displayed in it’s last known state until one of your vehicles can see that location again.
- Some vehicles can shoot farther than they can see and therefore will continue shooting at a building after it has actually been destroyed if no other vehicle can actually see the building.
- In multi-player mode, if a player marks you as an ally, then you will also see everything that player’s buildings and scout vehicles can see.
THE LOCAL TOOL BAR
More sophisticated commands require the Local Tool Bar, which is the row of buttons at the bottom of the Main Map. Depending upon which unit is currently selected, the Local Tool Bar will alter its arrangement of buttons. Below are the possible commands you can execute from the Local Tool Bar (this is the bar with nothing selected):

Last Attack
This will center the last building of yours that was last attacked in the middle of the Main Map window.
Rotate Clockwise
Rotate Counterclockwise
Zoom In
Zoom Out
The above four commands allow you to alter your view of the specific Area Map to which the Local Tool Bar is attached. If you have multiple Area Maps on screen, each can operate at different rotations and zoom levels.
Show Materials
This toggle button will show you the distribution of natural minerals across the surface of the planet. Small icons represent the minerals. An oil drum indicates the presence of oil, a bucket of coal represents coal, an orange chunk of iron represents iron, a shiny bar represents xilitium.
Stop
This button will bring to a halt any construction or routing that is in progress by the selected unit.
Build
If a Crane is selected, the Build button will bring up a Build Building window, allowing you to create new buildings.
SHORT-CUT: The Build Building command can also be achieved by double-LMB-clicking on a Crane.
If a vehicle-producing building is selected (like the Vehicle Factory), the Build button will bring up a Build Vehicle window, allowing you to create new vehicles.
SHORT-CUT: The Build Vehicle command can also be achieved by double-LMB-clicking on a building.
Below is the toolbar when a crane is selected:

Road
If a Crane is selected, the Road icon will allow you to use the Crane to build roads (see section on Roads, below).
Repair
If a Crane is selected, the Repair icon will change the cursor into a hammer. To use the Crane to repair a building, click the hammer on the building.
Other vehicles have a route button instead of Road and Repair.
Route
If the Route button is clicked, the Route window will appear. Trucks will route themselves automatically, based on needs, but you can always interrupt a Truck's route and give it new instructions.
SHORT-CUT: The Route command can also be achieved by double-LMB-clicking on a Truck.
The World Map in the corner is your global look at the planet. Units (yours and your enemies') are represented by colored dots. You can scroll the World Map by pressing the right mouse button (RMB). The four buttons on the World Map allow you to alter the display of the World Map as follows:
Upper left button: Toggles display of natural resources.
Upper right button (radar only): Toggles visible regions.
Lower left button: Toggles display of your units.
Lower right button: Toggles display of enemy units.
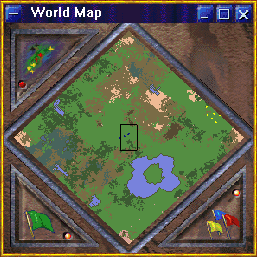
The various colors in the radar denote different terrain types. And the colored dots represent the buildings you have spotted of the various races. If one of your buildings is under attack you will see the building blink red.
The black square in the middle of the map is the part of the world displayed in the Main Map. If you have multiple main maps this is the area displayed in the most recently active main map.
After achieving a certain level of research in the game, you can build a Command Center. With a Command Center you will find that the World Map converts into a Radar, giving you additional functionality. The World Map is static, showing buildings only. The Radar shows visibility and vehicle movement.
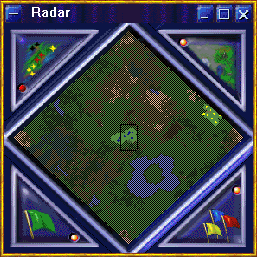
The clear areas are the parts of the world that are presently visible to you. All shaded areas are obscured by fog of war. The area in the center is occupied by the players buildings. The clear area to the right is occupied by a player who is an ally and therefore you can see that area live too.
To build a building you either double click on a crane or select a crane and press the build button on the Main Map toolbar. This will bring up the following dialog:
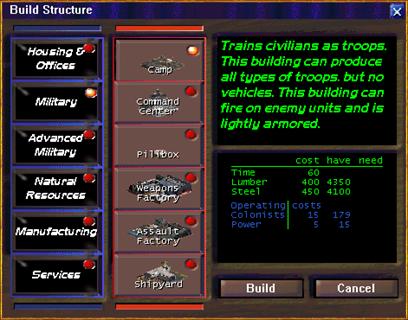
You first pick a category in the left column. Each category will display a different set of choices in the second column. The number of items in the second column is limited by what you have researched (the selection above is after all items have been researched).
For Housing and Offices the choices are set by your population size. As your population grows you will be offered the chance to build bigger buildings.
The section in the upper right describes the building. This gives you a quick rundown about the attributes of each building.
The middle section on the right lists the cost of the building. The first set of numbers tell you how long it will take to build it and how much lumber and steel it will require. The column labeled “have” is how much lumber and steel you have throughout your economy – although it may all be needed elsewhere.
The second set of numbers tells you what is required to run the building. Each building will use colonists and power from the global pool of available people and power. And if you overbuild then all buildings will operate at reduced efficiency.
To actually build the building you either double-click on the building in the second row or press the Build button. You then have to pick the location at which to place the building, just as you landed your rocket.
There is no limitation on where the building is located based on your other buildings, start area, etc. You can build anywhere on the map.
However, you are limited to places where the building can be situated. These restrictions include reasonably flat land, exits vehicles can navigate, etc. If a location is unacceptable, the status bar in the lower left will tell you why and the placement cursor will turn red.
Mines and the lumber mill are a special case. First, they cannot be built unless they are on the necessary resource. In addition, they will measure the relative value of a location and if it is only moderately productive the placement cursor will turn yellow.
The status bar in the lower right will give you a measure of a location’s utility. For a Lumber Mill and Farm this is a 1 - 10 measure with 10 being the most productive possible location.
For Mines it shows the density (0 - 100) and quantity (0-1,000). A more dense location will extract a greater amount of resources per second. A larger quantity will last longer before the mine is exhausted.
To build a vehicle you either double click on the factory or select a factory and press the Build button on the Main Map toolbar. This will bring up the following dialog:
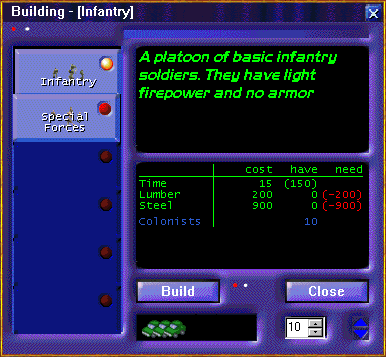
This is the dialog for the Camp but they all look the same. In the column on the left you select the unit you wish to build. In the section in the upper right it describes the selected unit.
The middle section lists the costs to build that unit, and the resources available in that specific building. Please note that this is different from the Build Structure dialog above in that the materials in the “have” column here represent only materials in that building.
In the bottom right you set how many of this unit to build. This can be any number. The cost totals above are for that number of units. The time cost is the time for one unit followed by the time for all of them.
To start construction you either double click on the unit or press the Build button.
Once you start construction of the units, this dialog does not go away. The main map is brought on top of it so if the main map totally obscures the dialog then it will appear to have disappeared but it is still up, just behind the main map.
You can bring it up again after starting construction and construction will continue. If a factory is building units then you will see the following in the dialog:
First, in the caption bar it will list what type of unit is being built. Second, in the bottom middle, the car icons will show how much of the next single unit has been built. (So you can see how long until it is completed.)
Finally, if this window is not active, the number of units to build will be decremented each time a unit is built showing how many units remain to be built. It will only change the number if this dialog is not presently the active (selected) window.
So, you can place this dialog to the side to monitor construction, to place new construction orders without returning to the factory, and to change orders while it is working.
Research is the most important element that will contribute toward the advancement of your colony. Your scientists will be able to conduct research into many different areas, and it is up to you to choose which path(s) you want to take first. For instance, researching Advanced Construction and Manufacturing technologies will increase efficiency in these areas, allowing you to build up more quickly in the long run, but will prevent you from researching Weapons technologies as early as you might like.
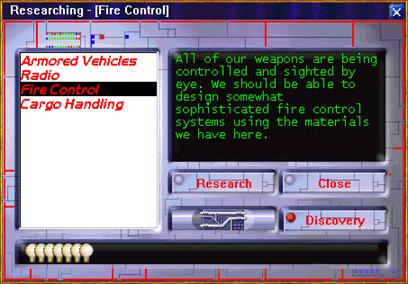
The list in the left-hand column lists those items you can presently research. Each research item may have both previous research items you must complete before researching and specific buildings you must build before it can be researched.
There are also a few research items that are only available in multi-player games because they have no utility in single-player games.
The window on the right explains what the research will achieve. You can click on different items to view their description without affecting what is presently being researched.
To research a given topic you need to either double-click the item in the list or single-click to select it and then press the Research button. That will start researching the selected item.
When an item is being researched, the topic will be listed in the title bar of the window and you will see light bulbs in the status bar across the bottom of the screen.
The amount of time required to research a given topic will be randomly determined each game. However, the rate the light bulbs move across the status bar is always the same for a given topic and the topic will always be discovered by the time the bulbs have gone all the way across.
You can switch topics at any time. When you go back to the old topic you will see that it retains some, but not all of it’s previous progress toward discovery. (In other words you are penalized for bouncing between different topics.)
When a topic is discovered you can press the Discovery button to read exactly what advantage that topic gives you. You can press the Discovery button after starting the next line of research. However, you must press it before the next topic is discovered.
Building multiple Research Institutes will allow you to research individual items more quickly, but will not allow you to research multiple items at once.
The small, colored flags on each unit differentiate one player's units from another's. You cannot change these values. If there are over 6 players (human and computer) then some players will have identical colors (ie. there are only 6 colors of flags).
To control any given unit, the unit must first be selected. To select a unit, move the mouse over it until the cursor changes to a white rectangle. Click on the units once with the left mouse button (LMB). If the unit is a vehicle, a rectangle will appear around the selected unit.
Drag Rectangle: Selecting Multiple Units
To select multiple units, you can click SHIFT-LMB on the additional unit. Or, alternatively, you can select multiple units by clicking/holding the LMB and dragging a rectangle around the group of units you wish to select. When you release the LMB, the units will be selected.
If there is more than one unit in the rectangle, the rectangle will ignore civilian units. If you are selecting a single civilian unit with the rectangle, the rectangle will select that unit.
If you drag the rectangle around a group of units, and hold the CTRL key when releasing the LMB, the rectangle will select all units in the rectangle, civilian or military.
Once selected, units can be controlled using a variety of commands.
Move
To move a selected vehicle(s), simply click the LMB where you want the vehicle(s) to go.
Attack
To attack enemy units (buildings or vehicles), simply click the LMB on the unit you wish to attack. The selected unit(s) will attack your target. (You will notice that, when you place the mouse cursor over an enemy unit, the cursor will change into a target, indicating that the LMB will issue the command to attack.)
NOTE: Not all units are combat units; the Crane, for example, is incapable of attack.
Move Without Attacking
If you wish to move units to an enemy unit without attacking, click CTRL-LMB when choosing the destination. Units will move to the destination but will not attack.
Forced Attack
CTRL-SHIFT-LMB is a "forced attack"; your unit(s) will attack the target, whether it is friendly or not (or even your own!).
INFO BOXES
Each unit (building or vehicle) has an "info box" containing all pertinent information concerning that unit. To view the info box, hold the SHIFT key and click the RMB.
NOTE: The box will remain on the screen as long as your mouse cursor is not moving. To get rid of the box, move the mouse cursor.
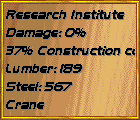
These info boxes are essential to effective game-play. For vehicles, the box indicates precise damage level, as well as (for trucks) materials being transported. For buildings, the box indicates materials which are housed there, with specific amounts, as well as materials needed for construction completion (these numbers will appear in parentheses).
| Key | Action |
|---|---|
| ALT-F4 | Exit the game |
| CTRL-A | Select area map |
| CTRL-B | Bring up buildings list |
| CTRL-D | Bring up diplomacy (relations) window |
| CTRL-M | Bring up mail & chat |
| CTRL-O | Bring up options window |
| CTRL-P | Pause (only the server can pause a multi-player game) |
| CTRL-R | Bring up research window |
| CTRL-S | Save |
| CTRL-V | Bring up vehicles list |
| F1 | Help |
| F2 | Minimize & pause |
| CTRL-F4 | Close selected window |
| CTRL-W | Select world (radar) map |
| Key | Action |
|---|---|
| E | Show enemies |
| R | Show resources |
| U | Show my units |
| V | Show visibility |
| Key | Action |
|---|---|
| B | Build (crane, factories only) |
| O | Drop selected target and fire at best Opportunity target (may be the same unit) |
| R | Bring up route window |
| U | Unload (infantry carrier, landing craft) |
| DEL | Destroy selected units |
| arrow keys | Scroll window |
| ESC | De-select units |
| HOME | Center on selected units (rocket if nothing selected) |
| X | Retreat (to repair center if damaged & one exists) |
| # (0-9) | Assign selected units to that number (a unit can be assigned to multiple numbers) |
| SHIFT-# | Add selected units to the list of units already assigned to that number. |
| CTRL-# | Set selected units to be the units previously saved to that number (This replaces the units previously selected) |
| SHIFT-CTRL-# | Add units previously saved to that number to the units presently selected |
Note: Be careful that you have the proper window type selected. It’s very easy to bang on the ESC key when a window other than the main map is selected and wonder why the vehicles are still selected.