This blog is created on top of langgraph guide.
An agentic or RAG-based solution typically relies on a two-layer memory system that allows an agent or LLM to both stay focused on the current context and retain past experiences.
- Short-term memory manages immediate information within an active session or conversation.
- Long-term memory stores and retrieves knowledge across sessions, enabling continuity and learning over time.
Together, these layers make the agent appear more coherent, context-aware, and intelligent. Let’s visualize where the memory component fits within a modern AI architecture
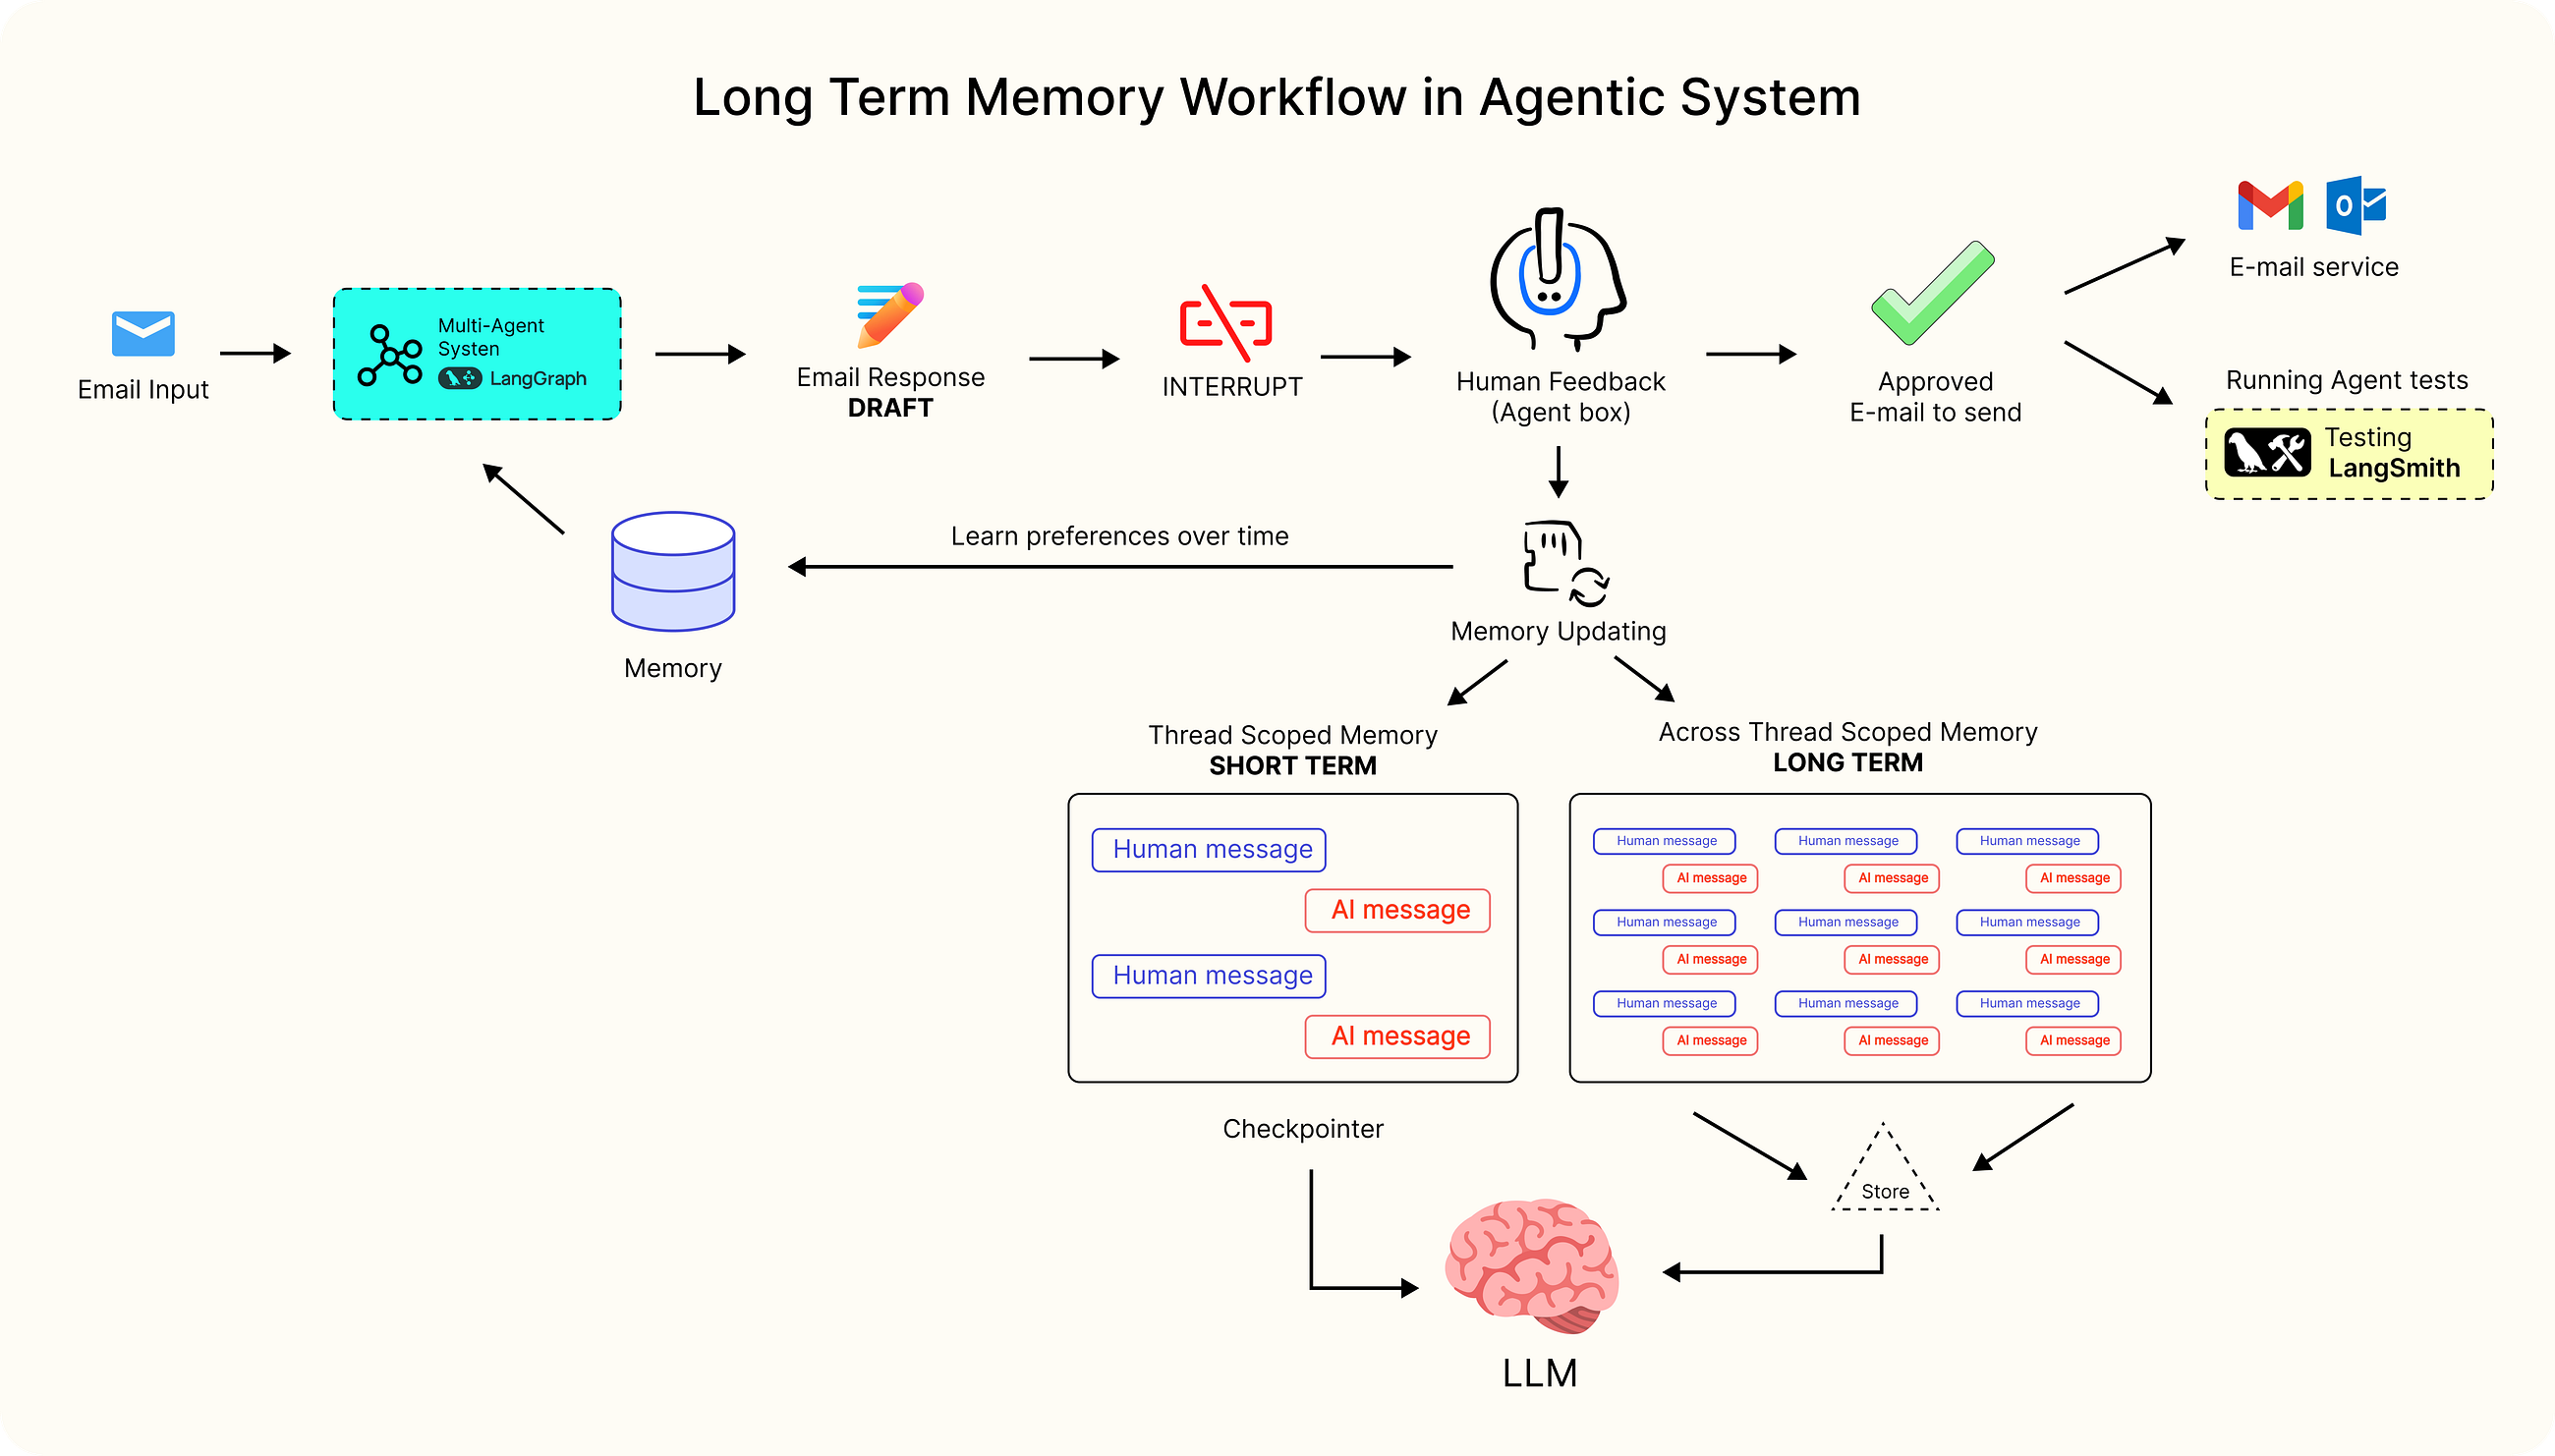
Let’s understand both of these memory layers:
This memory works inside one conversation thread. It keeps track of what has already happened messages, uploaded files, retrieved documents, and anything else the agent interacts with during that session.
You can think of it as the agent “working memory”. It helps the agent understand context and continue a discussion naturally without losing track of earlier steps. LangGraph manages this memory automatically, saving progress through checkpoints. Once the conversation ends, this short-term memory is cleared, and the next session starts fresh.
The second type of memory is designed to last more than a single chat. This long-term memory stores information that the agent might need to remember across multiple sessions like user preferences, earlier decisions, or important facts learned along the way.
LangGraph saves this data as JSON documents inside a memory store. The information is neatly organized using namespaces (which act like folders) and keys (which act like filenames). Because this memory does not disappear after a conversation, the agent can build up knowledge over time and provide more consistent and personalized responses.
In this blog, we are going to explore how a production-grade AI system manages long-term memory flow using LangGraph, a popular framework for building scalable and context-aware AI workflows.
- Implementing Long Term Memory in Agentic AI
- 1. Thread-Level Memory (Short-Term)
- 2. Cross-Thread Memory (Long-Term)
- Table of Content
- LangGraph Data Persistence Layer
- Working with InMemory Feature
- Building the Agentic Architecture
- Memory Functions and Graph Nodes
- Capturing Feedback Using Human-in-the-Loop
- Assembling the Graph WorkFlow
- Testing the Agent with Memory
- How is the Long-Term Memory System Working?
LangGraph is the most favorable component for handling memories in agents, and one of the most common features is the Store feature in LangGraph, which manages how memory is saved, retrieved, and updated, depending on where you are running your project.
LangGraph provides different types of store implementations that balance simplicity, persistence, and scalability. Each option is suited to a specific stage of development or deployment.
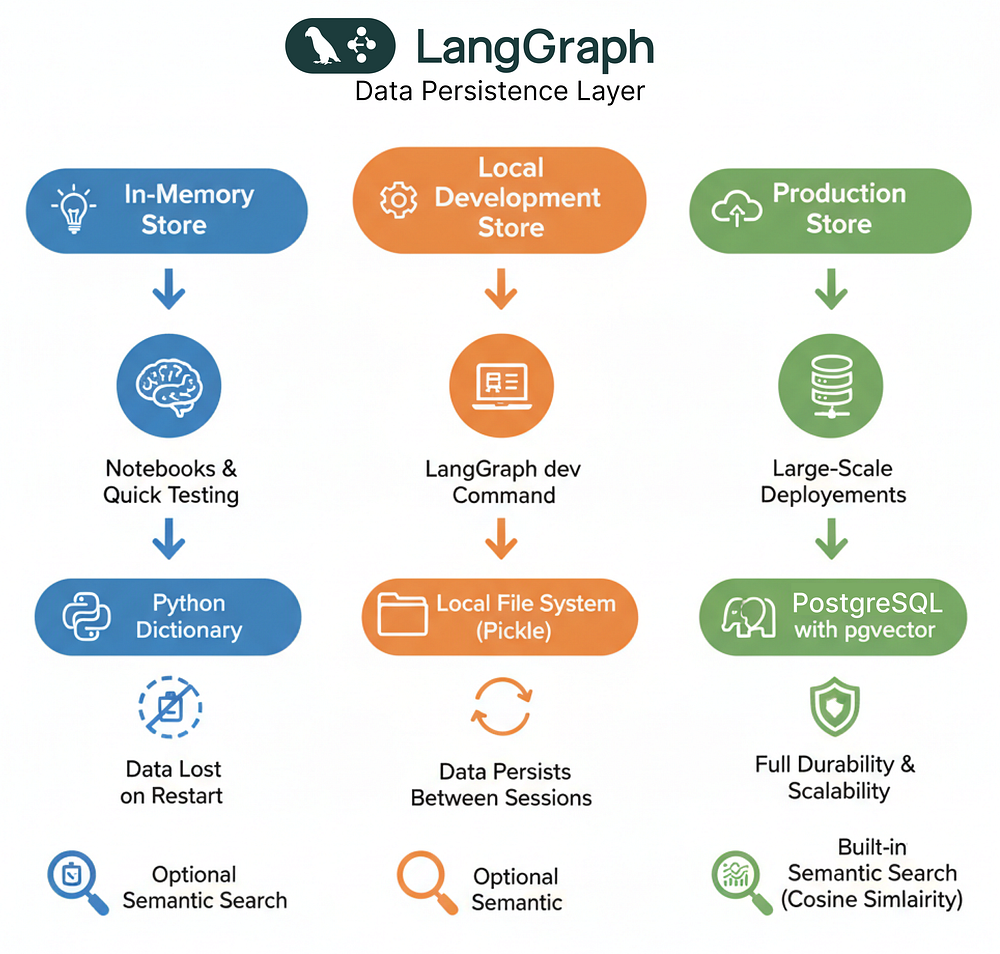
Let’s understand how and when to use each type accordingly.
This is the simplest store option and is ideal for short experiments or demonstrations.
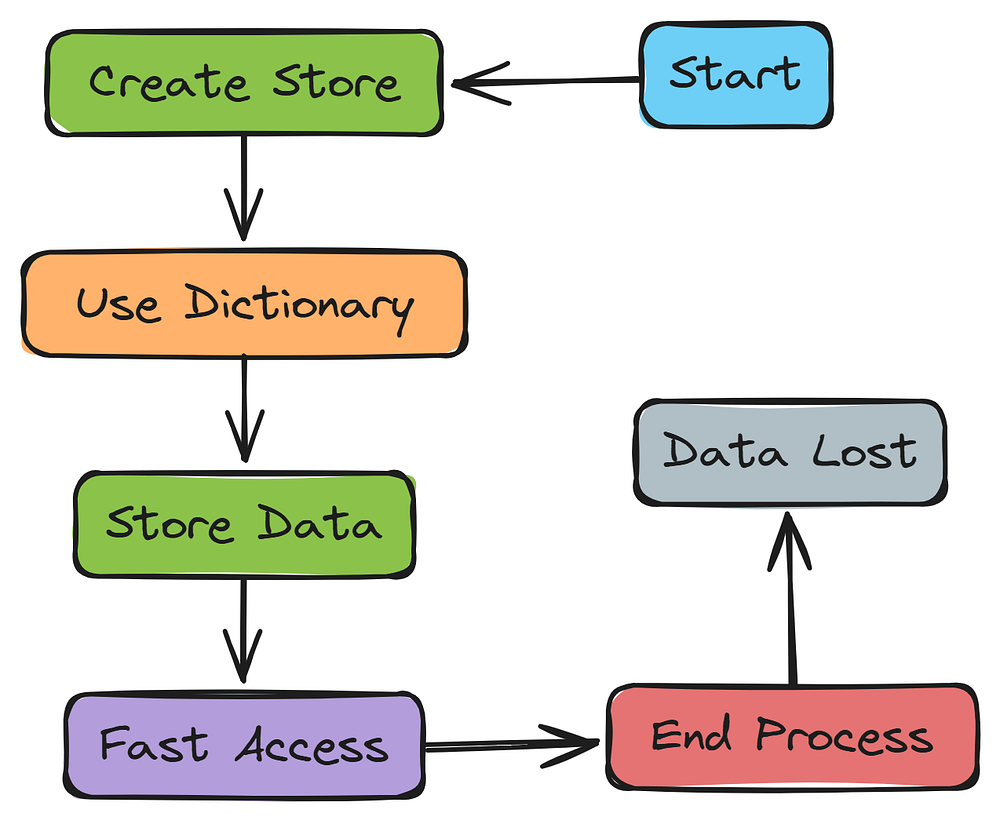
- It uses the import statement
from langgraph.store.memory import InMemoryStore, which creates a store that runs entirely in memory using a standard Python dictionary. - Since it does not write data to disk, all information is lost when the process ends. However, it is very fast and easy to use, making it perfect for testing workflows or trying out new graph configurations.
- If needed, semantic search capabilities can also be added, as described in the semantic search guide.
This option behaves similarly to the in-memory version but includes basic persistence between sessions.
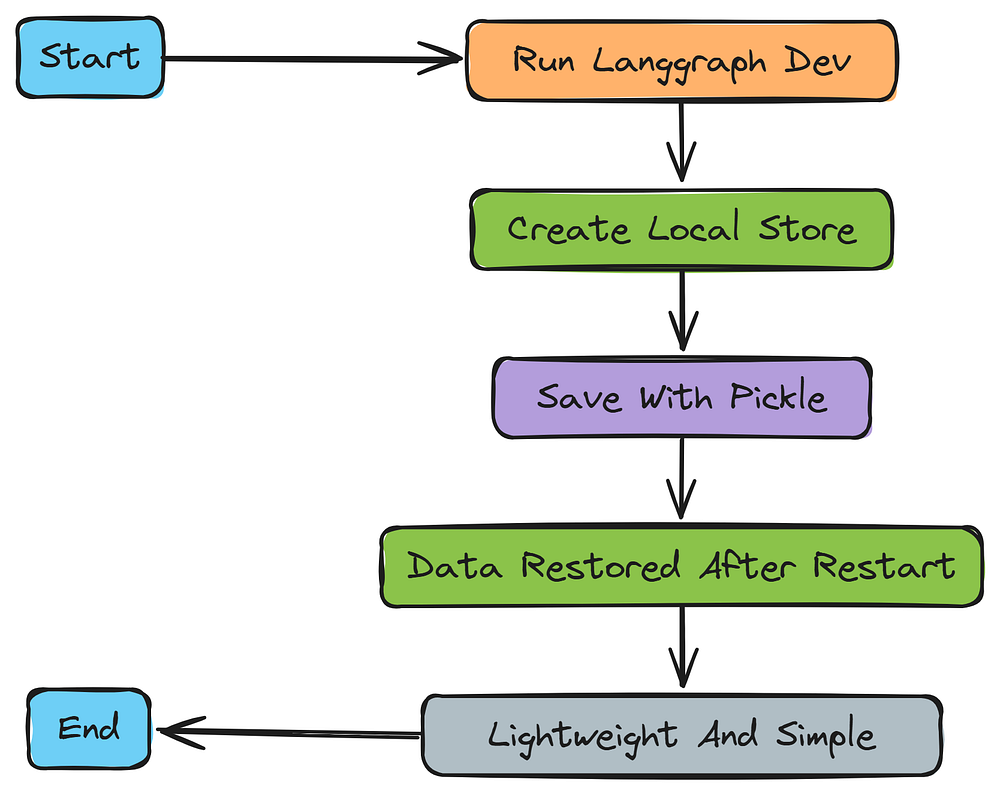
- When you run your application with the
langgraph devcommand, LangGraph automatically saves the store to your local file system using Python’s pickle format. This means your data is restored after restarting the development environment. - It is lightweight and convenient, requiring no external database. You can still enable semantic search features if you need them, as explained in the semantic search documentation.
- This setup is well suited for development work but is not intended for production environments.
For large-scale or production deployments, LangGraph uses a PostgreSQL database integrated with pgvector for efficient vector storage and semantic retrieval.
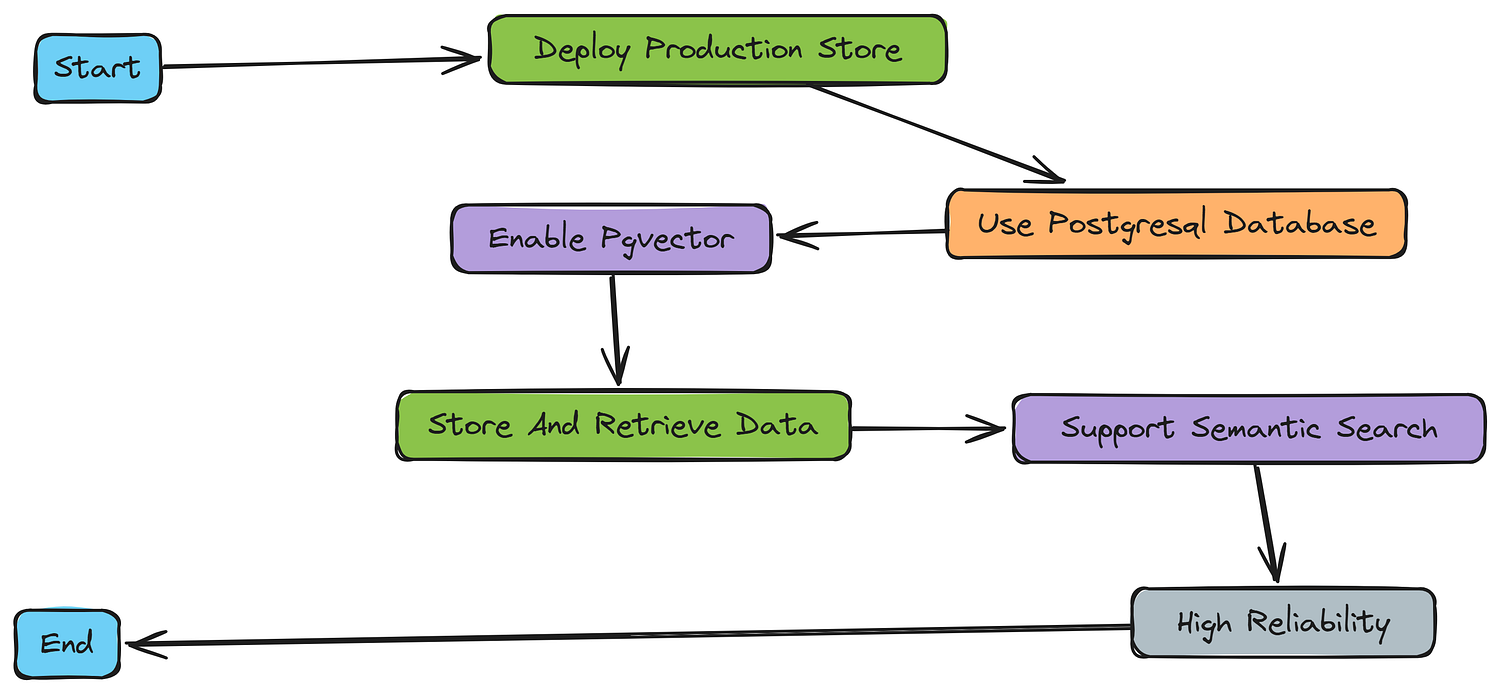
- This setup provides full data persistence, built-in reliability, and the ability to handle larger workloads or multi-user systems.
- Semantic search is supported out of the box, and the default similarity metric is cosine similarity, though you can customize it to meet specific needs.
- This configuration ensures your memory data is stored securely and remains available across sessions, even under high traffic or distributed workloads.
Now that we have understood the basics, we can start coding the entire working architecture step by step.
The category we will be implementing in this blog is the InMemory feature, which is the most common approach of managing memory in AI based system.
It works in a sequential way and is useful when building or testing a technical process step by step.
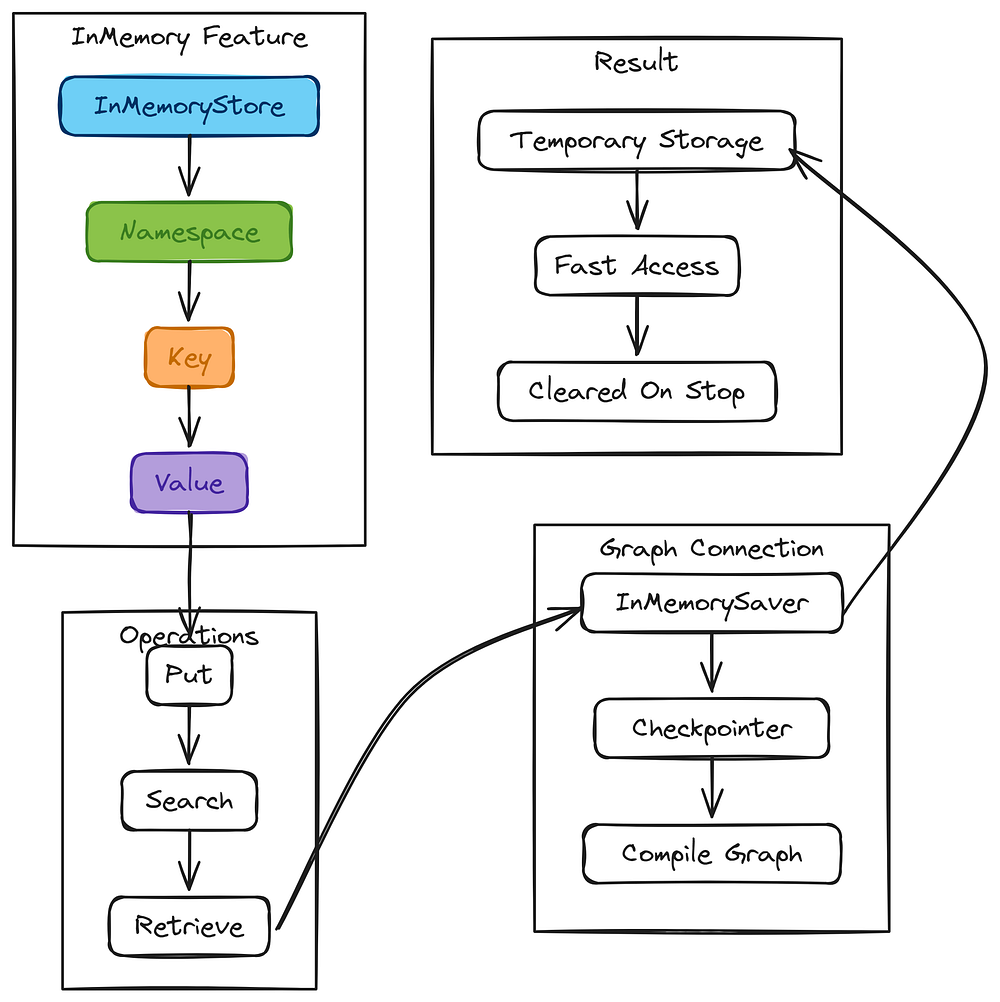
It allows us to store data temporarily while running the code and helps in understanding how memory handling works in LangGraph.
We can start by importing the InMemoryStore from LangGraph. This class lets us store memories directly in memory without any external database or file system.
# Import the InMemoryStore class for storing memories in memory (no persistence)
from langgraph.store.memory import InMemoryStore

# Initialize an in-memory store instance for use in this notebook
in_memory_store = InMemoryStore()
Here, we are basically creating an instance of the InMemoryStore. This will hold our temporary data as we work through the examples. Since this runs only in memory, all the stored data will be cleared once the process stops.
Every memory in LangGraph is saved inside something called a namespace.
A namespace is like a label or folder that helps organize memories. It is defined as a tuple and can have one or more parts. In this example, we are using a tuple that includes a user ID and a tag called "memories".
# Define a user ID for memory storage
user_id = "1"

# Set the namespace for storing and retrieving memories
namespace_for_memory = (user_id, "memories")
The namespace can represent anything, it does not always have to be based on a user ID. You can use it to group memories however you want, depending on the structure of your application.
Next, we save a memory into the store. For that, we use the put method. This method needs three things: the namespace, a unique key, and the actual memory value.
Here, the key will be a unique identifier generated with the uuid library, and the memory value will be a dictionary that stores some information in this case, a simple preference.
import uuid

# Generate a unique ID for the memory
memory_id = str(uuid.uuid4())

# Create a memory dictionary
memory = {"food_preference": "I like pizza"}

# Save the memory in the defined namespace
in_memory_store.put(namespace_for_memory, memory_id, memory)
This adds our memory entry into the in-memory store under the namespace we defined earlier.
Once we have stored the memory, we can get it back using the search method. This method looks inside the namespace and returns all memories that belong to it as a list.
Each memory is an Item object, which contains details like its namespace, key, value, and timestamps. We can convert it to a dictionary to see the data more clearly.
# Retrieve all stored memories for the given namespace
memories = in_memory_store.search(namespace_for_memory)

# View the latest memory
memories[-1].dict()
When we run this code in our notebook, we got the following output:
###### OUTPUT ######
{
 'namespace': ['1', 'memories'],
 'key': 'c8619cd4-3d3f-4108-857c-5c8c12f39e87',
 'value': {'food_preference': 'I like pizza'},
 'created_at': '2025-10-08T15:46:16.531625+00:00',
 'updated_at': '2025-10-08T15:46:16.531625+00:00',
 'score': None
}
The output shows the stored memory details. The most important part here is the value field, which contains the actual information we saved. The other fields help in identifying and managing when and where the memory was created.
Once the store is ready, we can connect it to a graph so that memory and checkpointing work together. We use two main components here:
- InMemorySaver for managing checkpoints between threads.
- InMemoryStore for storing across-thread memory.
# To enable threads (conversations)
from langgraph.checkpoint.memory import InMemorySaver
checkpointer = InMemorySaver()

# To enable across-thread memory
from langgraph.store.memory import InMemoryStore
in_memory_store = InMemoryStore()

# Compile the graph with the checkpointer and store
# graph = graph.compile(checkpointer=checkpointer, store=in_memory_store)
It enables the graph to remember conversation context within threads (short-term) and to retain important information across threads (long-term) using the same in-memory mechanism.
It is a simple and effective way to test how memory behaves before moving to a production-grade store.
Before we can see our memory system worflow, we need to build the intelligent agent that will use it. Since this guide focuses on memory management, we’ll construct a moderately complex email assistant. This will allow us to explore how memory works in a realistic scenario.
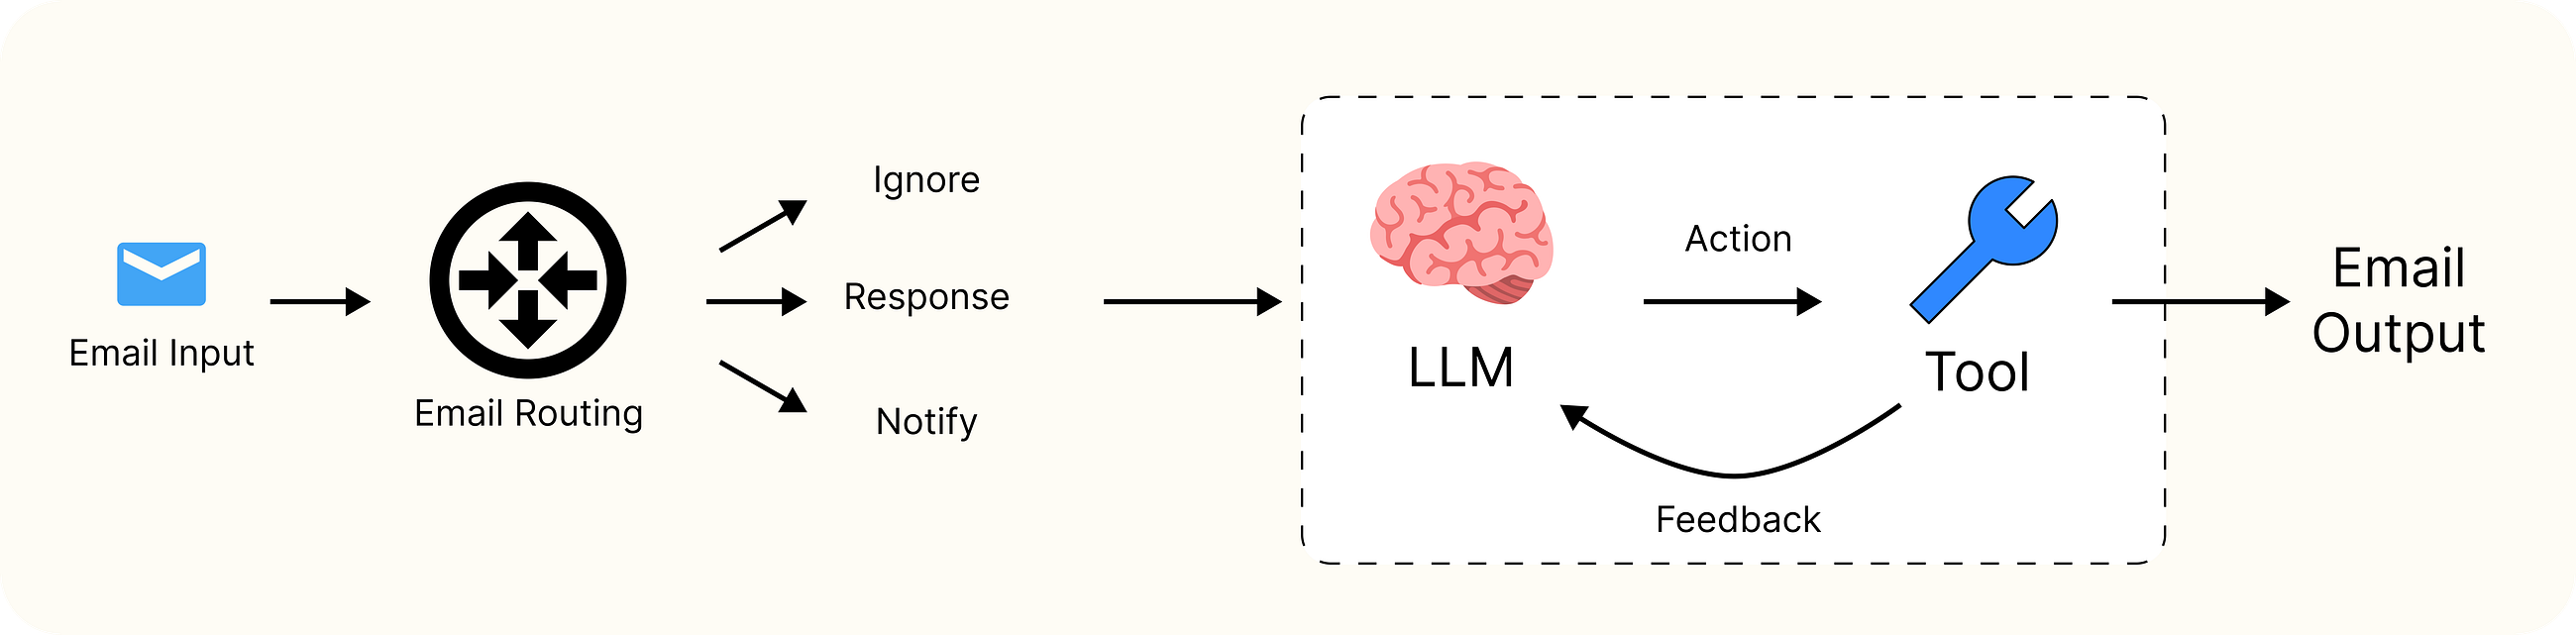
We will build this system from the ground up, defining its data structures, its “brain” (the prompts), and its capabilities (the tools). By the end, we will have an agent that not only responds to emails but also learns from our feedback.
To process any data, we need to define its shape. Schemas are the blueprint for our agent information flow, they make sure that everything is structured, predictable, and type-safe.
First, we will code the RouterSchema. The reason we need this is to make our initial triage step reliable.We can't risk the LLM returning unstructured text when we expect a clear decision.
This Pydantic model will force the LLM to give us a clean JSON object containing its reasoning and a classification that is strictly one of 'ignore', 'respond', or 'notify'.
# Import the necessary libraries from Pydantic and Python's typing module
from pydantic import BaseModel, Field
from typing_extensions import TypedDict, Literal

# Define a Pydantic model for our router's structured output.
class RouterSchema(BaseModel):
    """Analyze the unread email and route it according to its content."""

    # Add a field for the LLM to explain its step-by-step reasoning.
    reasoning: str = Field(description="Step-by-step reasoning behind the classification.")

    # Add a field to hold the final classification.
    # The `Literal` type restricts the output to one of these three specific strings.
    classification: Literal["ignore", "respond", "notify"] = Field(
        description="The classification of an email."
    )
We are creating a contract for our triage LLM. When we pair this with LangChain .with_structured_output() method later on, we guarantee that the output will be a predictable Python object we can work with, making the logic in our graph far more robust.
Next, we need a place to store all the information for a single run of our agent. This is the purpose of the State. It acts as a central whiteboard that every part of our graph can read from and write to.
# Import the base state class from LangGraph
from langgraph.graph import MessagesState

# Define the central state object for our graph.
class State(MessagesState):
    # This field will hold the initial raw email data.
    email_input: dict

    # This field will store the decision made by our triage router.
    classification_decision: Literal["ignore", "respond", "notify"]
We inherit from LangGraph MessagesState, which automatically gives us a messages list to track the conversation history. We then add our own custom fields. As the process moves from node to node, this State object will be passed along, accumulating information.
Finally, we will define a small but important StateInput schema to define what the very first input to our graph should look like.
# Define a TypedDict for the initial input to our entire workflow.
class StateInput(TypedDict):
    # The workflow must be started with a dictionary containing an 'email_input' key.
    email_input: dict
This simple schema provides clarity and type-safety right from the entry point of our application, ensuring that any call to our graph starts with the correct data structure.
We are using a prompting approach that will instruct and guide the LLM behavior. For our agent, we will define several prompts, each for a specific job.
Before the agent has learned anything from us, it needs a baseline set of instructions. These default strings will be loaded into the memory store on the very first run, giving the agent a starting point for its behavior.
First, let’s define the default_background to give our agent a persona.
# Define a default persona for the agent.
default_background = """
I'm Lance, a software engineer at LangChain.
"""
Next, the default_triage_instructions. These are the initial rules our triage router will follow to classify emails.
# Define the initial rules for the triage LLM.
default_triage_instructions = """
Emails that are not worth responding to:
- Marketing newsletters and promotional emails
- Spam or suspicious emails
- CC'd on FYI threads with no direct questions

Emails that require notification but no response:
- Team member out sick or on vacation
- Build system notifications or deployments
Emails that require a response:
- Direct questions from team members
- Meeting requests requiring confirmation
"""
Now, the default_response_preferences, which define the agent's initial writing style.
# Define the default preferences for how the agent should compose emails.
default_response_preferences = """
Use professional and concise language.
If the e-mail mentions a deadline, make sure to explicitly acknowledge
and reference the deadline in your response.

When responding to meeting scheduling requests:
- If times are proposed, verify calendar availability and commit to one.
- If no times are proposed, check your calendar and propose multiple options.
"""
And finally, default_cal_preferences to guide its scheduling behavior.
# Define the default preferences for scheduling meetings.
default_cal_preferences = """
30 minute meetings are preferred, but 15 minute meetings are also acceptable.
"""
Now we create the prompts that will use these defaults. First is the triage_system_prompt.
# Define the system prompt for the initial triage step.
triage_system_prompt = """

< Role >
Your role is to triage incoming emails based on background and instructions.
</ Role >

< Background >
{background}
</ Background >

< Instructions >
Categorize each email into IGNORE, NOTIFY, or RESPOND.
</ Instructions >

< Rules >
{triage_instructions}
</ Rules >
"""
This prompt template gives our triage router its role and instructions. The {background} and {triage_instructions} placeholders will be filled with the default strings we just defined.
Next is the triage_user_prompt , it’s a simple template used to structure the raw email content into a clean format that the LLM can easily parse.
# Define the user prompt for triage, which will format the raw email.
triage_user_prompt = """
Please determine how to handle the following email:
From: {author}
To: {to}
Subject: {subject}
{email_thread}"""
Now for the main component we have to create a agent_system_prompt_hitl_memory as it will contain the role and other kind of instructions that we have coded so far.
# Import the datetime library to include the current date in the prompt.
from datetime import datetime

# Define the main system prompt for the response agent.
agent_system_prompt_hitl_memory = """
< Role >
You are a top-notch executive assistant.
</ Role >

< Tools >
You have access to the following tools: {tools_prompt}
</ Tools >

< Instructions >
1. Analyze the email content carefully.
2. Always call one tool at a time until the task is complete.
3. Use Question to ask the user for clarification.
4. Draft emails using write_email.
5. For meetings, check availability and schedule accordingly.
   - Today's date is """ + datetime.now().strftime("%Y-%m-%d") + """
6. After sending emails, use the Done tool.
</ Instructions >

< Background >
{background}
</ Background >

< Response Preferences >
{response_preferences}
</ Response Preferences >

< Calendar Preferences >
{cal_preferences}
</ Calendar Preferences >
"""
This is the master instruction set for our main response agent. The placeholders like {response_preferences} and {cal_preferences} are the key to our memory system.
They allow us to dynamically inject the agent learned knowledge from the memory store, enabling it to adapt its behavior over time.
To make the agent to improve, we define special prompts for a dedicated “memory manager” LLM. Its only job is to update the memory store safely and intelligently.
# Define the system prompt for our specialized memory update manager LLM.
MEMORY_UPDATE_INSTRUCTIONS = """
# Role
You are a memory profile manager for an email assistant.

# Rules
- NEVER overwrite the entire profile
- ONLY add new information
- ONLY update facts contradicted by feedback
- PRESERVE all other information

# Reasoning Steps
1. Analyze the current memory profile.
2. Review feedback messages.
3. Extract relevant preferences.
4. Compare to existing profile.
5. Identify facts to update.
6. Preserve everything else.
7. Output updated profile.

# Process current profile for {namespace}
<memory_profile>
{current_profile}
</memory_profile>
"""
The MEMORY_UPDATE_INSTRUCTIONS prompt is highly structured, with strict rules which are to never overwrite, only make targeted additions, and preserve existing information. This approach is important for preventing the agent memory from being corrupted.
# Define a reinforcement prompt to remind the LLM of the most critical rules.
MEMORY_UPDATE_INSTRUCTIONS_REINFORCEMENT = """
Remember:
- NEVER overwrite the entire profile
- ONLY make targeted additions
- ONLY update specific facts contradicted by feedback
- PRESERVE all other information
"""
The MEMORY_UPDATE_INSTRUCTIONS_REINFORCEMENT is a modern prompt engineering technique. It’s a concise summary of the most critical rules that we will append to our message when asking the LLM to update memory. Repeating key instructions helps ensure the LLM adheres to them.
Now that our agent has its instructions, we need to give it the ability to take action. We’ll define the Python functions that serve as its tools, along with a few helper utilities to keep our main code clean and organized.
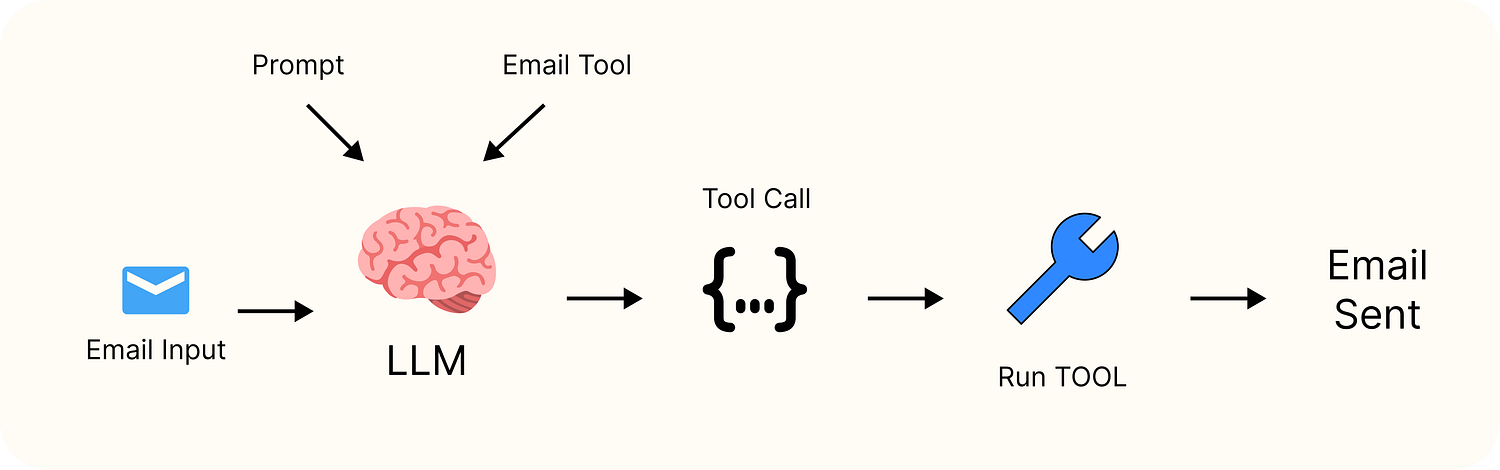
Before we write the actual tool functions, we need a simple text description of them. This is what the agent will “see” inside its main prompt, allowing it to understand what tools are available and how to use them.
# A simple string describing the available tools for the LLM.
HITL_MEMORY_TOOLS_PROMPT = """
1. write_email(to, subject, content) - Send emails to specified recipients
2. schedule_meeting(attendees, subject, duration_minutes, preferred_day, start_time) - Schedule calendar meetings
3. check_calendar_availability(day) - Check available time slots
4. Question(content) - Ask follow-up questions
5. Done - Mark the email as sent
"""
This string is not executable code itself. Instead, it serves as documentation for the LLM. It will be inserted into the {tools_prompt} placeholder in our main agent_system_prompt_hitl_memory. This is how the agent knows, for example, that the write_email function exists and requires to, subject, and content arguments.
Every good project has a utils.py file to house helper functions that perform common, repetitive tasks. This keeps our main graph logic clean and focused on the workflow itself.
First, we need a function to parse the initial email input.
# This utility unpacks the email input dictionary for easier access.
def parse_email(email_input: dict) -> tuple[str, str, str, str]:
    """Parse an email input dictionary into its constituent parts."""

    # Return a tuple containing the author, recipient, subject, and body of the email.
    return (
        email_input["author"],
        email_input["to"],
        email_input["subject"],
        email_input["email_thread"],
    )
The parse_email function is a simple unpacker for our input dictionary. While we could access email_input["author"] directly in our graph nodes, this helper makes the code more readable and centralizes the parsing logic.
Next, a function to format the email content into Markdown for the LLM.
# This function formats the raw email data into clean markdown for the LLM.
def format_email_markdown(subject, author, to, email_thread):
    """Format email details into a nicely formatted markdown string."""

    # Use f-string formatting to create a structured string with clear labels.
    return f"""
             **Subject**: {subject}
             **From**: {author}
             **To**: {to}
             {email_thread}
             ---
             """
The format_email_markdown function takes the parsed email parts and arranges them into a clean, Markdown-formatted block. This structured format is easier for an LLM to parse than a raw, unstructured string, helping it to better understand the different components of the email (who it's from, the subject, the body).
Finally, we need a function to format the agent’s proposed actions for a human reviewer.
# This function creates a human-friendly view of a tool call for the HITL interface.
def format_for_display(tool_call: dict) -> str:
    """Format a tool call into a readable string for the user."""

    # Initialize an empty string to build our display.
    display = ""

    # Use conditional logic to create custom, readable formats for our main tools.
    if tool_call["name"] == "write_email":
        display += f'# Email Draft\n\n**To**: {tool_call["args"].get("to")}\n**Subject**: {tool_call["args"].get("subject")}\n\n{tool_call["args"].get("content")}'
    elif tool_call["name"] == "schedule_meeting":
        display += f'# Calendar Invite\n\n**Meeting**: {tool_call["args"].get("subject")}\n**Attendees**: {", ".join(tool_call["args"].get("attendees"))}'
    elif tool_call["name"] == "Question":
        display += f'# Question for User\n\n{tool_call["args"].get("content")}'
    # Provide a generic fallback for any other tools.
    else:
        display += f'# Tool Call: {tool_call["name"]}\n\nArguments:\n{tool_call["args"]}'

    # Return the final formatted string.
    return display
This format_for_display function is important for the Human-in-the-Loop (HITL) step. When our agent proposes a tool call, like write_email, we don't want to show the human reviewer a raw JSON object.
This function transforms that technical representation into something that looks like an actual email draft or calendar invite, making it much easier for the user to review, edit, or approve.
With our schemas, prompts, and utilities all defined, we are now ready to assemble them into a complete graph and bring our learning agent to life.
From now on we will be implementing the memory logic and will see how everything is working. So in this section we will implement.
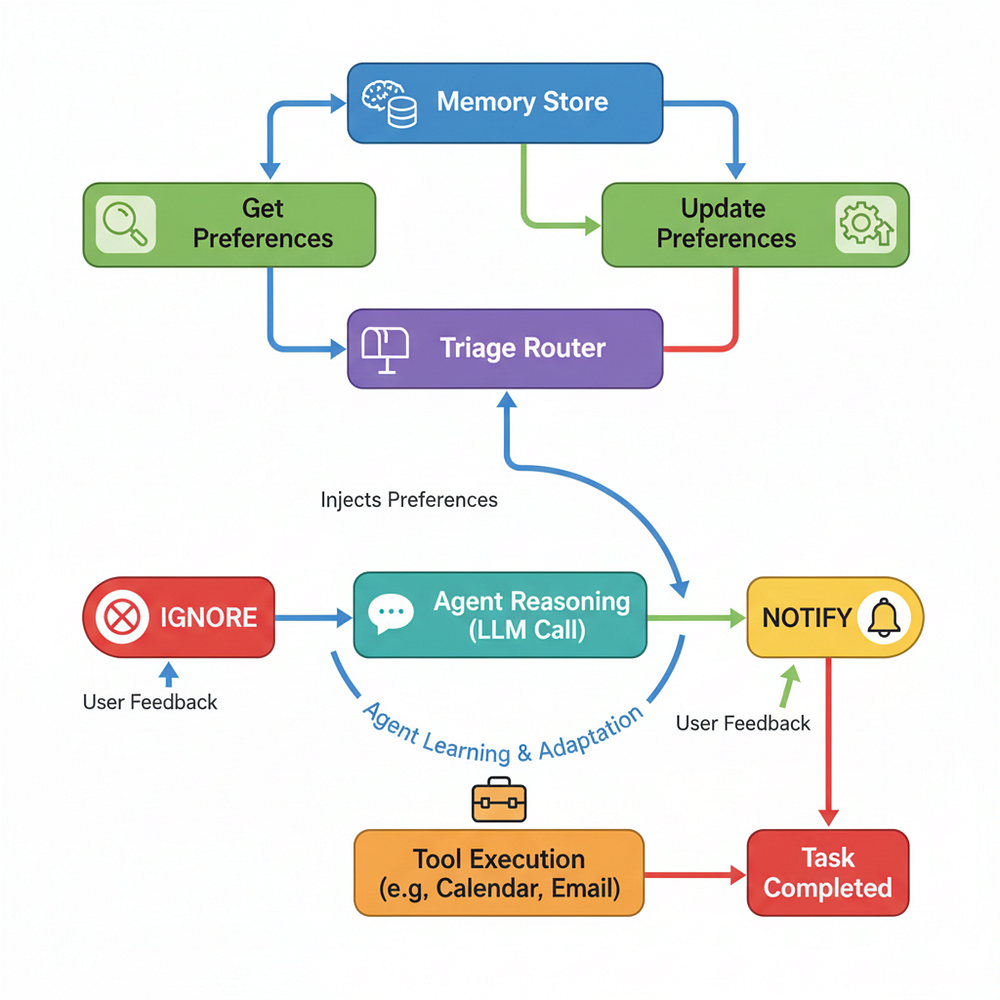
- Implement the core functions that read from and write to our memory store.
- Define the main nodes of our LangGraph workflow.
- Show how memory is injected into the agent’s reasoning process.
- Explain how user feedback is captured to make the agent smarter over time.
This is where our agent transitions from a static set of instructions to a dynamic system capable of learning.
Before we can build the graph nodes that use memory, we need the functions that will actually interact with our InMemoryStore. We'll create two key functions: one to get existing preferences and another to update them based on feedback.
First, we need a reliable way to fetch preferences from our store. We’ll write a function called get_memory. This function will look for a specific preference (like "triage_preferences") in the store. If it finds it, it returns the stored value.
If it doesn't which will happen on the very first run for a user—it will create the entry using the default content we defined earlier. This ensures our agent always has a set of rules to follow.
# A function to retrieve memory from the store or initialize it with defaults.
def get_memory(store, namespace, default_content=None):
    """Get memory from the store or initialize with default if it doesn't exist."""

    # Use the store's .get() method to search for an item with a specific key.
    user_preferences = store.get(namespace, "user_preferences")

    # If the item exists, return its value (the stored string).
    if user_preferences:
        return user_preferences.value

    # If the item does not exist, this is the first time we're accessing this memory.
    else:
        # Use the store's .put() method to create the memory item with default content.
        store.put(namespace, "user_preferences", default_content)
        # Return the default content to be used in this run.
        return default_content
This simple function is incredibly powerful. It abstracts away the logic of checking for and initializing memory. Any node in our graph can now call get_memory to get the most up-to-date user preferences without needing to know if it's the first run or the hundredth.
This is where the agent’s learning is triggered. The update_memory function is designed to take user feedback like an edited email or a natural language instruction and use it to refine the agent's stored knowledge. It orchestrates a special-purpose LLM call using the MEMORY_UPDATE_INSTRUCTIONS prompt we crafted earlier.
To make sure the LLM output is predictable, we will first define a UserPreferences Pydantic schema. This will force the memory manager LLM to return a JSON object containing both its reasoning and the final, updated preference string.
# A Pydantic model to structure the output of our memory update LLM call.
class UserPreferences(BaseModel):
    """Updated user preferences based on user's feedback."""

    # A field for the LLM to explain its reasoning, useful for debugging.
    chain_of_thought: str = Field(description="Reasoning about which user preferences need to add / update if required")

    # The final, updated string of user preferences.
    user_preferences: str = Field(description="Updated user preferences")
Now, we can write the update_memory function itself. It will retrieve the current preferences, combine them with the user's feedback and our special prompt, and then save the LLM's refined output back into the store.
# Import AIMessage to help filter messages before sending them to the memory updater.
from langchain_core.messages import AIMessage

# This function intelligently updates the memory store based on user feedback.
def update_memory(store, namespace, messages):
    """Update memory profile in the store."""
    # First, get the current memory from the store so we can provide it as context.
    user_preferences = store.get(namespace, "user_preferences")
    # Initialize a new LLM instance specifically for this task, configured for structured output.
    memory_updater_llm = llm.with_structured_output(UserPreferences)

    # This is a small but important fix: filter out any previous AI messages with tool calls.
    # Passing these complex objects can sometimes cause errors in the downstream LLM call.
    messages_to_send = [
        msg for msg in messages
        if not (isinstance(msg, AIMessage) and hasattr(msg, 'tool_calls') and msg.tool_calls)
    ]

    # Invoke the LLM with the memory prompt, current preferences, and the user's feedback.
    result = memory_updater_llm.invoke(
        [
            # The system prompt that instructs the LLM on how to update memory.
            {"role": "system", "content": MEMORY_UPDATE_INSTRUCTIONS.format(current_profile=user_preferences.value, namespace=namespace)},
        ]
        # Append the filtered conversation messages containing the feedback.
        + messages_to_send
    )

    # Save the newly generated preference string back into the store, overwriting the old one.
    store.put(namespace, "user_preferences", result.user_preferences)
This function is the main component of our agent ability to learn. By using a dedicated LLM call with strict instructions, we ensure that the memory is updated in a controlled and additive way, making the agent progressively more aligned with the user’s preferences over time.
We can now define the core logic of our agent. In LangGraph, this logic is encapsulated in nodes. Each node is a Python function that receives the current State of the graph, performs an action, and returns an update to that state.
Our email assistant will have several key nodes that handle everything from initial classification to generating the final response.
The first node in our workflow is the triage_router. This function's job is to make the initial decision about an incoming email …
should we respond, just notify the user, or ignore it completely? This is where our long-term memory first comes into play.
The router will use our get_memory function to fetch the user's latest triage_preferences and inject them into its prompt, ensuring its decision-making improves over time.
# Import the Command class for routing and BaseStore for type hinting
from langgraph.types import Command
from langgraph.store.base import BaseStore

# Define the first node in our graph, the triage router.
def triage_router(state: State, store: BaseStore) -> Command:
    """Analyze email content to decide the next step."""
    # Unpack the raw email data using our utility function.
    author, to, subject, email_thread = parse_email(state["email_input"])

    # Format the email content into a clean string for the LLM.
    email_markdown = format_email_markdown(subject, author, to, email_thread)

    # Here is the memory integration: fetch the latest triage instructions.
    # If they don't exist, it will use the `default_triage_instructions`.
    triage_instructions = get_memory(store, ("email_assistant", "triage_preferences"), default_triage_instructions)

    # Format the system prompt, injecting the retrieved triage instructions.
    system_prompt = triage_system_prompt.format(
        background=default_background,
        triage_instructions=triage_instructions,
    )

    # Format the user prompt with the specific details of the current email.
    user_prompt = triage_user_prompt.format(
        author=author, to=to, subject=subject, email_thread=email_thread
    )
    # Invoke the LLM router, which is configured to return our `RouterSchema`.
    result = llm_router.invoke(
        [
            {"role": "system", "content": system_prompt},
            {"role": "user", "content": user_prompt},
        ]
    )
    # Based on the LLM's classification, decide which node to go to next.
    if result.classification == "respond":
        print("📧 Classification: RESPOND - This email requires a response")
        # Set the next node to be the 'response_agent'.
        goto = "response_agent"
        # Update the state with the decision and the formatted email for the agent.
        update = {
            "classification_decision": result.classification,
            "messages": [{"role": "user", "content": f"Respond to the email: {email_markdown}"}],
        }
    elif result.classification == "ignore":
        print("🚫 Classification: IGNORE - This email can be safely ignored")
        # End the workflow immediately.
        goto = END
        # Update the state with the classification decision.
        update = {"classification_decision": result.classification}
    elif result.classification == "notify":
        print("🔔 Classification: NOTIFY - This email contains important information")
        # Go to the human-in-the-loop handler for notification.
        goto = "triage_interrupt_handler"
        # Update the state with the classification decision.
        update = {"classification_decision": result.classification}
    else:
        # Raise an error if the classification is invalid.
        raise ValueError(f"Invalid classification: {result.classification}")

    # Return a Command object to tell LangGraph where to go next and what to update.
    return Command(goto=goto, update=update)
This node is the gateway to our entire system. By adding a single line triage_instructions = get_memory(...) we have transformed it from a static router into one that learns. As the user provides feedback on triage decisions, the triage_preferences in our store will be updated, and this node will automatically start making better, more personalized classifications on future emails.
When an email is classified as “respond”, it gets passed to our main response agent. The core of this agent is the llm_call node. This function's purpose is to take the current conversation history and make the next move, which is usually deciding which tool to call.
Just like our triage router, this node integrates memory to guide its decisions. It fetches both response_preferences and cal_preferences to ensure its actions align with the user's learned style.
# This is the primary reasoning node for the response agent.
def llm_call(state: State, store: BaseStore):
    """LLM decides whether to call a tool or not, using stored preferences."""

    # Fetch the user's latest calendar preferences from the memory store.
    cal_preferences = get_memory(store, ("email_assistant", "cal_preferences"), default_cal_preferences)

    # Fetch the user's latest response (writing style) preferences.
    response_preferences = get_memory(store, ("email_assistant", "response_preferences"), default_response_preferences)
    # Filter out previous AI messages with tool calls to prevent API errors.
    messages_to_send = [
        msg for msg in state["messages"]
        if not (isinstance(msg, AIMessage) and hasattr(msg, 'tool_calls') and msg.tool_calls)
    ]

    # Invoke the main LLM, which is bound to our set of tools.
    # The prompt is formatted with the preferences retrieved from memory.
    response = llm_with_tools.invoke(
        [
            {"role": "system", "content": agent_system_prompt_hitl_memory.format(
                tools_prompt=HITL_MEMORY_TOOLS_PROMPT,
                background=default_background,
                response_preferences=response_preferences,
                cal_preferences=cal_preferences
            )}
        ]
        + messages_to_send
    )

    # Return the LLM's response to be added to the state.
    return {"messages": [response]}
This node showing the important of long-term memory. With every execution, it pulls the latest user preferences for writing style and calendar scheduling.
- When a user provides feedback that they prefer shorter emails or 30-minute meetings, our
update_memoryfunction will modify the store. - The next time this
llm_callnode runs, it will automatically fetch those new preferences and inject them into the prompt, instantly changing the agent's behavior without any code changes.
This creates a feedback loop where the agent continuously adapts to the user.
Our agent isn’t just acting, it must also knows when to ask for help or confirmation. The next set of nodes we will build are the interrupt handlers.
These are special nodes that pause the graph execution and wait for input from a human. This is where the magic happens: the feedback we provide in these steps will be captured and used to update the agent’s long-term memory.
We will have two interrupt points:
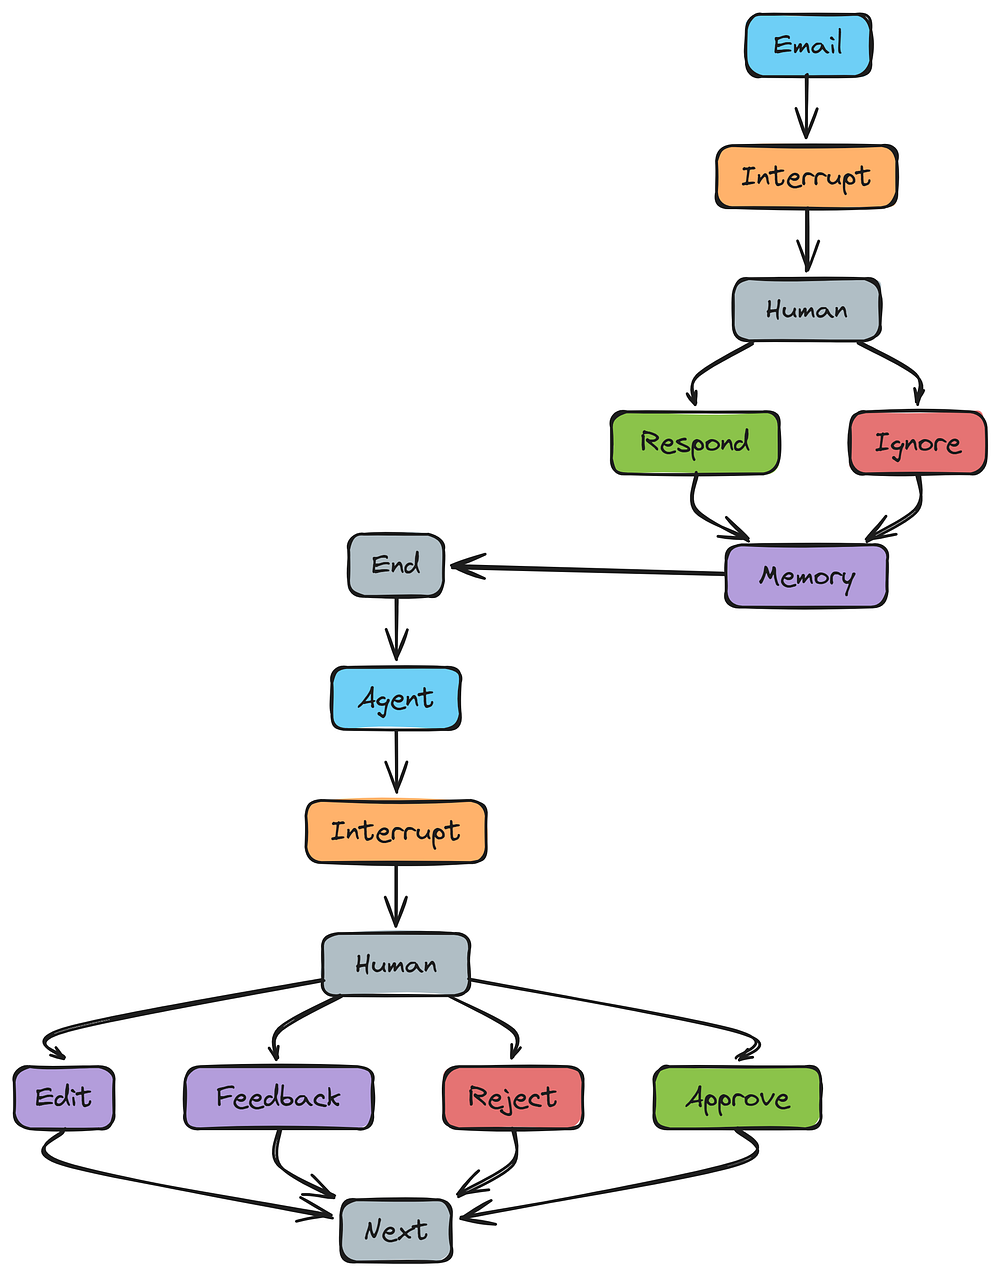
- one right after the initial triage (for
notifyclassifications). - and a more complex one to review the agent proposed tool calls.
First, let’s build the triage_interrupt_handler. This node is triggered when the triage_router classifies an email as notify. Instead of acting on the email, the agent will present it to the user and ask for a decision:
should it be ignored, or should we actually respond? The user's choice here is a valuable piece of feedback about their triage preferences.
# Import the `interrupt` function from LangGraph.
from langgraph.types import interrupt

# Define the interrupt handler for the triage step.
def triage_interrupt_handler(state: State, store: BaseStore) -> Command:
    """Handles interrupts from the triage step, pausing for user input."""

    # Parse the email input to format it for display.
    author, to, subject, email_thread = parse_email(state["email_input"])
    email_markdown = format_email_markdown(subject, author, to, email_thread)
    # This is the data structure that defines the interrupt.
    # It specifies the action, the allowed user responses, and the content to display.
    request = {
        "action_request": {
            "action": f"Email Assistant: {state['classification_decision']}",
            "args": {}
        },
        "config": { "allow_ignore": True, "allow_respond": True },
        "description": email_markdown,
    }
    # The `interrupt()` function pauses the graph and sends the request to the user.
    # It waits here until it receives a response.
    response = interrupt([request])[0]
    # Now, we process the user's response.
    if response["type"] == "response":
        # The user decided to respond, overriding the 'notify' classification.
        user_input = response["args"]
        # We create a message to pass to the memory updater.
        messages = [{"role": "user", "content": f"The user decided to respond to the email, so update the triage preferences to capture this."}]

        # This is a key step: we call `update_memory` to teach the agent.
        update_memory(store, ("email_assistant", "triage_preferences"), messages)

        # Prepare to route to the main response agent.
        goto = "response_agent"
        # Update the state with the user's feedback.
        update = {"messages": [{"role": "user", "content": f"User wants to reply. Use this feedback: {user_input}"}]}
    elif response["type"] == "ignore":
        # The user confirmed the email should be ignored.
        messages = [{"role": "user", "content": f"The user decided to ignore the email even though it was classified as notify. Update triage preferences to capture this."}]

        # We still update memory to reinforce this preference.
        update_memory(store, ("email_assistant", "triage_preferences"), messages)

        # End the workflow.
        goto = END
        update = {} # No message update needed.
    else:
        raise ValueError(f"Invalid response: {response}")
    # Return a Command to direct the graph's next step.
    return Command(goto=goto, update=update)
This node is an example of a learning opportunity …
- If the agent thought an email was just a notification, but the user decides to respond,
update_memoryis called. - The memory manager LLM will see the message "The user decided to respond..." and analyze the email content.
- It will then surgically update the
triage_preferencesstring, perhaps by moving "Build system notifications" from theNOTIFYcategory to theRESPONDcategory. - The next time a similar email arrives, the
triage_routerwill make a better, more personalized decision.
But we also need a main interruption handler which is the most complex node in our graph. After the llm_call node proposes a tool to use (like write_email or schedule_meeting), this interrupt_handler steps in. It presents the agent's proposed action to the user for review.
The user can then accept it, ignore it, provide natural language feedback (response), or edit it directly. Each of these choices provides a different, valuable signal for our memory system.
# The main interrupt handler for reviewing tool calls.
def interrupt_handler(state: State, store: BaseStore) -> Command:
    """Creates an interrupt for human review of tool calls and updates memory."""

    # We'll build up a list of new messages to add to the state.
    result = []
    # By default, we'll loop back to the LLM after this.
    goto = "llm_call"


    # The agent can propose multiple tool calls, so we loop through them.
    for tool_call in state["messages"][-1].tool_calls:

        # We only want to interrupt for certain "high-stakes" tools.
        hitl_tools = ["write_email", "schedule_meeting", "Question"]
        if tool_call["name"] not in hitl_tools:
            # For other tools (like check_calendar), execute them without interruption.
            tool = tools_by_name[tool_call["name"]]
            observation = tool.invoke(tool_call["args"])
            result.append({"role": "tool", "content": observation, "tool_call_id": tool_call["id"]})
            continue

        # Format the proposed action for display to the human reviewer.
        tool_display = format_for_display(tool_call)

        # Define the interrupt request payload.
        request = {
            "action_request": {"action": tool_call["name"], "args": tool_call["args"]},
            "config": { "allow_ignore": True, "allow_respond": True, "allow_edit": True, "allow_accept": True },
            "description": tool_display,
        }

        # Pause the graph and wait for the user's response.
        response = interrupt([request])[0]
        # --- MEMORY UPDATE LOGIC BASED ON USER RESPONSE ---

        if response["type"] == "edit":

            # The user directly edited the agent's proposed action.
            initial_tool_call = tool_call["args"]
            edited_args = response["args"]["args"]

            # This is the most direct form of feedback. We call `update_memory`.
            if tool_call["name"] == "write_email":
                update_memory(store, ("email_assistant", "response_preferences"), [{"role": "user", "content": f"User edited the email. Initial draft: {initial_tool_call}. Edited draft: {edited_args}."}])
            elif tool_call["name"] == "schedule_meeting":
                update_memory(store, ("email_assistant", "cal_preferences"), [{"role": "user", "content": f"User edited the meeting. Initial invite: {initial_tool_call}. Edited invite: {edited_args}."}])

            # Execute the tool with the user's edited arguments.
            tool = tools_by_name[tool_call["name"]]
            observation = tool.invoke(edited_args)
            result.append({"role": "tool", "content": observation, "tool_call_id": tool_call["id"]})

        elif response["type"] == "response":

            # The user gave natural language feedback.
            user_feedback = response["args"]

            # We capture this feedback and use it to update memory.
            if tool_call["name"] == "write_email":
                update_memory(store, ("email_assistant", "response_preferences"), [{"role": "user", "content": f"User gave feedback on the email draft: {user_feedback}"}])
            elif tool_call["name"] == "schedule_meeting":
                update_memory(store, ("email_assistant", "cal_preferences"), [{"role": "user", "content": f"User gave feedback on the meeting invite: {user_feedback}"}])

            # We don't execute the tool. Instead, we pass the feedback back to the agent.
            result.append({"role": "tool", "content": f"User gave feedback: {user_feedback}", "tool_call_id": tool_call["id"]})

        elif response["type"] == "ignore":
            # The user decided this action should not be taken. This is triage feedback.
            update_memory(store, ("email_assistant", "triage_preferences"), [{"role": "user", "content": f"User ignored the proposal to {tool_call['name']}. This email should not have been classified as 'respond'."}])
            result.append({"role": "tool", "content": "User ignored this. End the workflow.", "tool_call_id": tool_call["id"]})
            goto = END
        elif response["type"] == "accept":
            # The user approved the action. No memory update is needed.
            tool = tools_by_name[tool_call["name"]]
            observation = tool.invoke(tool_call["args"])
            result.append({"role": "tool", "content": observation, "tool_call_id": tool_call["id"]})

    # Return a command with the next node and the messages to add to the state.
    return Command(goto=goto, update={"messages": result})
This node is core of our learning system. You did notice how every type of user feedback edit, response, and ignore triggers a call to update_memory with a specific, contextual message.
- When a user edits a meeting duration from 45 to 30 minutes, the memory manager LLM sees this clear signal and updates the
cal_preferencesto favor 30-minute meetings in the future. - When a user says "make it less formal". the LLM generalizes this and adds a new rule to the
response_preferences. This continuous, fine-grained feedback loop allows the agent to become a highly personalized assistant over time.
We’ve built all the individual components of our agent: the schemas, the prompts, the tools, the utility functions, and the graph nodes. Now it’s time to assemble them into a functioning state machine using LangGraph. This involves defining the graph structure, adding our nodes, and specifying the edges that connect them.
After our main llm_call node runs, the agent will have proposed one or more tool calls. We need a way to decide what happens next. Should the agent stop, or should it proceed to the human-review step? This is handled by a conditional edge. It's a simple function that inspects the last message in the state and directs the flow of the graph.
# This function determines the next step after the LLM has made its decision.
def should_continue(state: State) -> Literal["interrupt_handler", END]:
    """Route to the interrupt handler or end the workflow if the 'Done' tool is called."""

    # Get the list of messages from the current state.
    messages = state["messages"]
    # Get the most recent message, which contains the agent's proposed action.
    last_message = messages[-1]

    # Check if the last message contains any tool calls.
    if last_message.tool_calls:
        # Loop through each proposed tool call.
        for tool_call in last_message.tool_calls:
            # If the agent has decided it's finished, we end the workflow.
            if tool_call["name"] == "Done":
                return END
            # For any other tool, we proceed to the human review step.
            else:
                return "interrupt_handler"
This function is the primary router for our response agent. It inspects the agent’s decision and acts as a traffic cop. If the Done tool is called, it signals that the process is complete by returning END. For any other tool call, it routes the graph to our interrupt_handler node for human review, ensuring no action is taken without approval.
Now we can assemble the graph to visually see how it looks. We are going to use a StateGraph to define the structure. The process involves two main stages:
- Build the
response_agentsubgraph: This will contain the core loop ofllm_call->interrupt_handler. - Build the
overall_workflow: This main graph will start with ourtriage_routerand will use theresponse_agentsubgraph as one of its nodes.
This way or approach I am using just to keeps our architecture clean and easy to understand.
# Import the main graph-building class from LangGraph.
from langgraph.graph import StateGraph, START, END

# --- Part 1: Build the Response Agent Subgraph ---
# Initialize a new state graph with our defined `State` schema.
agent_builder = StateGraph(State)

# Add the 'llm_call' node to the graph.
agent_builder.add_node("llm_call", llm_call)

# Add the 'interrupt_handler' node to the graph.
agent_builder.add_node("interrupt_handler", interrupt_handler)

# Set the entry point of this subgraph to be the 'llm_call' node.
agent_builder.add_edge(START, "llm_call")

# Add the conditional edge that routes from 'llm_call' to either 'interrupt_handler' or END.
agent_builder.add_conditional_edges(
    "llm_call",
    should_continue,
    {
        "interrupt_handler": "interrupt_handler",
        END: END,
    },
)

# After the interrupt handler, the graph always loops back to the LLM to continue the task.
agent_builder.add_edge("interrupt_handler", "llm_call")

# Compile the subgraph into a runnable object.
response_agent = agent_builder.compile()

# --- Part 2: Build the Overall Workflow ---
# Initialize the main graph, defining its input schema as `StateInput`.
overall_workflow = (
    StateGraph(State, input=StateInput)
    # Add the triage router as the first node.
    .add_node("triage_router", triage_router)
    # Add the triage interrupt handler node.
    .add_node("triage_interrupt_handler", triage_interrupt_handler)
    # Add our entire compiled `response_agent` subgraph as a single node.
    .add_node("response_agent", response_agent)
    # Set the entry point for the entire workflow.
    .add_edge(START, "triage_router")
    # Define the edges from the triage router to the appropriate next steps.
    .add_edge("triage_router", "response_agent")
    .add_edge("triage_router", "triage_interrupt_handler")
    .add_edge("triage_interrupt_handler", "response_agent")
)

# Compile the final, complete graph.
email_assistant = overall_workflow.compile()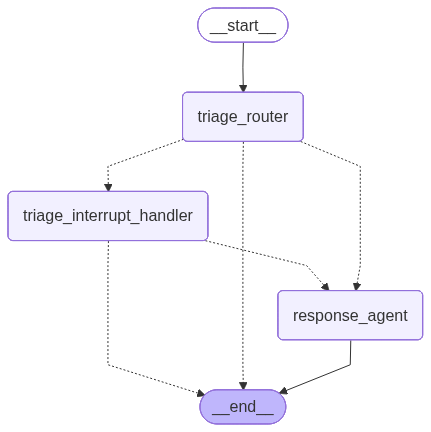
And with that, our agent is assembled.
- We have a
triage_routerthat makes the initial decision, which then branches to either end the process, ask the user for input viatriage_interrupt_handler, or hand off control to theresponse_agent. - The
response_agentthen enters its own loop of thinking (llm_call) and asking for review (interrupt_handler), updating its memory along the way until the task is complete.
This , stateful architecture is what makes LangGraph so good for building complex, learning agents. We can now take this compiled email_assistant and start testing its ability to learn from our feedback.
Now that we have implemented memory into our email assistant, let’s test how the system learns from user feedback and adapts over time. This testing section explores how different types of user interactions create distinct memory updates that improve the assistant’s future performance.
The primary questions these tests we are going to address are:
- How does the system capture and persist user preferences?
- In what ways do the stored preferences influence subsequent decision-making processes?
- Which patterns of user interaction trigger specific types of memory updates?
First, let’s build a helper function to display memory content so we can track how it evolves throughout our tests.
# Import necessary libraries for testing.
import uuid
from langgraph.checkpoint.memory import MemorySaver
from langgraph.types import Command
from langgraph.store.memory import InMemoryStore


# Define a helper function to display the content of our memory store.
def display_memory_content(store, namespace=None):
    """A utility to print the current state of the memory store."""

    # Print a header for clarity.
    print("\n======= CURRENT MEMORY CONTENT =======")

    # If a specific namespace is requested, show only that one.
    if namespace:
        # Retrieve the memory item for the specified namespace.
        memory = store.get(namespace, "user_preferences")
        print(f"\n--- {namespace[1]} ---")
        if memory:
            print(memory.value)
        else:
            print("No memory found")

    # If no specific namespace is given, show all of them.
    else:
        # Define the list of all possible namespaces we are using.
        for ns in [
            ("email_assistant", "triage_preferences"),
            ("email_assistant", "response_preferences"),
            ("email_assistant", "cal_preferences"),
            ("email_assistant", "background")
        ]:
            # Retrieve and print the memory content for each namespace.
            memory = store.get(ns, "user_preferences")
            print(f"\n--- {ns[1]} ---")
            if memory:
                print(memory.value)
            else:
                print("No memory found")
            print("=======================================\n")
This utility gives us a real-time window into the agent’s evolving knowledge base, making it easy to see exactly what has been learned after each interaction.
Let’s start performing different test cases.
Our first test examines what happens when a user accepts the agent’s actions without modification. This baseline case helps us understand the system’s behavior when no feedback is provided. We expect the agent to use its memory to make decisions but not to update it.
First, we set up a fresh test run.
# Define the input email for our test case.
email_input_respond = {
    "to": "Lance Martin <lance@company.com>",
    "author": "Project Manager <pm@client.com>",
    "subject": "Tax season let's schedule call",
    "email_thread": "Lance,\n\nIt's tax season again... Are you available sometime next week? ... for about 45 minutes."
}

# --- Setup for a new test run ---

# Initialize a new checkpointer and a fresh, empty memory store.
checkpointer = MemorySaver()
store = InMemoryStore()

# Compile our graph, connecting it to our new checkpointer and store.
graph = overall_workflow.compile(checkpointer=checkpointer, store=store)

# Create a unique ID and configuration for this conversation.
thread_id_1 = uuid.uuid4()
thread_config_1 = {"configurable": {"thread_id": thread_id_1}}

# Run the graph until its first interrupt.
print("Running the graph until the first interrupt...")
for chunk in graph.stream({"email_input": email_input_respond}, config=thread_config_1):
    if '__interrupt__' in chunk:
        Interrupt_Object = chunk['__interrupt__'][0]
        print("\nINTERRUPT OBJECT:")
        print(f"Action Request: {Interrupt_Object.value[0]['action_request']}")

# Check the memory state after the first interrupt.
display_memory_content(store)
The graph runs until the agent proposes its first action and pauses for our review.
####### OUTPUT #########
Running the graph until the first interrupt...
📧 Classification: RESPOND - This email requires a response

INTERRUPT OBJECT:
Action Request: {'action': 'schedule_meeting', 'args': {'attendees': ['lance@company.com', 'pm@client.com'], 'subject': 'Tax Planning Strategies', 'duration_minutes': 45, ...}}

======= CURRENT MEMORY CONTENT =======
--- triage_preferences ---

Emails that are not worth responding to: ...
--- response_preferences ---

Use professional and concise language. ...
--- cal_preferences ---

30 minute meetings are preferred, but 15 minute meetings are also acceptable.
--- background ---

No memory found

=======================================
The output shows two key things. First, the agent has correctly proposed a schedule_meeting tool call for 45 minutes, respecting the sender's request even though our default preference is 30 minutes.
Second, our display_memory_content function confirms that all memory namespaces have been initialized with their default values. No learning has occurred yet.
Now, we will accept the agent proposal.
# Resume the graph by sending an 'accept' command.
print(f"\nSimulating user accepting the {Interrupt_Object.value[0]['action_request']['action']} tool call...")
for chunk in graph.stream(Command(resume=[{"type": "accept"}]), config=thread_config_1):

    # Let the graph run until its next natural pause point.
    if '__interrupt__' in chunk:
        Interrupt_Object = chunk['__interrupt__'][0]
        print("\nINTERRUPT OBJECT:")
        print(f"Action Request: {Interrupt_Object.value[0]['action_request']}")
The agent executes the meeting tool and proceeds to its next logical step: drafting a confirmation email. It then interrupts again for our review.
Simulating user accepting the schedule_meeting tool call...

INTERRUPT OBJECT:
Action Request: {'action': 'write_email', 'args': {'to': 'pm@client.com', 'subject': "Re: Tax season let's schedule call", 'content': 'Dear Project Manager, I have scheduled a meeting...for 45 minutes...'}}
The agent has drafted an appropriate confirmation email and is waiting for our final approval. Now, let’s accept this second proposal and check the final state of the memory.
# Resume the graph one last time with another 'accept' command.
print(f"\nSimulating user accepting the {Interrupt_Object.value[0]['action_request']['action']} tool call...")
for chunk in graph.stream(Command(resume=[{"type": "accept"}]), config=thread_config_1):
    pass # Let the graph finish.

# Check the final state of all memory namespaces.
display_memory_content(store)
This completes the workflow. The user has simply approved all of the agent’s actions.
###### OUTPUT #######
Simulating user accepting the write_email tool call...

======= CURRENT MEMORY CONTENT =======
--- triage_preferences ---
Emails that are not worth responding to: ...
--- response_preferences ---
Use professional and concise language. ...
--- cal_preferences ---
30 minute meetings are preferred, but 15 minute meetings are also acceptable.
--- background ---
No memory found
=======================================
The final memory check confirms our hypothesis. Even after a complete, successful run, the memory contents are identical to their initial default state. This is the correct behavior. Simple acceptance doesn’t provide a strong learning signal, so the agent wisely doesn’t alter its long-term knowledge. It uses its memory but doesn’t change it without explicit feedback.
Now for the exciting part. Let’s see what happens when we provide explicit feedback by directly editing the agent’s proposals. This creates a clear “before” and “after” scenario that our memory manager LLM can learn from.
We will start a fresh run with the same email.
# --- Setup for a new edit test run ---
checkpointer = MemorySaver()
store = InMemoryStore()
graph = overall_workflow.compile(checkpointer=checkpointer, store=store)

thread_id_2 = uuid.uuid4()
thread_config_2 = {"configurable": {"thread_id": thread_id_2}}

# Run the graph until the first interrupt.
print("Running the graph until the first interrupt...")

for chunk in graph.stream({"email_input": email_input_respond}, config=thread_config_2):
    if '__interrupt__' in chunk:
        Interrupt_Object = chunk['__interrupt__'][0]
        print("\nINTERRUPT OBJECT:")
        print(f"Action Request: {Interrupt_Object.value[0]['action_request']}")

# Check the initial memory state.
display_memory_content(store,("email_assistant", "cal_preferences"))
The agent pauses, again proposing a 45-minute meeting. Now, instead of accepting, we will edit the proposal to match our true preferences: a 30-minute meeting with a more concise subject.
# Define the user's edits to the proposed `schedule_meeting` tool call.
edited_schedule_args = {
    "attendees": ["pm@client.com", "lance@company.com"],
    "subject": "Tax Planning Discussion", # Changed from "Tax Planning Strategies"
    "duration_minutes": 30,             # Changed from 45 to 30
    "preferred_day": "2025-04-22",
    "start_time": 14
}

# Resume the graph by sending an 'edit' command with our new arguments.
print("\nSimulating user editing the schedule_meeting tool call...")

for chunk in graph.stream(Command(resume=[{"type": "edit", "args": {"args": edited_schedule_args}}]), config=thread_config_2):
    if '__interrupt__' in chunk: # Capture the next interrupt
        Interrupt_Object = chunk['__interrupt__'][0]
        print("\nINTERRUPT OBJECT (Second Interrupt):")
        print(f"Action Request: {Interrupt_Object.value[0]['action_request']}")

# Check the memory AGAIN, after the edit has been processed.
print("\nChecking memory after editing schedule_meeting:")
display_memory_content(store,("email_assistant", "cal_preferences"))
Let’s run this and see how it is working.
###### OUTPUT #######
Simulating user editing the schedule_meeting tool call...

INTERRUPT OBJECT (Second Interrupt):

Action Request: {'action': 'write_email', 'args': {'to': 'pm@client.com', ...}}

Checking memory after editing schedule_meeting:

======= CURRENT MEMORY CONTENT =======

--- cal_preferences ---
30 minute meetings are preferred, but 15 minute meetings are also acceptable. The subject of the meeting should be 'Tax Planning Discussion' instead of 'Tax Planning Strategies'. The meeting duration should be 30 minutes instead of 45 minutes. ...
This output is the proof that our system works. The cal_preferences memory is no longer the simple default. Our memory manager LLM analyzed the difference between the agent's proposal and our edit, generalizing our changes into broader rules.
It has learned our preference for shorter meetings and more concise subjects, and this new knowledge is now a permanent part of the agent's memory.
Now, let’s complete the workflow by also editing the email draft.
# The graph is paused. Let's define our edits for the email draft.
edited_email_args = {
    "to": "pm@client.com",
    "subject": "Re: Tax Planning Discussion",
    "content": "Thanks for reaching out. Sounds good. I've scheduled a 30-minute call for us next Tuesday. Looking forward to it!\n\nBest,\nLance"
}

# Resume the graph with the 'edit' command for the write_email tool.
print("\nSimulating user editing the write_email tool call...")
for chunk in graph.stream(Command(resume=[{"type": "edit", "args": {"args": edited_email_args}}]), config=thread_config_2):
    pass

# Check the 'response_preferences' memory to see what was learned.
print("\nChecking memory after editing write_email:")

display_memory_content(store, ("email_assistant", "response_preferences"))
print("\n--- Workflow Complete ---")
Let’s see what it is showing in our terminal …
######## OUTPUT #########
Simulating user editing the write_email tool call...

Checking memory after editing write_email:
======= CURRENT MEMORY CONTENT =======

--- response_preferences ---
When responding to meeting scheduling requests, the assistant should schedule a meeting for 30 minutes instead of 45 minutes. The assistant should also use the subject line "Re: Tax Planning Discussion" instead of "Re: Tax season let's schedule call". The rest of the user preferences remain the same.

--- Workflow Complete ---
Once again, the learning is evident. The response_preferences have been updated. The memory manager LLM correctly identified the key differences in tone and structure, extracting generalizable rules about subject lines and meeting durations.
By providing just two edits in a single run, we have personalized our agent behavior in two distinct areas, showcasing the power of this feedback loop.
We have seen our agent learn from feedback, but what’s happening under the hood? It’s a simple yet powerful four-step loop that turns your corrections into the agent’s new rules.
Here is the entire process, broken down:
- Step 1: Feedback is the Trigger, The learning process only starts when you provide feedback. Simply
acceptinga proposal won't change the memory. Learning is only triggered when youeditan action or give a conversationalresponse. - Step 2: A Dedicated Memory Manager is Called, We don’t just save your raw feedback. Instead, we make a special-purpose LLM call. This “memory manager” uses our strict
MEMORY_UPDATE_INSTRUCTIONSprompt to analyze the feedback. - Step 3: Surgical Updates are Made to Memory, The memory manager’s job is to make a targeted update. It compares your feedback to the existing preferences and integrates the new rule without overwriting or deleting old ones. This ensures the agent never forgets past lessons.
- Step 4: New Knowledge is Injected on the Next Run, The updated preference string is saved to the
Store. The next time the agent starts a new task, it will fetch this new string, injecting the learned behavior into its prompt and changing how it acts in the future.
This Trigger -> Manage -> Update -> Inject cycle is what allows our agent to evolve from a generic tool into a personalized assistant.
You can follow me on Medium if you find this article useful