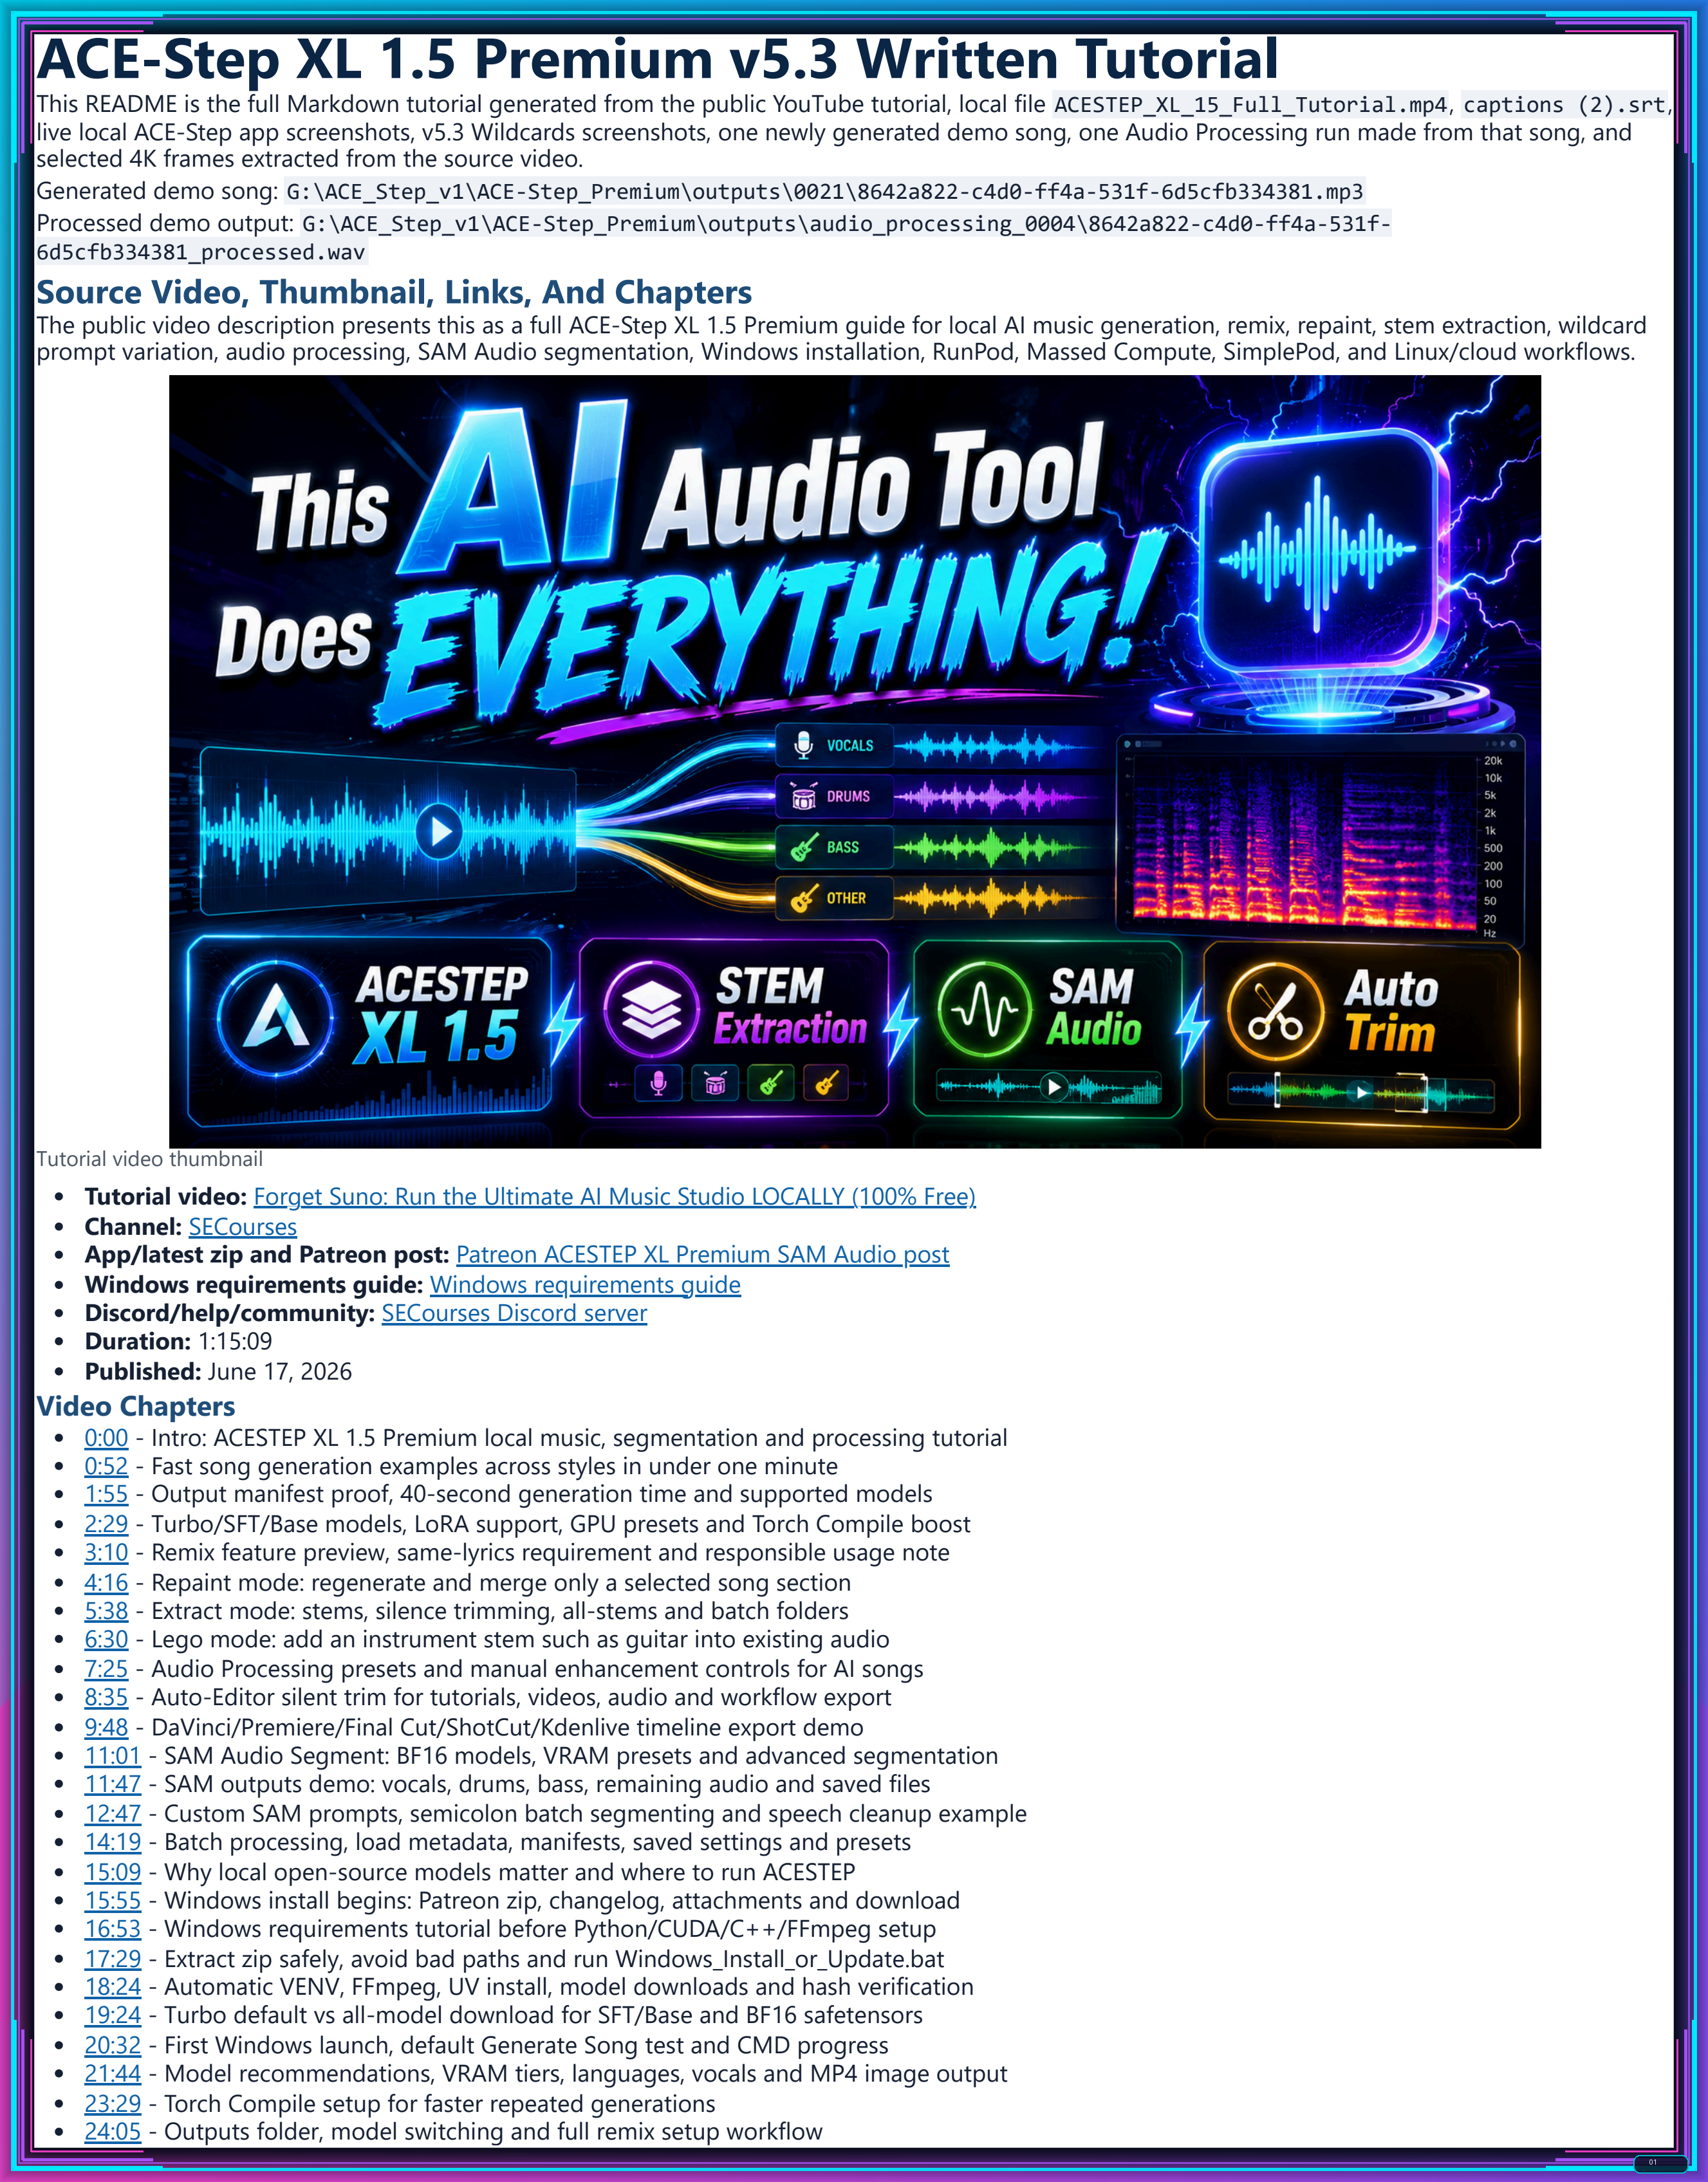
Forget Suno Run the Ultimate AI Music Studio LOCALLY 100 Free
Full tutorial link > https://www.youtube.com/watch?v=9C_6qNKjgpA


Full ACESTEP XL 1.5 Premium guide for local AI music generation, remix, repaint, stem extraction, audio processing, SAM Audio segmentation, Windows installation, RunPod, Massed Compute, SimplePod and Linux cloud workflows. This tutorial walks through the entire practical pipeline from first launch to final output management: generating fast songs, comparing Turbo/SFT/Base models, reusing prompts and seeds, remixing with reference audio, repainting selected sections, improving generated tracks, splitting vocals/drums/bass/other stems and adding instruments back with Lego mode. You will also see how to trim silence, export timelines for editing software, use SAM Audio with text prompts, process batches.
Essential links:
📥 App/latest zip: https://www.patreon.com/posts/ACESTEP-XL-Premium-SAM-Audio-157675060
💬 Discord/help/community: https://discord.com/servers/software-engineering-courses-secourses-772774097734074388
Video Chapters:
00:00:00 Intro: ACESTEP XL 1.5 Premium local music, segmentation and processing tutorial
00:00:52 Fast song generation examples across styles in under one minute
00:01:55 Output manifest proof, 40-second generation time and supported models
00:02:29 Turbo/SFT/Base models, LoRA support, GPU presets and Torch Compile boost
00:03:10 Remix feature preview, same-lyrics requirement and responsible usage note
00:04:16 Repaint mode: regenerate and merge only a selected song section
00:05:38 Extract mode: stems, silence trimming, all-stems and batch folders
00:06:30 Lego mode: add an instrument stem such as guitar into existing audio
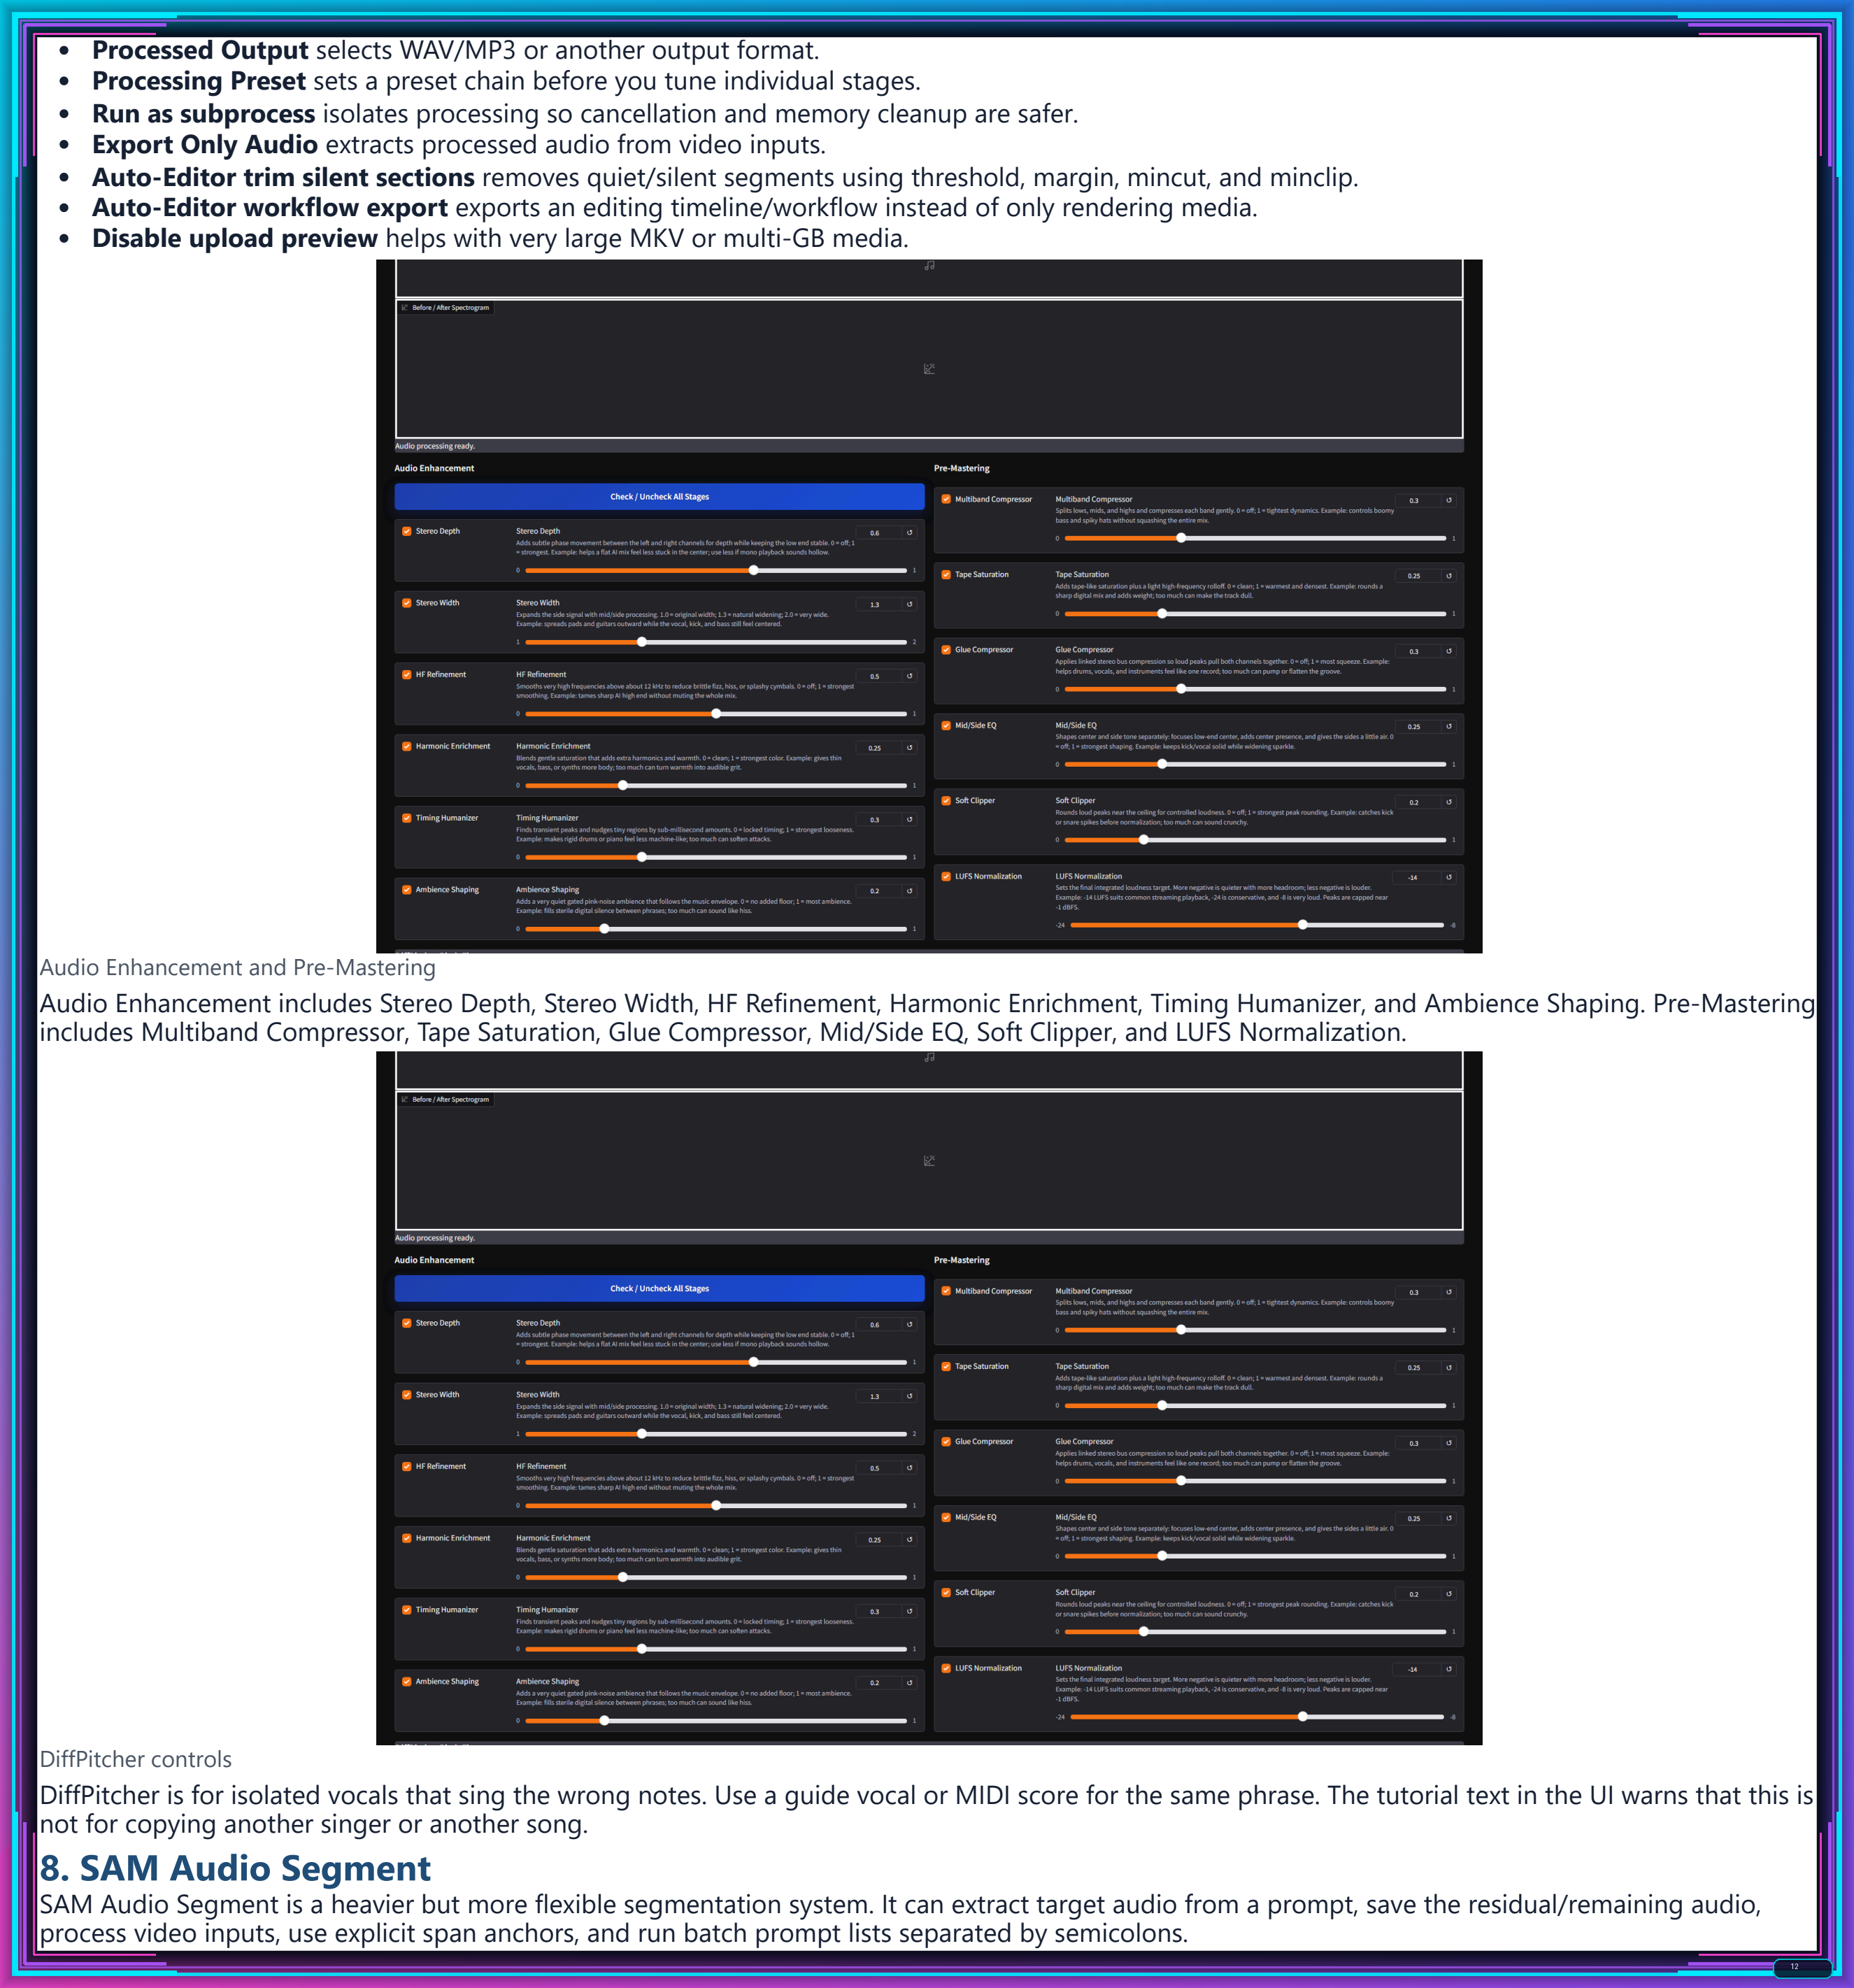
00:07:25 Audio Processing presets and manual enhancement controls for AI songs
00:08:35 Auto-Editor silent trim for tutorials, videos, audio and workflow export
00:09:48 DaVinci/Premiere/Final Cut/ShotCut/Kdenlive timeline export demo
00:11:01 SAM Audio Segment: BF16 models, VRAM presets and advanced segmentation
00:11:47 SAM outputs demo: vocals, drums, bass, remaining audio and saved files
00:12:47 Custom SAM prompts, semicolon batch segmenting and speech cleanup example
00:14:19 Batch processing, load metadata, manifests, saved settings and presets
00:15:09 Why local open-source models matter and where to run ACESTEP
00:15:55 Windows install begins: Patreon zip, changelog, attachments and download
00:16:53 Windows requirements tutorial before Python/CUDA/C++/FFmpeg setup
00:17:29 Extract zip safely, avoid bad paths and run Windows_Install_or_Update.bat
00:18:24 Automatic VENV, FFmpeg, UV install, model downloads and hash verification
00:19:24 Turbo default vs all-model download for SFT/Base and BF16 safetensors
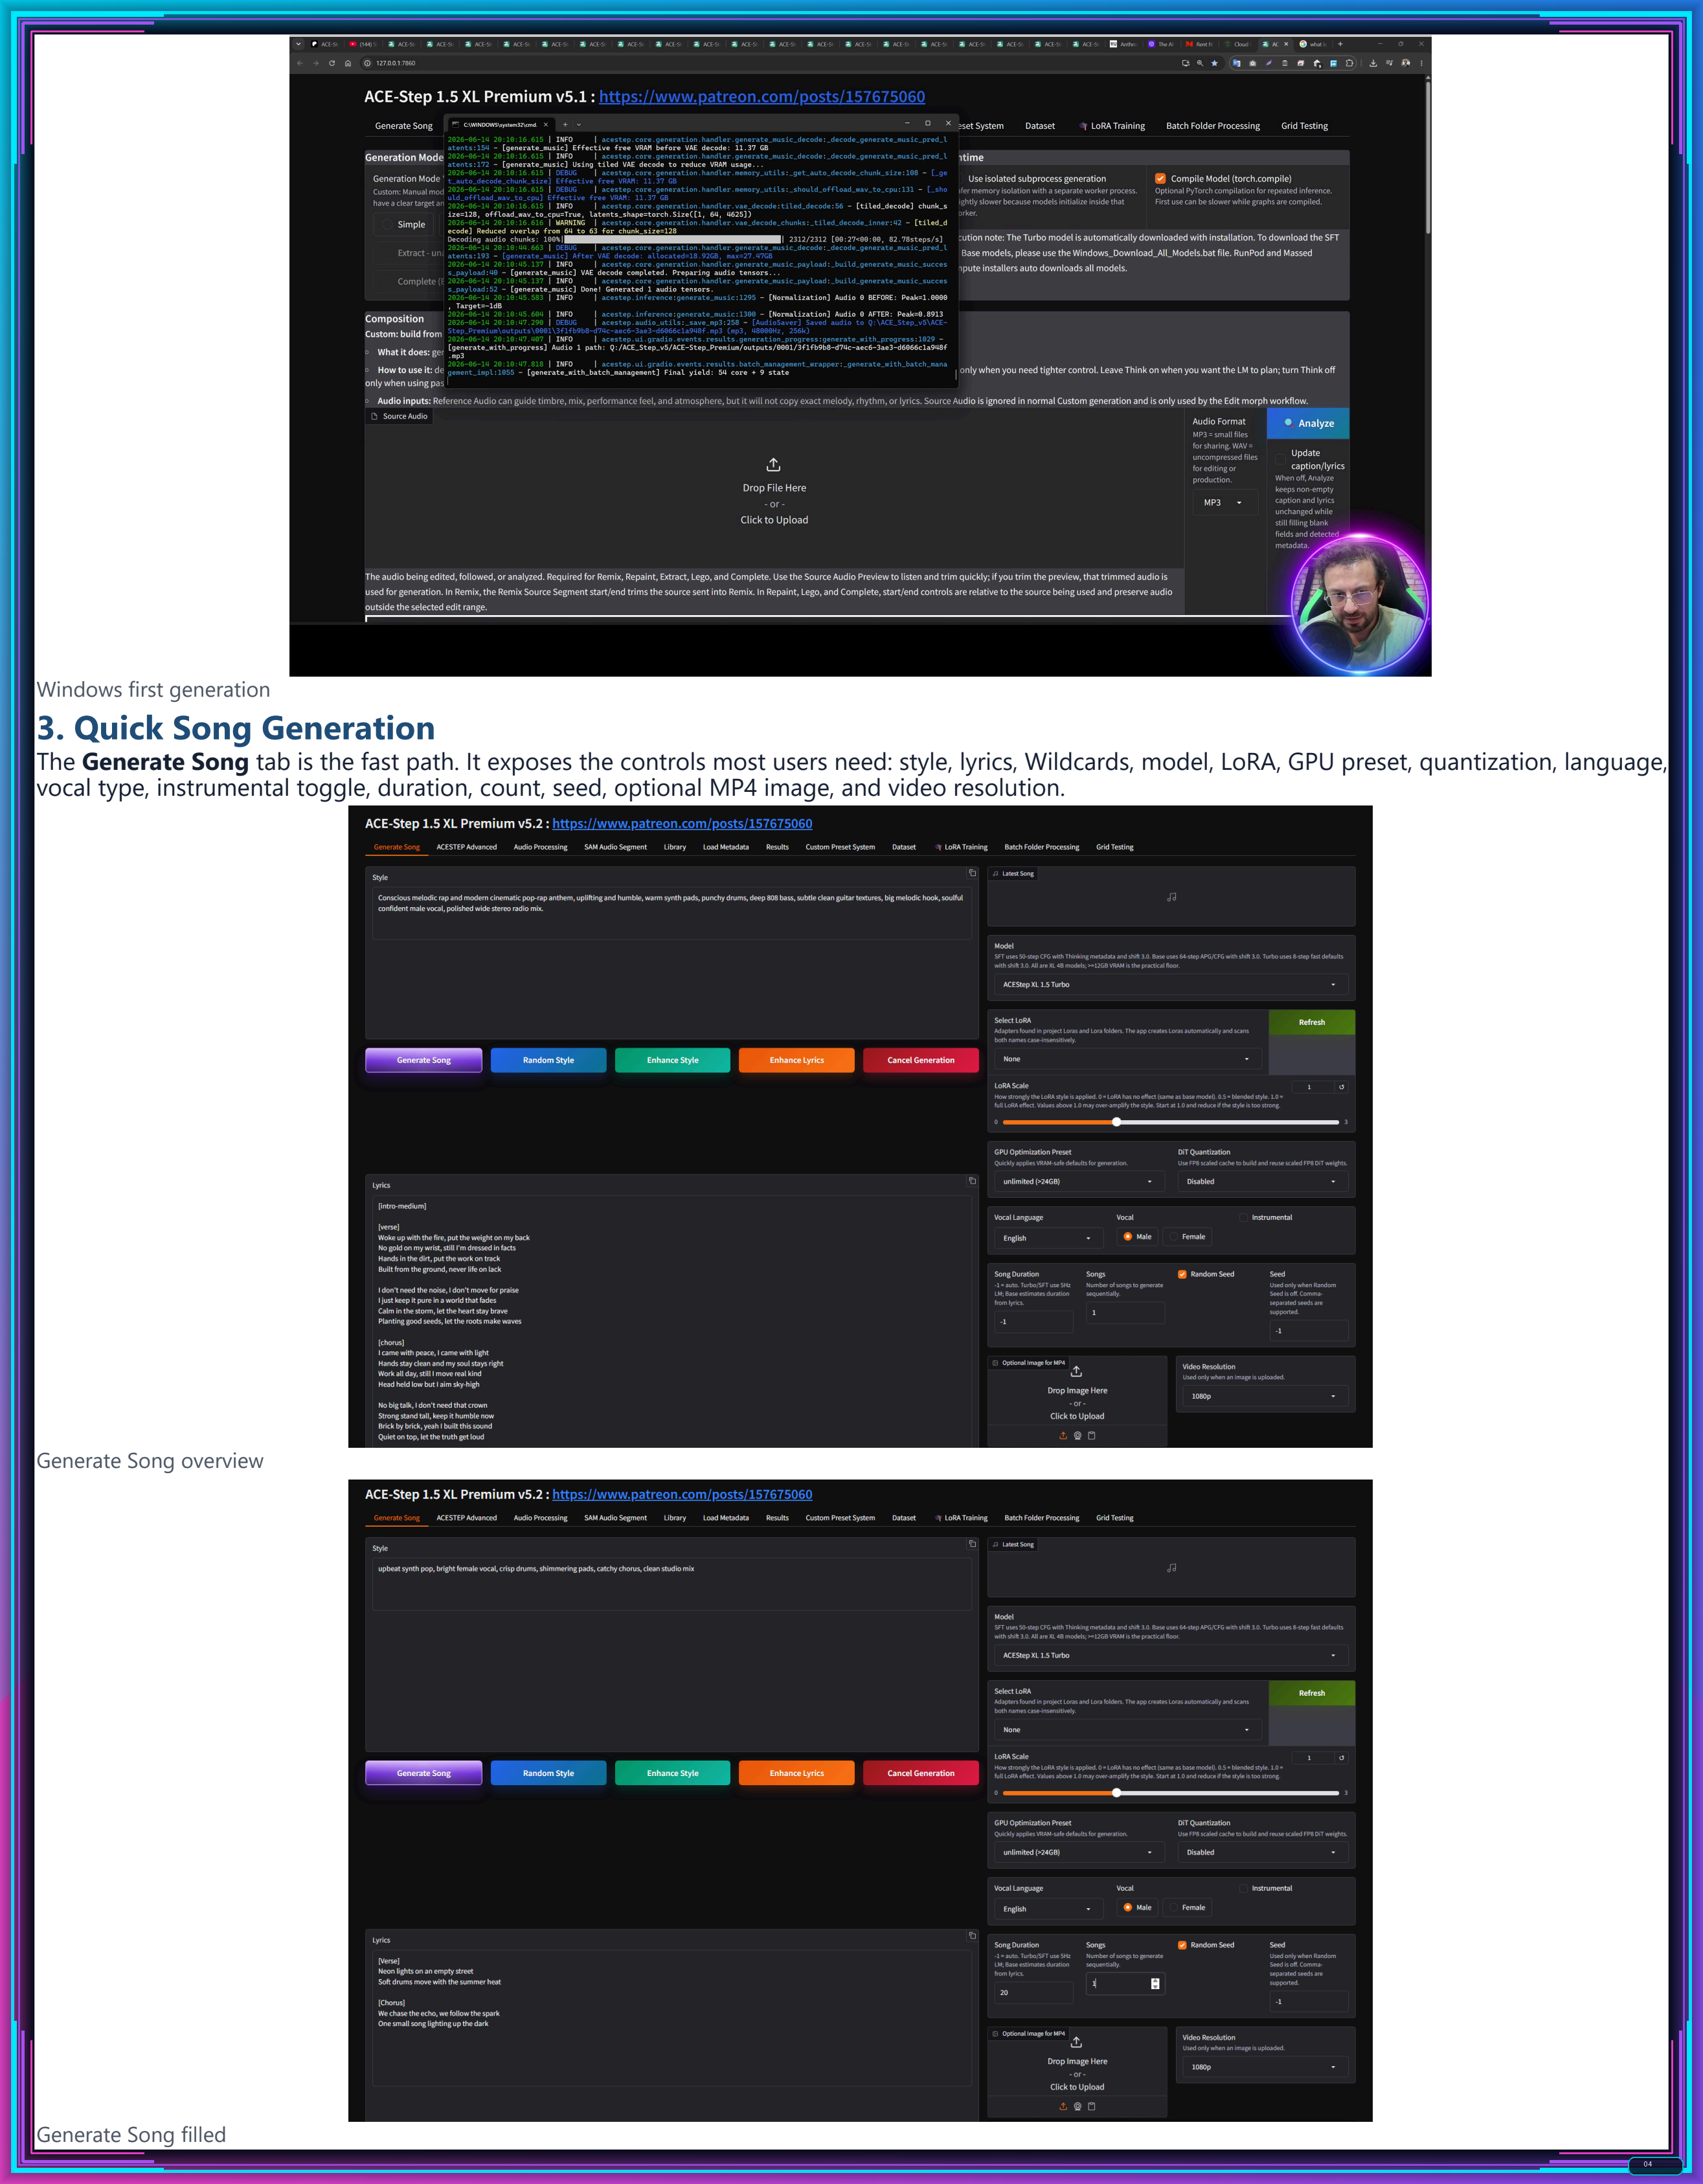
00:20:32 First Windows launch, default Generate Song test and CMD progress
00:21:44 Model recommendations, VRAM tiers, languages, vocals and MP4 image output
00:23:29 Torch Compile setup for faster repeated generations
00:24:05 Outputs folder, model switching and full remix setup workflow
00:25:24 Practical remix loop: adapted lyrics, strength, reference audio and seed lock
00:28:03 Repaint workflow with source range preview, generated result and comparison
00:29:13 Recap: extraction, Lego, audio processing and SAM text-prompt usage
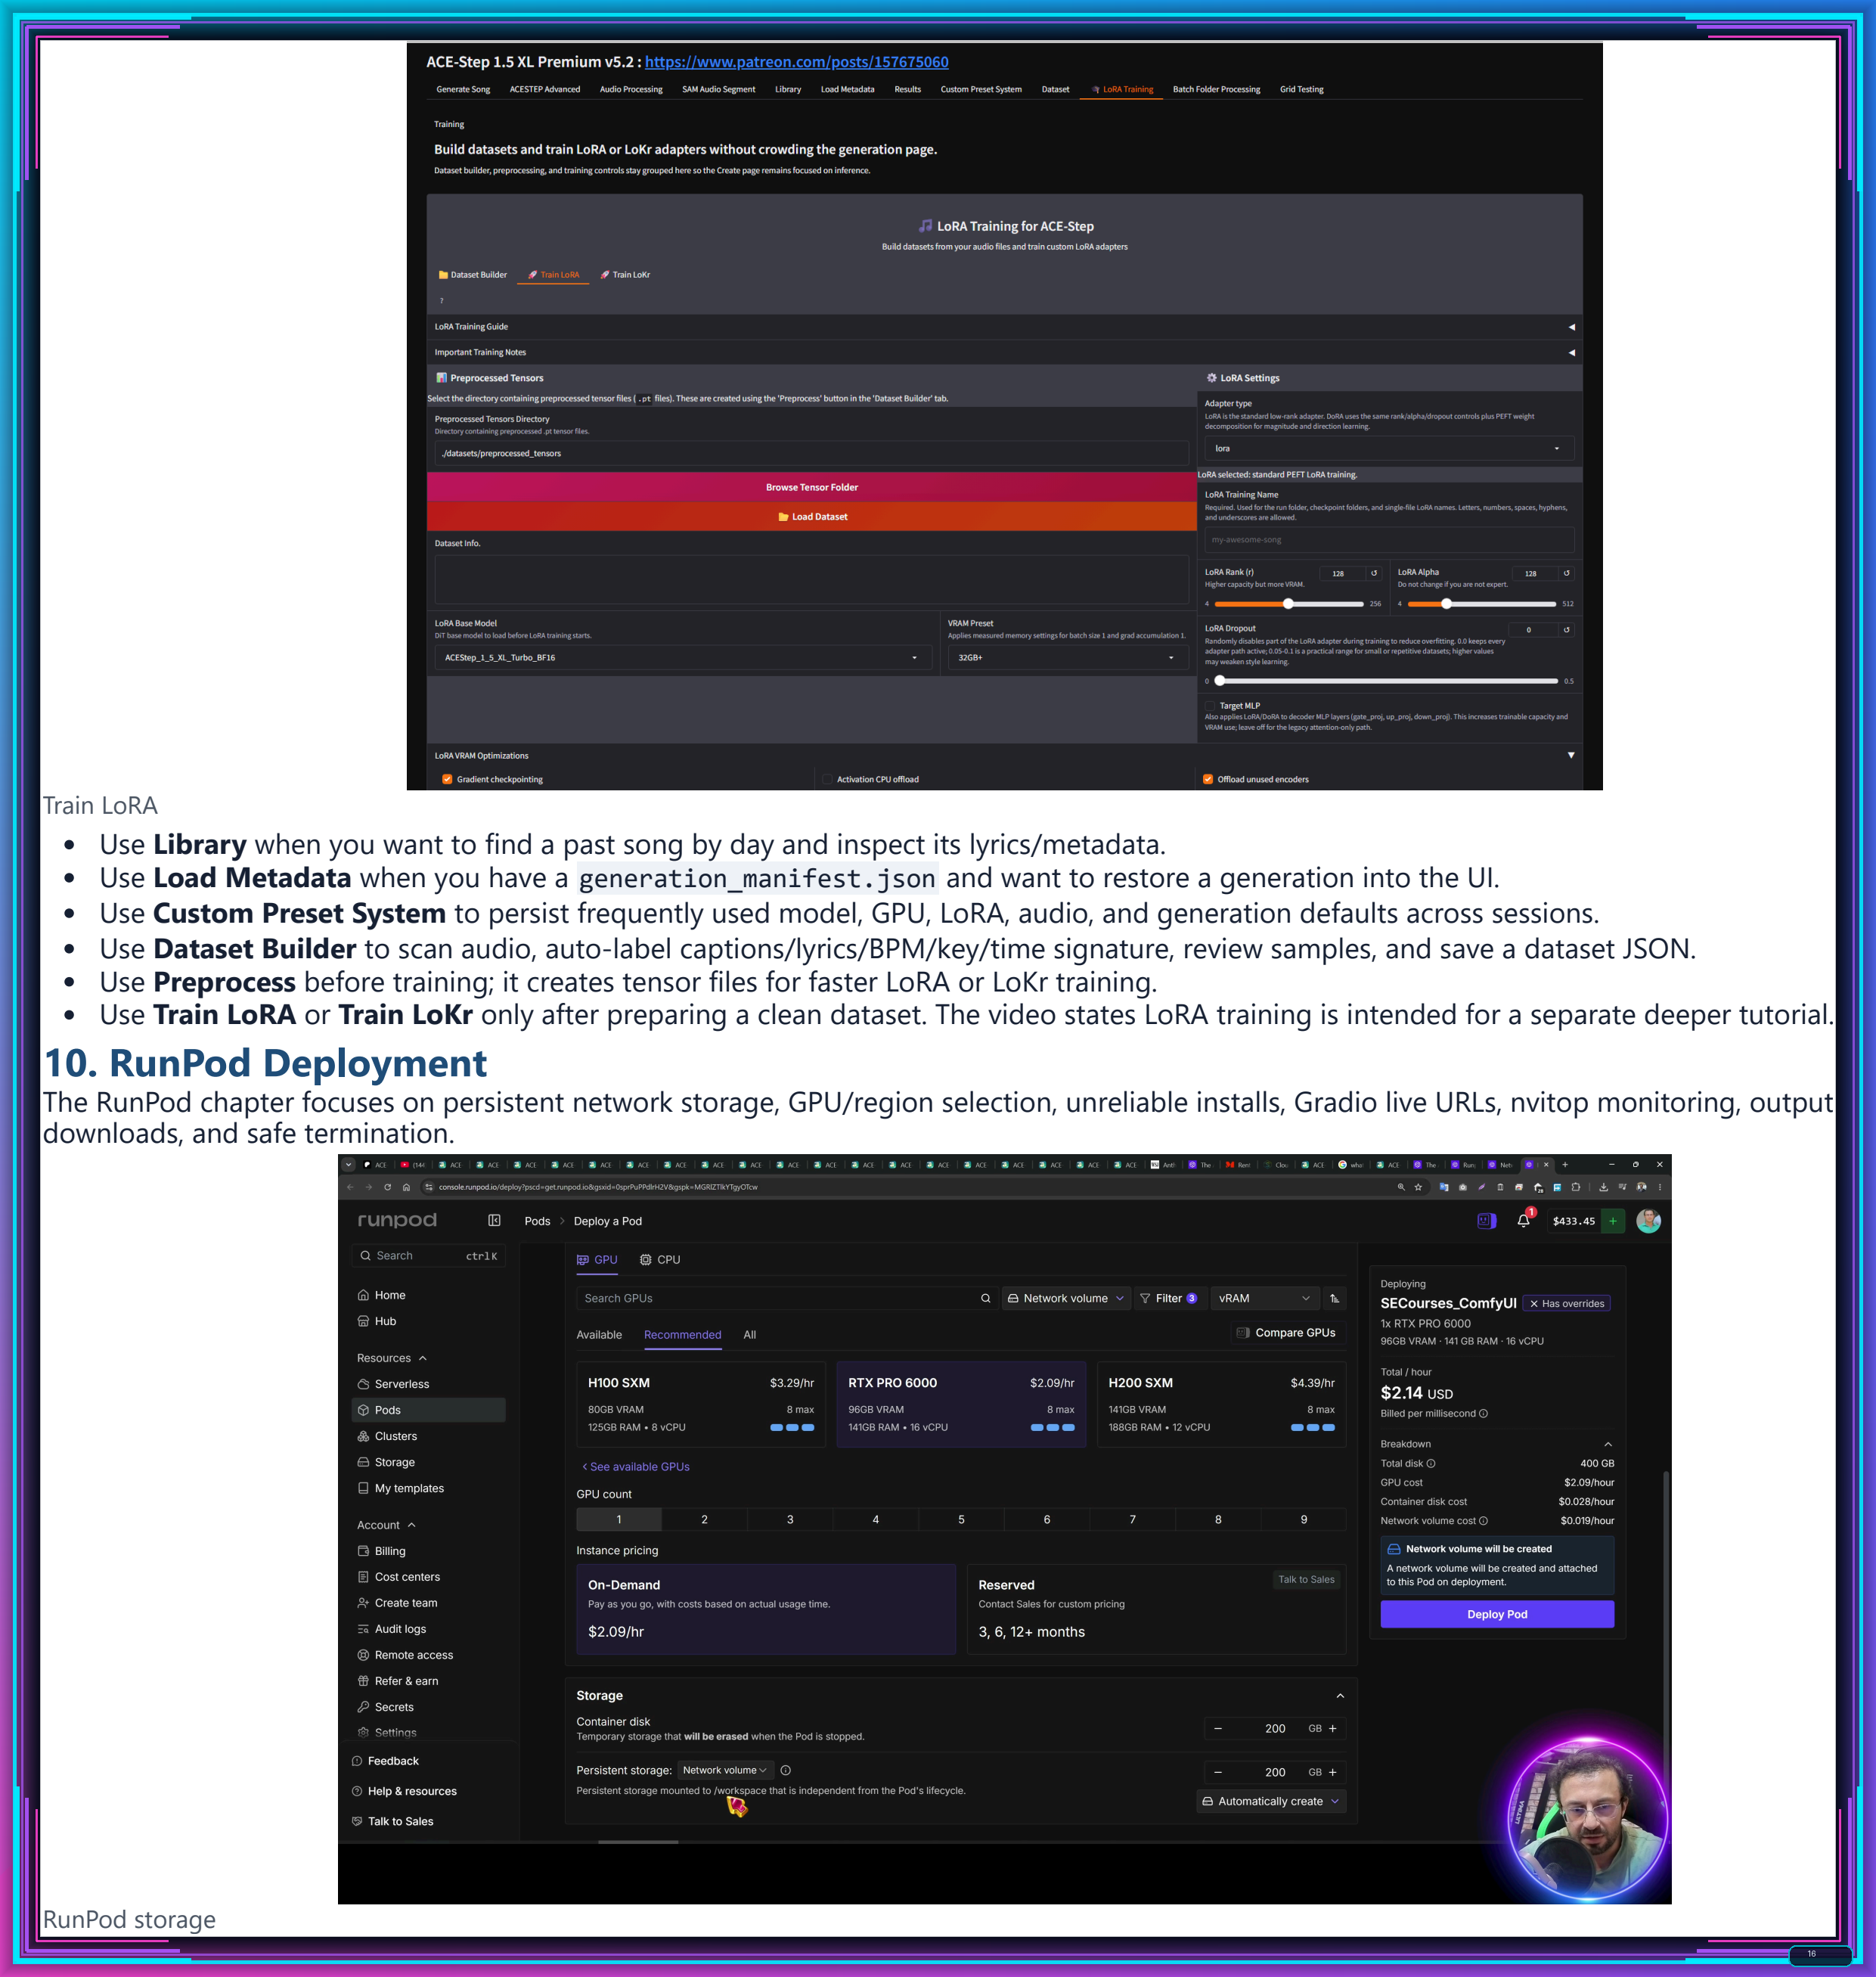
00:30:20 Windows wrap-up, LoRA training teaser and move to cloud installs
00:31:16 RunPod setup: credits, template, CUDA filters, GPU choice and storage
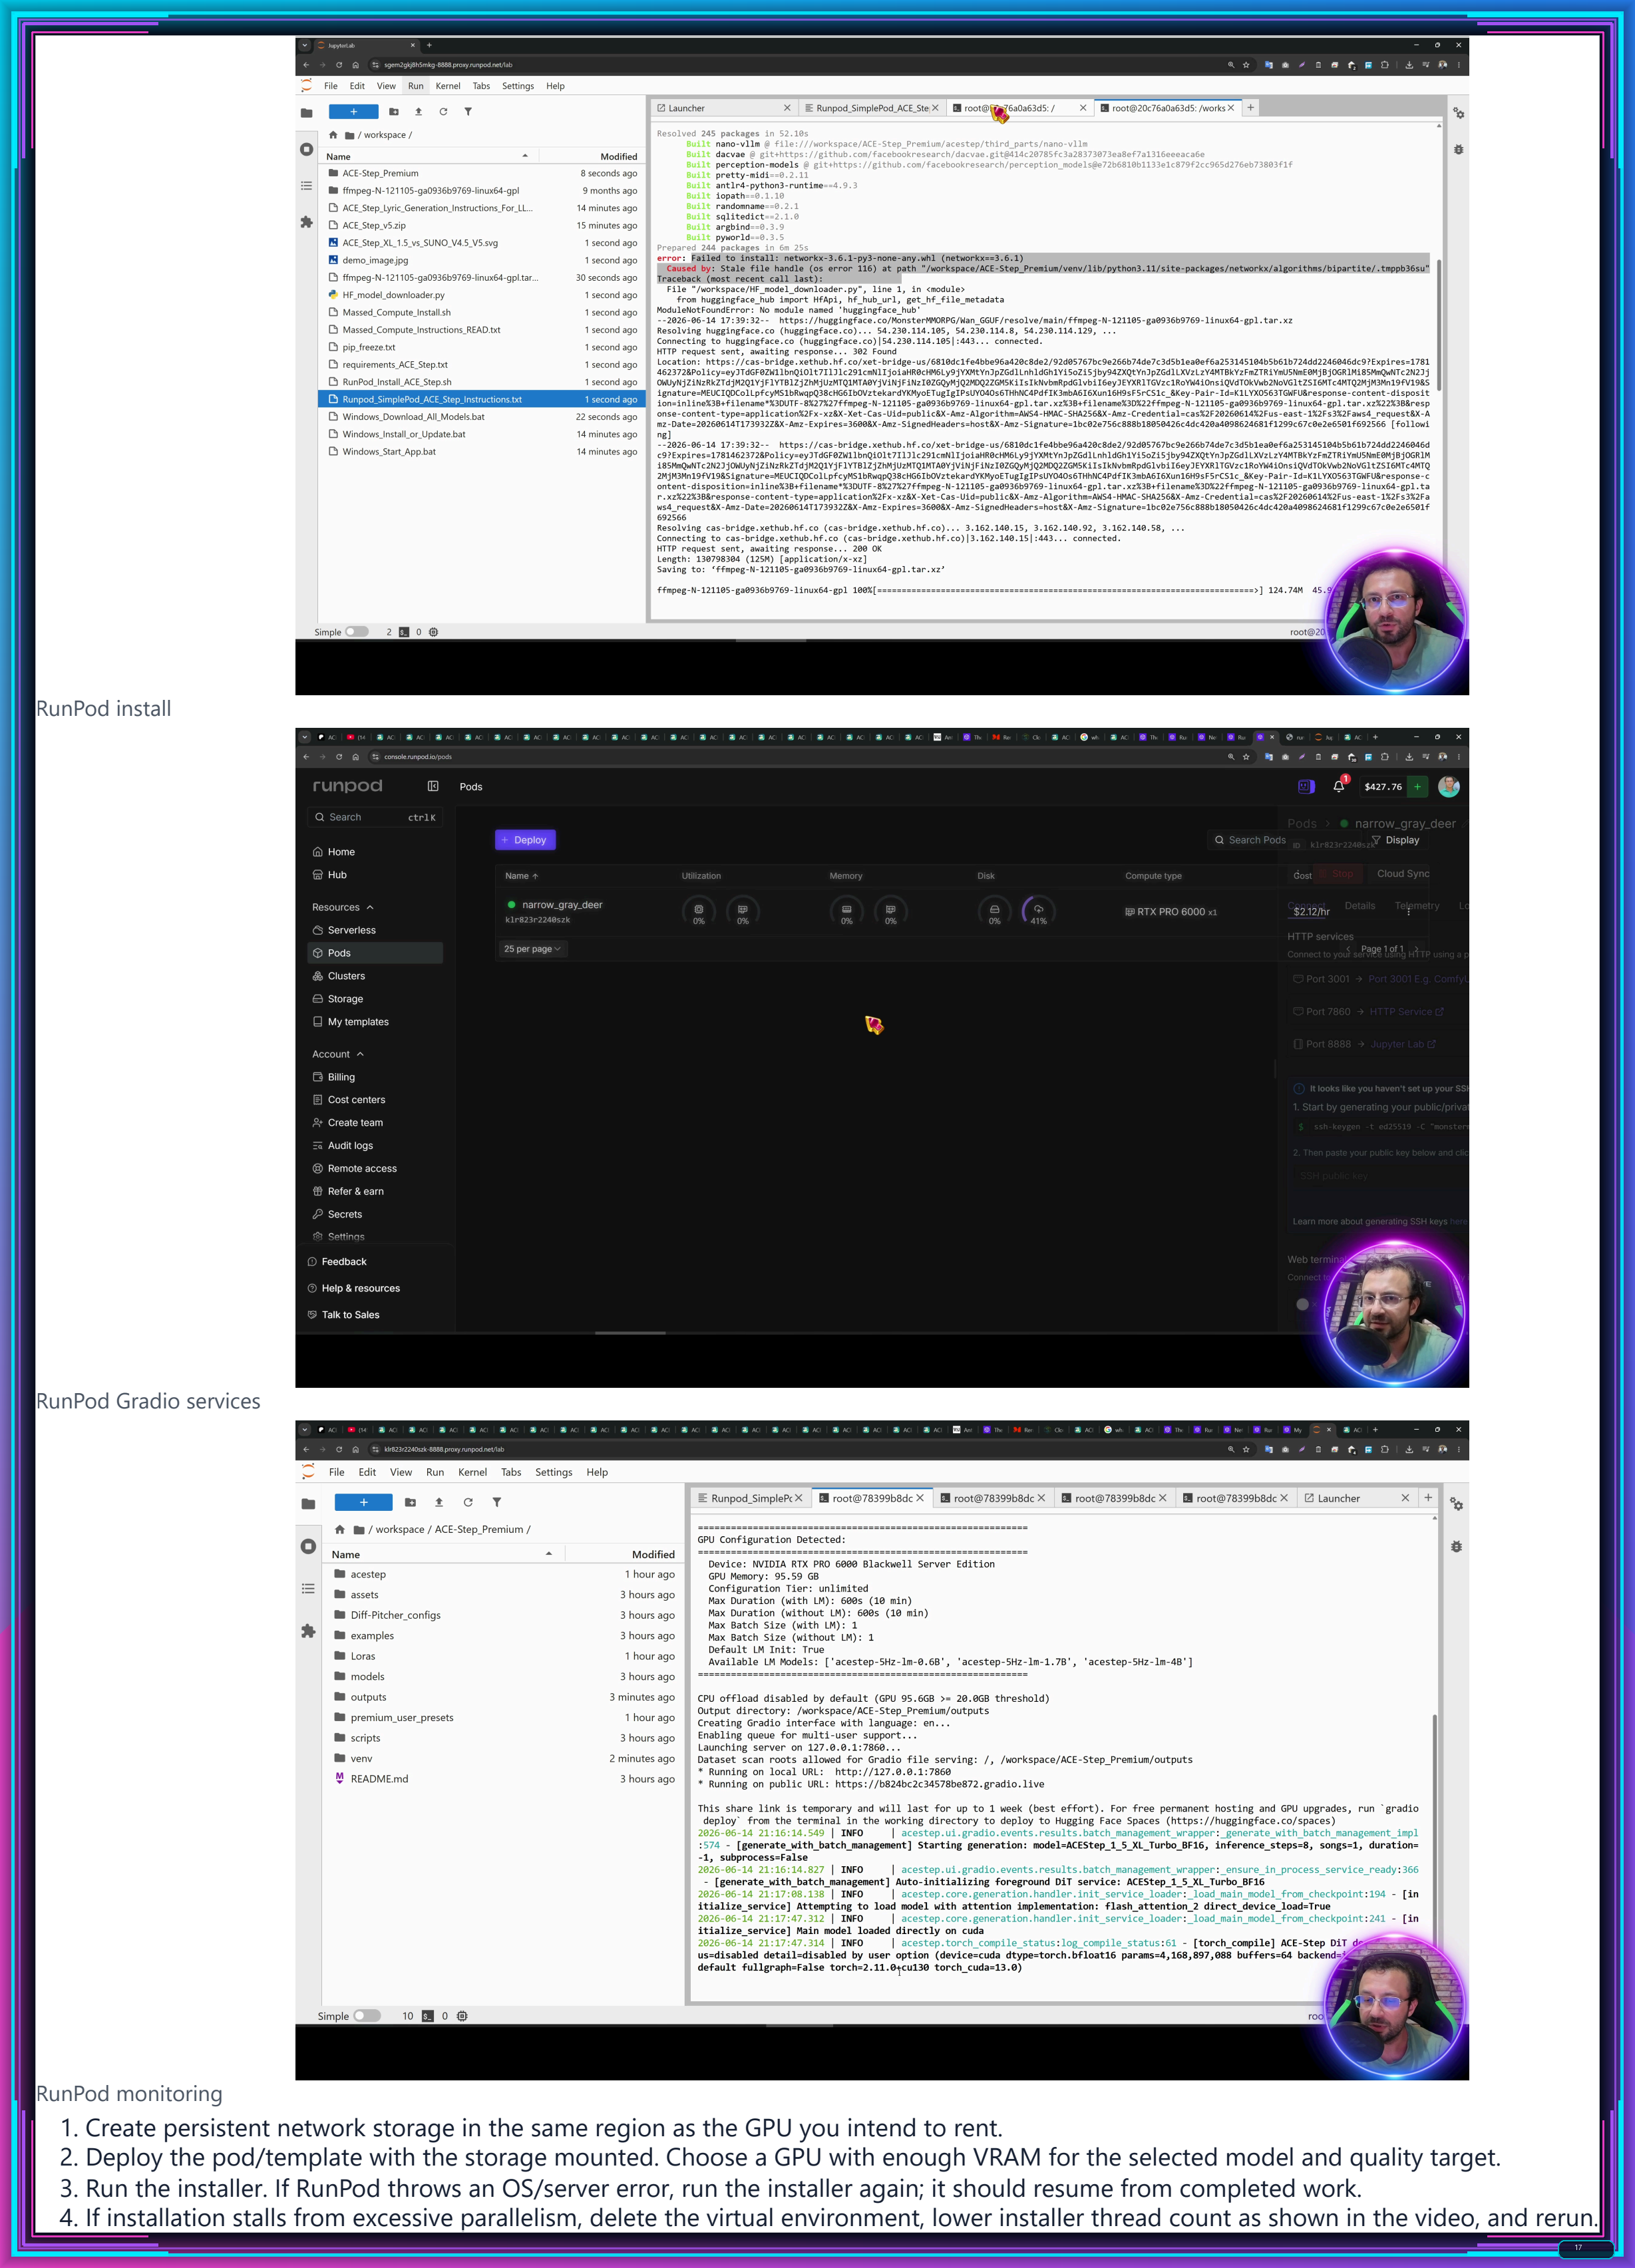
00:34:53 Upload zip in Jupyter Lab, extract, run instructions and handle installs
00:35:43 RunPod errors, resume behavior, model downloads and hash verification
00:38:04 Start ACESTEP on RunPod with Gradio Live, proxy ports and persistence
00:40:18 Add 7860/7861 ports, verify storage reuse and rerun installer after resume
00:42:10 RunPod connection troubleshooting and Gradio Live recommendation
00:44:12 Fix corrupted VENV/stale handle errors, reinstall safely and retest
00:47:24 Successful RunPod relaunch, default generation, nvitop and loading tips
00:49:26 RunPod first load vs fast inference, 15-second second generation example
00:51:02 Download outputs and delete RunPod pods/storage to stop spending
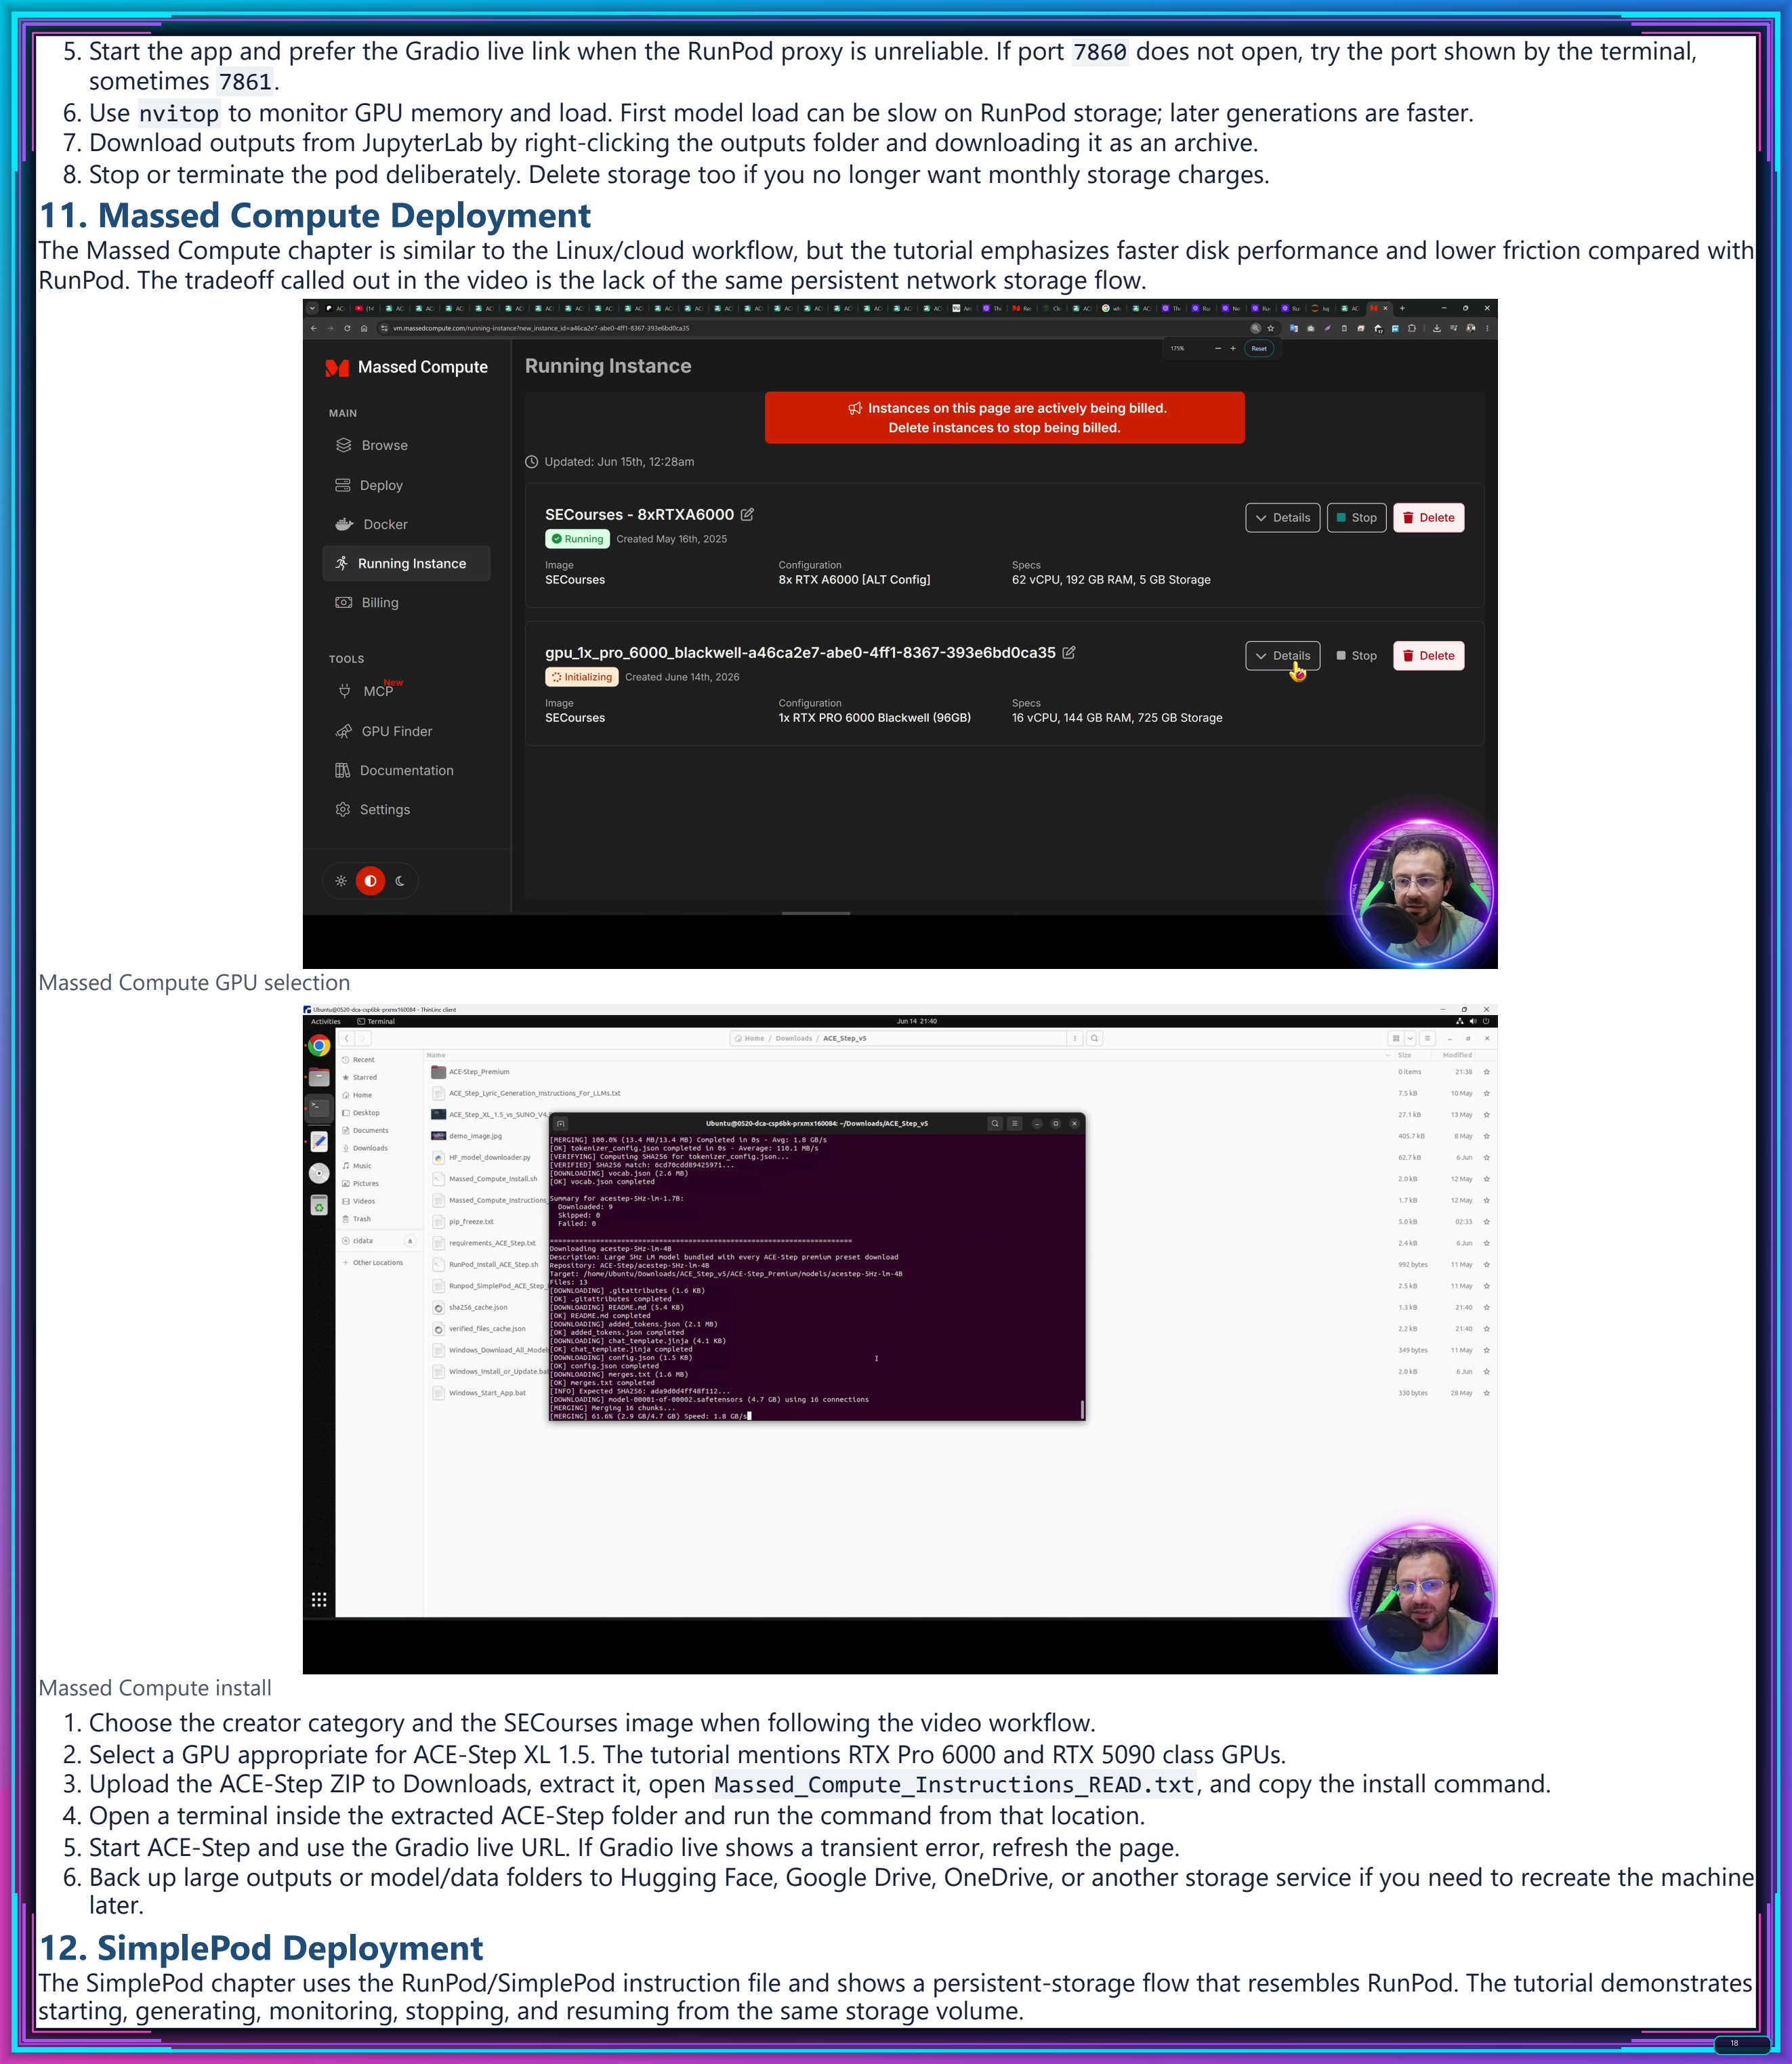
00:53:30 Massed Compute setup: coupon, Creator image, GPU prices and ThinLinc
00:57:13 Massed install from extracted folder, Linux notes and ultra-fast downloads
00:59:18 Start app on Massed Compute via localhost or Gradio Live
01:00:23 Default Massed generation, nvitop, faster loading and speed test
01:02:03 Sync/download outputs and delete Massed Compute instance safely
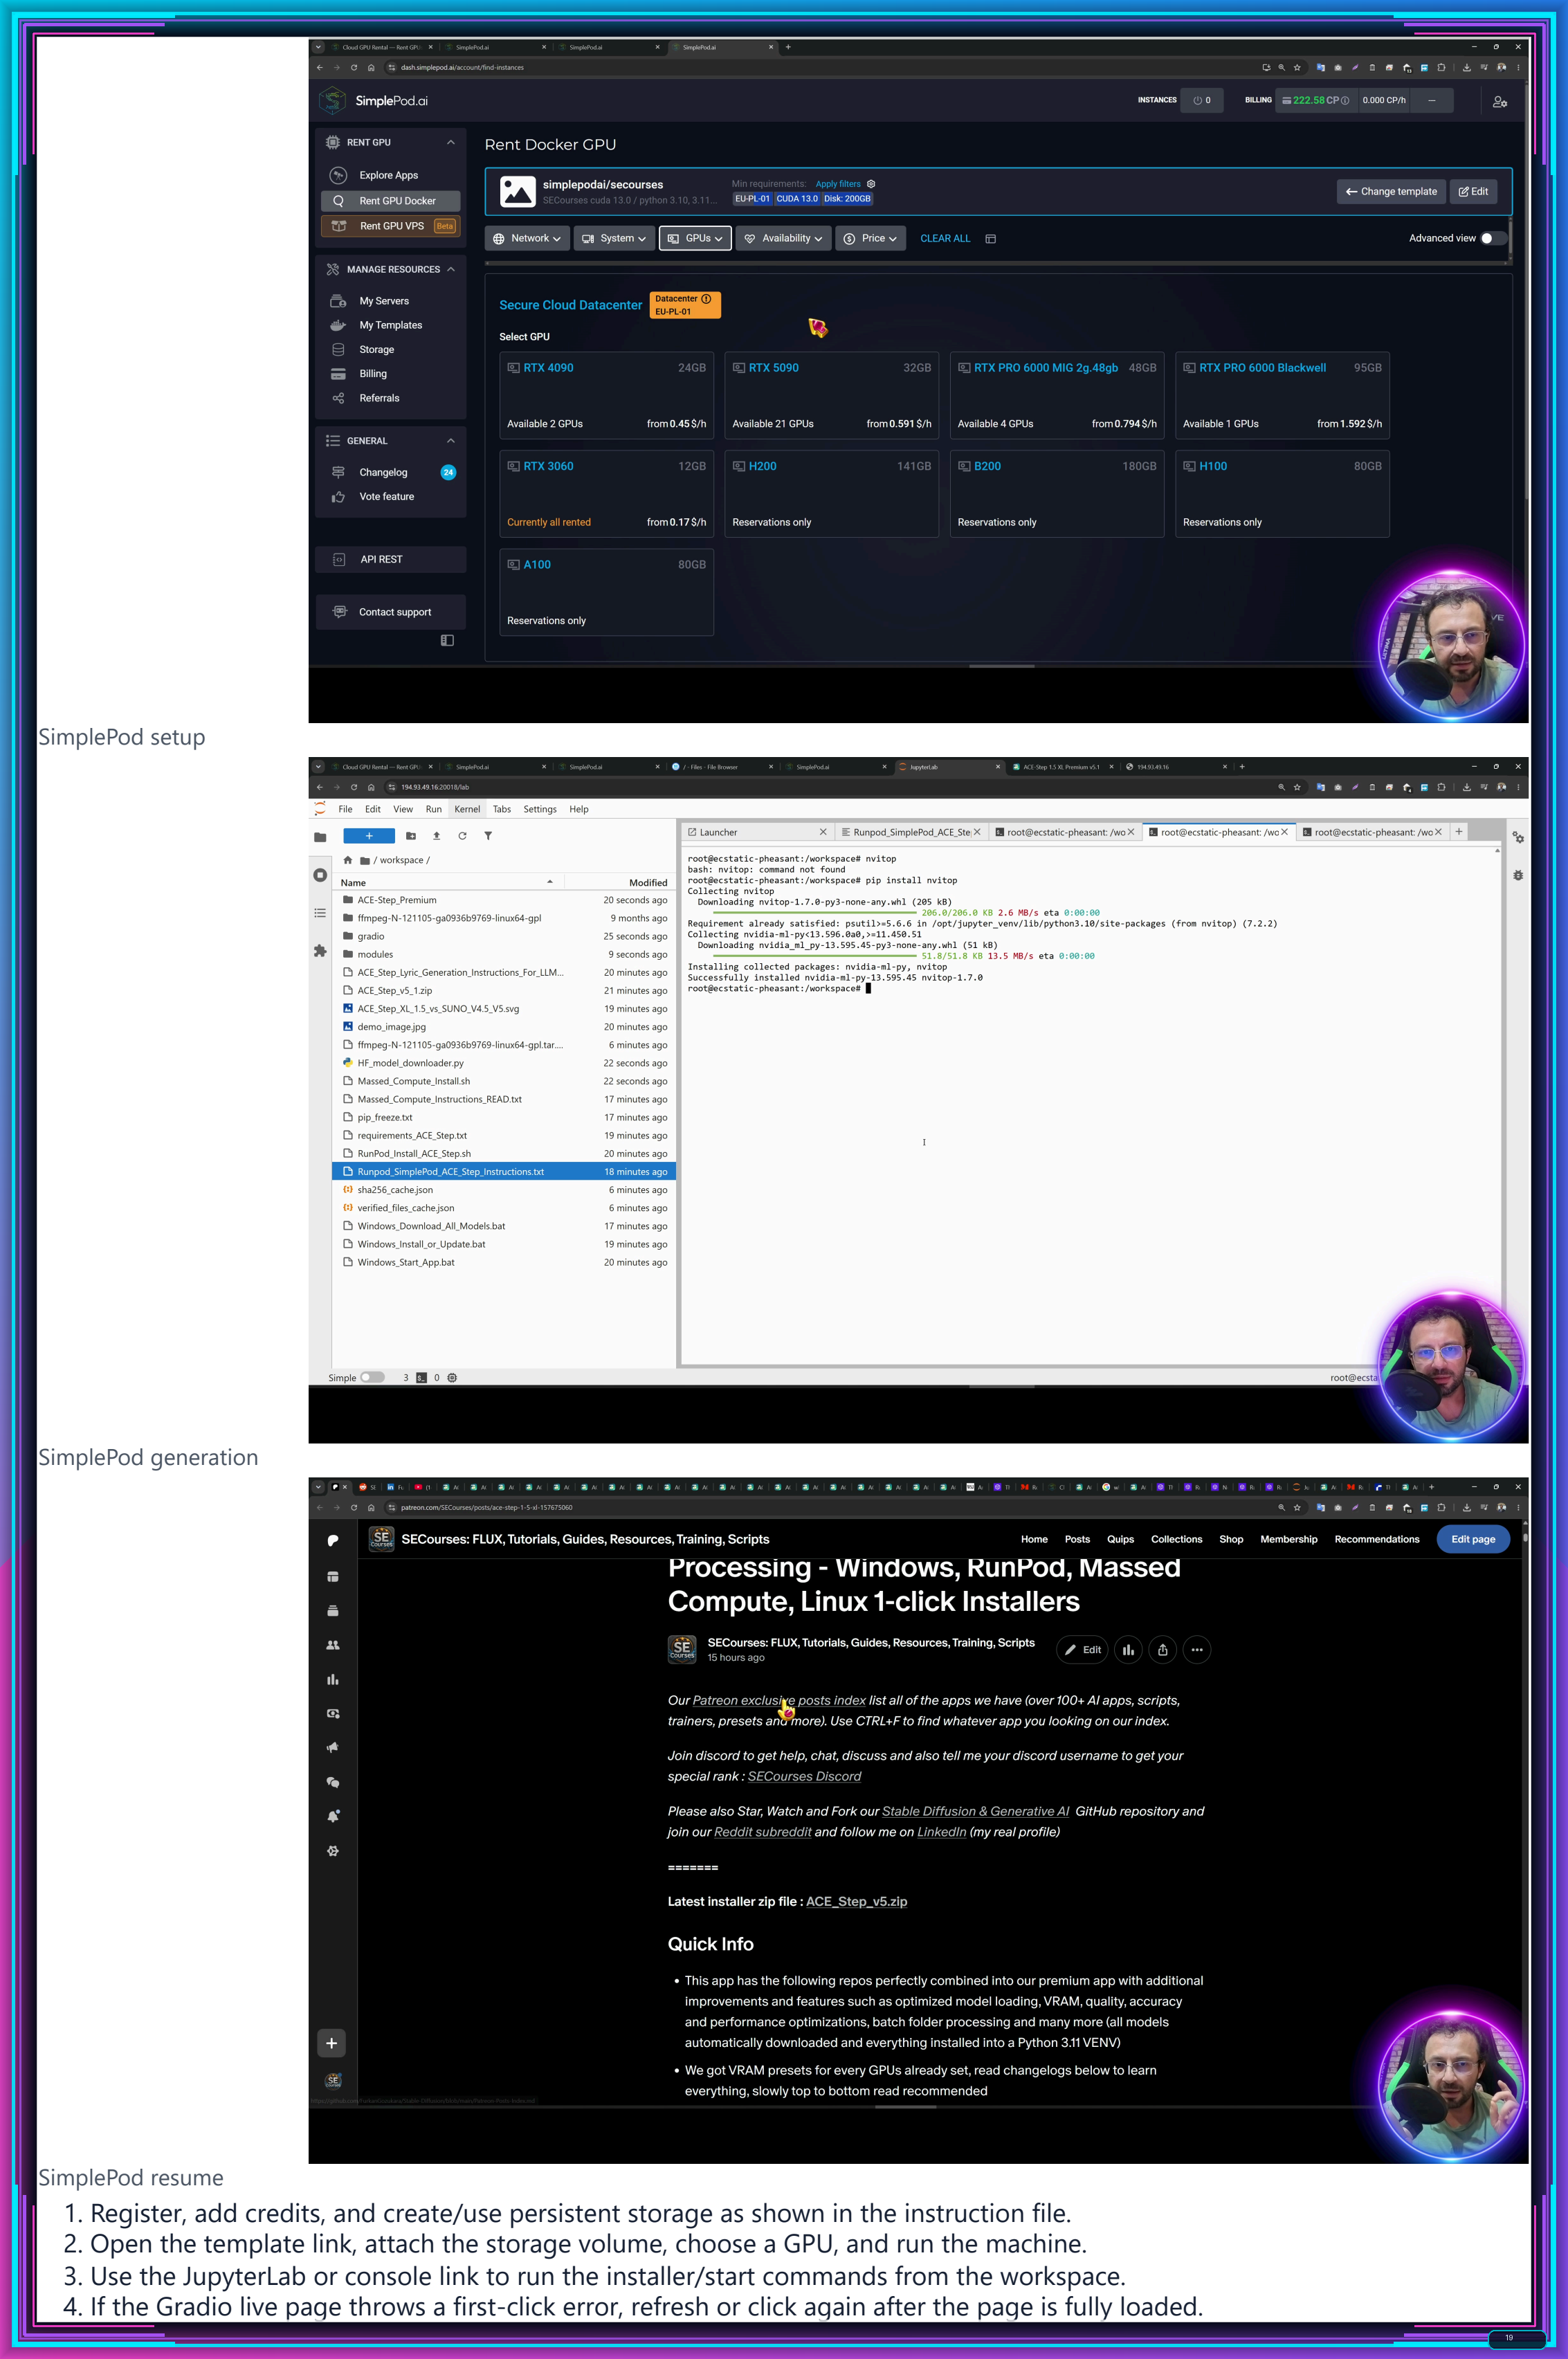
01:03:25 SimplePod setup: template, persistent volume, pricing and GPU choice
01:06:39 Jupyter upload, direct file browser, install command and model downloads
01:08:21 Start SimplePod, Gradio Live, default generation and one-time load errors
01:09:31 nvitop monitoring, newer driver/CUDA details and generation completion
01:10:42 Direct output/model downloads through SimplePod file browser
01:11:42 Delete instance, keep storage, relaunch GPU and verify install
01:13:15 Discord, subreddit, changelog, update guidance and support links
01:14:30 Final cleanup: terminate servers, delete storage and LoRA training outro
#ACESTEP #AIMusic #LocalAI #RunPod #MassedCompute #SimplePod #SAMAudio
I also prepared a polished written tutorial from the full ACESTEP XL 1.5 video and updated it with the new ACE-Step XL 1.5 Premium v5.3 Wildcards feature. It uses real screenshots from the actual application, includes the YouTube tutorial thumbnail/link context, and keeps the complete video chapters and transcript below this section.
- Full YouTube video tutorial: https://youtu.be/9C_6qNKjgpA
- Patreon app/latest zip and premium post: https://www.patreon.com/posts/ACESTEP-XL-Premium-SAM-Audio-157675060
- Written DOCX tutorial: https://github.com/FurkanGozukara/Stable-Diffusion/raw/main/Tutorials/assets/forget-suno-ace-step-xl-15-written-tutorial/ACESTEP_XL_15_Written_Tutorial.docx
- Written HTML tutorial: https://github.com/FurkanGozukara/Stable-Diffusion/raw/main/Tutorials/assets/forget-suno-ace-step-xl-15-written-tutorial/ACESTEP_XL_15_Written_Tutorial.html
- Compact 20-page PDF tutorial: https://github.com/FurkanGozukara/Stable-Diffusion/raw/main/Tutorials/assets/forget-suno-ace-step-xl-15-written-tutorial/ACESTEP_XL_15_Compact_20_Page_Tutorial.pdf
- Compact 20-page HTML tutorial: https://github.com/FurkanGozukara/Stable-Diffusion/raw/main/Tutorials/assets/forget-suno-ace-step-xl-15-written-tutorial/ACESTEP_XL_15_Compact_20_Page_Tutorial.html
- All high-resolution tutorial PNG pages: https://github.com/FurkanGozukara/Stable-Diffusion/tree/main/Tutorials/assets/forget-suno-ace-step-xl-15-written-tutorial
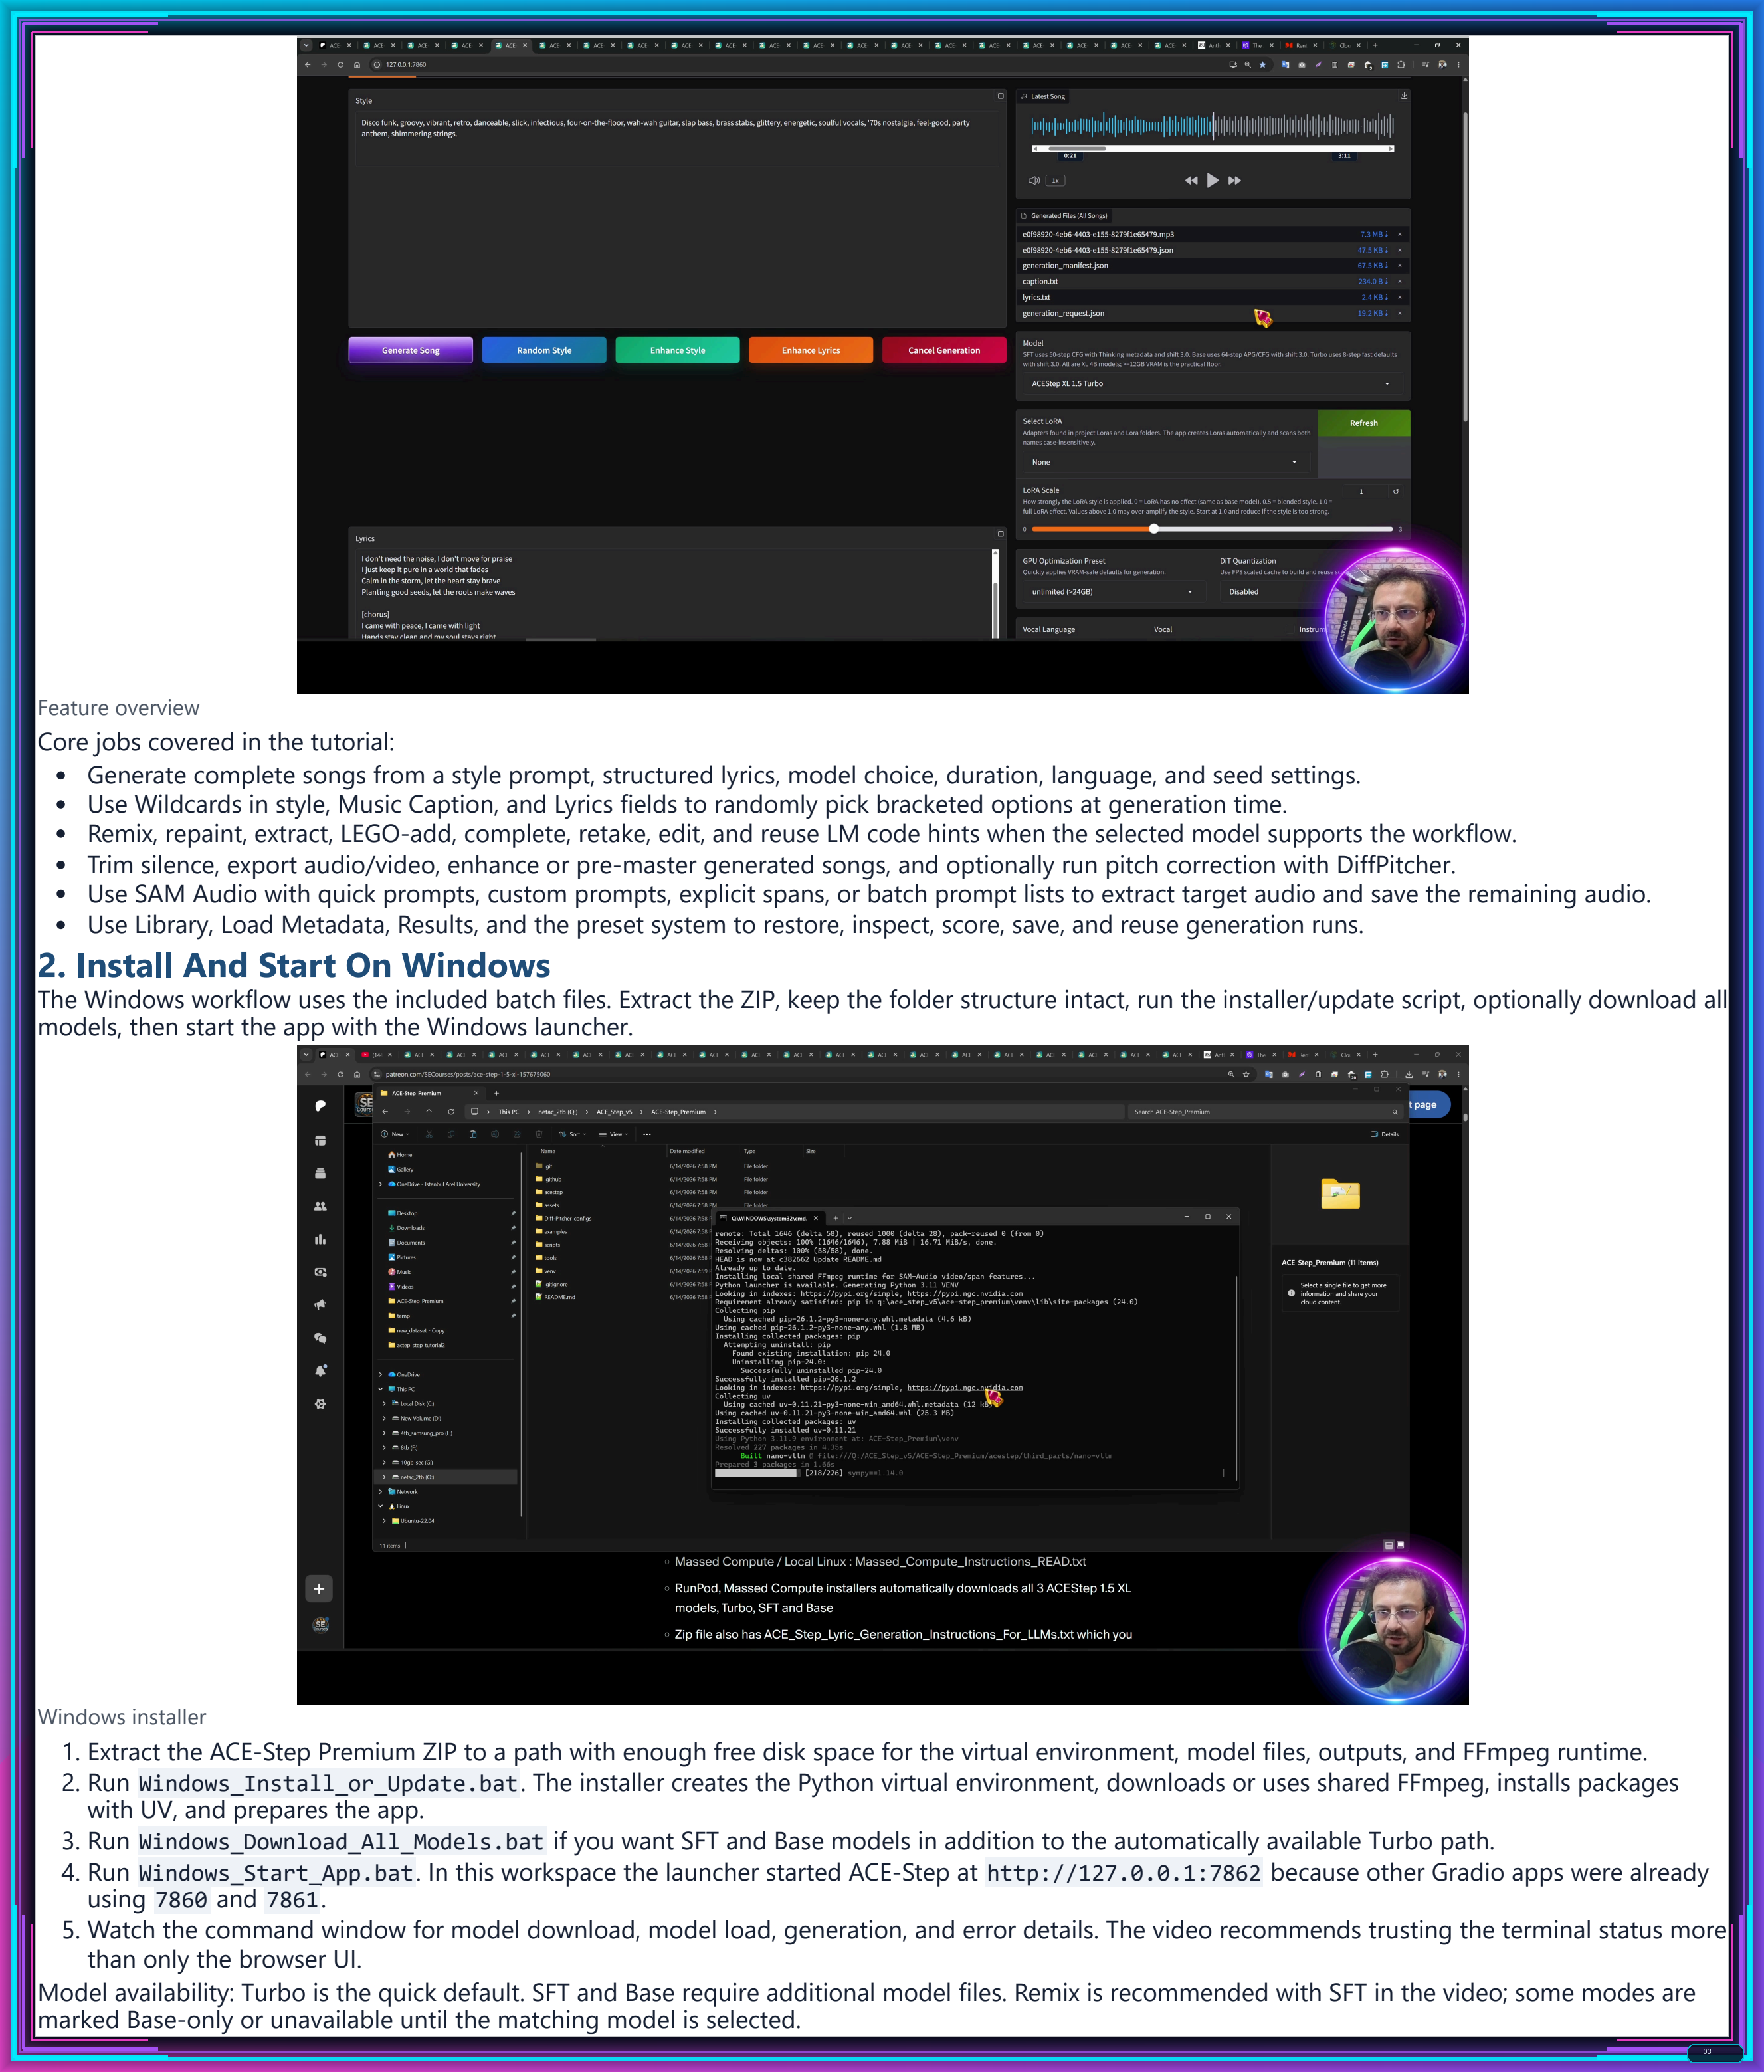
- Windows setup: downloading the Patreon zip, extracting safely, running
Windows_Install_or_Update.bat, downloading models, and launching withWindows_Start_App.bat. - First generation workflow: prompt, lyrics, model choice, duration, guidance/steps, seeds, output folders, metadata, and reusable settings.
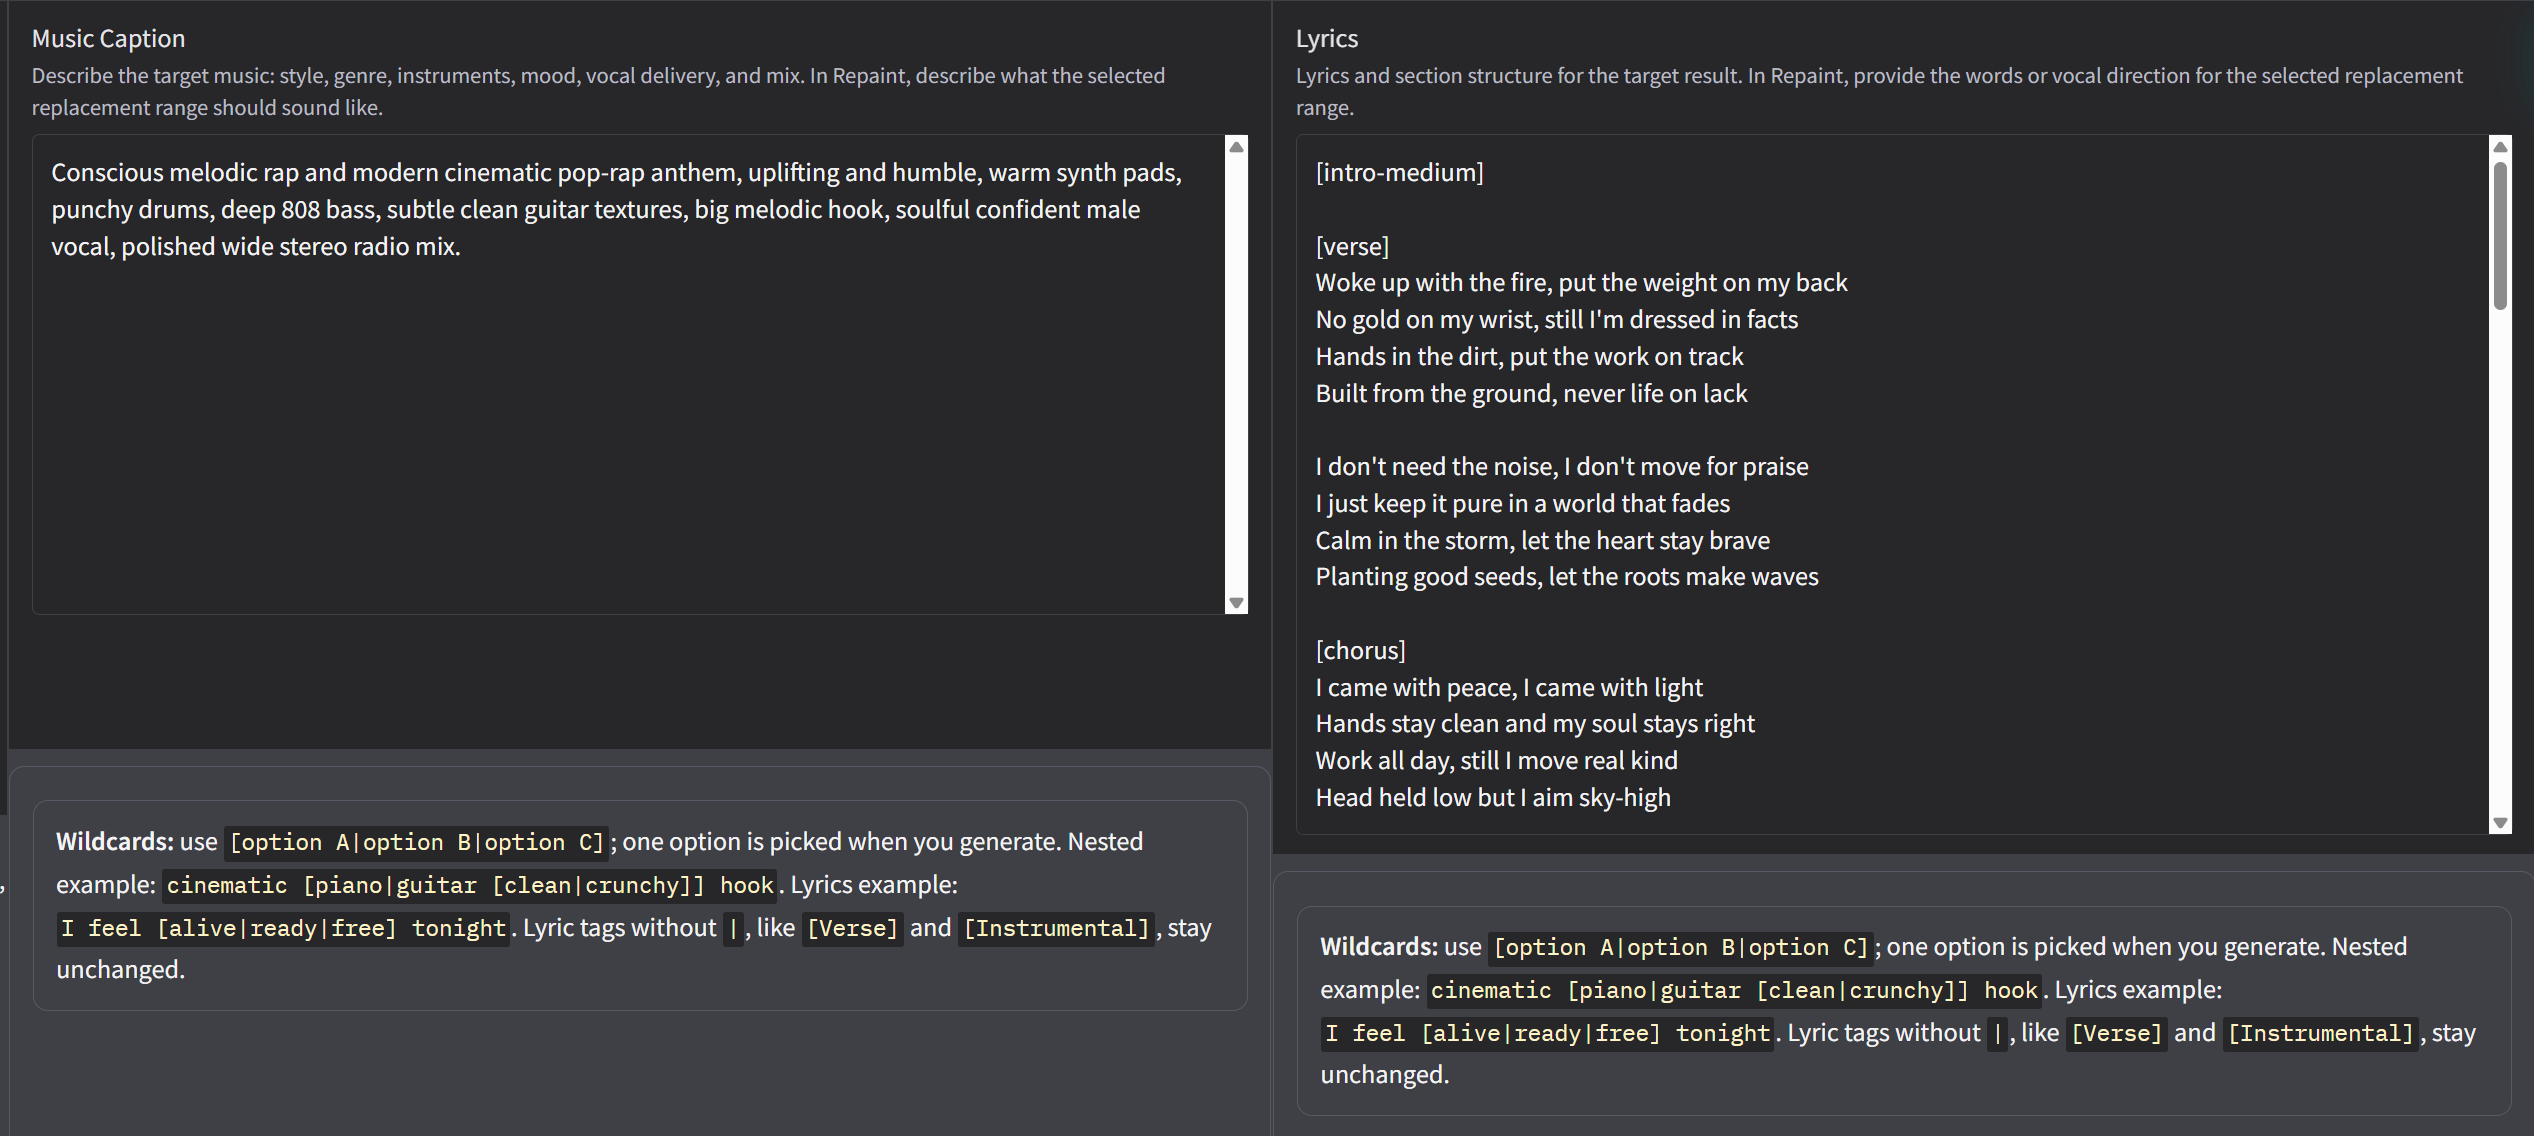
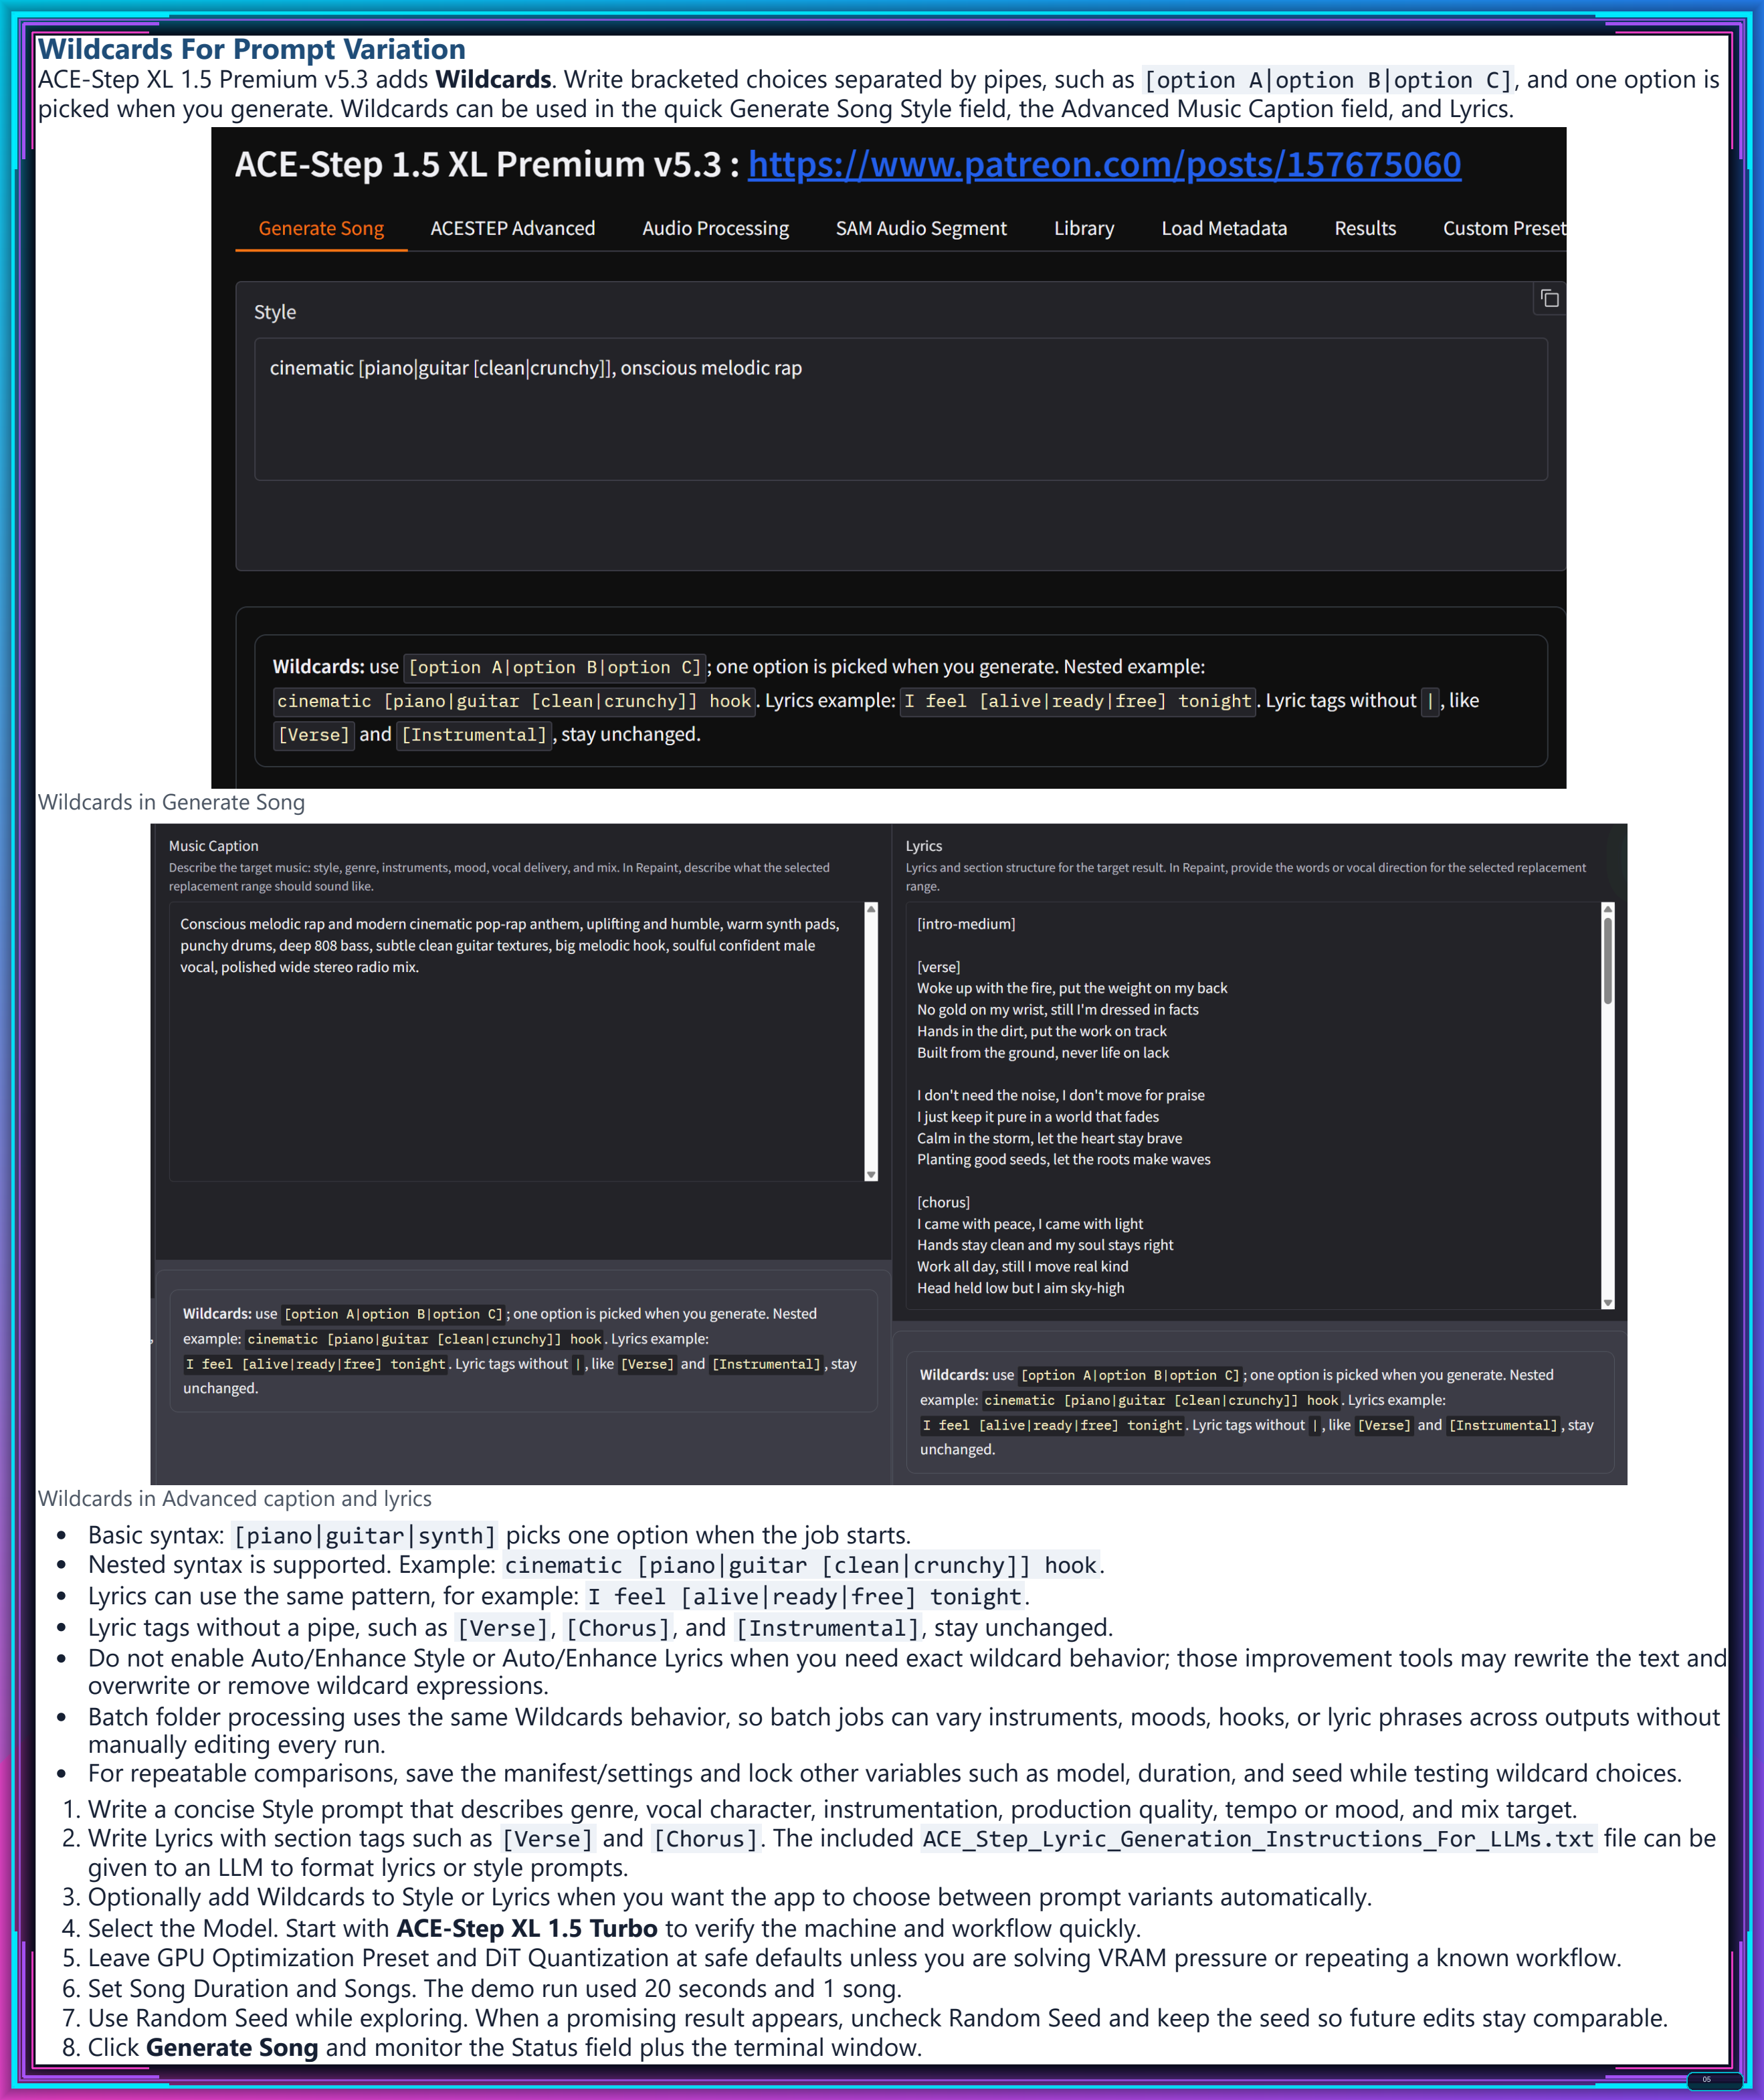
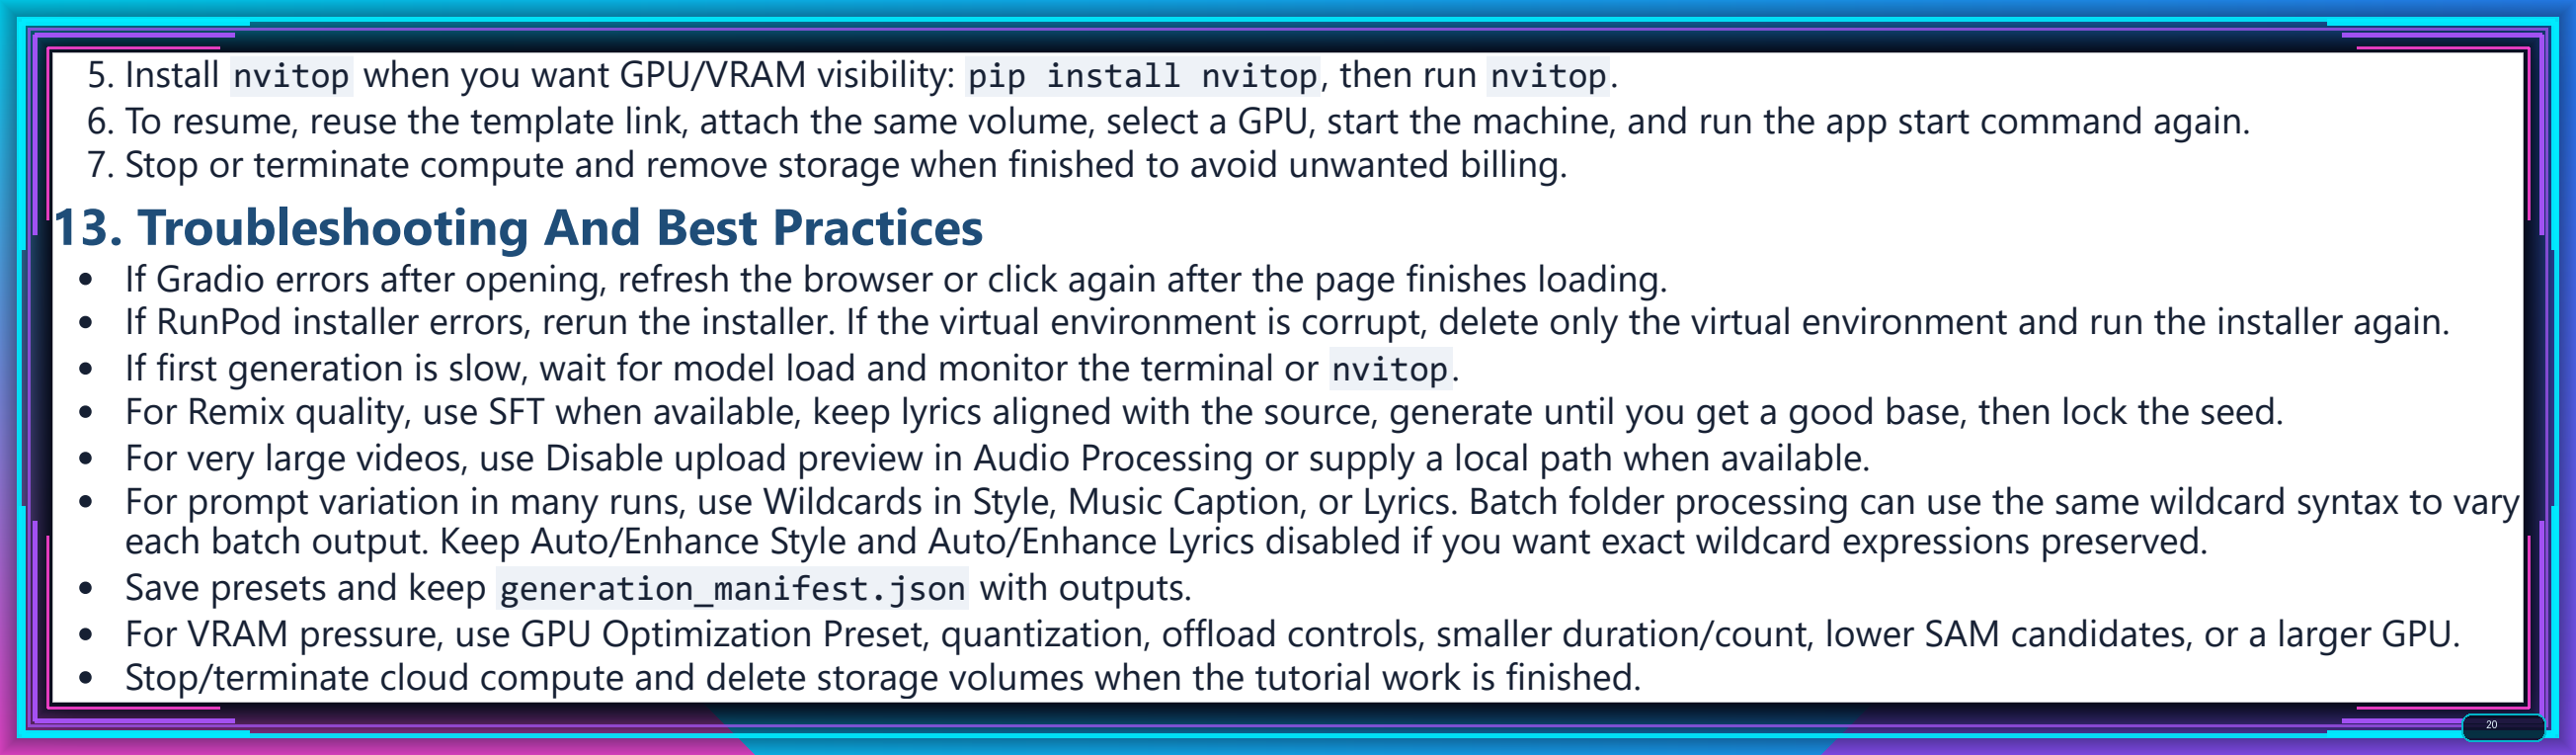
- Wildcards: use
[option A|option B|option C]in Style, Advanced Music Caption, or Lyrics so one option is picked at generation time; nested wildcards are supported. - Batch folder processing uses the same Wildcards behavior: batch jobs can vary instruments, moods, hooks, or lyric phrases across outputs without manually editing every run.
- Wildcards caveat: keep Auto/Enhance Style and Auto/Enhance Lyrics disabled when you need exact wildcard expressions preserved, because those improvement tools may rewrite the prompt text.
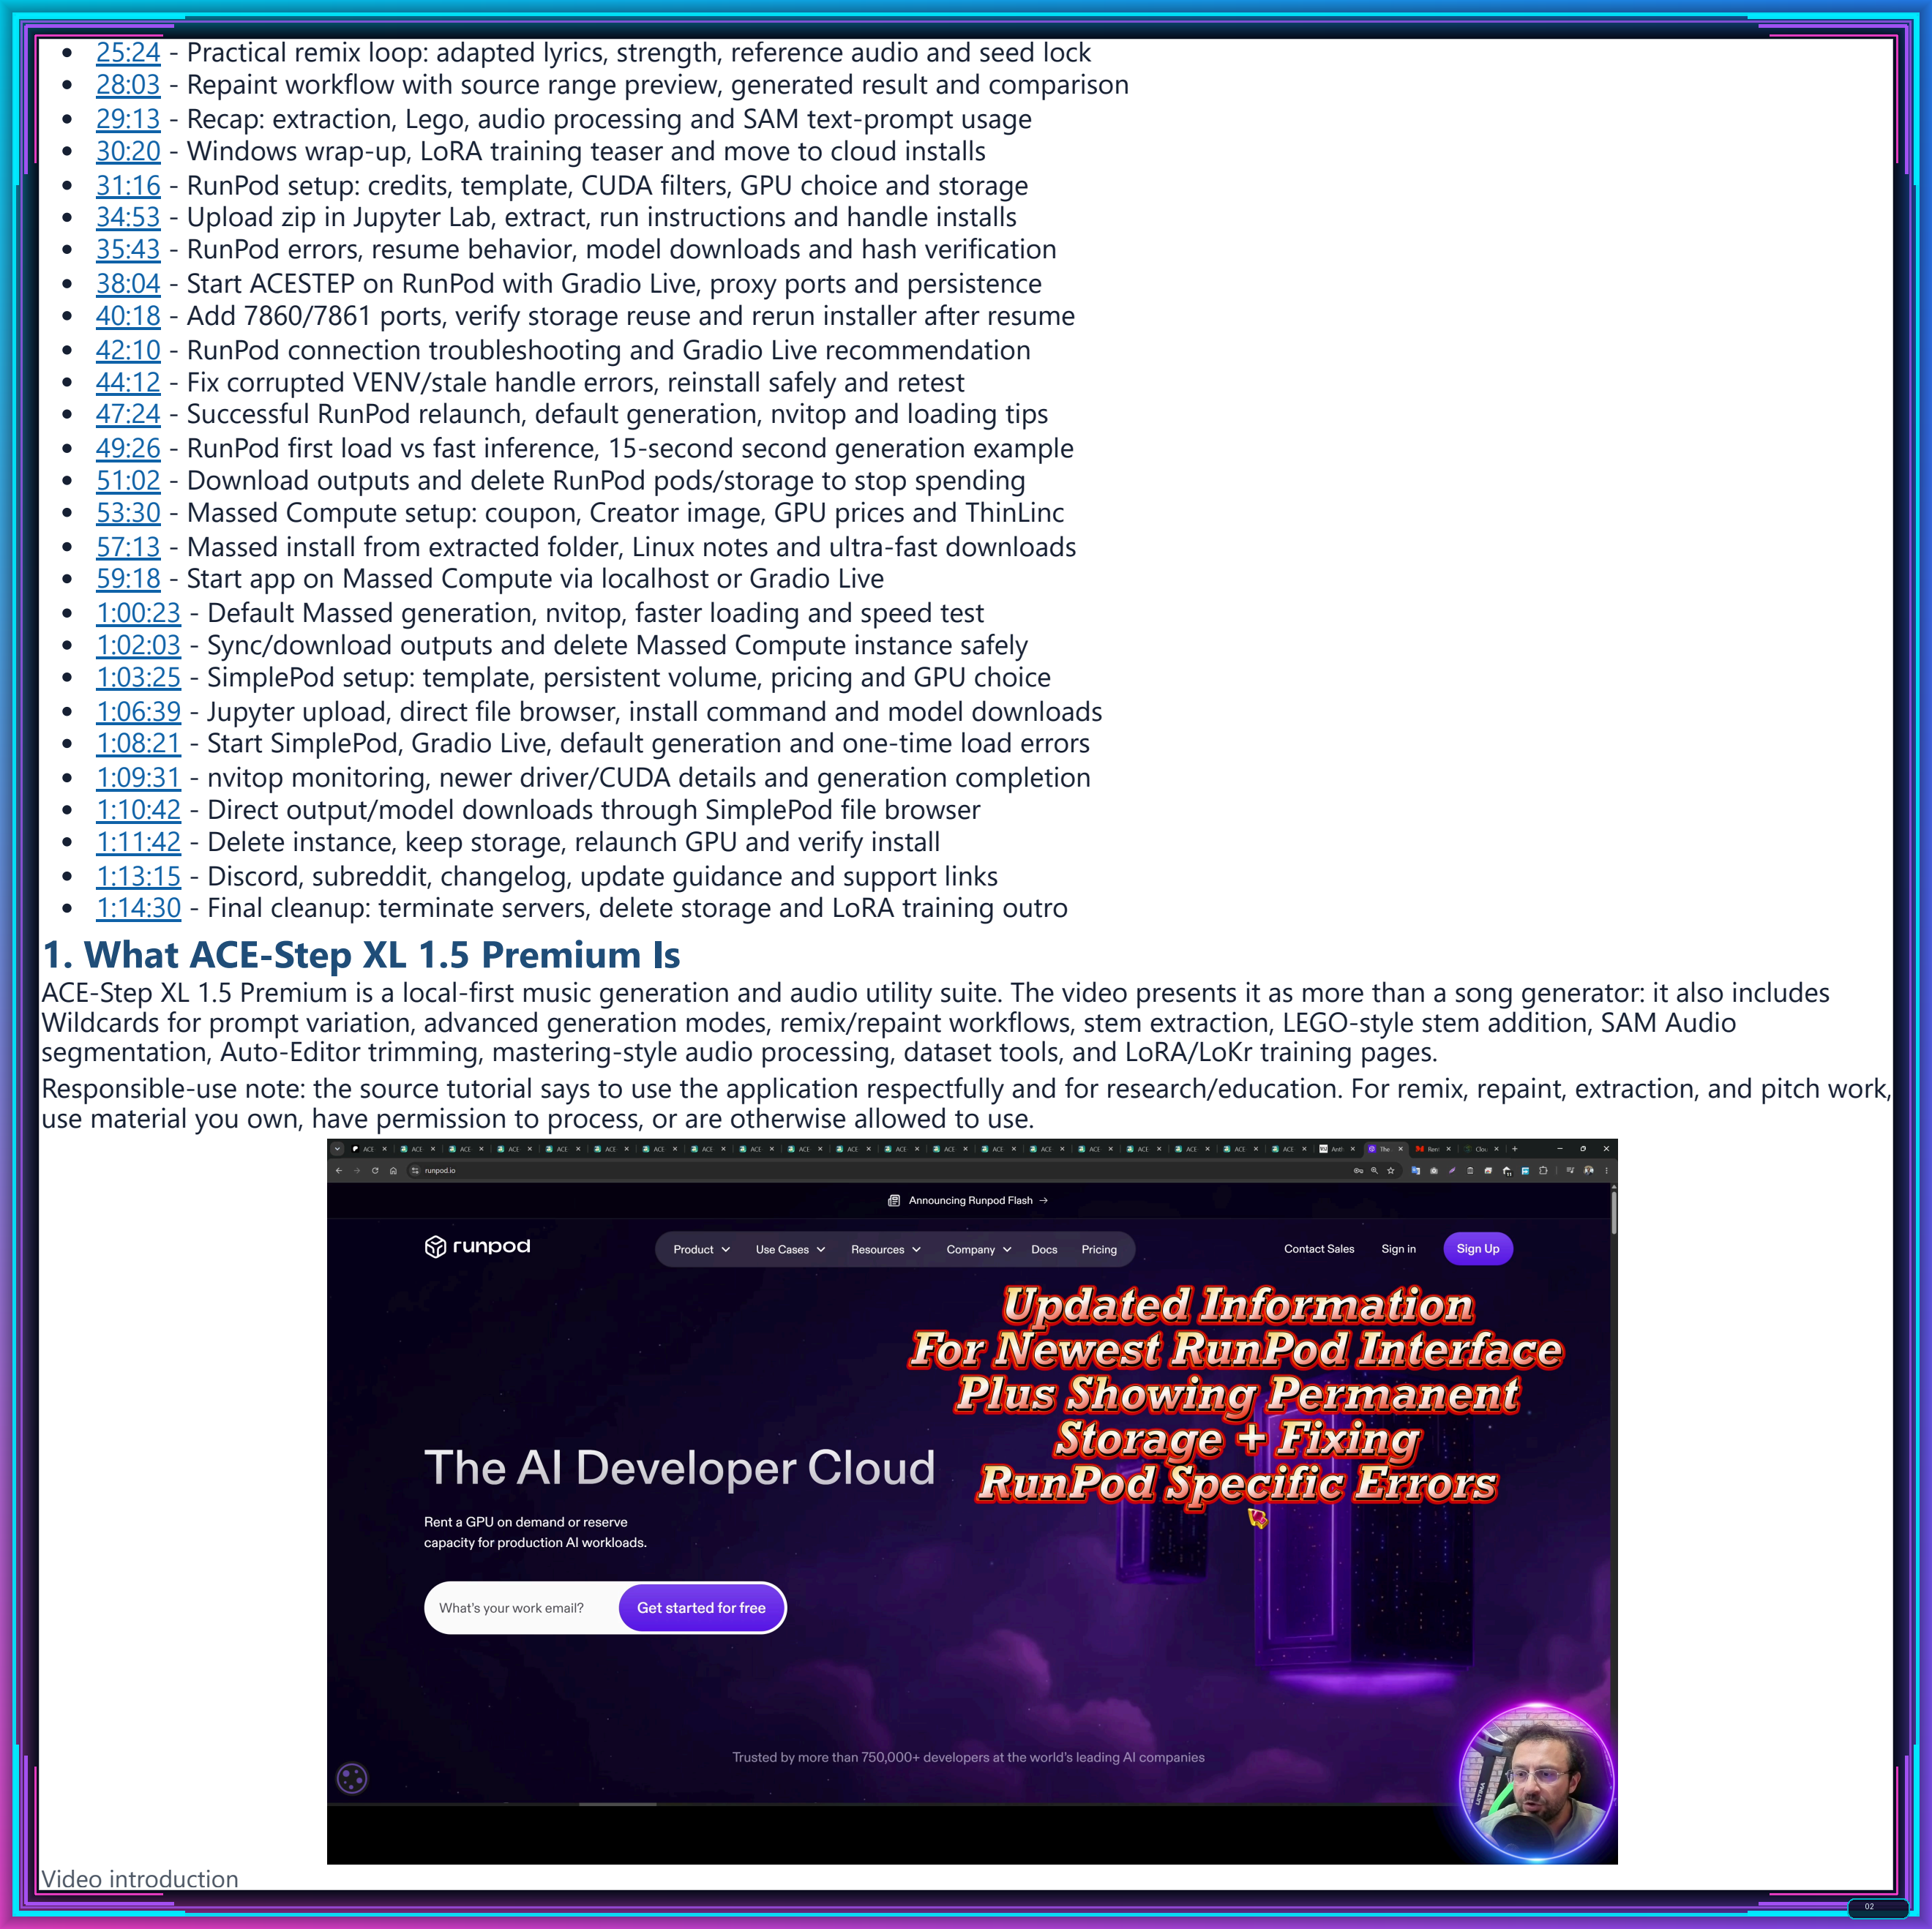
- Model and speed choices: Turbo, SFT, Base, BF16, VRAM presets, Torch Compile, and when each choice matters.
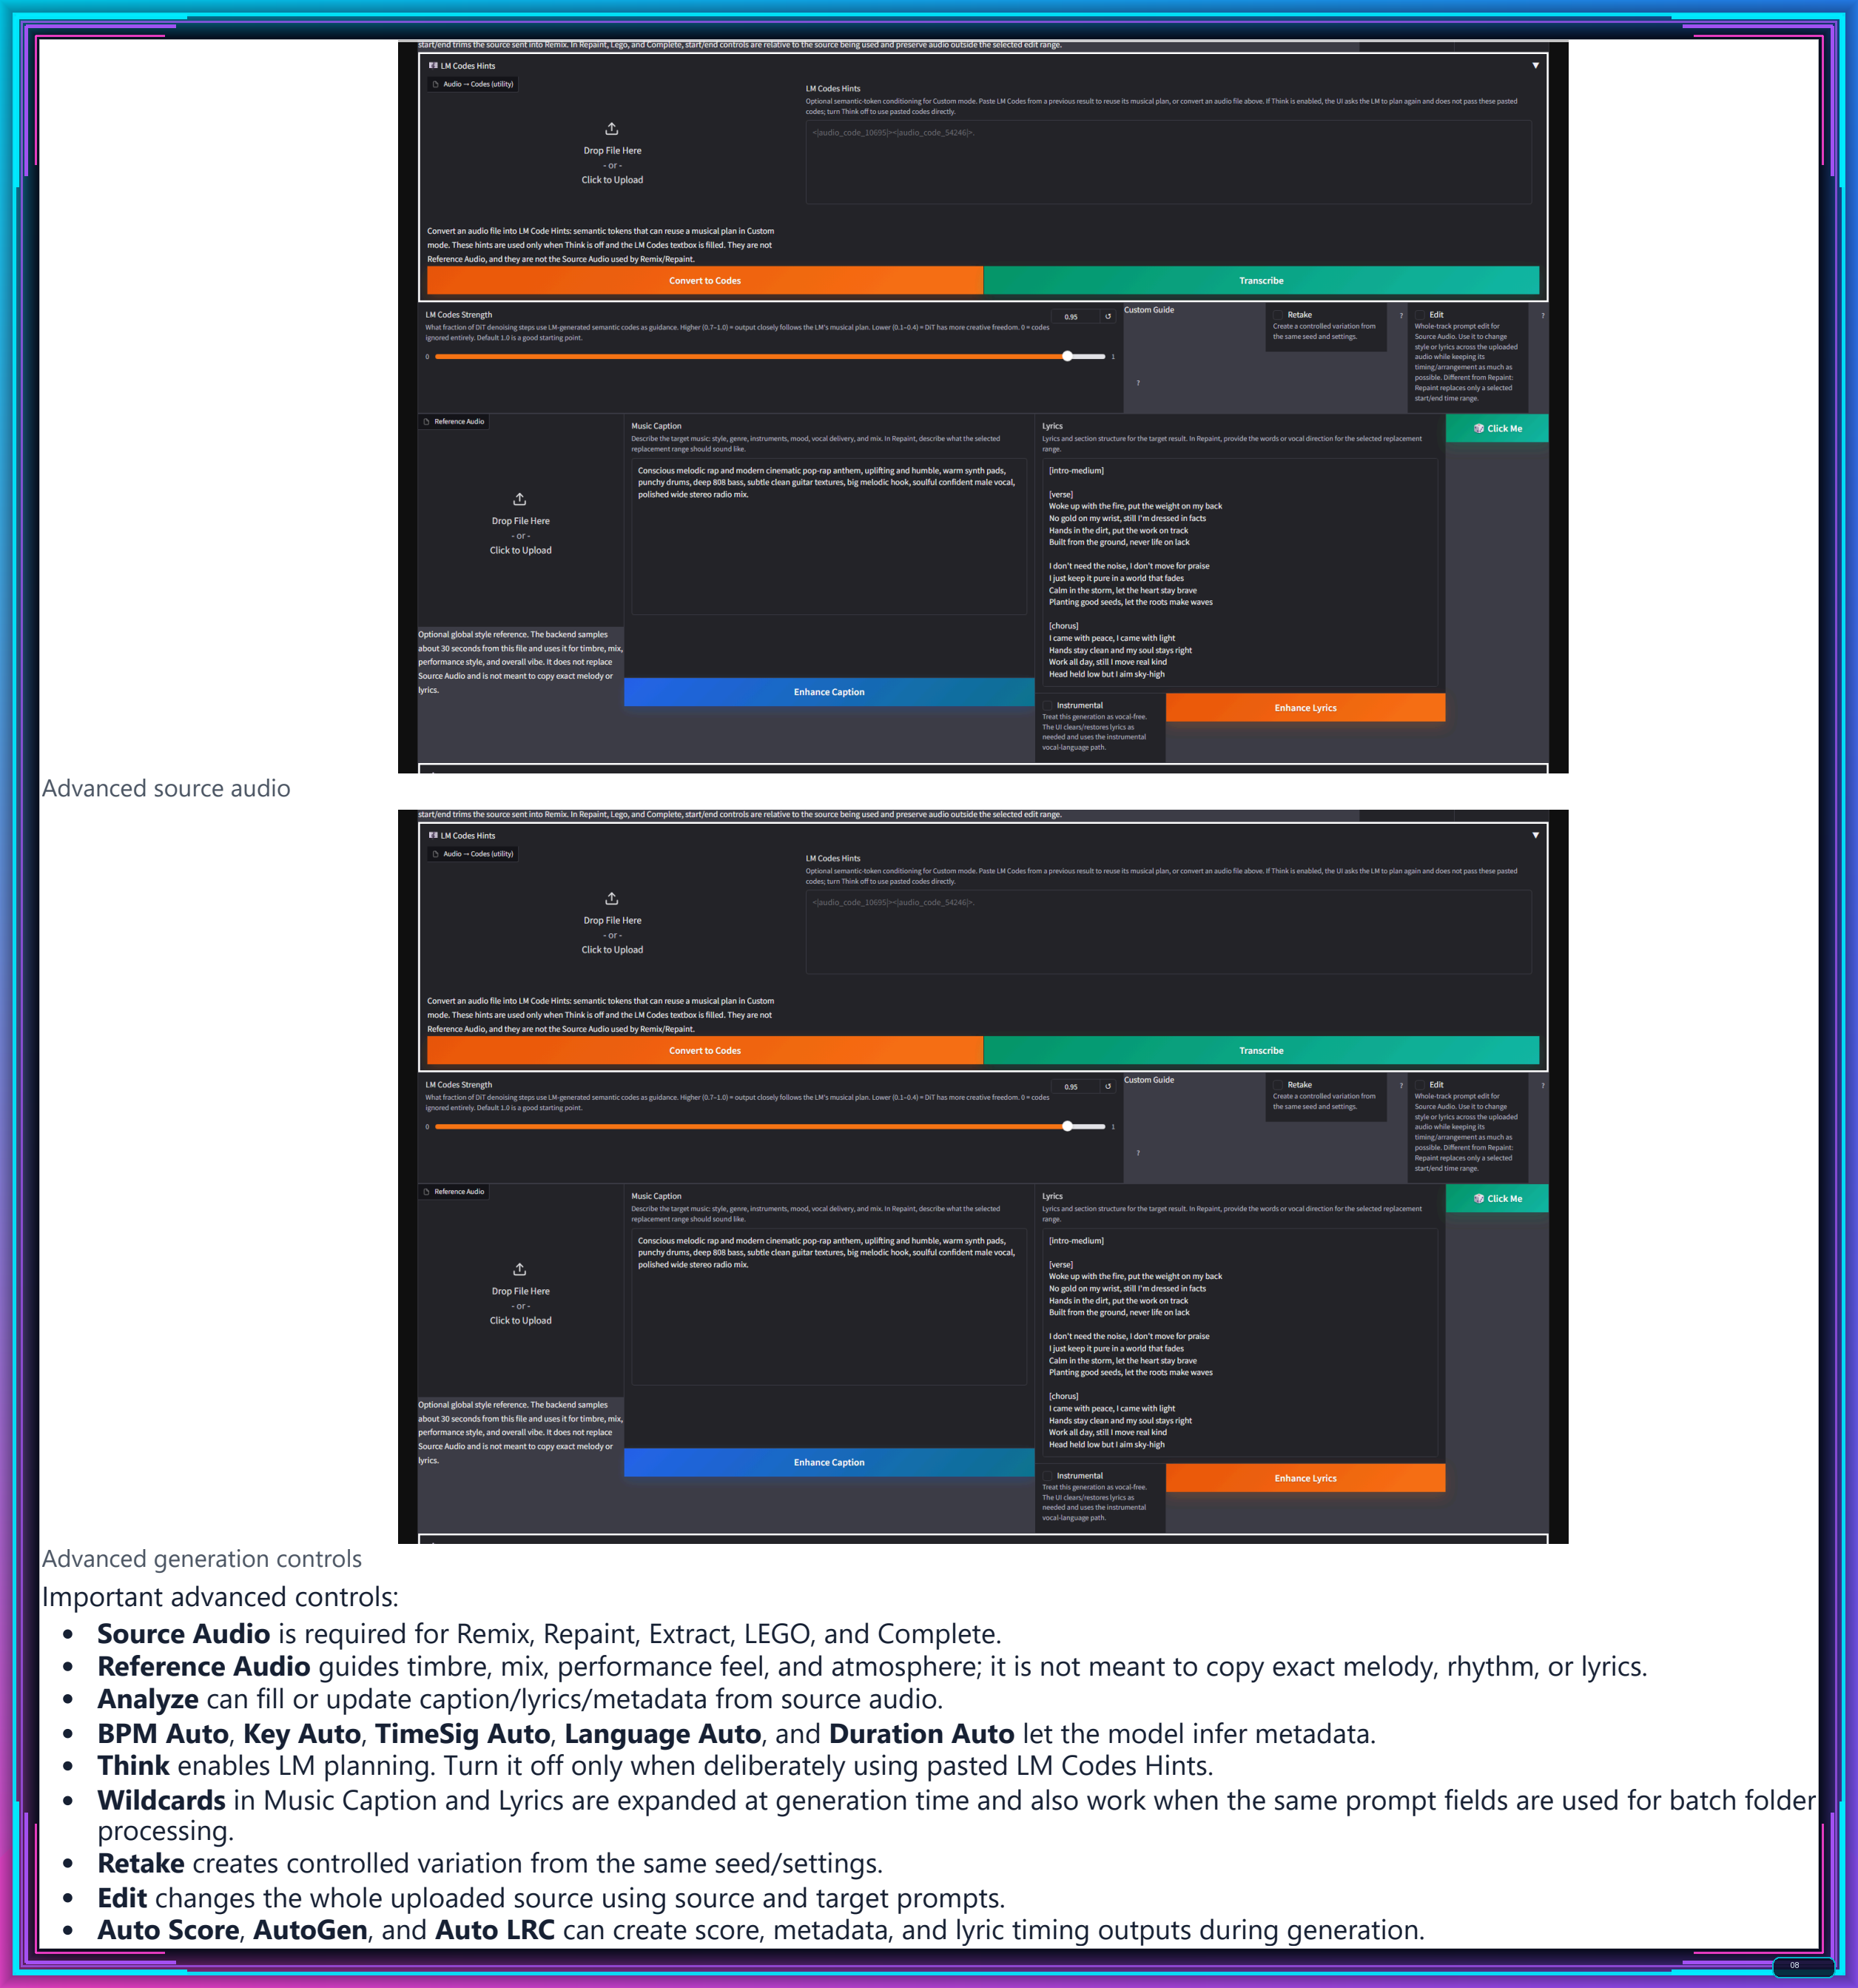
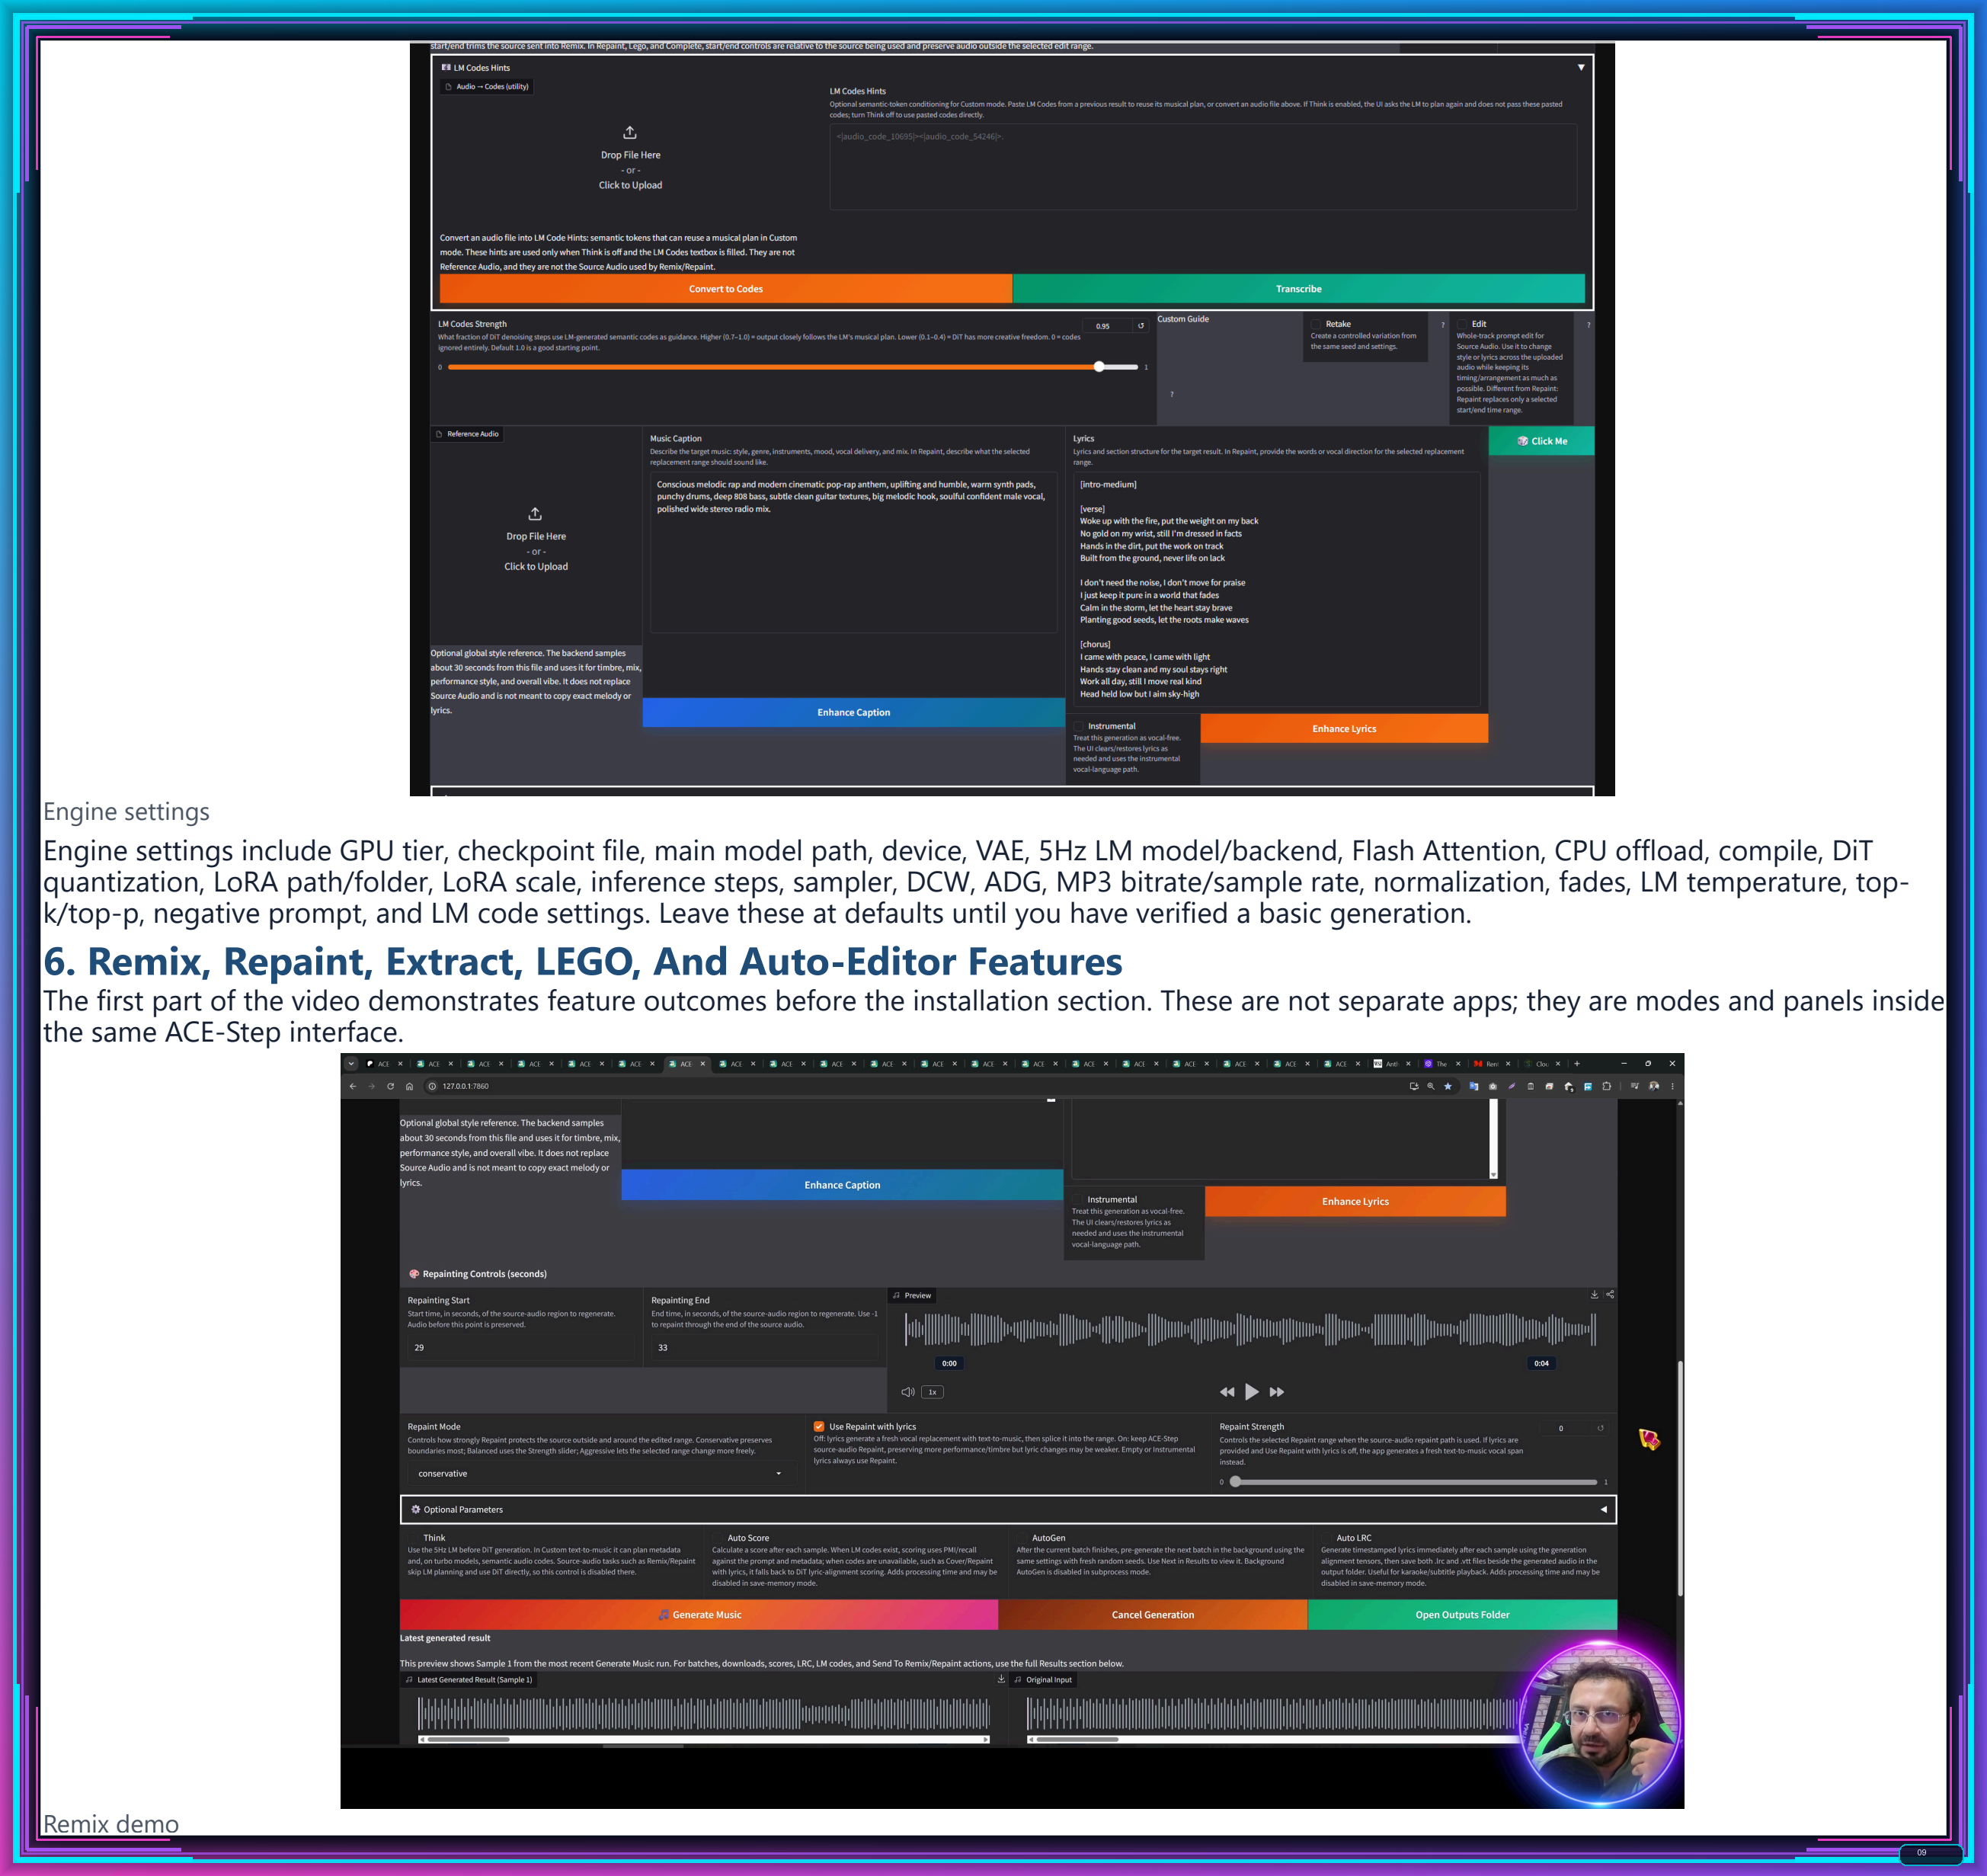
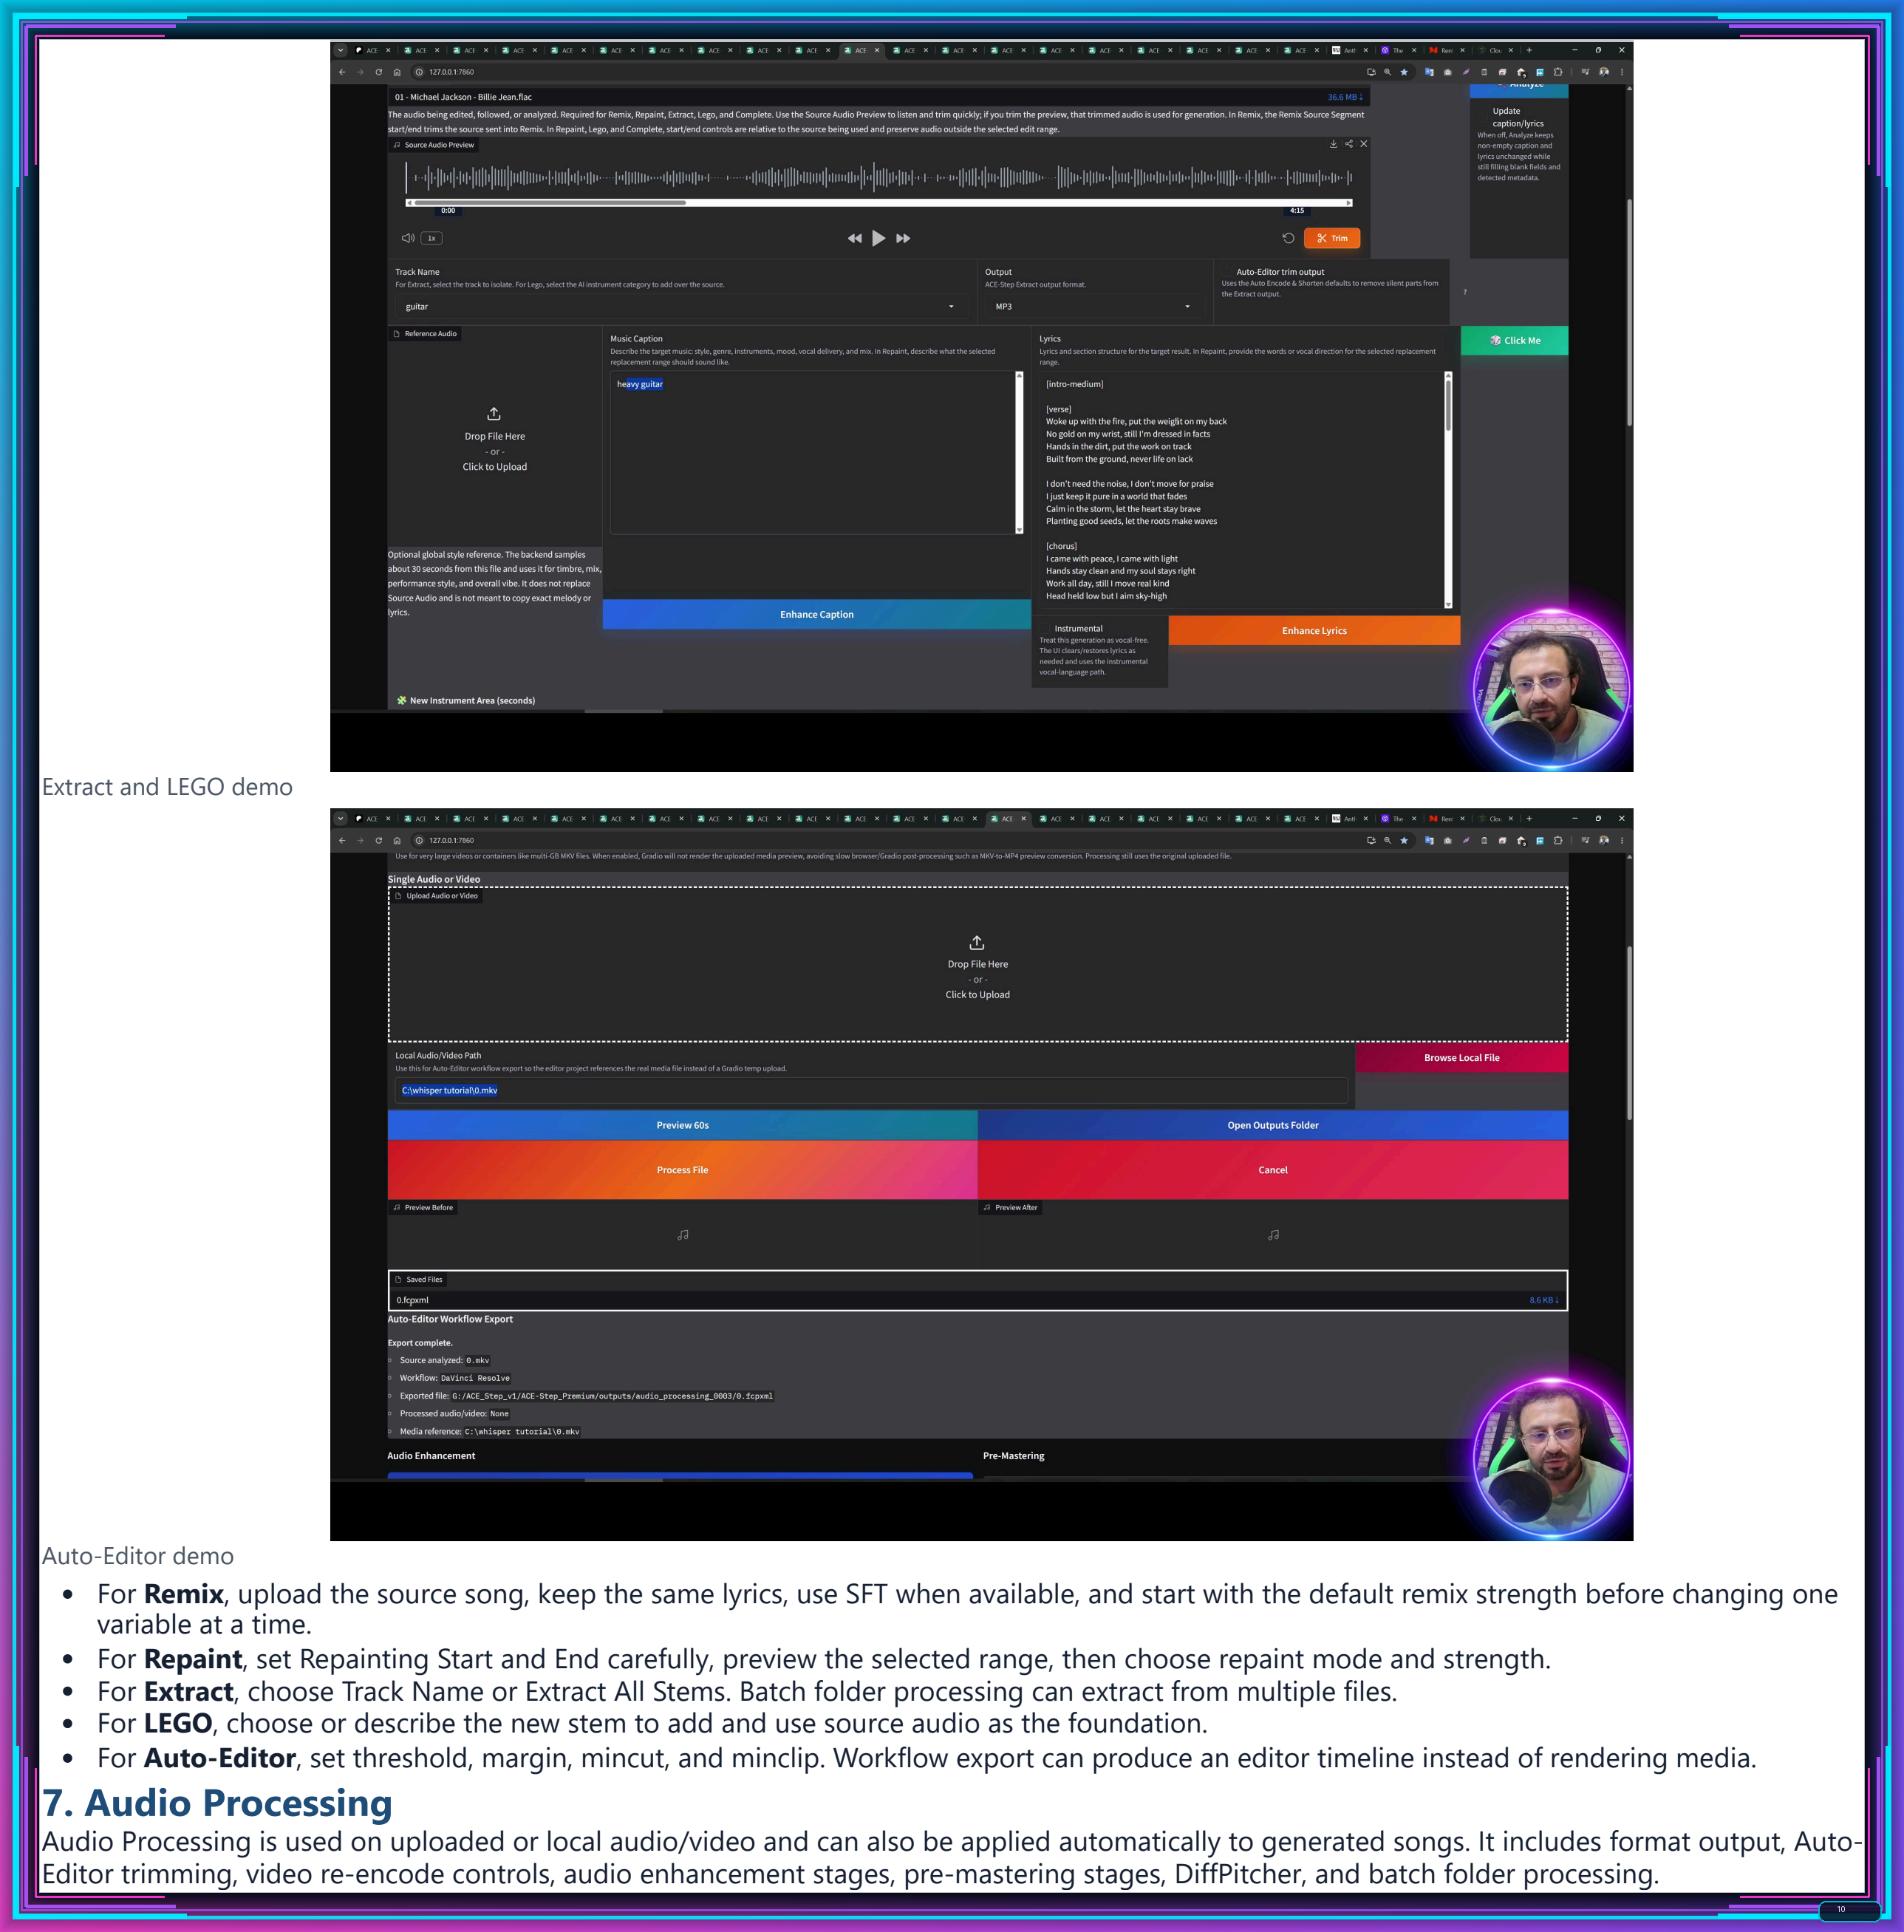
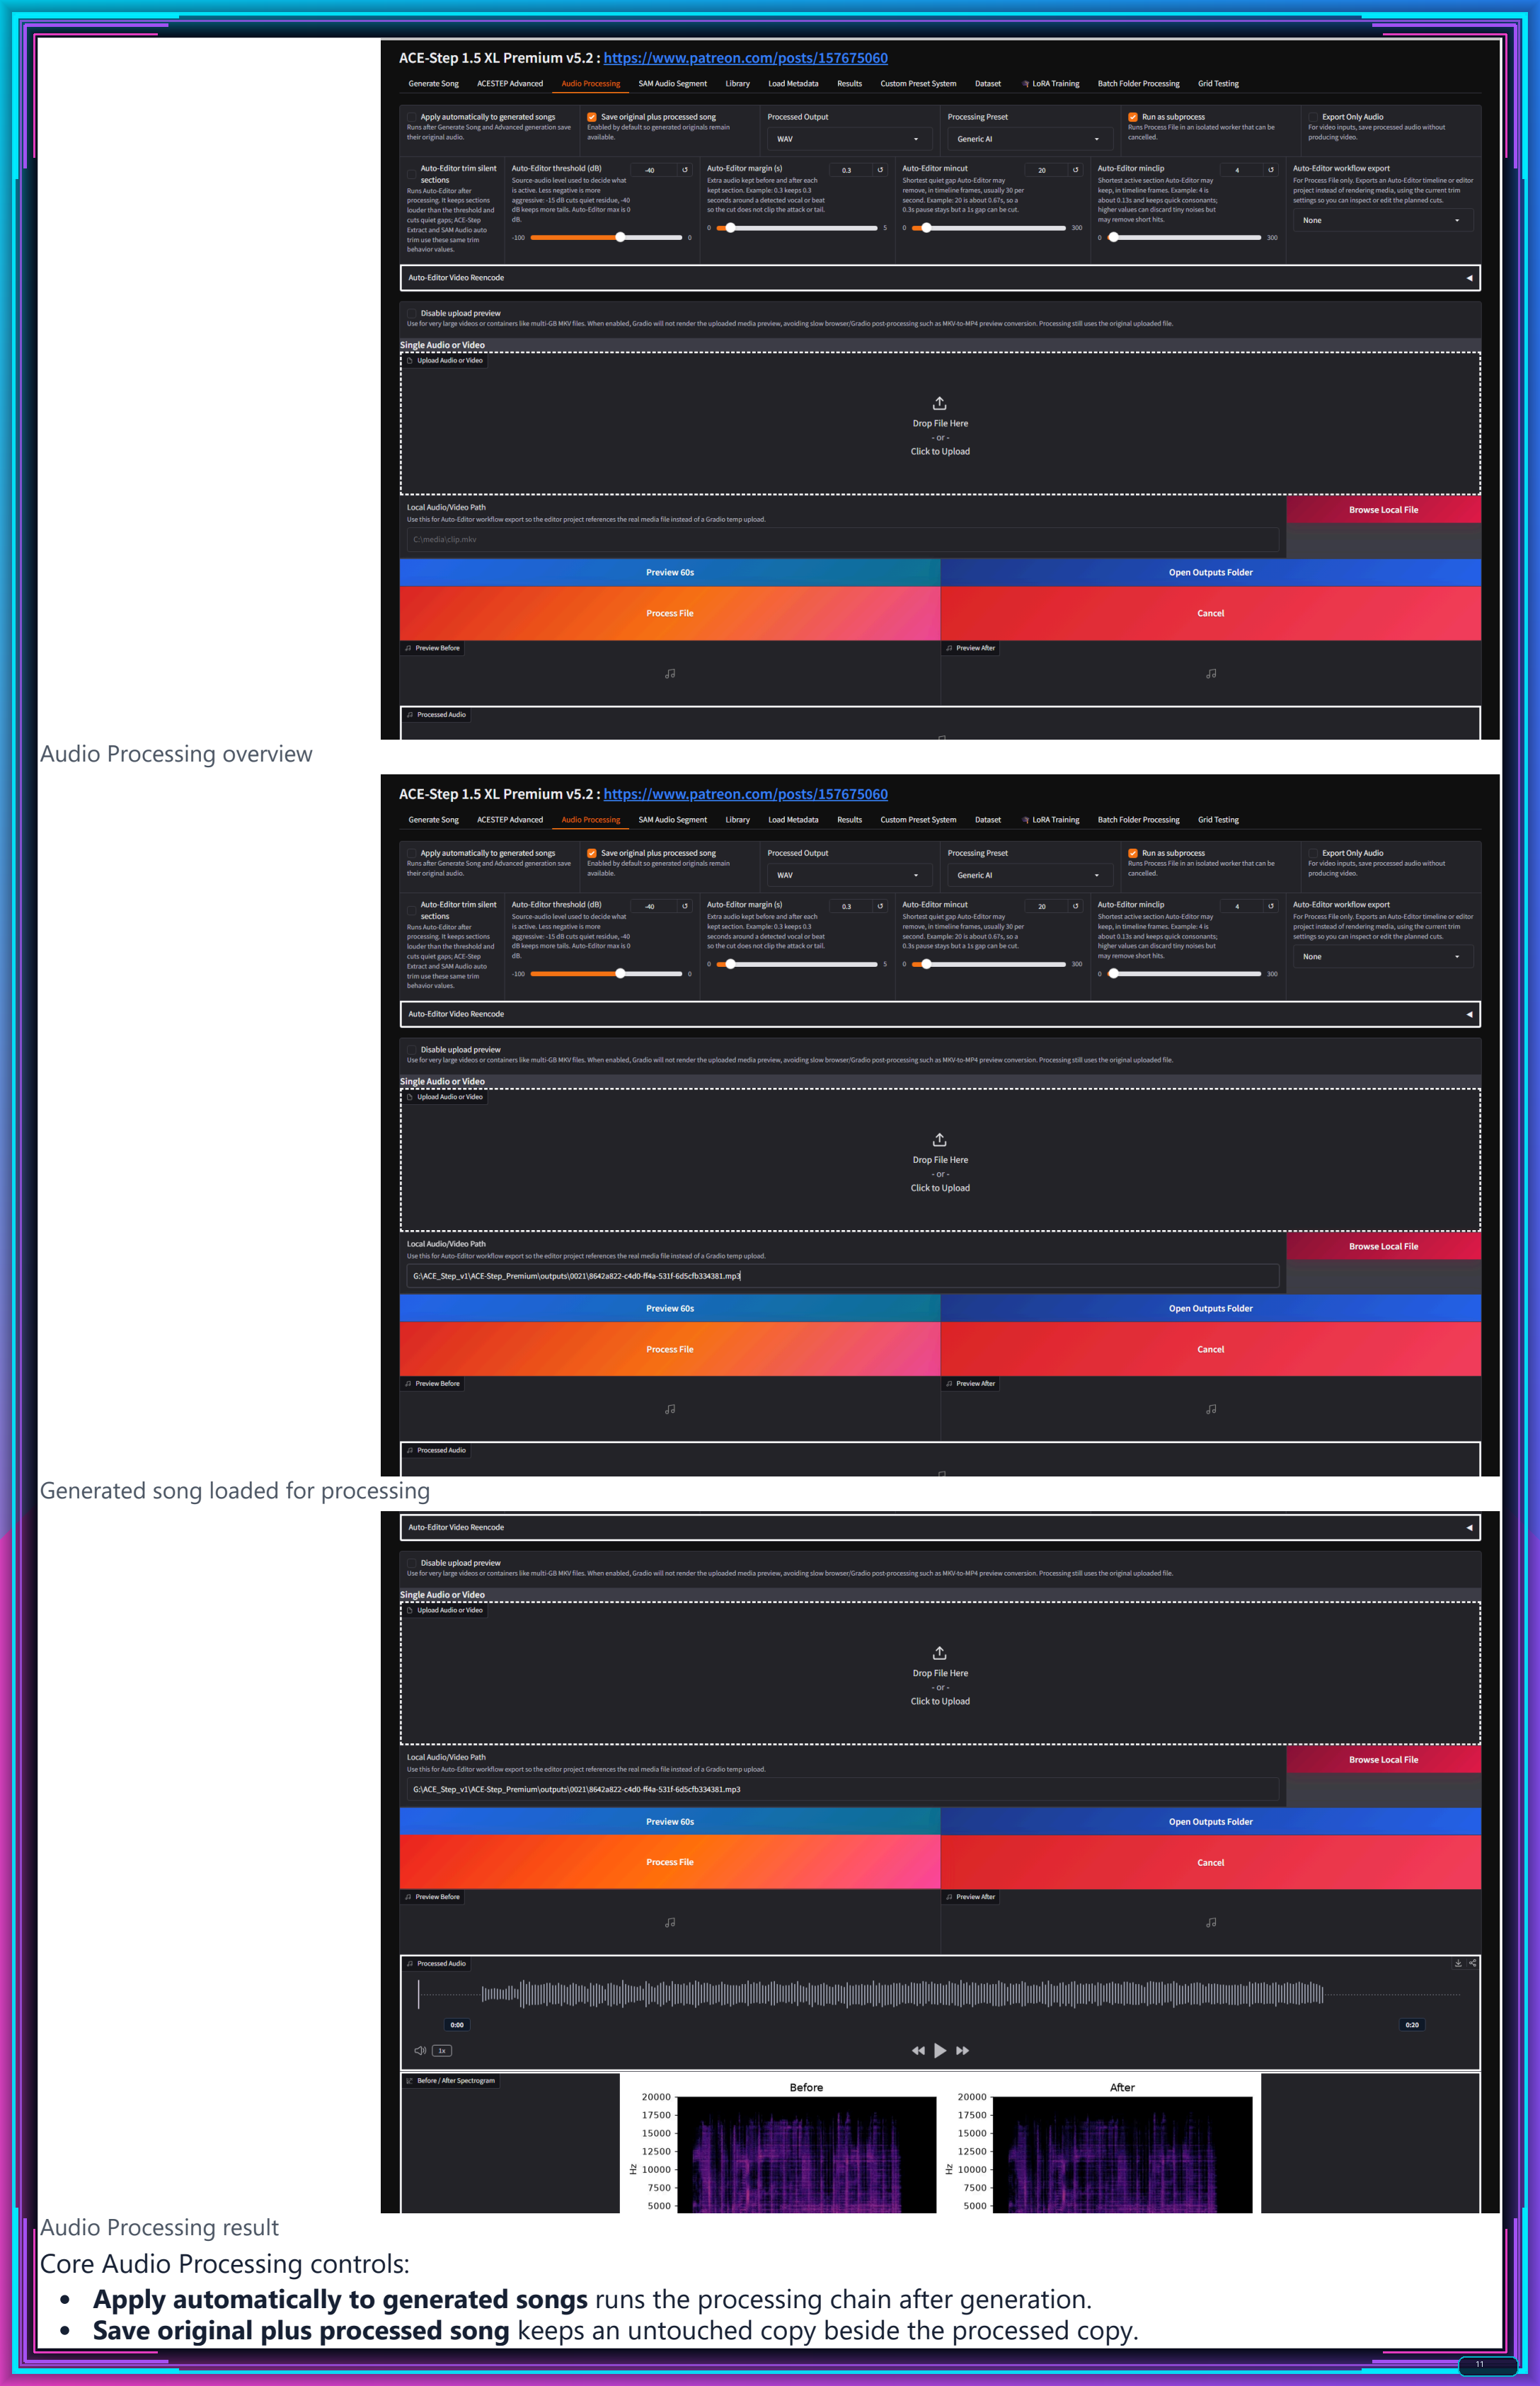
- Creative tools: Remix, Repaint, Extract, Lego mode, Audio Processing, Auto-Editor timeline export, and SAM Audio text-prompt segmentation.
- Output management: MP3/WAV/FLAC/MP4 results, manifests, stems, trimmed files, SAM segment folders, and batch processing.
- Cloud workflows: RunPod, Massed Compute, SimplePod, Jupyter uploads, Gradio Live links, persistent storage, restart behavior, nvitop monitoring, downloading outputs, and deleting rented resources.
- Practical troubleshooting: bad extraction paths, missing requirements, first-load delays, stale/corrupted VENV handles, connection issues, model verification, and safe reinstall/update behavior.
Click either screenshot to open the full-resolution PNG. Embedded previews use height="700" with no fixed width.

Click any page image to open the full-resolution PNG. Embedded previews are intentionally shown at height="700" with no fixed width, so GitHub keeps the page readable while still allowing full-size inspection.
-
00:00:00 Greetings everyone. Today I am going to show you how to install and use the ultimate local music
-
00:00:09 generation application. This application, ACESTEP XL 1.5, is a combination of applications that not
-
00:00:16 only generates music but also supports SAM Audio Segmenting and Audio Processing. I will not only
-
00:00:24 show how to install and use it on your Windows computer but also on RunPod, on Massed Compute,
-
00:00:32 and on SimplePod. I will show it on all 4 different platforms; Linux users can use
-
00:00:39 the Massed Compute installation procedures and scripts. So what is this application about? This
-
00:00:46 is a music generation application mainly, but with so many other features. So let's see them
-
00:00:52 quickly. You can generate widely different style musics under 1 minute. Let me play some of them:
-
00:01:04 "Hands in the dirt. Put the work on track. Built from the ground, never life on lack.
-
00:01:26 Woke up with the fire with the weight on my back. No gold on my wrist till
-
00:01:31 I'm dressed.". "Woke up with the fire. Put the weight on my back. No gold on my
-
00:01:39 wrist till I'm dressed in fact. Hands in the dirt. Put the work on track.
-
00:01:53 Woke up with the fire.". So, as you have seen, I have generated several different style music.
-
00:01:59 Every one of them is amazing and they only took like 50 seconds. Let me show you. When we open
-
00:02:05 the outputs folder, we can go to generation and we can open the generation manifest file. It
-
00:02:12 will show us how much time it took; it took only 40 seconds to generate this full song
-
00:02:20 which is 3 minutes 11 seconds. How? Because this application is very professionally developed. It
-
00:02:28 supports all 3 models: ACESTEP XL 1.5 SFT, Turbo, and Base models. It supports full LoRA training
-
00:02:37 and LoRAs, though that will be another tutorial, not this one. We have GPU optimization presets
-
00:02:42 automatically selecting; therefore, it is fully optimized for my GPU. And most importantly, when
-
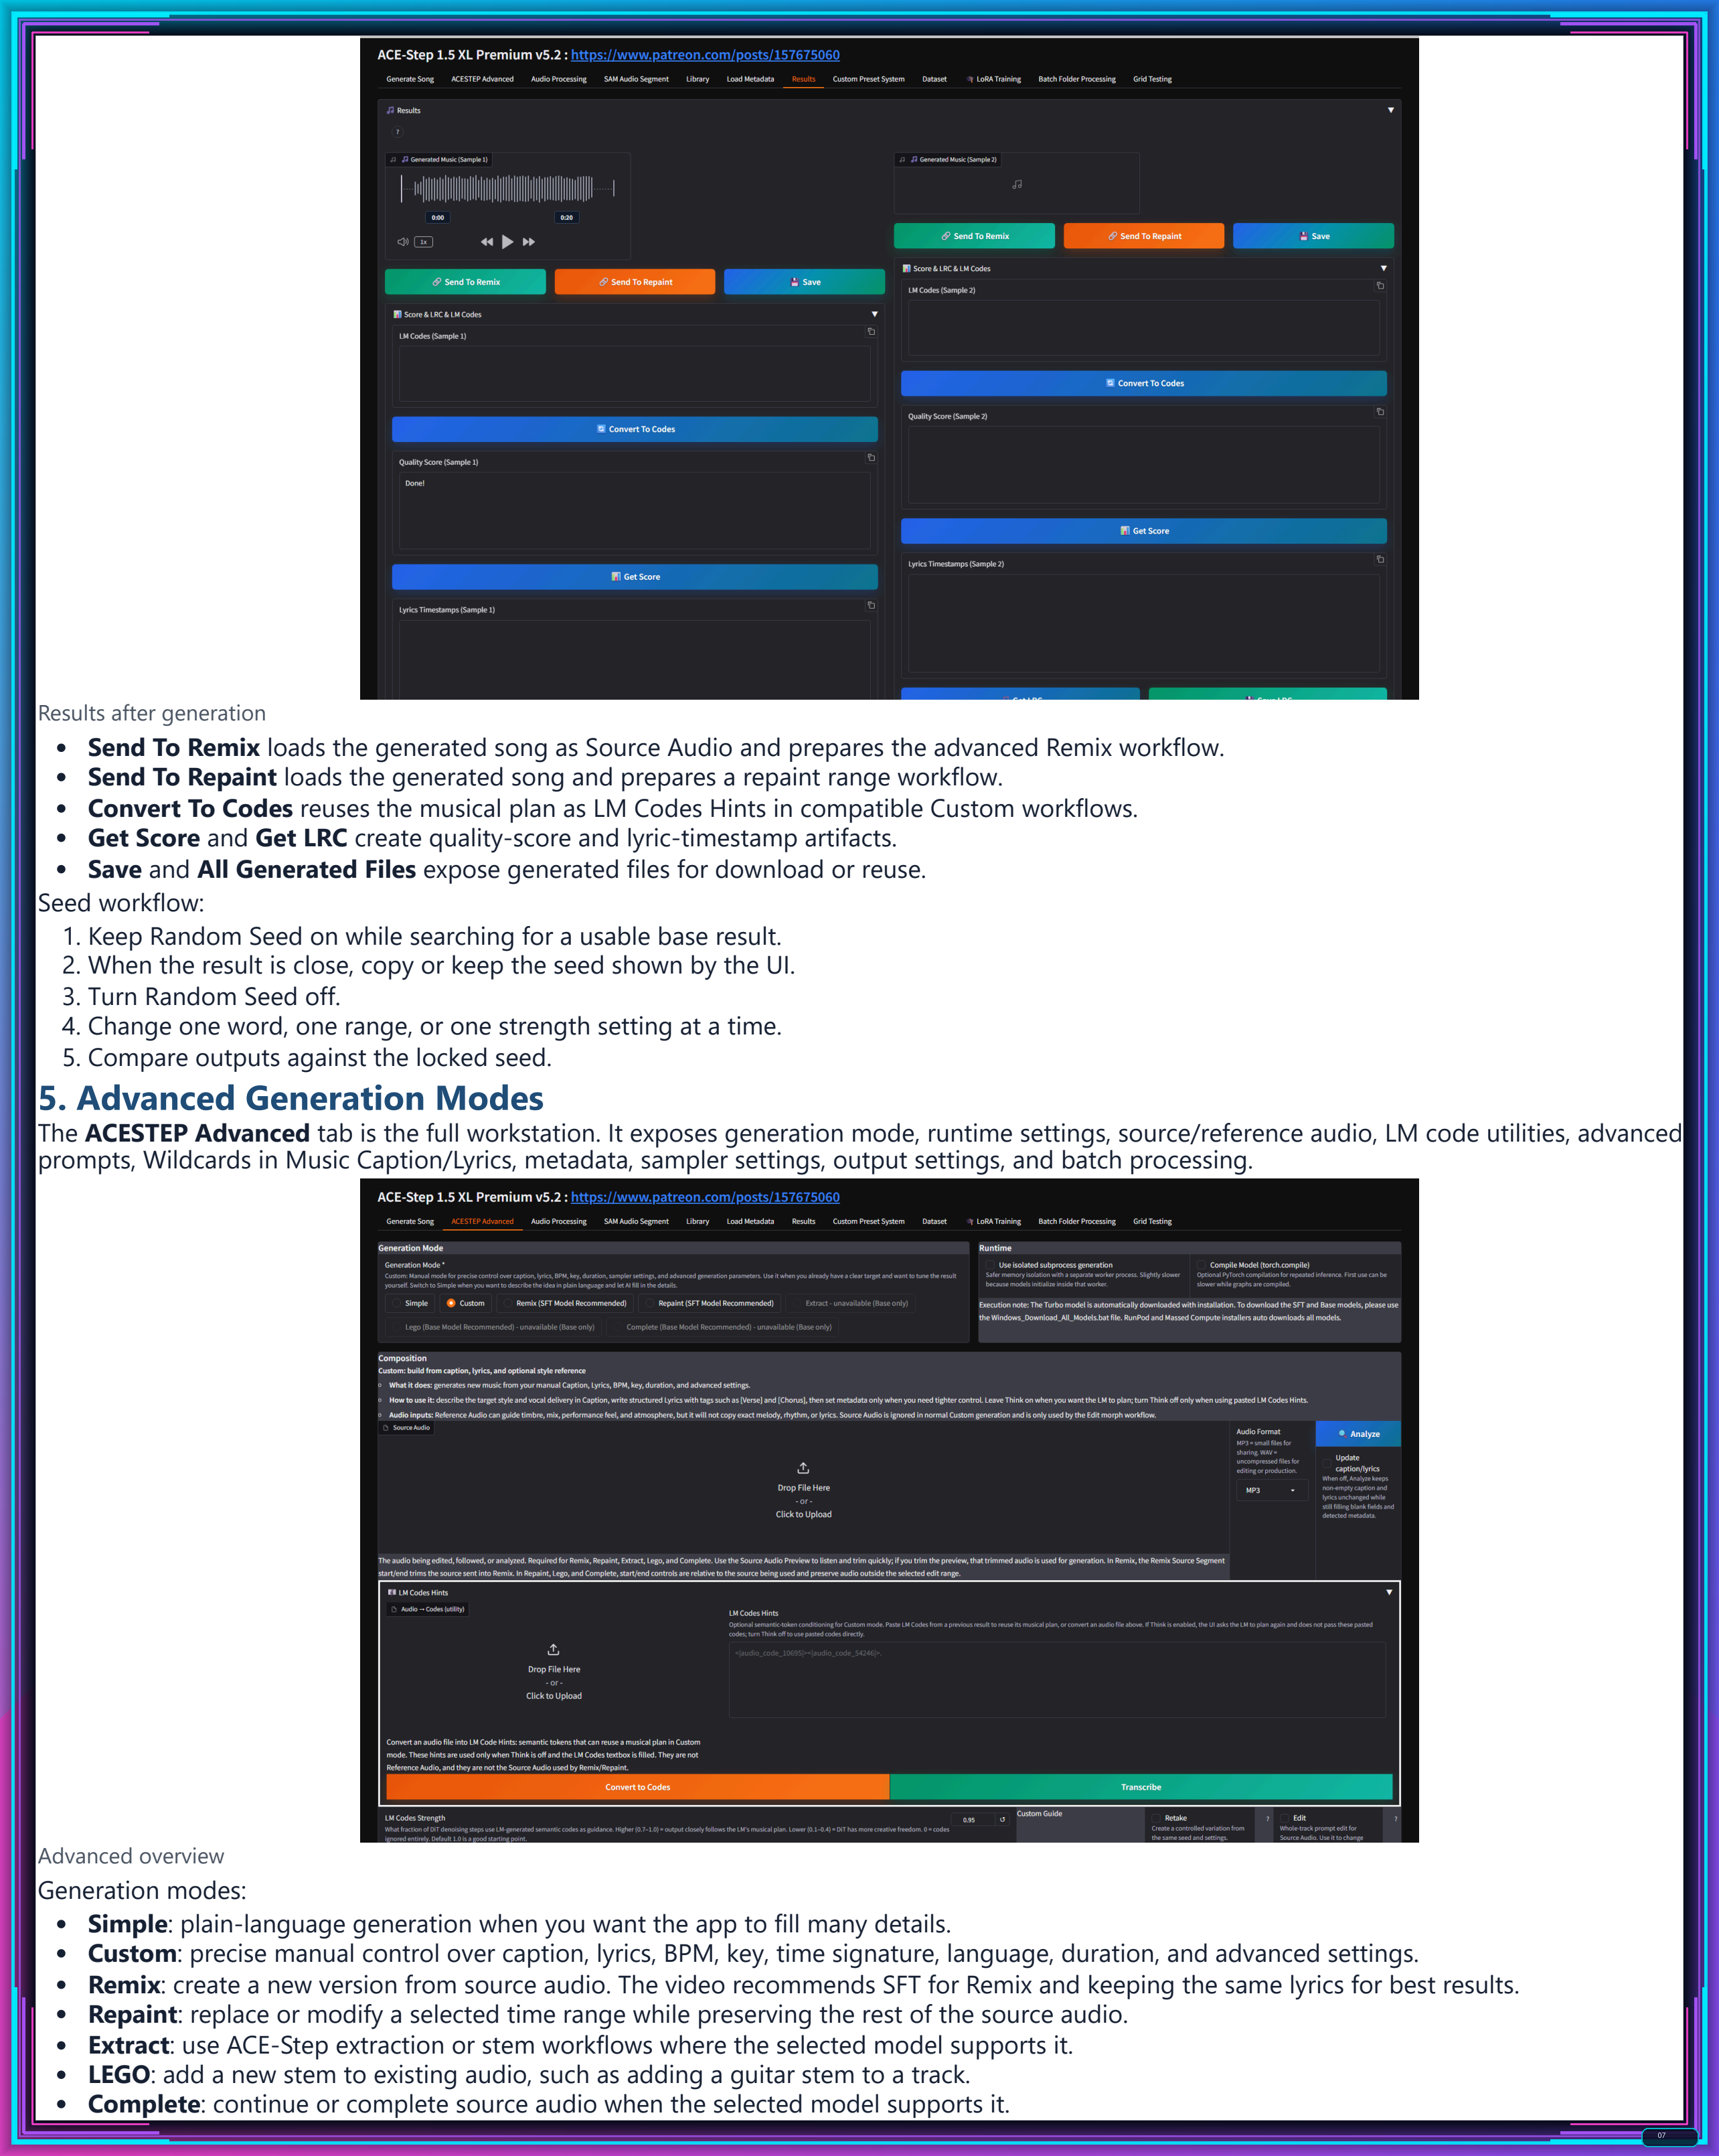
00:02:49 you go to ACESTEP Advanced, you will see that we have a compile model. Therefore, it speeds up the
-
00:02:57 generation speed up to 50%. This is my addition to the public repositories that you can find about
-
00:03:03 this application. But believe me, this ACESTEP XL 1.5 premium is nothing like you will find anywhere
-
00:03:10 else. So what other features it has? It can remix full songs amazingly. For remix to work, you need
-
00:03:17 to have the same lyrics. By the way, before I start showing you all these features, I need to
-
00:03:24 tell you that this application needs to be used respectively, and this tutorial is for research
-
00:03:31 and education purposes. Okay, first I will play from the original then I will play from the remix.
-
00:03:41 beauty queen from a movie scene. So one of the best part of this application that it is really
-
00:04:01 fast. Therefore, you can generate many iterations and get what you want exactly. So, it is so easy.
-
00:04:09 I will show how to use, install, and everything. This was the remix feature. Let's see the repaint
-
00:04:16 feature. Now, the repaint is like a remix, but you generate only a certain part of the song. And to
-
00:04:24 be useful, we need actually LoRAs. When we train LoRAs with our vocals and with our audio—you know,
-
00:04:32 with our own speaking—it will be perfect. For now, it can be still used to generate fully new parts;
-
00:04:40 however, it won't be very consistent for lyrics generation. For instrumental regenerations it can
-
00:04:47 work, but let me show you for now. And as I said, it will be much more useful hopefully with LoRA
-
00:04:53 training and with vocals training. I'm working on that, so first I will show the original area then
-
00:04:58 I will show the repainted area. I don't need the noise. I don't. So this way I can totally generate
-
00:05:12 new sections of the song. However, currently, it is not consistent, so it is looking like
-
00:05:18 this. Let me show you: we have selected the parts between 19 seconds to 23 seconds. Just
-
00:05:30 as you have seen, it has successfully repainted the selected area and merged it like this. So the
-
00:05:38 next feature is extraction. This is extremely useful to extract stems from any given song
-
00:05:45 or audio file. The normal extraction extracts everything like this—the full song—or you can
-
00:05:51 use our Auto-Editor trim output and just get the extracted section and trim out the silence. Let me
-
00:05:58 play some of them to show you. So you can extract vocals, woodwinds, brass, fx, and everything that
-
00:06:09 this ACESTEP XL model supports. You can extract all stems at once. This is very useful,
-
00:06:15 or you can do batch folder processing to extract from multiple given files. Everything is working
-
00:06:21 perfectly. To change the configuration and features of the auto editor trim output, just
-
00:06:26 change the settings set here and it will follow. So the next feature is Lego. Lego is adding a new
-
00:06:35 stem to the existing audio. So let me demonstrate to you how it works: first I will show the
-
00:06:41 original then I will show the Lego painted area. So in this example, I have added a guitar stem to
-
00:06:57 the track. From here you can select the stem that you want to add and it will add that stem. It will
-
00:07:03 paint that stem into your audio. It can be a full song, it can be just only vocal, whatever. And it
-
00:07:09 will generate and add it properly. It will follow the music caption; however, not the lyrics. For
-
00:07:16 lyrics to be valid, you need to use vocals, but you may not get the performance you want. You need
-
00:07:21 to test it; however, it is working amazing at the moment. The next feature is the audio processing
-
00:07:28 tab that we have implemented. So this audio processing tab has several different features.
-
00:07:34 The default feature is processing presets which changes the audio enhancements that you will
-
00:07:41 see here. This is very useful to improve your AI generated songs. You can read their descriptions,
-
00:07:47 you can play with their values, or you can use the presets from here and it will update the values
-
00:07:53 you will see here. And when you click the process file, it will generate the processed audio.
-
00:08:06 with the weight on my back. Since the original song is already pretty good,
-
00:08:21 you may not notice the difference, but if you max all of these, you will notice the difference. So,
-
00:08:26 play with it and see if it is really improving the quality for you. This is a very useful tool that I
-
00:08:32 have implemented upon the request of someone. So the next feature, which I like very much,
-
00:08:38 is auto editor trim silent. This is extremely useful. I use this daily in my tutorial videos
-
00:08:45 to trim out unspoken parts. You know when I am thinking something, I am not speaking;
-
00:08:51 therefore, that section is silent and I want to trim that part. So I have a video tutorial here,
-
00:09:00 one of the last tutorials that I have recorded; it is 20 minutes 31 seconds because it has a
-
00:09:05 lot of pauses. Then I process this file and it becomes 16 minutes. So it trimmed out 4 minutes of
-
00:09:14 silent parts or maybe when I am taking breaths or some other stuff where I wasn't talking properly.
-
00:09:23 This is extremely useful. You can use this feature: upload a video and get trimmed output.
-
00:09:29 You can set the re-encode values from here, but it will automatically try to match the original
-
00:09:35 video and you don't even need this; you can export only audio or you can export as a workflow which
-
00:09:44 I am using normally. Davinci Resolve Export. For DaVinci Resolve export, select processing preset
-
00:09:50 'none' if you don't want to process the audio, obviously enable 'auto editor trim silent',
-
00:09:55 and select the editor workflow, then use 'browse local file' so that it will generate accurate file
-
00:10:03 paths. Then click 'process file'. At the end, you will get a file that you can import into DaVinci
-
00:10:10 Resolve like this from here. Let me show you. Moreover, everything you have generated in our
-
00:10:16 application will be saved. When you click to open outputs folder, you can see the SAM audio process,
-
00:10:22 audio processing results all here. They are all saved. And in DaVinci Resolve, I will go
-
00:10:28 here and I will click timelines, import this file, select the file and okay. And it will fully import
-
00:10:35 accurately with accurate file path references and resolution, whatever I want. And you can see
-
00:10:41 that it is properly split like this. So I can use the DaVinci Resolve as I want with this timeline.
-
00:10:48 This auto editor workflow supports DaVinci Resolve, Adobe Premiere Pro, Final Cut Pro,
-
00:10:54 ShotCut, and Kdenlive. It is extremely useful; I use this at my every tutorial. It is super
-
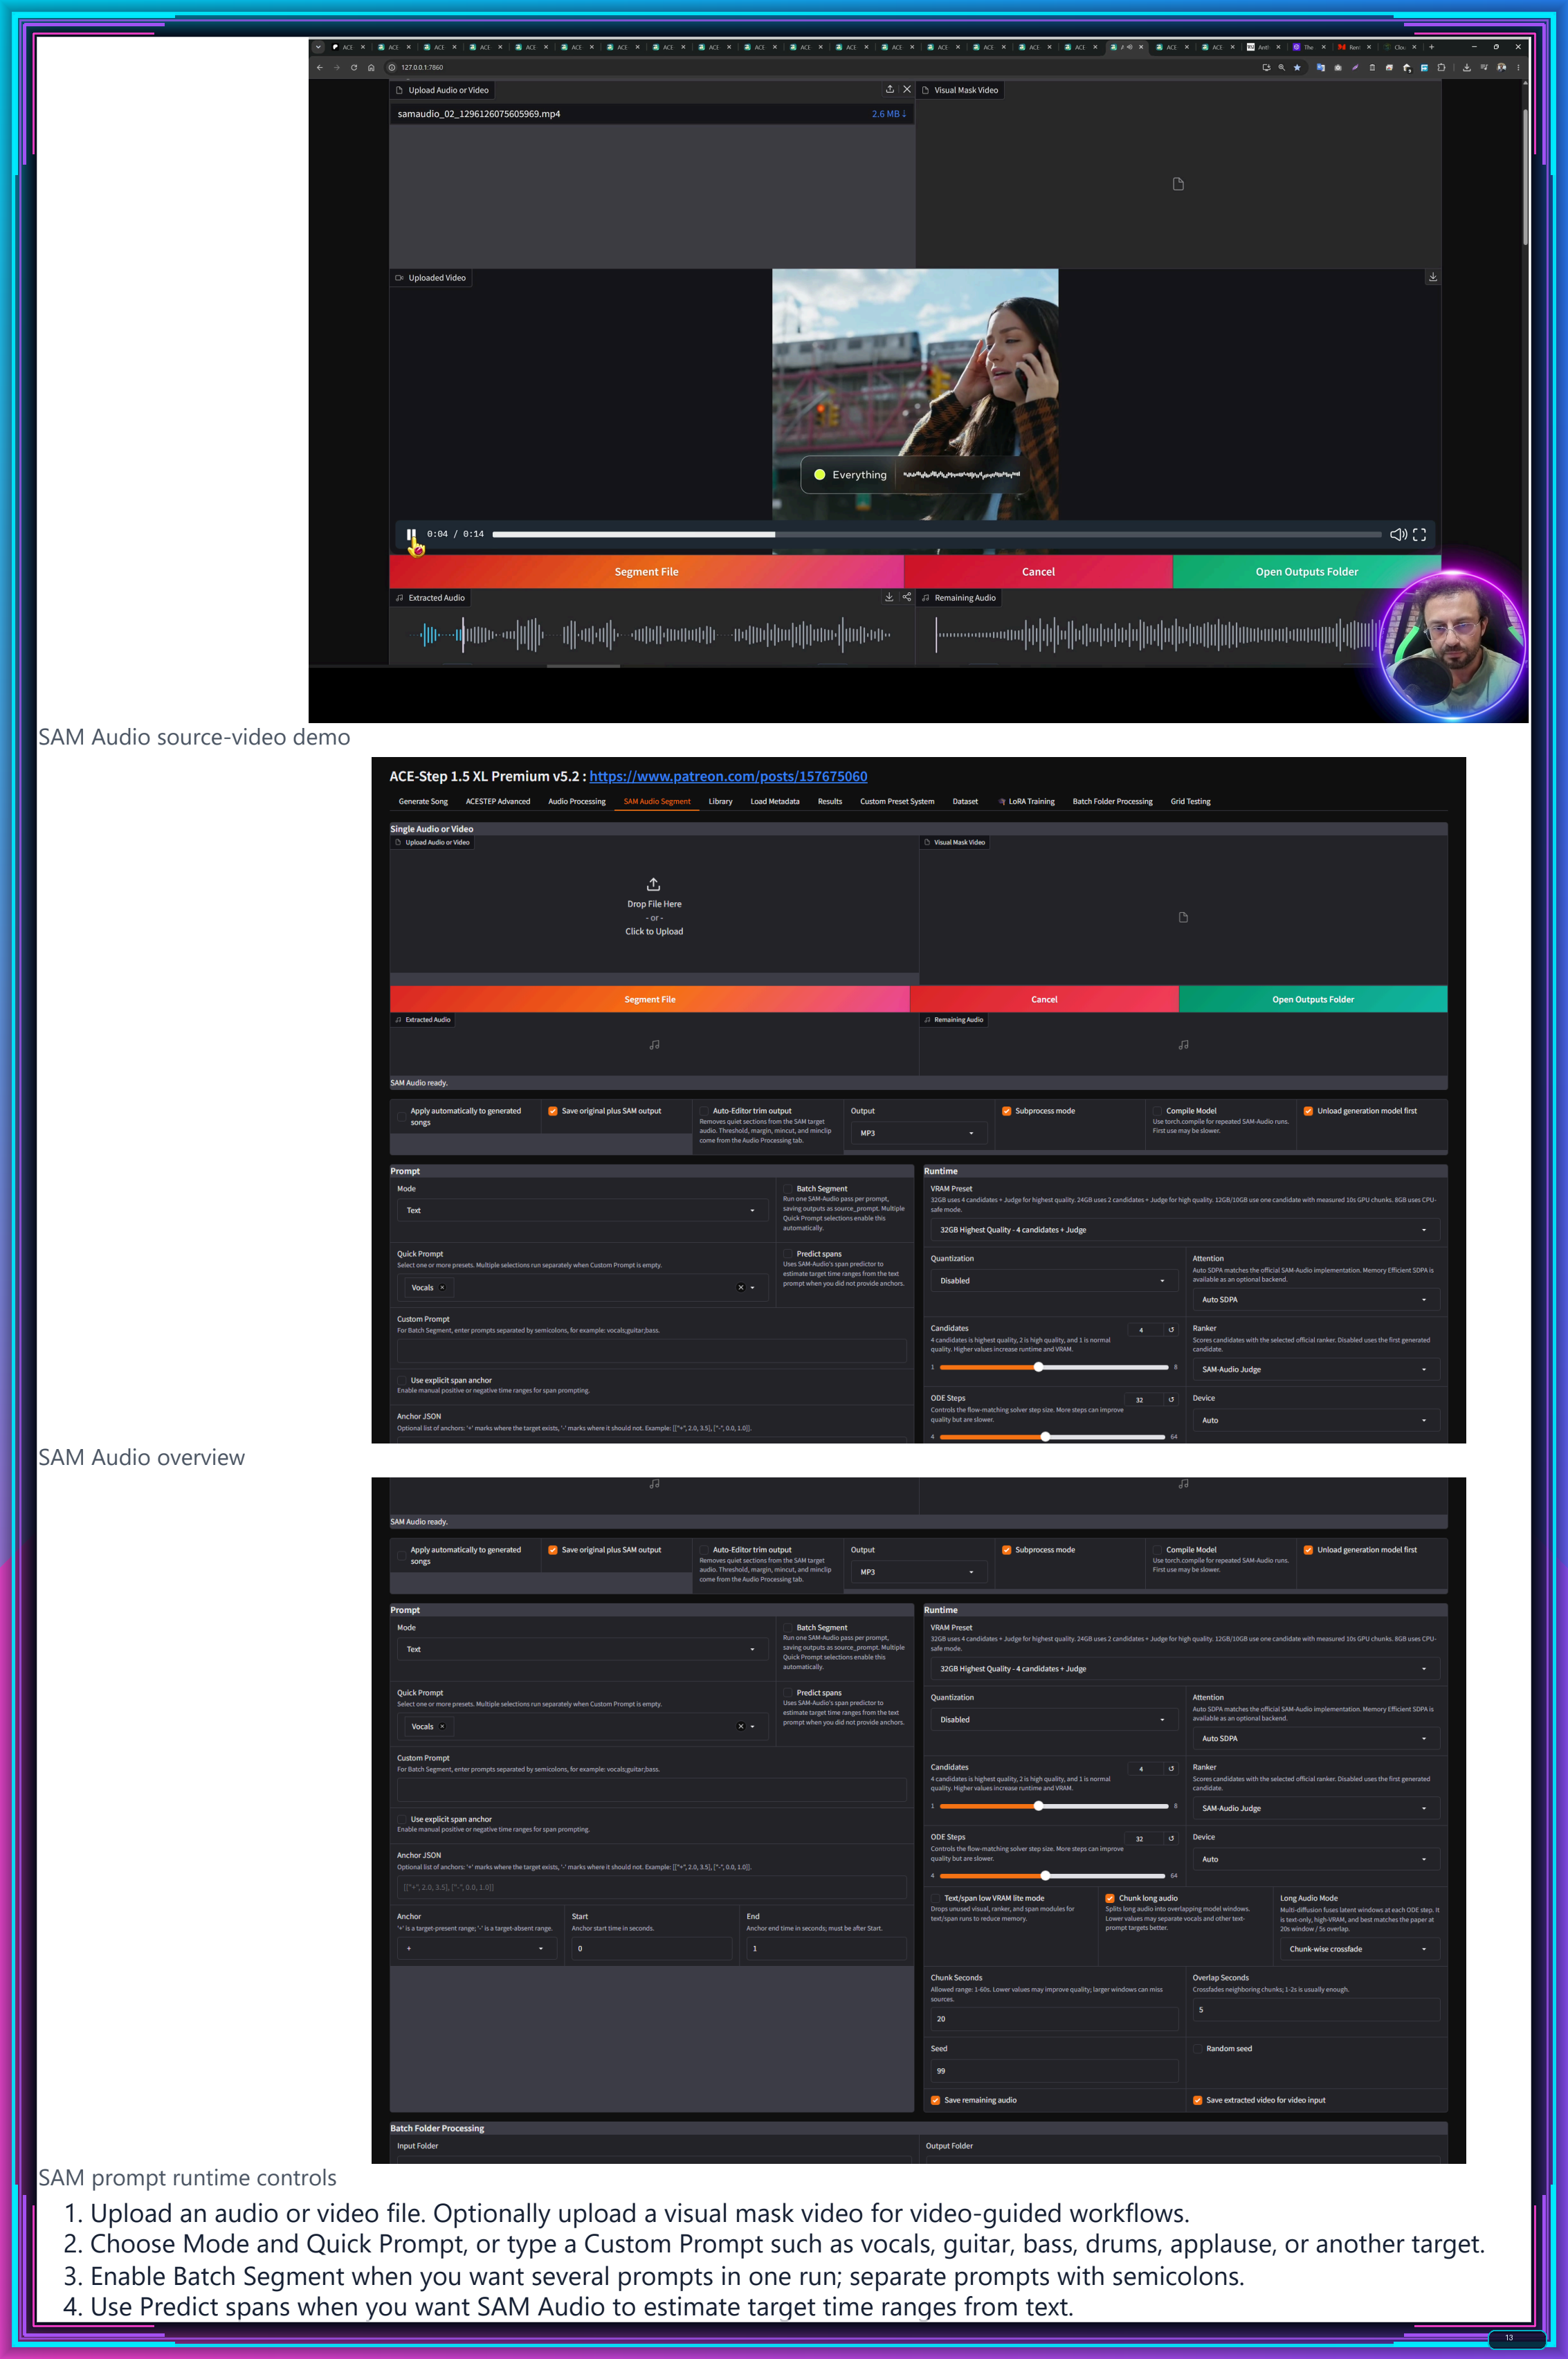
00:11:00 useful. The next feature is SAM audio segment. SAM audio segment is Facebook Meta's published model
-
00:11:08 and it is a state-of-the-art audio segmentation model right now. I have implemented SAM audio
-
00:11:14 with all of the extra features and optimizations. The downloaded models are all BF16 by me. We have
-
00:11:22 VRAM presets automatically set according to your GPU. This is a very heavy model. It is processing
-
00:11:29 with segmentation. You see, we support as low as 10 GB GPUs and even 8 GB GPUs as well. Moreover,
-
00:11:36 it can extract any audio arbitrarily and it supports quick prompts. You can select multiple
-
00:11:42 quick prompts from here as well to extract multiple values at once. So, let me show you
-
00:11:47 some of the results. It also supports the audio editor trim output and compile model to improve
-
00:11:54 the speed. So, this is segmentation output, this is vocals output, and also drums and bass. It will
-
00:12:02 only show the first one; the other ones will be saved inside the outputs folder in the SAM audio
-
00:12:09 segmentation. You see with suffixes of drums, guitar, or vocals, whatever you want to extract.
-
00:12:19 So it is like this; let me also play some of the others from here. As you can see, it is amazing.
-
00:12:35 You can also play the remaining audio; it also saves that. This model is very, very powerful.
-
00:12:40 It's a heavy model compared to ACESTEP extraction; however, this model is more powerful and it also
-
00:12:47 supports, as I said, custom prompts. For example, for custom prompts, you can enable batch segment
-
00:12:53 as well with semicolon separation. You can write the stems or segments that you want to extract
-
00:12:59 and it will iteratively process every one of them and save them in the outputs folder. It
-
00:13:04 is working amazing. This was a feature that you have requested, so I added it. Moreover,
-
00:13:09 you can use this SAM audio segmentation for other tasks as well. Let me demonstrate to you.
-
00:13:14 This is an everything video: "Hey, hang on. Can you hear me? Super loud. You know what?
-
00:13:21 You know what actually looks better? You will not believe the day that I have had. Seriously,
-
00:13:26 no way. I can't wait to tell you all about it when I get home. I'll be over in like...". Now imagine
-
00:13:31 that I can clean this very well and extract only the speech. To extract only the speech, all I need
-
00:13:39 to do is select the quick prompt 'speech' from here. I also enabled auto editor trim to trim out
-
00:13:46 the silent parts, and let me play you the cleaned audio. This is amazing. This is magnificent:
-
00:13:52 "Hey, hang on. Can you hear me? Super loud. You know what? Do you know what? Actually, what's
-
00:13:57 better? You will not get the day that I arrived. Seriously, no way. I can't wait to tell you all
-
00:14:03 about it when I get home. I'll be over in like 10 minutes.". As you have seen, it is just amazing,
-
00:14:08 amazing—the extracted cleaned audio. So, we have all the optimizations, quantization, attention,
-
00:14:15 whatever you want. We support so many features and you can use the SAM audio. It also fully
-
00:14:21 supports batch folder processing so that you can process so many files at once in a given folder
-
00:14:28 and extract multiple stems, extract multiple, you know, segments, whatever you want. Another
-
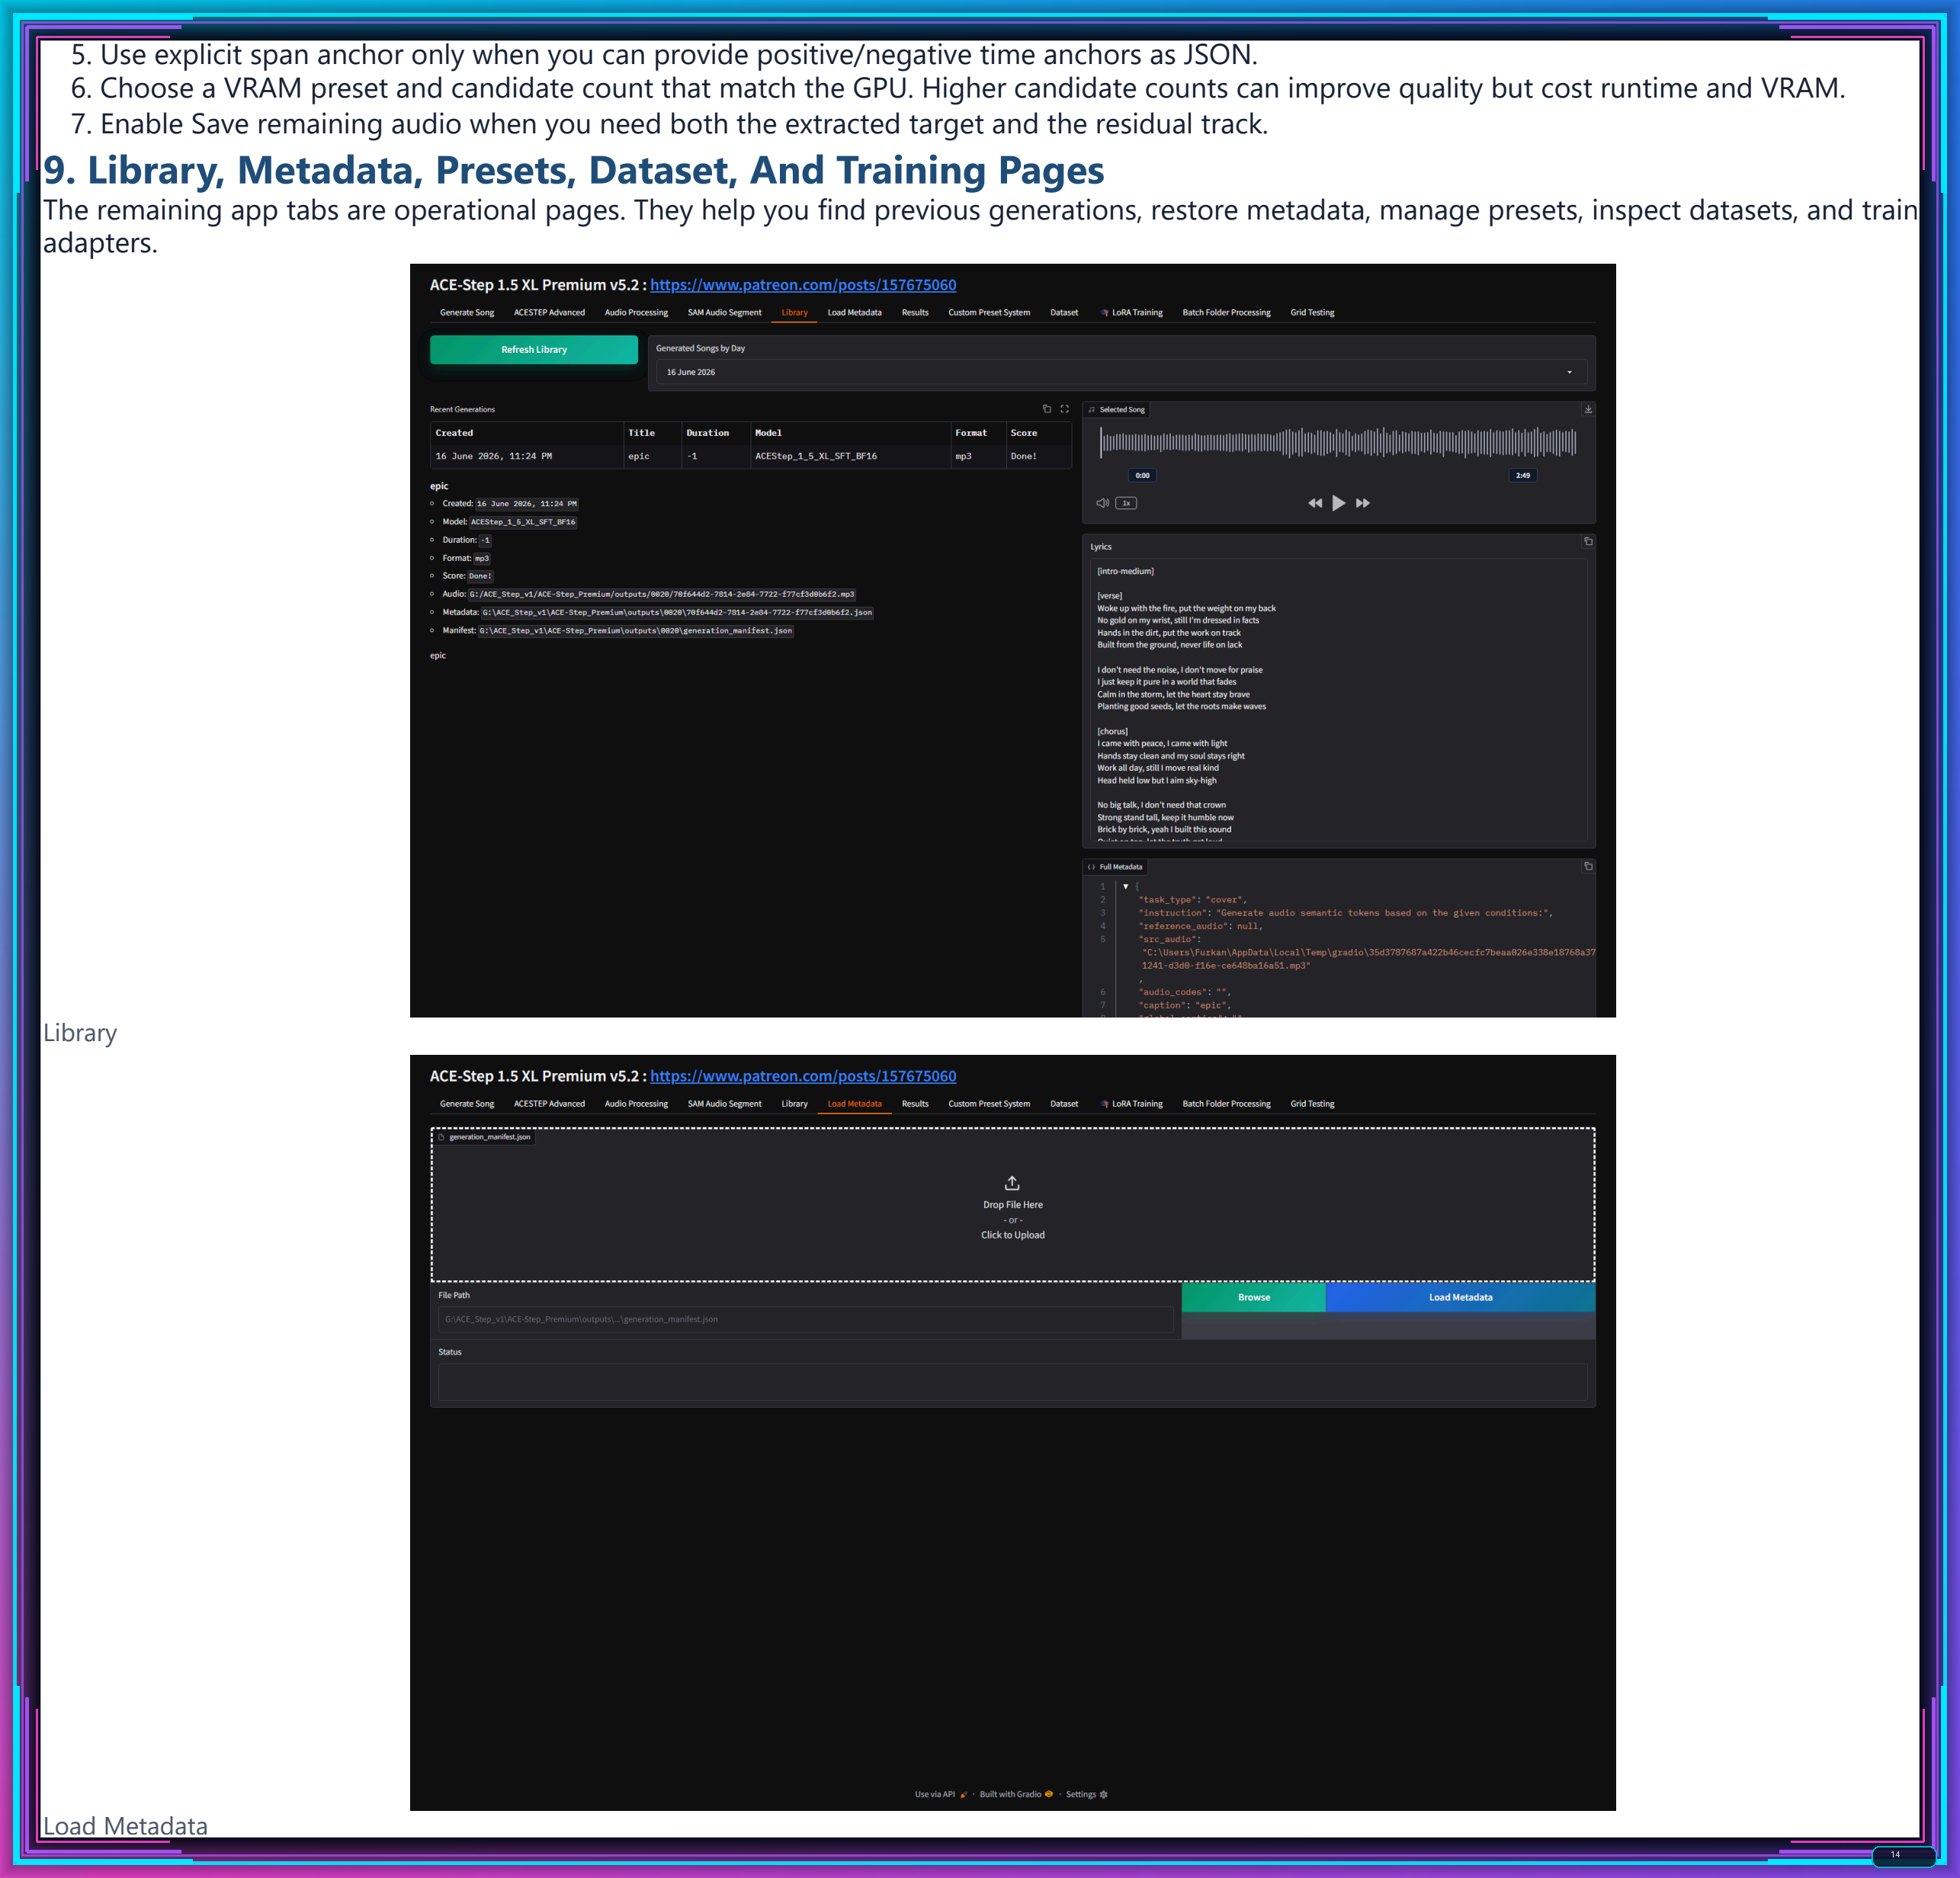
00:14:34 feature is load metadata. I save all the metadata of all generations in the outputs folder. You see
-
00:14:41 everything is properly saved like this and you can select the manifest and it will load all the
-
00:14:47 settings that were used to generate this song or audio processing or segmentation, whatever. You
-
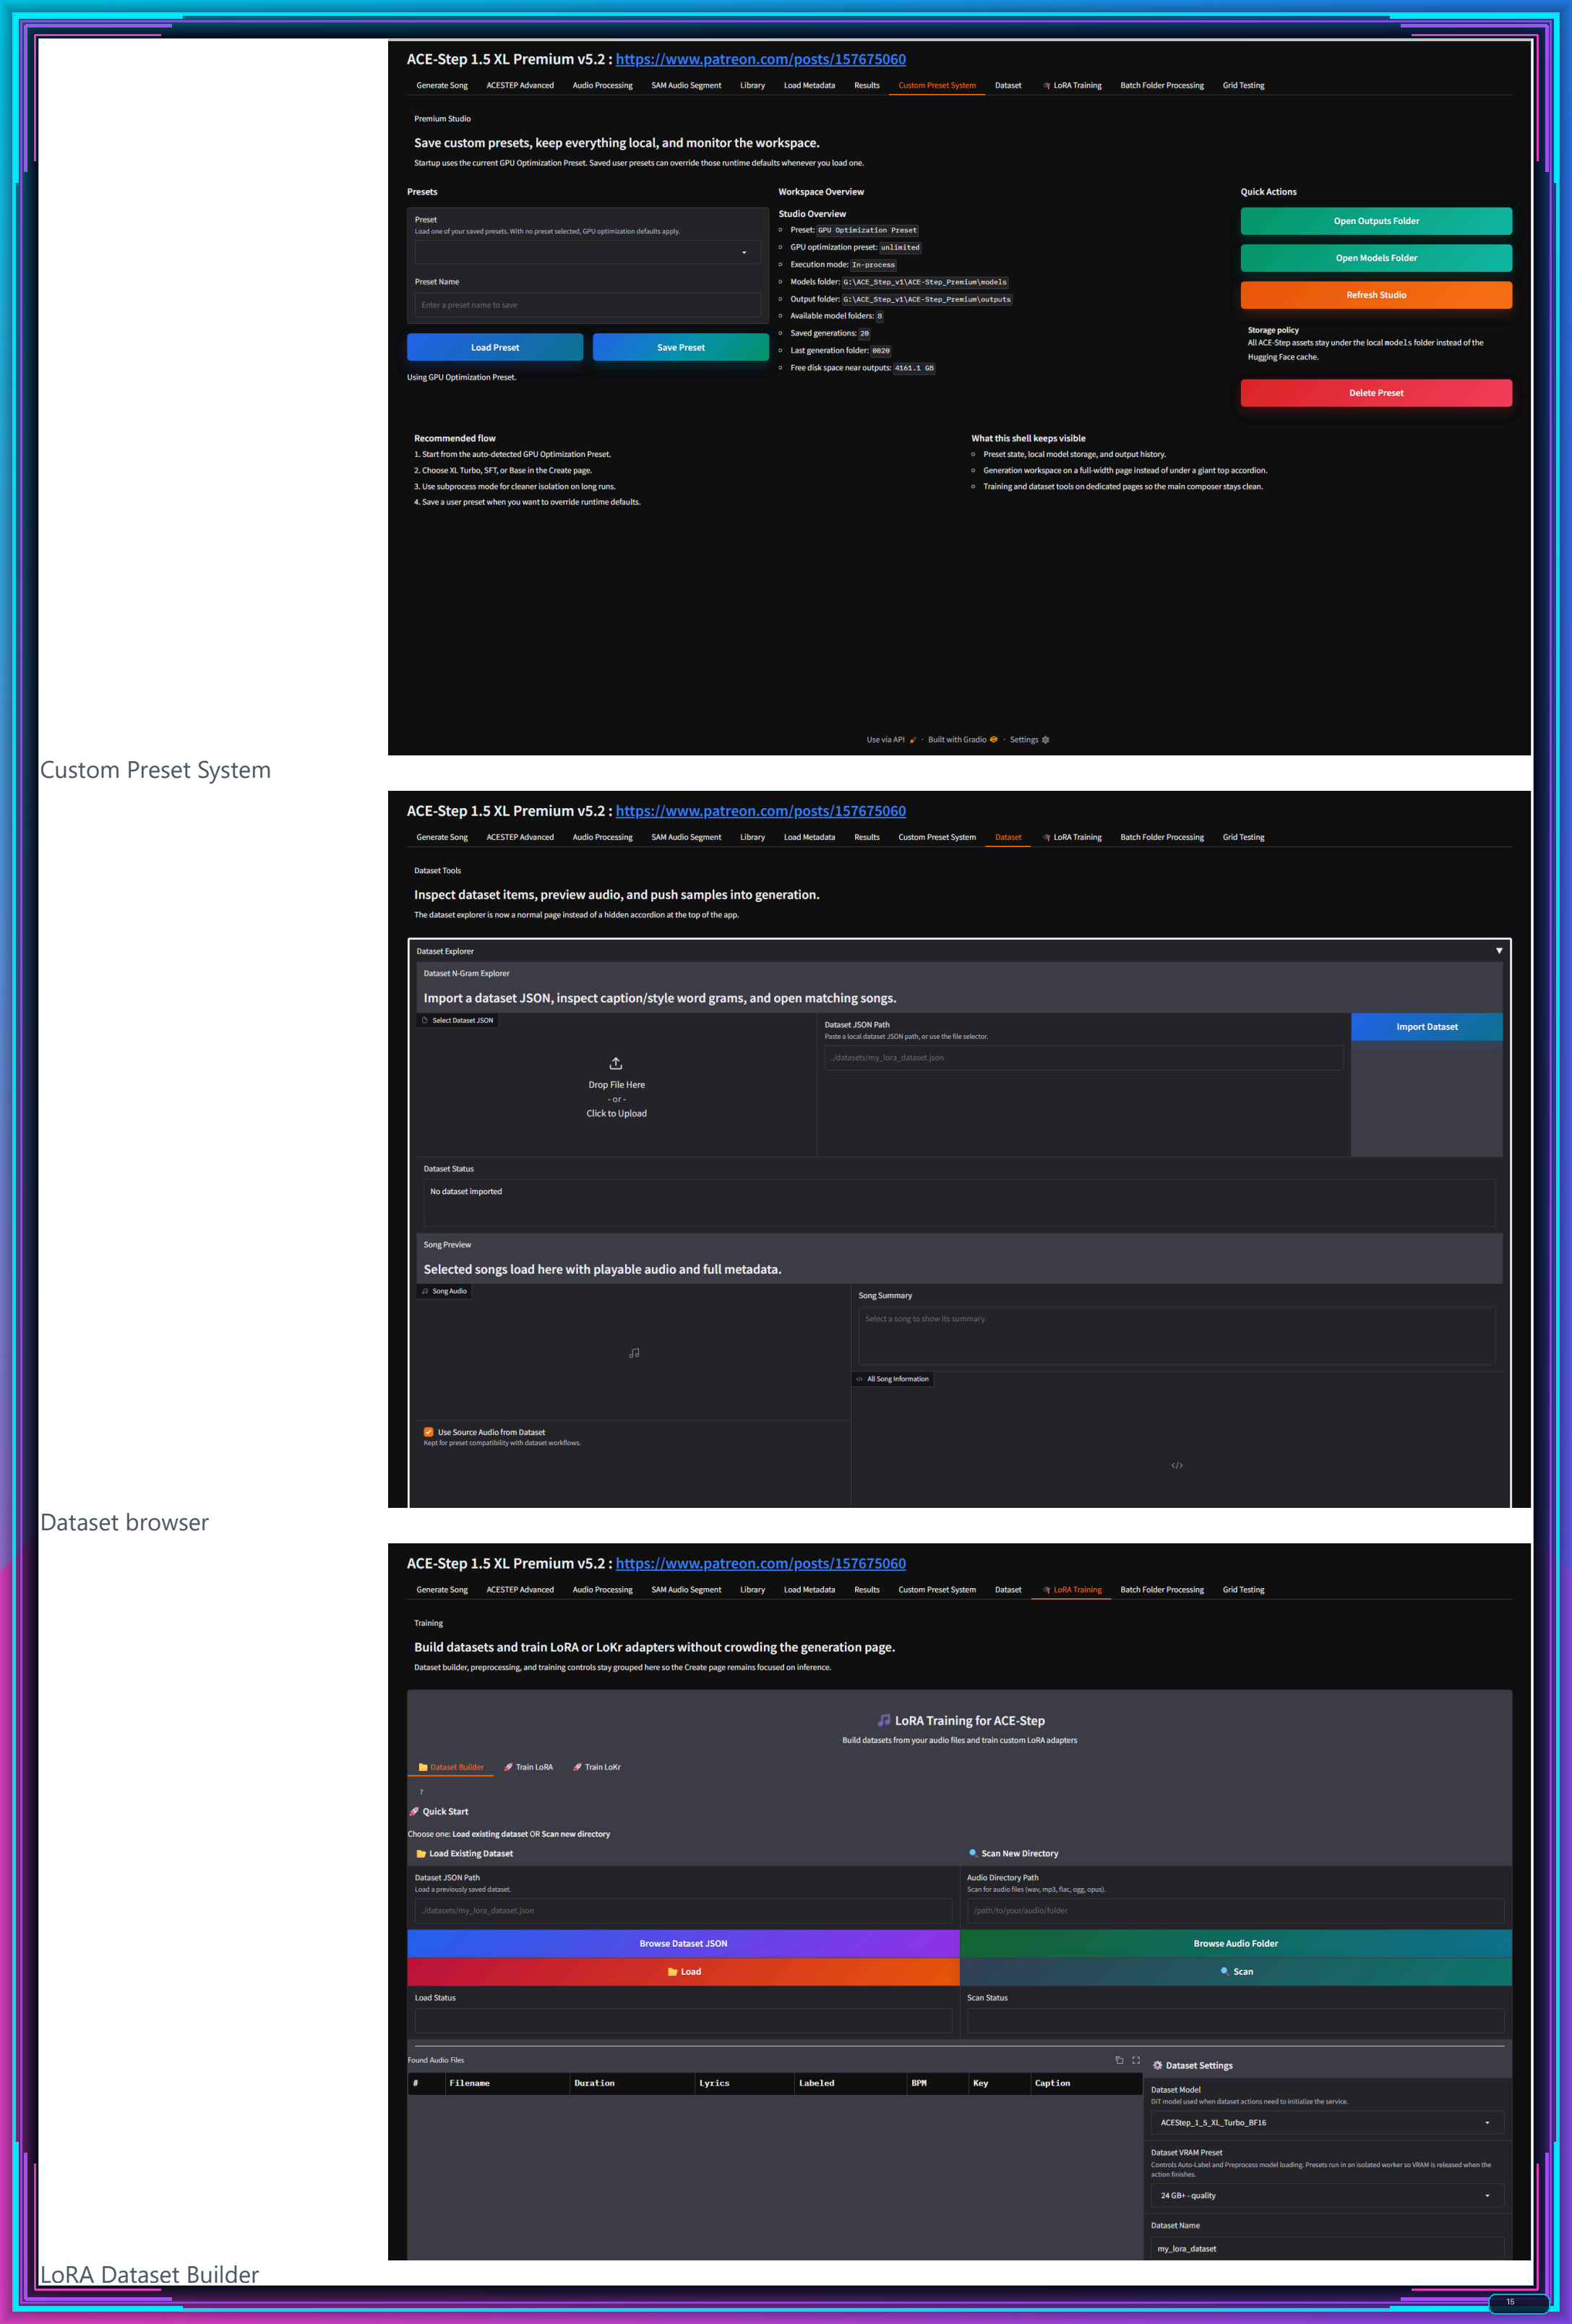
00:14:53 can also have full custom presets; it is fully working. You can save every setting, load them,
-
00:15:00 you can delete your preset, so whatever you want to do, and they will be also remembered when you
-
00:15:06 next time restart your application, very useful. This local model is now more important than ever
-
00:15:13 if you know the recent incident that Anthropic stopped serving its very best model. So anytime if
-
00:15:23 you are dependent on the cloud providers' cloud services, they may stop serving you. However,
-
00:15:29 this model is local. You can use it as much as you want. It is fully commercially usable. Therefore,
-
00:15:35 this is the way of the future: having local models, open-source models, using them on your
-
00:15:40 local computer. If your local computer is not powerful enough, then you can use it on private
-
00:15:46 cloud services, private GPU providing services like RunPod, like Massed Compute or SimplePod.
-
00:15:52 I will show all of them. Since we have seen all the features, now we can begin the installation
-
00:15:59 and the setup, using it on Windows first then the cloud services. So you need to go to this link;
-
00:16:06 this link will be in the description of the video below and also in the comment section
-
00:16:11 of the video. Download the latest installer zip file. It will be here or at the bottom when you
-
00:16:17 scroll down in the attachments you will see it. You see this post is very long. Why? Because I
-
00:16:23 write every update as a change log here. If you read everything here, then you will learn how this
-
00:16:30 app is developed—the timeline, what new features were added, how it is working. This is very, very
-
00:16:37 useful to read, so I recommend you to read it. And at the very bottom, let me show you—yes, it
-
00:16:42 is very long, I agree with that—you will see the attachment. So you can also download from here.
-
00:16:48 Let's go to top again, click download. It will download the zip file, but do not start installing
-
00:16:55 yet. First of all, you need to follow the Windows requirements tutorial. If you haven't followed it
-
00:17:01 yet, do so; if you have followed it previously, then you are ready. So this is the tutorial that
-
00:17:07 you need to follow first. Its source is fully up to date, the tutorial is fully up to date. You
-
00:17:13 can still skip watching this tutorial and try to make it work. It may work depending on your setup;
-
00:17:18 however, if you want to use torch compile especially, you need to follow that tutorial. Then
-
00:17:24 move the downloaded zip file into any disk where you want to install. So let's install it into
-
00:17:31 our Q drive and extract the file like this and enter inside the extracted folder. Make sure that
-
00:17:37 your folder path doesn't have space characters or non-English characters; if you don't want to have
-
00:17:44 any issues, I recommend that. Then double-click Windows install or update.bat file and run. This
-
00:17:50 will start the installation. It will generate a Python 3.11 virtual environment, so you need
-
00:17:56 to have Python 3.11. It is also installing local shared FFmpeg runtime. So the installation will
-
00:18:05 be fully automatic as long as you have followed the Windows requirements tutorial. It will also
-
00:18:10 automatically download all the models that you need and everything will be inside this folder and
-
00:18:17 inside the virtual environment that it is going to generate in a moment. First, it is downloading
-
00:18:23 the necessary shared FFmpeg file so that you won't have any issues. Okay, virtual environment
-
00:18:29 generated and the FFmpeg are also downloaded like this: ffmpeg shared and ffmpeg shared download.
-
00:18:36 The installation will be super fast because we are using UV installation, not depending on anything
-
00:18:41 else. So the installation already completed. You can verify the installation with scroll up,
-
00:18:46 and it will start downloading the models automatically into accurate folders with accurate
-
00:18:51 names. My downloader has 16 connection download and it also does hash verification; therefore,
-
00:18:59 all the downloaded models are 100% accurate. They can never be corrupted. It fully supports resume
-
00:19:06 as well. When you run the Windows install again or for update again, it will verify the status and
-
00:19:12 continue wherever it was left. This will download the SAM audio segment model, audio processing
-
00:19:18 related models, and it will also download the ACESTEP XL 1.5 turbo model. If you also want
-
00:19:25 to use ACESTEP XL 1.5 SFT and base model, then once this installation has been completed, you
-
00:19:32 need to run the Windows download all models.bat file. I will show that after this download is
-
00:19:39 completed. You can also see the speed; it is 100 megabytes per second, which is my maximum
-
00:19:45 internet connection speed. Normally shared models were FP32; however, we are not doing inference at
-
00:19:52 FP32. Therefore, I have generated BF16 versions which is our inference precision. And so you see
-
00:20:00 the models are now half size—faster to download, not faster to load. It uses lesser RAM memory;
-
00:20:06 everything is much better right now. You see the ACESTEP model is just a single safetensors file. I
-
00:20:13 also converted the Pytorch PT files into secure safetensors files. Okay, so all the 57 models
-
00:20:21 downloaded, everything is accurately downloaded, hash verified. If you wonder how much space the
-
00:20:27 models are taking, it is currently 34 GB which is very reasonable. Let's start the application with
-
00:20:34 Windows startup.bat file and while generating some songs I will also download the remaining models.
-
00:20:42 So I will run the Windows download all models; for cloud installation it will automatically download
-
00:20:47 these remaining models, so you won't be needing that since they are fast. So the new installed
-
00:20:54 application started. This is an easy-to-use interface which I have developed. First,
-
00:20:58 you can hit generate song to verify everything is working without changing anything else. This has
-
00:21:05 a default style prompt to give you an idea and lyrics. In the zip file, you will also
-
00:21:11 find a file named as ACESTEP lyric generation instructions for LLMs. You can use this file:
-
00:21:19 give it to your favorite LLM like ChatGPT and make it format your lyrics or your style accordingly.
-
00:21:27 These ACESTEP XL models really work well to format the lyrics or the style. So you can always watch
-
00:21:35 the status in the CMD window rather than depending on the Gradio interface itself which I recommend,
-
00:21:41 and the remaining models are also being downloaded right now which are ACESTEP XL SFT and base
-
00:21:48 models. When you go to the Advanced tab you will see which models are recommended and supported
-
00:21:54 for which task. So the turbo model is mostly for generation only because it is fast, high quality,
-
00:22:02 and the other models are for other tasks. It will automatically select the GPU optimization
-
00:22:07 preset. If it be too slow, you can reduce your tier to generate fast. You can also provide an
-
00:22:13 image from here and it will generate an MP4 file with the song it generated and with the image you
-
00:22:21 have provided. It is automatically generating with the selected resolution and it is keeping
-
00:22:27 the original aspect ratio. You can also set your song instrumental from here, change the
-
00:22:32 vocal from here, or change the language from here. You see, it supports so many different languages.
-
00:22:37 This model is currently state-of-the-art. It is certainly better than the Suno free version. It
-
00:22:43 is rivaling the Suno 5, Suno 5.5, especially with LoRA training. Hopefully, it will be the next
-
00:22:48 tutorial. It will be better than even the paid Suno 5.5. And you know, Suno is very likely to be
-
00:22:55 putting some watermark into your generations; therefore, platforms like YouTube know that
-
00:23:02 song is AI generated. Okay, we can listen to the default song. Woke up with the track. Woke up with
-
00:23:17 the five. Put the weight on my back. I'm blessed in fact. Okay, it is working amazing as expected.
-
00:23:27 If you are going to generate multiple songs and if you want to speed up, go to advanced setup and
-
00:23:31 enable compile model. For this to work, you need to have CUDA installed properly and also MSVC C++
-
00:23:40 compiler to be installed properly. Everything is explained in the Windows requirements tutorial.
-
00:23:44 This application will find accurate CUDA and the installed C++ compiler automatically and use it
-
00:23:51 to torch compile. The first run with torch compile will be very slow since it will compile, but the
-
00:23:58 subsequent ones will be very fast, and it may need to recompile depending on the settings
-
00:24:03 that you can change. So this is how you generate songs. Everything will be saved inside the outputs
-
00:24:10 folder. When you open the outputs folder, you will see that it is saved like this. You can change the
-
00:24:16 models from here. You can go to advanced, select remix. For selecting remix, I recommend you to
-
00:24:23 change the recommended model to SFT and upload your generated song or whatever song that you want
-
00:24:29 to remix, and use the same lyrics here. Change the music caption like rap or whatever you want, and
-
00:24:36 then you can also select the remix source start and end. It shows the preview here and generate
-
00:24:43 music. By the way, if you get an out of VRAM error, you can restart the application. Oh, you
-
00:24:48 see we have just downloaded the model, it didn't see it. So, I need to restart the application. So,
-
00:24:54 as I said, if you get an out of VRAM error, I recommend you to restart the application. However,
-
00:24:59 I made a lot of improvements so it shouldn't be necessary; it should automatically switch between
-
00:25:05 models without restarting your application. So select SFT, go to advanced, select the remix,
-
00:25:13 and have the same lyrics as the remix song to not have any lyrics issue. Change the caption,
-
00:25:20 then hit generate music and it will generate the remix. Okay, as you have seen the remix
-
00:25:27 results were not great. However, one of our users just messaged me and explained to me how he makes
-
00:25:35 amazing remixes. So I'm now going to show you how he makes them. He made a production loop. It's a
-
00:25:43 loop; therefore, you need to repeat it. First of all, we are uploading our original audio. Then
-
00:25:49 write an adapted lyric, not a literal translation. Keep line length, syllable count, vowel shape, and
-
00:25:56 stressed syllables close to the original phrase. Replace meaning with sound compatible wording
-
00:26:02 when needed. Set remix strength between 0.92 and 0.99; start in the middle of the range. Listen,
-
00:26:10 then move tighter or looser depending on whether the vocal follows the original too much or not
-
00:26:16 enough. How you set it? If you pay attention to the remix strength, it is here. So, by default,
-
00:26:21 it is 1. However, as recommended, try with 0.92 to 0.99 to keep the wording more accurate. Add
-
00:26:30 a clean 30 second voice reference. Now, this is important. This is something that I didn't test,
-
00:26:36 but he tested and figured that out: use it for timbre vocal character. Keep it clean, dry,
-
00:26:42 and center it on the voice you want to be copied. So, where you are going to edit? Obviously, it is
-
00:26:47 here. So, provide the reference audio here to make the remixed audio even closer and better to the
-
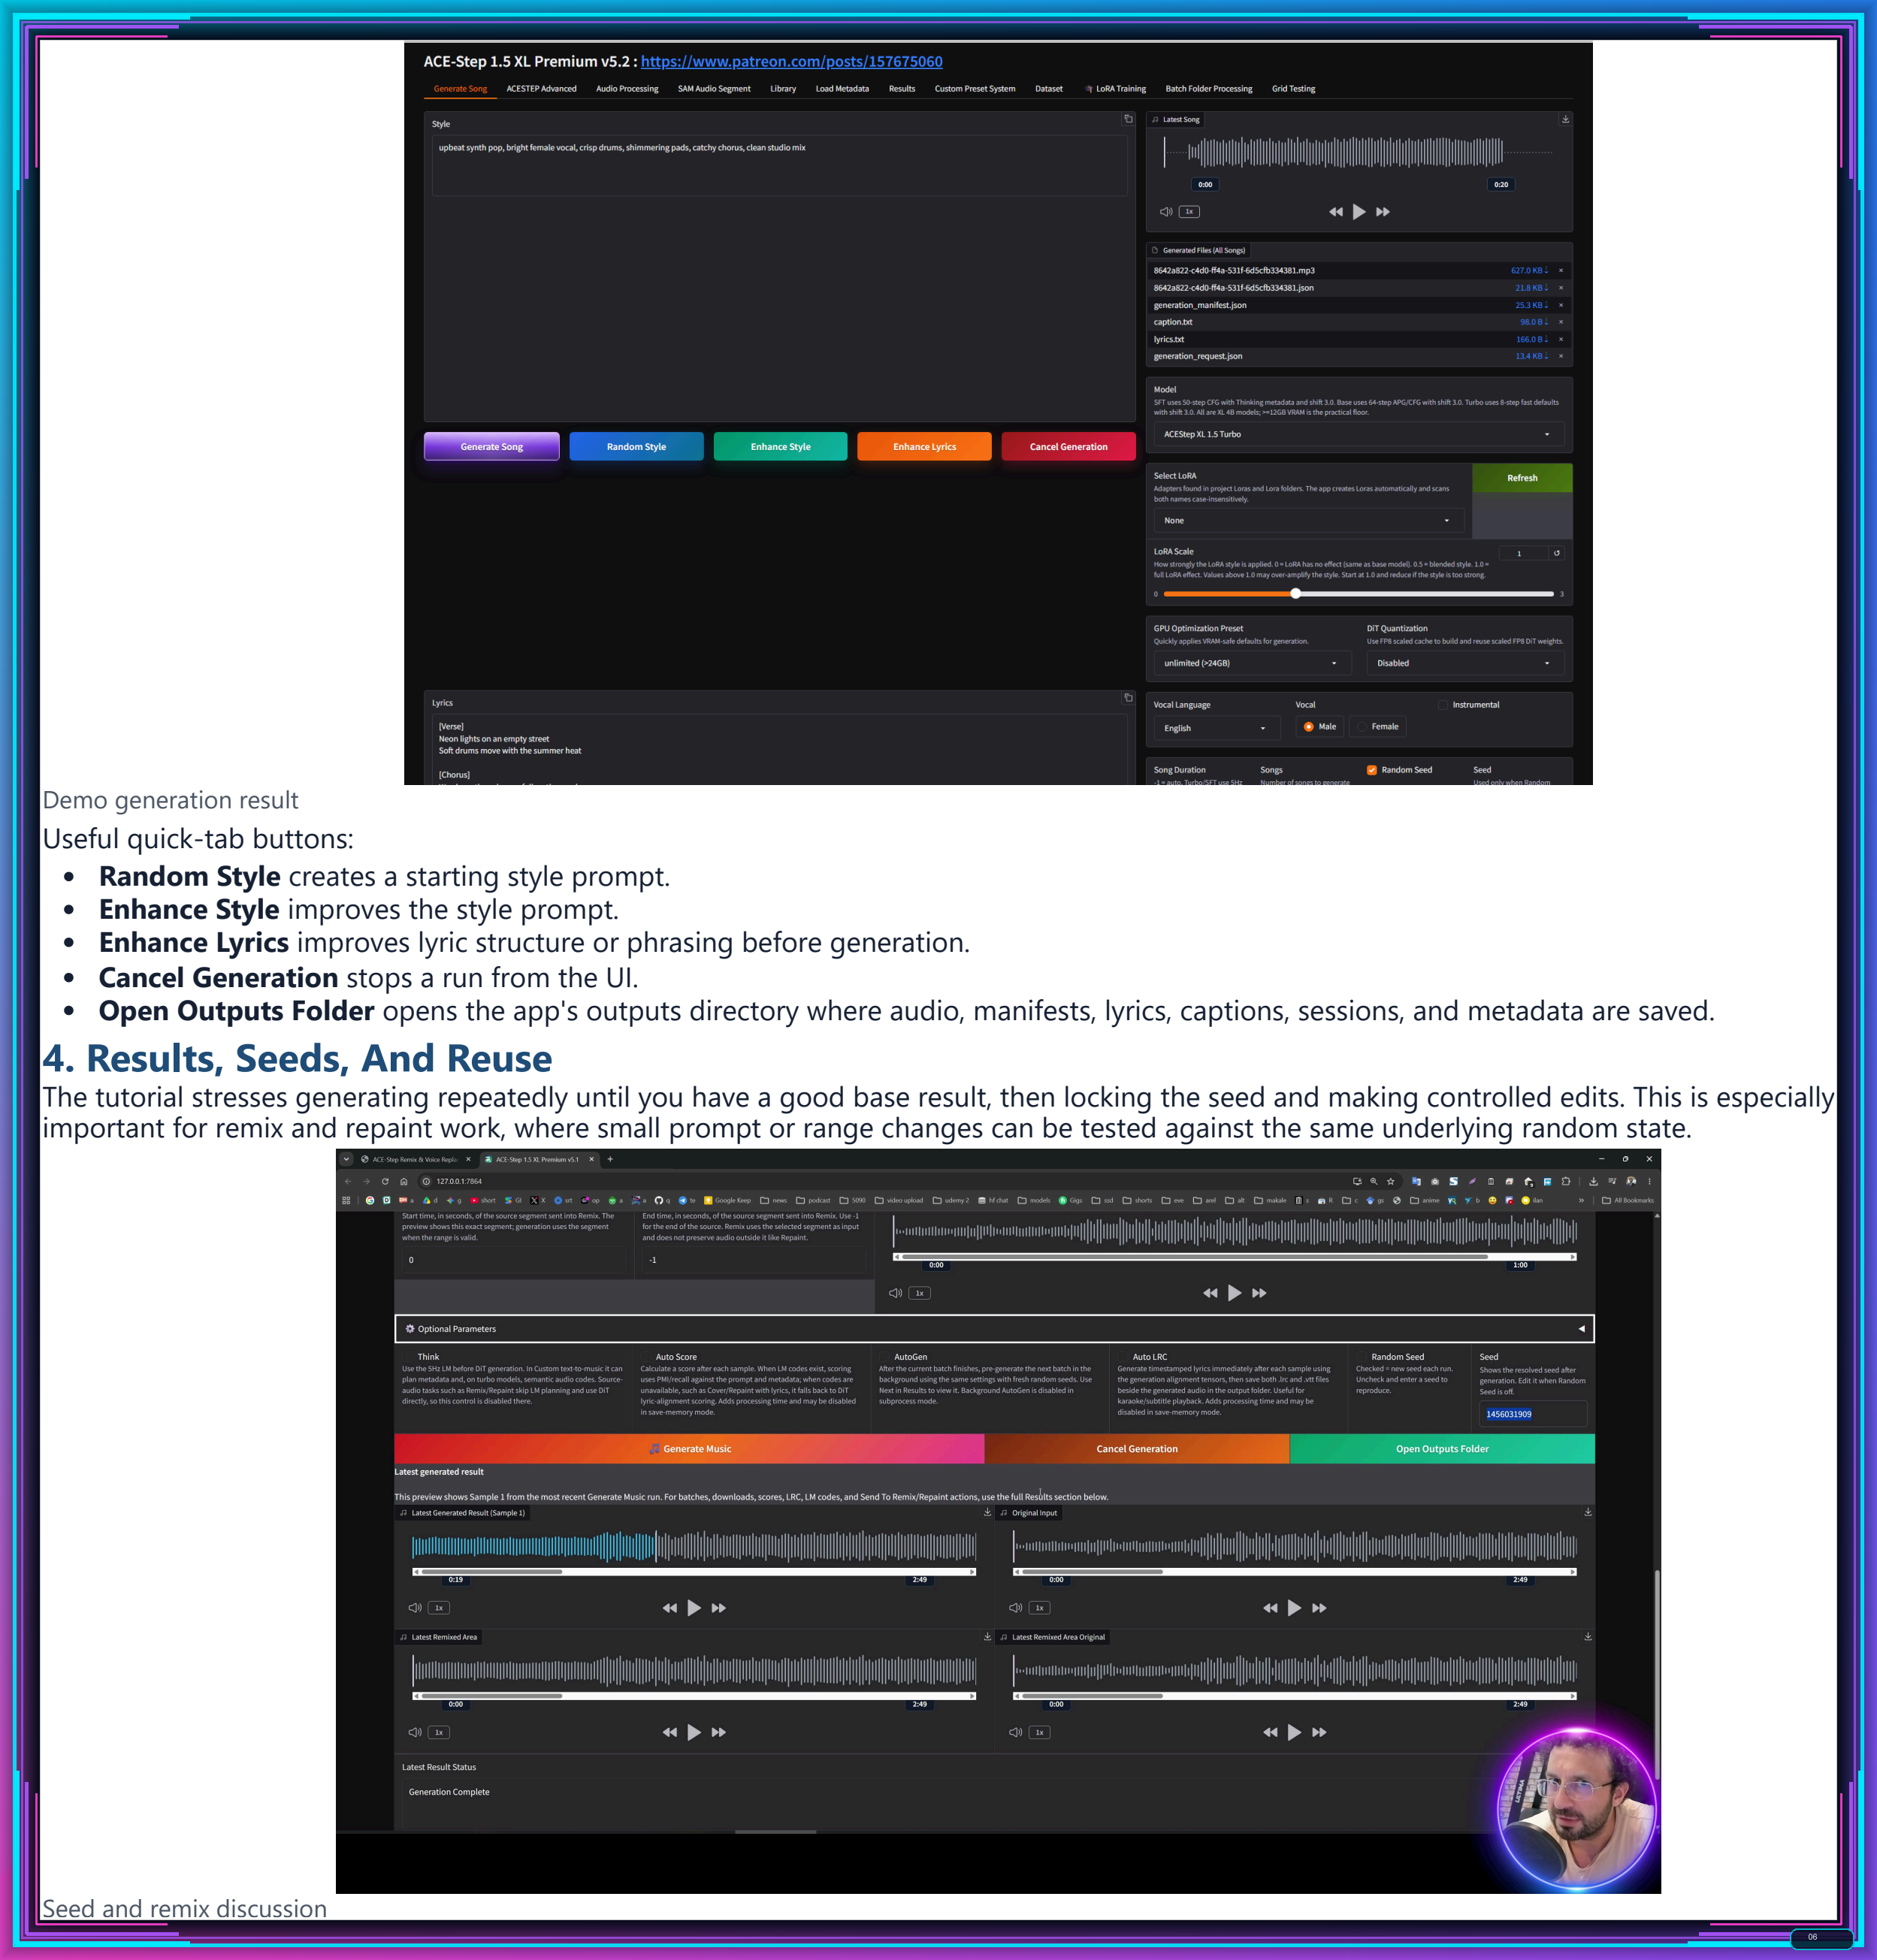
00:26:55 original song. And the next step, generate until the base take feels right. So as I have shown,
-
00:27:01 the generation is fast. So generate again and again and again until you get a good base result.
-
00:27:08 Then lock the seed and disable random. How you are going to do that? I have updated the application
-
00:27:15 and moved the seed to this place. So it is much easier now and it will automatically
-
00:27:22 set the last generated seed value. So once you have the accurate and reasonably good remix,
-
00:27:30 just uncheck this and keep working on the same seed value. Moreover, I did set the default remix
-
00:27:38 strength to 0.95, so with the latest update, you are going to have both of the features.
-
00:27:45 Then change one word or phrase at a time and keep working until you get the desired result. He is
-
00:27:52 also doing some additional stuff like separating stems, tuning vocals, then mixing all; it is
-
00:27:58 all up to you to the level that you want to go. For repaints, same way: upload to source audio,
-
00:28:04 set your caption and lyrics, and select the repaint start and end like 19 to 24. It will
-
00:28:11 show the preview here. However, currently, we are generating remix; therefore, it is
-
00:28:15 waiting for that, so we need to first wait for the remix to be completed. Okay, change it to preview.
-
00:28:21 You can watch the status in the CMD window. As you are seeing, I am not changing any optional
-
00:28:27 parameters or advanced settings because they are all set to maximum quality with the VRAM presets
-
00:28:34 we have. As you play with this application, you will understand how to use it, how useful it is,
-
00:28:39 how advanced it is. It has so many amazing features. So, our generation is almost
-
00:28:43 completed. Yes, it is completed. The result should appear in a moment. And it is here. So, the latest
-
00:28:50 generated result is here. The latest remixed area is here. You can also see the original inputs.
-
00:29:03 Yeah, this didn't work very well, so I probably need to change my caption or generate more. This
-
00:29:08 is just a very basic caption, but this is how it works. When I go to repaint, it's the same way.
-
00:29:13 For extracting, I need to change the base model to this one. The base, the Lego, and extraction
-
00:29:20 will become available. I have already shown how to use them. And as you have noticed, everything has
-
00:29:26 very good explanations on the Gradio interface, so read every one of them to understand. I also
-
00:29:31 can use audio processing: just upload the file and click the process file, or I can use the auto-trim
-
00:29:39 editor. We already saw them. SAM audio is same way: just select your file and select the options
-
00:29:46 whichever you want to do like text prompt. I never tried the span actually, so I can't say
-
00:29:52 that it is working as expected and it is very hard to use, or the visual mask. I also never used it,
-
00:29:58 but the text is working perfect. These two others are very hard to use; they require a lot of manual
-
00:30:03 work. However, text is working perfect. Type your custom prompt whatever you want to extract as I
-
00:30:09 have shown in the beginning of the tutorial and it will work. My installer has properly compiled
-
00:30:16 Flash Attention; therefore, it should work on your Windows or on cloud services. So, this was how to
-
00:30:24 do inference on this application on Windows. The LoRA training is also fully working and it will
-
00:30:31 come as a next tutorial. Hopefully, I am still in research; I will try to train a vocal voice
-
00:30:37 and generate with that voice consistently and with the style, of course—the singing style. It
-
00:30:42 will be an amazing, epic tutorial hopefully. So now I will show how to install and use on RunPod,
-
00:30:48 on Massed Compute, and on SimplePod. If you don't have a powerful GPU, if you want to
-
00:30:53 generate faster, if you want to scale up your generation, then you need some cloud services
-
00:30:58 and these are the best services. So in the zip file, we already have all the instructions.
-
00:31:03 Let's begin with the RunPod. You see we have a RunPod SimplePod ACESTEP instructions.txt
-
00:31:09 file. They are all in the zip file; you need to first download it and extract it. When I open it,
-
00:31:14 it will show me all the instructions. So let's begin with the RunPod. First of all,
-
00:31:19 please use this link to register; I appreciate that very much. Once you register and sign in,
-
00:31:24 click this plus icon and add some credits. You see I am currently spending some money because I have
-
00:31:31 some storage. Okay, let's delete them because I will show you how to use the storage as well. Man,
-
00:31:38 if you forget this, you will spend money like me. This is the homepage, the newest homepage of the
-
00:31:44 RunPod. You registered, you added some credits, then as a next step, you will see that we have the
-
00:31:49 template. All of my application installers work the same way; so once you understand the logic,
-
00:31:56 you will be able to use every one of them. So click this; it will open the accurate template
-
00:32:03 and select it. This may change depending on the application. Since we are using CUDA 13,
-
00:32:08 there is one important thing which is go to filter and select the CUDA version as 12.8, 12.9,
-
00:32:17 and 13. Why? Because RunPod is not updating its NVIDIA drivers. The issue is the NVIDIA driver,
-
00:32:24 not the CUDA version. Because we can install the CUDA version, but we cannot install the NVIDIA
-
00:32:29 driver. This way we are going to get a machine that has the accurate NVIDIA driver that will
-
00:32:35 run the CUDA 13. After that, you can also play with the other filters like secure / community—I
-
00:32:41 recommend secure—the RAM amount, disk type, whatever, and then apply filters. It will
-
00:32:47 select it. Now if you don't select any permanent storage, it will create a temporary storage that
-
00:32:54 you will use on this instance. If you want to use permanent storage which you can resume later,
-
00:32:59 you need to add a volume disk. So you see currently we don't have a network here;
-
00:33:04 therefore, I will go to storage first and create a network volume in here. You need to select a
-
00:33:09 region because it's region-specific and depending on the GPU that you are going to use, you need to
-
00:33:14 select your region accurately. So I am going to select a region which has a lot of RTX Pro 6000,
-
00:33:21 which is one of my favorite GPUs, or RTX 5090. For this one, it would work too. Okay, let's see
-
00:33:28 what we have here—high performance. The US regions are usually better. So this is a Europe region but
-
00:33:35 it has a lot of RTX Pro 6000. It will be slow but I need to select this. I hope it doesn't
-
00:33:41 be too slow. Let's say example, I will make this 200 GB and create network volume. Now my volume
-
00:33:47 is ready. Therefore, I will click this again to get the accurate template. Template is selected,
-
00:33:54 my filters are kept, very nice. And now I am going to select my GPU. Wow, the prices are all
-
00:34:00 increased because of the demand, and persistent storage is network volume. Okay, now I have it,
-
00:34:07 but it doesn't show whether it has selected it or not. It says automatically create; oh, here. Yes,
-
00:34:12 from here I can select my persistent storage like this. So don't make it automatically create. But
-
00:34:19 I see that we could create from this as well, so the interface keeps changing. Pay attention
-
00:34:24 to the interface. The most crucial part is using the accurate template and deploy port
-
00:34:30 and also selecting the accurate filter for NVIDIA driver CUDA 12.8, 12.9, or 13. Okay,
-
00:34:38 this template was already used, very nice, so we didn't wait. When you go to the details or
-
00:34:45 telemetry it will show the driver; yes, this is the driver version. This driver supports 13,
-
00:34:51 therefore it should work very well. So go to connect and click Jupyter Lab. If you don't
-
00:34:55 see this is enabled, you can refresh this page. The Jupyter Lab is starting. Then I will drag
-
00:35:01 and drop the downloaded zip file into here like this. You can also use this upload icon to upload
-
00:35:10 your zip file. Once the upload is completed, it will show the upload status here. Right-click and
-
00:35:15 extract archive, then it will extract like this. Then there is RunPod SimplePod instructions and
-
00:35:22 there is this installation command. Always read these instruction files. Open a new terminal
-
00:35:27 from this plus, copy-paste it, and it will do all the installation and model downloads. This will
-
00:35:33 download all of the models, not only the turbo model, because this is a cloud service; therefore,
-
00:35:38 it is fast. All you need to do is now wait, depending on your port. It may take a lot of time
-
00:35:44 or it may be fast. However, RunPod may be broken at many times; so if you get any error, just get
-
00:35:50 a new GPU. Unfortunately, there is no other way. Currently, this one is looking like it's working,
-
00:35:56 but you can never be sure, and it is already slow. So the installation started and it is installing
-
00:36:02 the libraries. We are using UV installation and even with UV, RunPod is unfortunately slow. So
-
00:36:10 depending on your chance, the server, and the GPU you get, you may wait a lot of time or it may be
-
00:36:17 fast. During the installation, unfortunately, an error occurred. This is an operating system error;
-
00:36:24 that means this is a RunPod error. To fix this issue, run the installer again and it will try to
-
00:36:32 resume from wherever it was left, so it should be faster when you run it the second time. As I said,
-
00:36:39 RunPod is very erratic. It may throw errors, not all GPUs work, so it is totally unpredictable in
-
00:36:50 performance. However, it is the most widely used one and it has so many different GPUs;
-
00:36:56 therefore, this is like a trade-off between some features and some errors or unpredictability. You
-
00:37:05 see the second time running installation is much faster. I hope this time it won't have any issues;
-
00:37:11 we should see. But this operating system error is 100% related to RunPod's shared storage and
-
00:37:19 network system itself. Now it is starting to download all of the models. You don't
-
00:37:24 need to run an additional command. If you get any errors during the model download as well,
-
00:37:29 just run the installation again; it just resumes, it doesn't start from the beginning. The model
-
00:37:34 download speed is looking decent. Since I am using 16 connection downloads, it is merging them;
-
00:37:41 therefore, the downloads are really fast and optimized. It's also verifying the hash values
-
00:37:46 so that you will never have corrupt model issues, because corrupt models are very annoying where
-
00:37:52 everything looks normal but it doesn't work or it produces inaccurate results. Yes, the speed
-
00:37:58 is also decent, equal to 100 megabytes per second. All right, so the installation has been completed.
-
00:38:03 All the models have been downloaded. Now we are ready to start launching the application.
-
00:38:10 For launching, return back to the RunPod SimplePod instructions.txt file. All of my applications have
-
00:38:17 that. Copy the start command, open a new terminal, and paste the start command. This will start as a
-
00:38:25 Gradio live shared link. The starting may take time depending on your port speed. Okay, so the
-
00:38:32 application started. We can see that Gradio live is here. If you don't want to use Gradio live,
-
00:38:39 you need to add a port to here; it will restart your port, so be careful with that. So you need
-
00:38:46 to edit this port and add a port here to connect from the proxy of the RunPod. I will show that
-
00:38:54 after this. Okay, so the application started. Now it is the same as using in Windows; I'm not going
-
00:39:01 to repeat. However, I'm going to show you how you can resume using without making everything
-
00:39:07 from your persistent storage permanent storage. To resume it, I'm going to delete this port. You
-
00:39:13 see when I stop this port, it will be like this, and since I was using permanent storage, I will
-
00:39:19 be able to resume it. Let's verify that. Okay, it doesn't show, so I'm not sure if it started
-
00:39:26 with my permanent storage now. Okay, it says that yes, it was using this, so it should start. Okay,
-
00:39:32 I'm going to terminate now. You know, when you terminate it, everything will be deleted unless it
-
00:39:37 is in your permanent storage, so let's terminate the port. And our template is still selected,
-
00:39:43 but let's begin from the beginning to verify: so open the instructions.txt and double-click
-
00:39:49 the template. You see it is selected, then as a filter, I'm going to select the disk and I'm
-
00:39:56 going to make the CUDA filter. I also recommend selecting maximum RAM and this disk. Okay, apply
-
00:40:04 filters. So I'm also going to select my network volume. You see when I select the network volume,
-
00:40:10 the options will be lesser because it will filter based on my network storage region. Okay,
-
00:40:18 selected; everything is ready. But before I start, I'm also going to add the port; the port was 7860.
-
00:40:27 So let's also add it. However, am I going to add the port? So for adding the port, I'm going
-
00:40:33 to click set overrides and add it here: 7860 like this and set overrides. Even though you are using
-
00:40:45 my template, you can add some stuff like this and deploy port. Now it will be almost instant
-
00:40:52 to start the application. You will not be spending the whole time to reinstall, and every file you
-
00:40:58 have generated, everything you did, will be kept. This is how the permanent storage system works.
-
00:41:04 SimplePod is exactly the same as RunPod; I will also show that. Okay, now when I click the port
-
00:41:10 instance, you see there is also the 7860 port. First of all, connect with Jupyter Lab so that we
-
00:41:16 can start the application. I recommend you to run the installation again to not have any issues. So
-
00:41:22 open a new terminal, run the installation. This time the installation should be almost instant.
-
00:41:28 Let's see. Okay, it's saying that requirements are verified; everything will be just verified.
-
00:41:33 It will only install the FFmpeg again. Okay, it is verifying the packages, everything is getting
-
00:41:40 verified right now. All the models it is skipping since their hash values were already verified. So,
-
00:41:47 it will take like 1 minute to verify everything and get ready. This is the recommended way with
-
00:41:52 my old applications; I recommend you run the installer again to be sure to not have
-
00:41:57 any issues after you start your permanent storage again. Okay, everything verified. It is now just
-
00:42:04 reinstalling the FFmpeg, then we will be ready. Yes, ready. Now return back and start. So this
-
00:42:10 time we will be able to connect both from proxy and Gradio live. However, I recommend connecting
-
00:42:18 from Gradio live because RunPod proxy always causes issues for me—it doesn't work very well.
-
00:42:25 Therefore, I recommend the Gradio live option always. Okay, it has started on the local port
-
00:42:30 and also on Gradio live. So let's open the Gradio live, and to open the local port, you see there is
-
00:42:36 this 7860 which is the port it starts. Okay, looks like we have to use 7861; sometimes it
-
00:42:44 requires you to start with the plus 1. This is how the RunPod proxy works. So let's also show that;
-
00:42:51 I will just repeat the steps. You see from here I can also edit the port and I will just add 7861.
-
00:42:58 When I do this, it restarts the port; therefore, I will be needed to start it again, but once you
-
00:43:06 restart, you don't need to run the installation again. Restarts keep the workspace installations;
-
00:43:13 so after the restart—okay, it is done—I will just connect back to the Jupyter Lab interface. Yeah,
-
00:43:20 it will take some time. Okay, it started. This time I will just run the start command, not the
-
00:43:26 installation, because I only did a restart. When you stop the port or terminate and start again,
-
00:43:32 you need to run the installation; if you just restart, you don't need to run the installation
-
00:43:37 again. It is restarted; I will just run the start command. This start command also updates
-
00:43:46 the application if there are newer versions. Okay, the application started. So, let's open the Gradio
-
00:43:51 live and we should be able to connect from 7861. Yes, yes, I know this is awkward, this is weird,
-
00:43:59 but this is how the RunPod proxy works. Okay. I don't know, maybe I should block or unlock;
-
00:44:05 let's try block. Okay, Gradio live starts. Yeah, proxy didn't start, but this is the way you can
-
00:44:11 try it. Let's generate a song with the default values on RunPod. It will be slow to load models;
-
00:44:17 their network storage system is slow. Okay, we got an error. But don't need to panic;
-
00:44:24 I know the reason, I know the solution. Remember when we were installing we had this network RunPod
-
00:44:32 related error? The reason for this error was that UV installs with multi-threads based on
-
00:44:39 the number of CPU cores, and this machine has 256 CPUs. Therefore, it was spawning so many threads
-
00:44:48 to install and it was causing this issue and it corrupted our virtual environment. Therefore,
-
00:44:54 we got this error. So, how are we going to solve this error? First of all, restart your pod. Then
-
00:45:01 we are going to delete our virtual environment and run the installer again. Also don't worry,
-
00:45:06 I have updated the zip file; in the future, the installation will be limited to 4 threads.
-
00:45:11 If your machine is better, like if you're on SimplePod or if you trust your machine,
-
00:45:16 you can increase this to improve the speed of installation; however, on RunPod, I recommend
-
00:45:22 making it 4. So first we will delete the virtual environment. For deleting the virtual environment,
-
00:45:26 we are going to use this command. Let's connect back to the Jupyter Lab interface. Open a new
-
00:45:32 terminal, copy-paste. It will delete the virtual environment; this is the only way to fix when the
-
00:45:37 virtual environment is corrupted. Then copy the installation command again. It is still deleting
-
00:45:43 the virtual environment; when it deletes the virtual environment, it will disappear from here.
-
00:45:47 You can refresh to see. You see the RunPod network storage system is slow; therefore, Massed Compute
-
00:45:54 is a much better alternative. However, they don't have a permanent network storage system; that is
-
00:45:59 their disadvantage. Or you can use SimplePod; I didn't encounter such issues, and their network
-
00:46:04 storage system is also fast. Okay, it is deleted. Now I will open a new terminal and run the install
-
00:46:10 command again. This time I will limit it to 4. So if you get such errors, you can reduce it
-
00:46:15 even to 2 or 1. This is the way of preventing such operating system errors. You see stale file handle
-
00:46:24 errors on RunPod or any shared network having systems; in my Windows computer or in Massed
-
00:46:32 Compute, I never encountered this issue, nor on SimplePod. However, this is extra information
-
00:46:37 for you in the future to fix such issues yourself. Obviously, since we are running 4 threads instead
-
00:46:44 of the maximum, it will be slower to install, but it should work perfectly fine. Okay,
-
00:46:49 the installation went smooth this time; we do not see any errors. Everything is looking perfect. The
-
00:46:57 speed was decent, not very bad, but it was slower obviously, and since we had downloaded everything
-
00:47:04 they are just skipped—already verified—and now I can start the application again. So this was
-
00:47:12 important information for any other application in the future where you may encounter this problem,
-
00:47:20 and now you will know the solution. Okay, the application started; let's open the Gradio live
-
00:47:26 link. You see it is like this. If you encounter any issues with Gradio live, you can open it
-
00:47:32 in a private window; it may help sometimes, or restart your browser entirely. As a rule of thumb,
-
00:47:38 always run the application with default values then verify it is working. You see it said it
-
00:47:44 could not parse the server response, but then it started because we clicked it too early. Probably
-
00:47:50 the Gradio is taking some time to load, especially when you change the model, waiting to load values
-
00:47:56 accurately. So the processing started; we have no error this time and it should work. Let's
-
00:48:01 see. Once the model is loaded, the subsequent generations will be very fast, but the initial
-
00:48:07 model loading will be very slow. And if you want to monitor the VRAM usage, you can open a new
-
00:48:13 terminal. Type pip install nvitop like this. Then type nvitop and it will open the nvitop window. It
-
00:48:23 shows the driver version and the CUDA version of the driver. This CUDA version is the version of
-
00:48:28 the driver, not what the template has. So this is important. So it is starting to load the model; we
-
00:48:35 have to wait because model loading is slow because the hard drive system on RunPod is slow. But it is
-
00:48:42 loading. We have full optimizations to speed up this process both on Windows, on Linux, and on
-
00:48:48 cloud machines. We can also follow the status here. You see it is using Flash Attention;
-
00:48:53 I have compiled this myself so that it supports every cloud GPU. This compile took over 12 hours;
-
00:49:01 it was really brutal to make it right. We are using torch 2.11 with CUDA 13. Hopefully, I will
-
00:49:07 upgrade applications and compiles to torch 2.12; I'm waiting for it to mature. We are also using
-
00:49:14 torchao; this is just torchao loading, but torchao is used in the inference. So, this is a fully
-
00:49:21 optimized and highest quality, highest performance programming application. It took me weeks to make
-
00:49:28 this application and get it to this point. I will show the second run as well. You see the
-
00:49:34 first run is taking like 200 seconds because it is all taking time with loading the model. Okay,
-
00:49:40 the inference started. So the models were loaded; inference is really fast as you can see. Wow,
-
00:49:47 really, really fast. It is using like 24 GB of VRAM; you can perfectly run this on an RTX 5090
-
00:49:53 as well. So the first song has been generated. It may take a little bit of time to appear here
-
00:50:00 because of the Gradio live. You can click this download; if it doesn't appear here, you can also
-
00:50:05 download from outputs which I will show. Let's listen to it. Excellent, the default is working.
-
00:50:17 Let's generate another song and see the speed. Okay, generation started; it should be ultra-fast
-
00:50:25 since it will use the already loaded model. We are really fast, I can see that already. So, let's see
-
00:50:32 how many seconds. Okay, it is already done. Oh my god, yep. You see how many seconds it took? Let's
-
00:50:39 go to outputs. This is the 3rd song; let's see the manifest.json. So, it took literally—let's see—15
-
00:50:48 seconds. So, on this GPU, you can generate 4 full songs in 1 minute. In 1 hour, you can generate 240
-
00:50:58 songs and it costs only 2 dollars per hour. And how to download every generation? Go back to your
-
00:51:06 workspace, go to ACESTEP Premium, and right-click outputs and download as an archive, and it will
-
00:51:12 zip it and start downloading everything like this. You can of course download from here;
-
00:51:17 click this and it will download. So how to terminate the machine properly? You can stop
-
00:51:22 the machine. When you stop the machine, it will still use some credits. You see it shows 0. Why?
-
00:51:28 Because it is using the credits in my storage. So currently it is using 14 dollars per month.
-
00:51:35 You need to also delete this if you want to not use any storage. I'm going to just delete this
-
00:51:41 because I am done with it. But this is how you use the permanent storage system. How to use RunPod,
-
00:51:48 how to solve issues. Basically, we have explained everything. You see I have to remove this first,
-
00:51:54 so I will just terminate the pod. So what is the difference between permanent storage and
-
00:51:58 the regular network volume? So let's go to pods; everything is selected. Let's select this GPU and
-
00:52:04 let's select the volume disk. So you see network volume uses my permanent network; volume disk uses
-
00:52:11 the volume, and volume disk also uses some credits by itself. And this time when I stop this you will
-
00:52:19 see that it is going to use this much money. However, I can resume this if there is a GPU
-
00:52:24 later. And to make it 0, I need to terminate the pod. Okay, let's also delete my permanent
-
00:52:30 storage too. So I will not get money wasted and now I am spending 0. Let's verify that. Okay,
-
00:52:38 it still shows my spend rate; let's refresh. Wow, it is taking some time to update, I guess. But
-
00:52:46 I am spending 0 right now because I don't have any pods or I don't have any storage here. Wow,
-
00:52:53 it still didn't delete it; man, the system became very slow. Oh, I generated this inaccurately with
-
00:52:59 the network volume now accidentally. Yes, why I had generated it accidentally? Because let me show
-
00:53:05 you so you won't make the same mistake: if you select the network volume here,
-
00:53:11 it will automatically create it. This is actually misleading; this is how I wasted money. Yes,
-
00:53:16 I just understood it. So you need to select volume disk if you don't want such accidental spend;
-
00:53:23 if you make network volume, it will automatically create unless you select your existing network
-
00:53:28 volume, or you need to select volume disk. Okay, this was everything about the RunPod part. Now
-
00:53:33 I am going to move into Massed Compute. So for Massed Compute we have Massed Compute instructions
-
00:53:41 read.txt file. Open it. Please use this link to register; I appreciate that, this is important.
-
00:53:49 After registration, add some credits to your account from billing. Then go to deploy. In the
-
00:53:56 deploy menu, it will show you available GPUs like this. Now the main difference of Massed Compute is
-
00:54:02 that it is always super fast; its speed is like 20 times faster than RunPod. You won't get such
-
00:54:09 errors and it is cheaper than RunPod. However, it doesn't have a permanent network storage system;
-
00:54:16 so every time you have to install or you have to download models. So let's use the same GPU.
-
00:54:22 From category, select 'creator'. From image select 'SECourses'. And you see currently it is
-
00:54:27 2.19 dollars per hour; it is the same as RunPod. However, we have a coupon 'SECourses'. This is
-
00:54:34 working on every GPU that you can see here, every one of them. So, this is a great GPU;
-
00:54:40 you can also take even better ones like H200 NVL or H100 or like H200 NVL. But this is probably
-
00:54:49 best for inference as a price-performance balance. Let's verify. And it is now 1.64 dollars. You
-
00:54:56 see it is 25% cheaper than RunPod. Then click deploy. The initial generation may take a little
-
00:55:04 bit of time; you have to wait for initialization. Meanwhile, let's install the necessary application
-
00:55:10 to connect, which is ThinLinc Client. You can also connect from the browser, but I don't recommend
-
00:55:15 that. So, open this ThinLinc Client link from here. Let's allow all downloads according to your
-
00:55:22 operating system; since I am on Windows, let's download it. Installation is so easy: open it,
-
00:55:28 click Yes, then click next, accept, next, install. That's it; everything is default. Run ThinLinc
-
00:55:34 Client. Then you need to set the shared folder; so you can share the zip file. Options—you can also
-
00:55:41 read the other options here—go to local devices; I only enable clipboard synchronization and drives.
-
00:55:46 Then click details, and in here add a shared folder like this with read and write permission.
-
00:55:52 So this is my folder on my PC. And okay. So copy the file into your shared folder; so it is in
-
00:55:59 my shares folder right now, the installation zip file. Then I need to just wait for initialization
-
00:56:04 to be completed. Sometimes you may refresh this to verify whether it is done or click
-
00:56:09 this running instance and it will refresh, but it should automatically show you as well. Okay,
-
00:56:14 so our machine is ready to connect. You see, click details, copy the login URL, paste it into here,
-
00:56:21 copy the username, paste it into here, and copy the password and paste it into here. Then connect,
-
00:56:28 click continue. Just wait a little bit. This ThinLinc Client may be slow for big file transfers
-
00:56:35 but for small files it should be fast. For big file transfers, you can use like your Google
-
00:56:40 Drive or your OneDrive. So this is the interface: go to home, go to thin drives. You will see there
-
00:56:46 is your shared folder, whatever the name you have given. And inside this, I will see my zip file.
-
00:56:51 You can also open Google Chrome here, login to your Patreon, and download from here. So it is
-
00:56:57 basically like your Windows but it is running on a cloud machine and this is a Linux Ubuntu system.
-
00:57:04 So our installer zip file is here; drag and drop it into downloads. Do not run anything here;
-
00:57:10 you have to drag and drop them into your downloads folder. Right-click and extract here. Enter inside
-
00:57:15 the folder, open Massed Compute instructions read.txt file. Copy this command, return back
-
00:57:22 to the downloads, enter inside this folder, and open in terminal. You see this location
-
00:57:29 is so important: I am in this folder where these files are located. Right-click and paste and hit
-
00:57:35 enter. Then it will start the installation. The installation on Massed Compute will be ultra-fast;
-
00:57:40 let's watch it real-time because their disk system is really fast. When you get this software updated
-
00:57:46 information just click cancel, you don't need it. So it is installing Python 3.10, then installing
-
00:57:53 packages with a virtual environment. If you are a Linux user, Mass Compute installation is what
-
00:57:58 you need. It should work perfectly fine on Linux as well on your local Linux system as well. So
-
00:58:04 for Linux users, I recommend my Massed Compute scripts. So the installation almost completed;
-
00:58:10 I mean this is like 100 times faster than RunPod. Yes, it is done. You see it took like 1 minute to
-
00:58:16 install. Then the download begins and the download speed is also amazing on Massed Compute; their
-
00:58:21 network and their disk speeds are unchallenged. There are no other cloud services like them. So
-
00:58:27 you are seeing it in real real-time: it is just downloading, verifying, downloading, verifying.
-
00:58:32 Download speed is around 500 megabytes per second, even faster. The merge speed is very fast since it
-
00:58:38 is downloading with 16 different connections then doing hash verification. I'm trying to
-
00:58:43 unify scripts as much as possible; whatever is on Windows is also on Linux and on cloud services,
-
00:58:50 I'm all trying to use the same stuff. Even the requirements and other stuff are the same. So,
-
00:58:55 it is just downloading and verifying really, really fast. Yes, I mean yes, 800 megabytes;
-
00:59:02 it means like it is 5 gigabit internet connection speed—it is just amazing. All right, so the
-
00:59:08 installation has been completed. All of the models are already downloaded. We can even see the full
-
00:59:13 size of the folder; so it is 65 GB. Then return back to Massed Compute instructions read.txt file.
-
00:59:22 Copy this starting command, return back to the folder, and open a new terminal. The location of
-
00:59:28 the terminal is super important; right-click and paste. Then it will start the application. We can
-
00:59:33 see that the start of the application will be also really fast. There is one difference with this:
-
00:59:38 you see it is starting like this, so I can open the localhost as well here since it is
-
00:59:46 a desktop-based operating system. So you see now this is running inside the Massed Compute,
-
00:59:52 not in my computer. So I can use it locally like this or I can copy this Gradio live link and open
-
00:59:59 it in my computer. This is the way I prefer so that I have the full smoothness of the interface.
-
01:00:07 It is like running on my own Windows computer but it is running on the server. Okay, we got this
-
01:00:13 error again, so it was because of the loading; let's refresh. It is also happening because of
-
01:00:18 the Gradio live; sometimes it can happen, but refresh of the page should fix it. Yes. So the
-
01:00:23 model is selected; let's make a quick generate song. Always do default generation then start
-
01:00:29 playing with other stuff; verify that it is working first because your GPU could be broken,
-
01:00:34 your machine could be broken—anything can happen—and the usage is exactly the same as
-
01:00:39 on the Windows tutorial part. Once you reached this point, when you return back to your CMD,
-
01:00:44 you can see the status. You can open a new window and type nvitop and you can see the progress on
-
01:00:52 the GPU. It is loading; the loading is much faster on Massed Compute as expected since
-
01:00:57 their disk speeds are much faster. Once the model is loaded, the subsequent generations will be
-
01:01:02 really fast. Okay, generation is proceeding with amazing speeds. Yes, really fast. Almost done.
-
01:01:09 And since this is the turbo model, it is only 8 steps inference. Yes, it is already generated and
-
01:01:16 the song has appeared. Since it is Gradio live, it is taking some time, but it is here. Let's listen.
-
01:01:27 So I can generate as many as songs I want and use the perfect one. The next generation will
-
01:01:33 be—let's see how many seconds—it should be around 15 seconds, maybe even faster. Okay: 7, 8, 10, 12,
-
01:01:42 13, 14. Yes, in 15 seconds I got a new song and it should appear. Yes, you see this way I can
-
01:01:50 generate as many as I want and use the best one. I came with This way you can get your perfect song;
-
01:02:00 you can try different styles, use any lyrics you want, and everything else is the same. When
-
01:02:05 you click here, it will download the song, or you can go to your installation folder,
-
01:02:10 go to outputs—everything will be here. You can copy them into your thin drives. Enter here;
-
01:02:18 when you generate something here or when you copy something here, it will be synchronized
-
01:02:22 with your shared drive on your operating system. So my shared drive is here; you see the outputs
-
01:02:27 arrived. It is also copying; right now you can see that it is synchronizing. It is not very fast,
-
01:02:34 but for small files it should work fine, and now they are on my computer; they are all
-
01:02:39 synchronized. So how are you going to stop your machine on Massed Compute? There is no stop; I
-
01:02:45 mean when you stop your instance, it will continue spending your money. Therefore, once you are fully
-
01:02:51 done and you did back up your data and everything, you need to delete it like this. If you need to
-
01:02:58 transfer big files, search 'wget' on our channel and watch this tutorial. This way you can upload
-
01:03:05 your folders and big files onto Hugging Face and quickly download them back into your Massed
-
01:03:11 Compute instance. You can also back up your data or big files in your Google Drive or OneDrive and
-
01:03:16 quickly download them back to your Massed Compute. Everything is possible once you learn it; it is so
-
01:03:21 easy to use, and this is the tutorial that you need. So now I will show on the SimplePod. Open
-
01:03:27 back the RunPod SimplePod instructions and you will see that there is this link to register.
-
01:03:31 Please use this link to register; I appreciate that. Once you registered and logged in,
-
01:03:36 add some credits to your account. Then return back to the instructions and you will see that
-
01:03:42 there is this template; you need to use this. Double-click it; it will select the template. Now
-
01:03:48 it may be a little bit different in the selection part compared to RunPod, so I will explain.
-
01:03:54 This SimplePod also supports a permanent network storage system. You see there is 'Add persistence
-
01:04:00 volume'; if you select this, it will use it. If you don't, it will use a temporary disk. So let's
-
01:04:05 select 'Add persistent volume', then click 'use template' or 'edit and use'. I prefer you to do
-
01:04:11 first 'edit and use' to add permanent storage. So on this screen, you see there is 'Add new volume'.
-
01:04:18 I already have a volume, but you can add a new volume. So when I click 'none', it doesn't work,
-
01:04:23 so I have to first generate the volume. Let's generate the volume and repeat: go to storage. I
-
01:04:29 am going to delete this one and I will generate a new one. For the tutorial, they only have a single
-
01:04:36 data center right now; so the biggest disadvantage of SimplePod is that it doesn't have as many GPUs
-
01:04:42 as RunPod, but it is cheaper and faster. So let's make this 200 GB and save. You see the
-
01:04:47 200 GB per month price is 6 dollars; it was 14 dollars on RunPod. Save. Then return back
-
01:04:54 and double-click this link; it will open the template. Let's say 'Add persistent volume',
-
01:04:59 'edit and use'. Select the volume from here: Tutorial. The mount point is accurate. You can
-
01:05:04 add the ports like 7860 and 7861. You can give the name like this, and everything else is automatic.
-
01:05:15 Save and use. Now it is not started yet; we only did set our accurate template. You see there is
-
01:05:21 'change template', there is 'edit template', and the template is selected. The filters are here;
-
01:05:26 you can apply them. So currently I am going to select RTX Pro 6000. You see the price is
-
01:05:33 1.6 dollars; it was 2.15 dollars on RunPod. Almost the same price as Massed Compute,
-
01:05:41 so you can choose either one of them. You can also use the half RTX Pro 6000—this is shared between 2
-
01:05:48 people, so you are getting half performance and 48 GB. This is lesser performance than an RTX 5090;
-
01:05:55 you can also pick an RTX 5090, the price is amazing and the speed and quality is amazing.
-
01:06:00 Since this model fits into 32 GB with maximum quality, you can also pick this one, and when
-
01:06:07 you scroll down, you will see all of the features here and run. Then it will start the machine;
-
01:06:14 the machine is getting composite. Once you get to this screen, the rest is exactly the same as the
-
01:06:21 RunPod. Let's just wait; the data and everything will appear here. You can also see the logs
-
01:06:25 here. You see system general crash logs are also shown; it is showing my current spending. Okay,
-
01:06:31 console and Jupyter links appeared. We can also see the volume: you see it is using our tutorial
-
01:06:38 permanent storage system, so everything will be automatically saved. Click the Jupyter direct;
-
01:06:43 my browser is particularly giving a warning—I will just say I want to continue and confirm.
-
01:06:48 This is because it is using some HTTPS link, therefore it is giving that error, but it is fine;
-
01:06:55 this is running on HTTPS, so it is secure. Drag and drop your zip file, same as on RunPod; you can
-
01:07:01 also use this upload files icon, and right-click and extract archive once it is uploaded. One big
-
01:07:08 advantage of SimplePod is that there is a direct file browser. This is ultra-fast and it allows you
-
01:07:15 to upload and download very big files very fast; RunPod doesn't have this feature but they have.
-
01:07:20 So once the extraction is completed it should be instant. Open RunPod SimplePod instructions.
-
01:07:26 You will notice that it is currently installing with concurrent installs set to 4. On SimplePod,
-
01:07:32 you can make this 8; on RunPod, we make it 4 to be secure because their network storage system is
-
01:07:38 slow. On Massed Compute, we make it default; it always works. This should be really fast
-
01:07:43 to install on SimplePod. So the installation started; it is quickly installing right now,
-
01:07:49 same as on RunPod. Okay, so the installation has been completed. Let's verify if there are any
-
01:07:56 errors or not; all looking great so far. I am scrolling down slowly and it started
-
01:08:02 downloading the models and is still downloading the models, I think. Let's go to the very bottom;
-
01:08:09 yes, still downloading the models. Let's just wait a little bit more. All right, so the models have
-
01:08:14 been downloaded. Installation has been completed; we can see that downloaded 75, all completed. Now
-
01:08:21 we can start the application. So return back to the instructions.txt, copy the start command here,
-
01:08:28 open a new terminal and paste it. If you get any installation error as happened in RunPod,
-
01:08:34 you can delete the virtual environment and install again. So the application is starting; we
-
01:08:39 just need to wait a little bit more. Okay, so the application started quickly; let's open the Gradio
-
01:08:44 live. You can also connect from this link: you see this is the HTTP port which we have enabled. Let's
-
01:08:53 see if it will work accurately. Okay, let's try plus 1—maybe as it is in the RunPod proxy. No, it
-
01:08:59 didn't work on SimplePod, but it doesn't matter; we are going to use the Gradio live. As I said,
-
01:09:05 make a default generation. This error is not important; this is happening because of the Gradio
-
01:09:12 live, let's click again. If you get that error, okay, the second time clicking started. Yes, it
-
01:09:19 is happening because of the Gradio live, but it is not important; it happens one time until the page
-
01:09:25 is fully loaded. The generation started; to follow everything, I think we can open nvitop. Okay,
-
01:09:31 we need to install first: pip install nvitop, then nvitop. Yes, so you can monitor your VRAM usage
-
01:09:38 here; you can see your CPU usage and memory usage. The loading of the model is much faster than
-
01:09:45 RunPod. Once the first time is loaded, the second and subsequent generations will be much faster;
-
01:09:50 but as a rule of thumb, generate one time with the default values. Verify it is working then
-
01:09:56 proceed to use other features. Everything is shown in the Windows tutorial part,
-
01:10:01 so watch it to learn if you skipped to this point. Okay, generation should be completed quickly once
-
01:10:08 all of the models are loaded. Okay, models loaded and it is generating with great speed right now.
-
01:10:15 You can also see this GPU usage, but I see that this one is limited to 500 Watts. This should be
-
01:10:22 600 Watts if I remember correctly; I will tell the developers of SimplePod. Their driver version is
-
01:10:28 very up to date—you see, 595, whereas on RunPod it was 580. Their driver is also supporting CUDA
-
01:10:36 13.2; this is a big disadvantage of RunPod. Okay, generation completed, the song appeared
-
01:10:42 here. Everything is same: you can click here to download, you can go to ACESTEP Premium from your
-
01:10:53 Jupyter Lab interface, right-click outputs and download as an archive; but SimplePod, as I said,
-
01:10:59 supports direct download. Go to file browser; you can even download the models from here or
-
01:11:04 upload here. When I scroll down to workspace, I will see everything is here. Double-click it:
-
01:11:10 ACESTEP Premium. Double-click it and let's download the outputs folder. So I click it
-
01:11:14 and I will click this download and it will zip and download; it will be super fast. Keep it. You can
-
01:11:21 even download models: go to models, let's download one of the big models. For example, this one; this
-
01:11:26 is like 9 GB. Click download; you see the download will start immediately with full speed, amazing
-
01:11:33 speed as you can see. Same way you can upload very big files: go to the folder wherever you want,
-
01:11:38 click this upload icon. You can upload a file or folder, upload whatever you want. So to prevent
-
01:11:45 your credits from being used, you need to delete the instance. There is no stop button in here;
-
01:11:50 when you delete your instance, if you were using your permanent storage volume like this,
-
01:11:55 everything will be kept there. Delete instance, confirm. Now my storage is back here, it is fully
-
01:12:02 working. To use again and to start again is the same as the RunPod part: return back to the RunPod
-
01:12:07 SimplePod instructions and double-click the template link. It will appear like this: add
-
01:12:12 persistent storage, edit and use. Make sure your volume is selected from here and it will continue;
-
01:12:18 save and use. Then select your GPU; you can use any GPU like this, for example, let's use the 5090
-
01:12:25 this time. Scroll down and run, it will start the machine and it will use my storage. Okay,
-
01:12:31 machine started back; click direct Jupyter Lab, show details, I want to continue. Since this was a
-
01:12:37 full stop, I recommend running the install command again; it will be really fast. The second time,
-
01:12:43 it will just verify the installation; it should be almost instant. It will fix the extra libraries
-
01:12:51 and dependencies that need to be installed into the instance, not into the shared storage,
-
01:12:58 like FFmpeg. Yes, it is verifying everything. You see it is just verifying the models,
-
01:13:03 not redownloading, not reinstalling. So the installation verified, then just start again
-
01:13:10 and start using it back. So this is it; thank you so much for watching. You can always join our
-
01:13:17 Discord channel; joining the Discord channel is my number 1 recommendation to contact me. You can
-
01:13:23 make a reply; the Discord channel link is here. You can join our subreddit, follow me on LinkedIn,
-
01:13:30 and to see all of our scripts, you see we have our Patreon exclusive posts index. Click it and you
-
01:13:36 will see all the scripts we have with their links and details. You can use Ctrl+F to search anything
-
01:13:44 here like the ComfyUI, F3 to switch between them. Our subreddit is getting bigger and bigger;
-
01:13:51 you see we have a massive amount of subscribers, visits, and views. You can also leave a comment
-
01:13:57 here. I recommend you to read everything here to understand how we are developing,
-
01:14:03 what features we are adding, and how to use them. I have done so many different updates,
-
01:14:08 so this is so important. The zip file also updated to version 5.1. The zip file may not get updated
-
01:14:15 all the times whenever I update the version of the application because it patches updates from
-
01:14:22 a remote repository. So you just need to run the Windows install or update file if the zip file is
-
01:14:30 saved. So the new instance also started; this was how we reuse on SimplePod with a permanent
-
01:14:37 storage system. Now I am going to terminate everything to not spend any money; currently,
-
01:14:42 I'm spending like this much. So go to my servers—you can also have multiple servers here,
-
01:14:47 it will show in 'my servers'—I will just delete it. If you want to open it back, just click the
-
01:14:52 instance name and it will happen; also you can switch them from here too. So let's just delete;
-
01:14:57 there is no stop button. Then I need to delete my storage too. So I will delete that as well. Okay,
-
01:15:02 thank you so much and hopefully see you later in the LoRA training tutorial of the ACESTEP 1.5.