User Manual
This is the complete reference for MoleditPy's features, mirroring the structure of the published manual in the main app repository (manual/manual.md). It is for anyone using the application, from first launch through advanced 3D editing.
- 1. Introduction
- 2. Installation and launch
- 3. Screen layout
- 4. Basic operations (2D edit view)
-
5. 3D functions
- 5.1. 2D to 3D conversion
- 5.2. 3D structure optimization
- 5.3. Changing 3D display style
- 5.4. 3D view operations
- 5.5. 3D measurement function ("3D Select" mode)
- 5.6. 3D editing function ("3D Drag" mode / Alt key)
- 5.7. Other 3D editing functions (menu 3D Edit)
- 5.8. Constrained optimization
- 5.9. Displaying atom information
- 6. File operations
- 7. Molecular analysis
- 8. Settings
- 9. Plugin system
- 10. Keyboard shortcuts
- 11. Version / license
MoleditPy is a molecular editing application written in Python. Through an intuitive interface, it lets you draw and edit molecular structures in 2D, and generate, display, and edit 3D structures.
Main features:
- 2D molecular editing — add, delete, or modify atoms and bonds; create structures using templates, including your own saved user templates.
- 3D structure generation — generate 3D coordinates from 2D structures and optimize them using RDKit or Open Babel (optional).
- 3D molecular display — Ball & Stick, CPK (space-filling), Wireframe, and Stick styles.
-
File operations — save and load projects in a proprietary format (
.pmeprj). Import/export standard chemical file formats (MOL, SDF, XYZ) and SMILES/InChI strings, suitable as input for DFT calculation software. Export as images (PNG/SVG) or 3D models (STL, OBJ) for 3D printing. See File Formats and Import/Export for the full reference. - Molecular analysis — SMILES, InChI, molecular formula, molecular weight, LogP, TPSA, and more.
- 3D measurement — distances, angles, and dihedral angles in the 3D view.
- 3D editing — translate the whole molecule, planarize selected atoms, align to specific axes, adjust bond lengths/angles/dihedral angles, and create mirror images.
- Customization — 2D and 3D display settings such as background color, lighting, and display styles.
-
Plugin system — extend functionality with Python scripts placed in
~/.moleditpy/plugins, added to the Plugin menu. See Using Plugins.
The recommended way to install MoleditPy on any OS is via moleditpy-installer, which installs the correct package for your platform (moleditpy on Windows/macOS, moleditpy-linux on Linux) and can set up a desktop/menu shortcut and the .pmeprj file association:
pip install moleditpy-installer
moleditpy-installer
See the per-OS guides for full details and alternatives (Conda-based install, Docker):
- Installation for Windows
- Installation for macOS
-
Installation for Linux (uses the dedicated
moleditpy-linuxpackage) - Installation with Docker
Launch:
moleditpyThe first launch may take some time while libraries like RDKit are initialized; see Troubleshooting Common Issues.
Command-line options:
| Option | Description |
|---|---|
moleditpy [file] |
Open the specified file on startup |
moleditpy --version |
Print the version number and exit |
moleditpy --safe |
Start in safe mode: all plugins are skipped on launch. Use this if a plugin is causing a crash or preventing startup |
moleditpy --install-plugin PATH |
Install a plugin from a .py, .zip, or folder in headless mode (requires manual confirmation) |
See Command-Line Options for the complete reference, including environment variables.
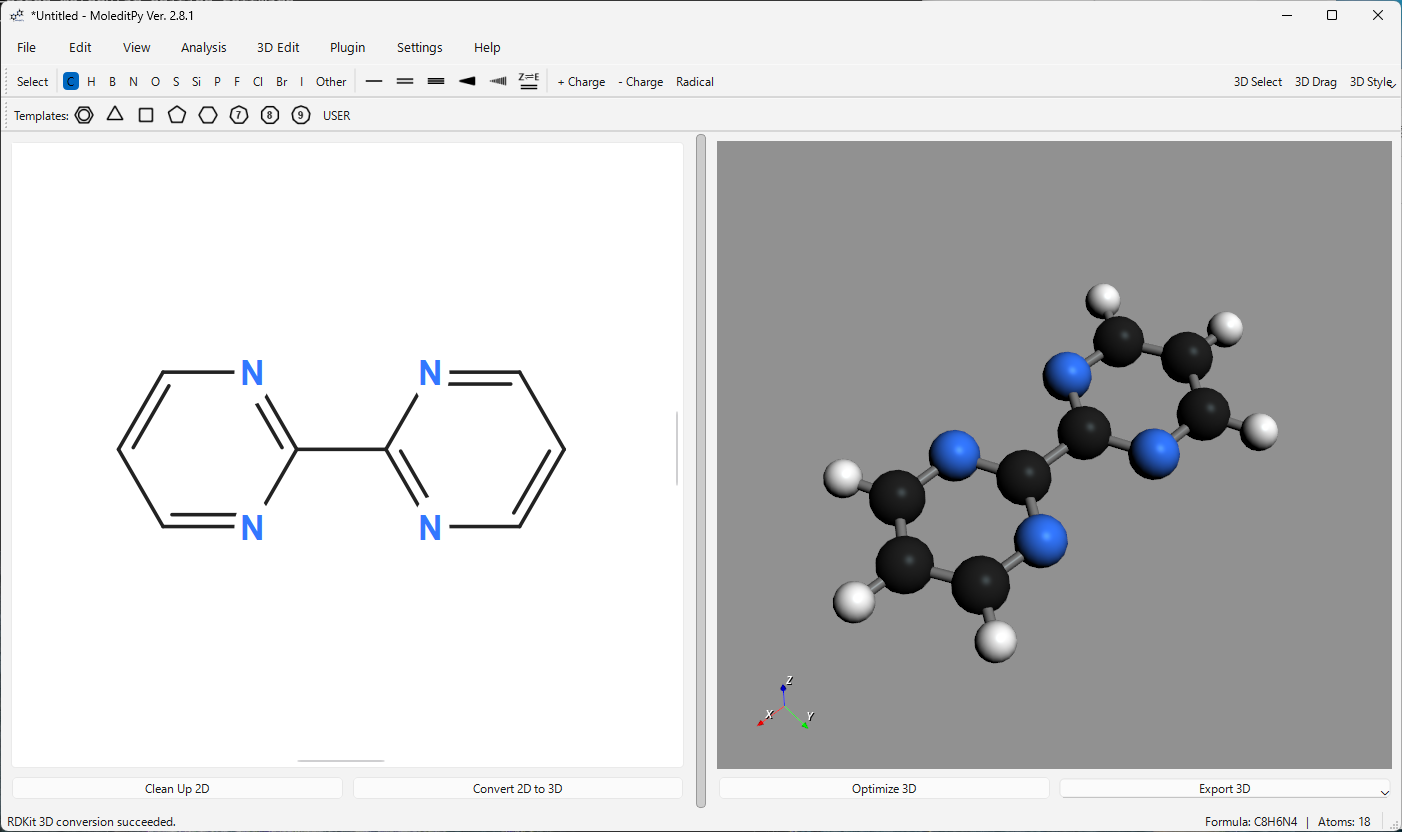
The MoleditPy main window is primarily composed of the following elements:
- Menu bar — file operations, editing, viewing, analysis, 3D editing, plugins, settings, and help.
- Main toolbar — atom/bond drawing modes, charge/radical buttons, 3D display style selector.
- Template toolbar — buttons for selecting templates such as ring structures.
- 2D edit view — the main canvas for drawing and editing molecular structures with the mouse.
- 3D view — displays the 3D structure of the generated or loaded molecule; rotate/zoom/pan with the mouse. 3D measurement and editing are also performed here.
-
Splitter — the boundary between the 2D and 3D views. Drag it to resize either view, or use View > Panel Layout (
Ctrl+1/2/3) to switch preset ratios, orCtrl+Hto hide the 2D panel entirely. - Status bar — current operating mode, messages, and the molecular formula/atom count.
In the 2D edit view, you create and edit molecular structures using the mouse, toolbar, and keyboard shortcuts.
Select a drawing mode by clicking a button on the main toolbar or pressing the corresponding keyboard shortcut.
-
Select (
Space) — select and move atoms or bonds. -
Atom buttons (
C,H,N,O, etc.) — add the corresponding element. Click to place an atom; drag to add an atom and a bond. - Bond buttons (single bond, double bond, etc.) — add or change a bond type. Drag between atoms to create a bond; click an existing bond to change its type.
-
Charge buttons (
+/-) — increase or decrease the charge on an atom by clicking it; right-click to reset to 0. - Radical button — toggle the number of radical electrons on an atom (0 → 1 → 2 → 0) by clicking it; right-click to reset to 0.
- Template buttons (benzene ring, etc.) — add a template structure by clicking the canvas; can snap to and merge with existing atoms or bonds.
-
Alkyl chain button (
-(-)n-icon, at the end of the template toolbar) — drag to draw a zigzag carbon chain of any length.
-
Adding an atom — select the element button (e.g.
C), then click anywhere on the canvas. - Adding a bond — select the bond button, then press on Atom A, drag to Atom B, and release to bond them. Dragging from empty space onto an atom, or from an atom into empty space, creates a new carbon atom bonded to the existing one.
-
Selecting atoms/bonds — in Select mode, click an item (
Shift+click for multiple), or drag over empty canvas for a rectangular selection. - Moving — in Select mode, drag the selected atom or bond; connected bonds follow.
-
Deleting — right-click an atom/bond in Select mode or any drawing mode (except template, charge, or radical), or select items and press
Delete/Backspace. -
Changing an element — select the target element button and click an existing atom, or hover over an atom and press its shortcut key (e.g.
N). -
Changing bond order — select the target bond-type button and click an existing bond, or select a bond and press its shortcut key (e.g.
2for double). -
Setting stereo bonds (wedge/dash) — select the Wedge or Dash button and click a single bond; click again to reverse direction. Or select a bond and press
W/D. -
E/Z configuration of double bonds — select Toggle E/Z and click a double bond to cycle Z → E → unspecified, or hover the bond and press
Z/E.
-
Standard templates — click a template-toolbar button (benzene ring, cyclohexane ring, etc.), then click the canvas to place it. Clicking an existing atom or bond merges the structures. Snapping distance and fusing settings are adjustable in Settings. Hold
Altto temporarily bypass atom fusing. -
Alkyl chain — click the
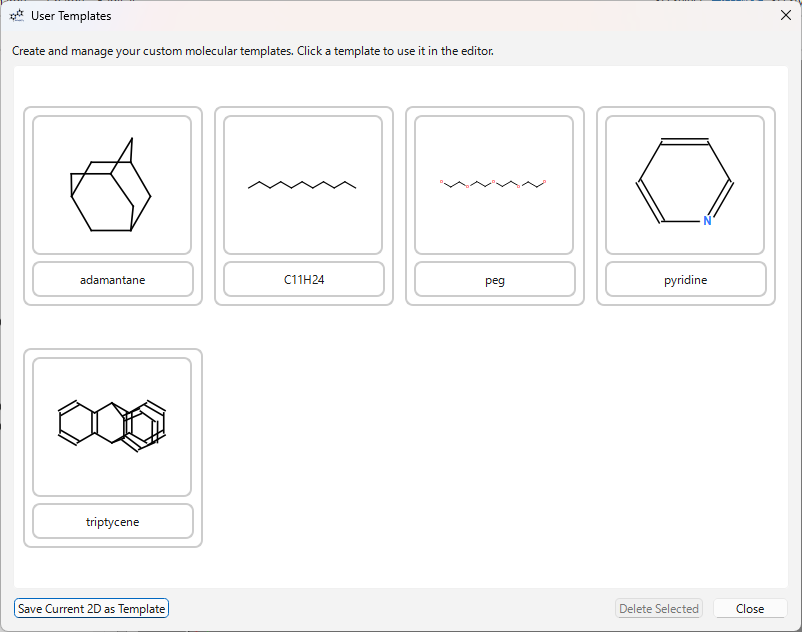
-(-)n-button on the template toolbar, then drag on the canvas. Every bond keeps the standard 2D bond length and the chain axis snaps to 15° steps, so the drag distance decides the chain length and the drag direction decides its orientation; the zigzag bends toward whichever side of the axis the cursor is on. The number of carbon atoms that will be added (n = ...) is shown next to the cursor while dragging, and the chain is only created on release. Starting the drag on an existing atom extends that atom instead of duplicating it — the reused atom is not counted inn. Releasing on an existing atom joins the chain to it: any atom highlighted under the cursor is a valid target, and the final bond simply comes out a little longer or shorter so that every other bond can keep its exact length. - User templates — click USER on the template toolbar, or use File > Save 2D as Template..., to save the current structure as a template. Clicking USER opens the user template dialog; click a template to enter its placement mode, then click the canvas. The dialog stays open so you can place several templates in a row.
Use Edit > Undo (Ctrl+Z) and Edit > Redo (Ctrl+Y on Windows, Ctrl+Shift+Z on macOS/Linux). The undo/redo stack works by serializing the full application state (2D + 3D + constraints) at each step.
In Select mode, select atoms or bonds and use Edit > Copy (Ctrl+C) or Edit > Cut (Ctrl+X). Edit > Paste (Ctrl+V) pastes the clipboard contents at the cursor position. This is internal copy/paste within MoleditPy only.
-
Clean Up 2D — click the Clean Up 2D button at bottom left, or press
Ctrl+J, to re-layout the 2D structure with RDKit'sCompute2DCoords. -
Rotate 2D... — Edit > Rotate 2D... (
Ctrl+R) opens a dialog to rotate the 2D molecule by a specified angle. -
Add Hydrogens — Edit > Add Hydrogens adds explicit hydrogen atoms based on each atom's current implicit valence (RDKit's
AddHs). - Remove Hydrogens — Edit > Remove Hydrogens removes all hydrogen atoms.
-
Select All / Clear All — Edit > Select All (
Ctrl+A) selects everything; Edit > Clear All (Ctrl+Shift+C) deletes everything on the canvas. - Show Chiral Labels — View > Show Chiral Labels displays R/S labels for chiral centers in the 3D view.
MoleditPy provides functions to generate, display, measure, and edit 3D structures from the drawn 2D structure.
- Draw a molecular structure in the 2D edit view.
- Click Convert 2D to 3D at bottom left, or Edit > Convert 2D to 3D (
Ctrl+K). - Progress is shown in the status bar. 3D coordinates are generated using RDKit (ETKDGv2 algorithm), then lightly optimized with a force field (MMFF94 or UFF).
- On success, the generated 3D structure appears in the 3D view.
Settings: choose the library priority (RDKit, Open Babel) or the Direct mode (use 2D coordinates + add H) from Settings > 3D Conversion. If Open Babel isn't installed, its options are disabled.
Conversion modes:
| Mode | Behavior |
|---|---|
| Fallback (default) | Tries RDKit first, then Open Babel (if available), then Direct |
| RDKit | RDKit's ETKDGv2 (Experimental-Torsion Knowledge Distance Geometry) conformer generation; retries with bounds-matrix triangle smoothing and explicit stereochemistry constraints if the first embedding fails |
| Open Babel | Open Babel's make3D() generator, run in an isolated background subprocess to prevent application hangs or crashes |
| Direct | Bypasses 3D embedding; keeps your exact 2D layout (Z = 0), adds missing hydrogens geometrically, and preserves stereochemistry via offset Z-coordinates (±1.5 Å) on wedge/dash atoms |
See Tips for 2D to 3D conversion for guidance on choosing between these.
- With a 3D structure displayed, click Optimize 3D at bottom right, or Edit > Optimize 3D (
Ctrl+L). - A more detailed optimization runs using the selected force field (MMFF or UFF).
- If the method fails, an interactive fallback prompt may offer a temporary UFF override.
- The optimized structure is redrawn in the 3D view when complete.
Settings: choose the force-field library and method (RDKit MMFF94/MMFF94s/UFF, Open Babel MMFF94/MMFF94s/UFF/GAFF/Ghemical) from Settings > 3D Optimization Settings.
Quick select: right-click Optimize 3D to run any available method once, without changing your default.
Optimization methods:
| Backend | Supports | Notes |
|---|---|---|
| RDKit | MMFF94s (default), MMFF94, UFF | Falls back to UFF automatically if MMFF94s can't be set up (e.g. transition metals) |
| Open Babel | MMFF94s, MMFF94, UFF, GAFF, Ghemical | 100 Steepest Descent iterations to clear major clashes, then Conjugate Gradients minimization |
| Plugins | Any optimizer a plugin registers | Appears in Settings > 3D Optimization Settings and the Optimize 3D right-click menu alongside the built-ins |
See Force Field Selection: MMFF vs. UFF for a comparison and when to use each.
Select the display style from the 3D Style dropdown on the right of the main toolbar.
- Ball & Stick — atoms as scaled-down van der Waals spheres, bonds as sticks (the standard style).
- CPK (space-filling) — atoms as full van der Waals spheres, useful for visualizing molecular volume/shape.
- Wireframe — bonds only, as thin lines; atoms not displayed.
- Stick — thick bond sticks, small atom spheres.
- Aromatic ring — aromatic rings display as single bonds by default; Settings can switch this to circles (torus) or Kekulé structures (alternating double bonds).
Settings: per-style details (atom size, bond radius, multiple-bond offsets, rendering quality) are in Settings > Settings...; atom colors are in Settings > CPK Colors....
| Action | Input |
|---|---|
| Rotate | Left-drag |
| Zoom | Mouse wheel, or Ctrl+wheel |
| Pan | Middle-drag, or Shift+left-drag |
| Reset view |
View > Reset 3D View (Ctrl+Shift+R) |
| Redraw 3D molecule | View > Redraw 3D Molecule |
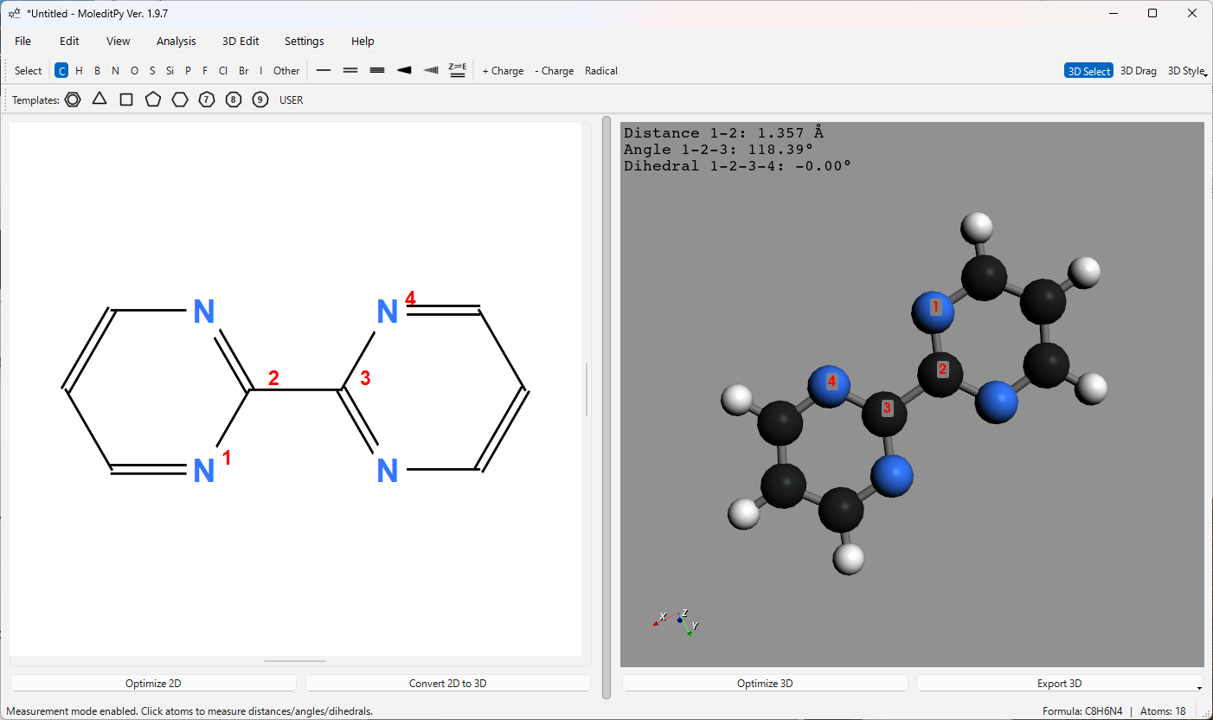
- Click 3D Select on the main toolbar to enable selection and measurement.
- Click atoms in the 3D view to select them; selected atoms show red labels in order (1, 2, 3, 4).
- Measurements appear in the upper-left corner of the 3D view depending on selection count:
| Atoms selected | Measurement shown |
|---|---|
| 2 | Distance (Å) |
| 3 | Distance (1-2) and angle (1-2-3) (°) |
| 4 | Distance (1-2), angle (1-2-3), and dihedral angle (1-2-3-4) (°) |
- Clicking elsewhere, or clicking 3D Select again to exit, clears the selection and measurements.
Turn on 3D Drag on the main toolbar, or hold Alt, to directly edit atomic coordinates: click and drag an atom to move it in 3D space; the position is confirmed on release.
See Tips for 3D editing for advice on making conformational changes stick after optimization.
Available from the 3D Edit menu when a 3D structure is displayed. Many open a dialog where you select atoms or input parameters.
- Translation... — translate the whole molecule or a selected group, by relative shift or to an absolute position.
- Move Selected Atoms... — translate/rotate only the selected atoms, numerically (dX/dY/dZ in Å, rotation in degrees around the centroid) or interactively (left-drag to translate, right-drag to rotate).
-
Move Group... — select and manipulate connected molecular fragments: left-click an atom to select its group (highlighted yellow);
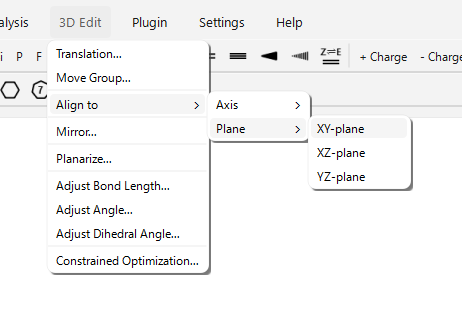
Ctrl+left-click to add/remove groups; left-drag to move, right-drag to rotate around the combined center of mass; or use the dialog for numeric input. - Align to > Axis > (X/Y/Z)-axis... — rotate/move the molecule so the line through two selected atoms aligns with the chosen axis.
- Align to > Plane > (XY/XZ/YZ)-plane... — rotate the molecule so the plane through three or more selected atoms becomes parallel to the chosen coordinate plane.
- Mirror... — create a mirror image with respect to a specified plane (XY, XZ, YZ).
- Adjust Bond Length... — change the distance between two selected atoms, fixing one side or moving both, with an interactive slider.
- Adjust Angle... — change the angle formed by three selected atoms (1-2-3), rotating one side or both, with an interactive slider.
- Adjust Dihedral Angle... — change the dihedral angle formed by four selected atoms (1-2-3-4), rotating one side or both, with an interactive slider.
- Planarize... — project three or more selected atoms onto their best-fit plane.
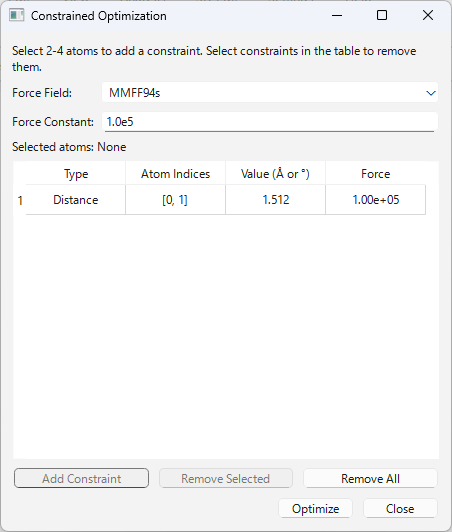
An advanced feature that optimizes the structure (force-field calculation) while holding specific distances, angles, or dihedral angles fixed.
- Adding constraints — select 3D Edit > Constrained Optimization..., click 2/3/4 atoms in the 3D view (for distance/angle/dihedral), then press Add Constraint to record the current value in the table.
-
Editing and deleting — double-click (or select +
Enter) the Value column to edit directly; select row(s) and press Remove Selected orDelete/Backspaceto remove; selecting a row highlights its atoms in cyan. -
Running — pick the force field (MMFF94s, MMFF94, or UFF; default from Settings), then press Optimize (or
Enter) to optimize while preserving all listed constraints.
From View > 3D Atom Info Display, choose what to show above each atom in the 3D view: Show Index (internal RDKit index), Show Original ID (2D-editor ID), Show XYZ Index (index in the imported XYZ file), Show Coordinates (X,Y,Z), Show Element Symbol, and an Index Base submenu (0-based / 1-based). Selecting the same item again turns it off.
Perform file operations from the File menu. See File Formats and Import/Export for the complete list of supported formats and their import/export details.
-
New (
Ctrl+N) — clears all current work and starts a new session (confirms first if there are unsaved changes). -
Open Project... (
Ctrl+O) — opens a previously saved project file (.pmeprjor.pmeraw). -
Save Project (
Ctrl+S) — overwrites the current project file (opens Save As if none is set yet)..pmeprj(JSON) is the recommended format. -
Save Project As... (
Ctrl+Shift+S) — saves the current work as a project file under a new name or location.
- Import > MOL/SDF File... — loads a MOL/SDF file as a 2D structure (2D coordinates are recalculated; stereochemistry is preserved). Appended to the canvas, not overwritten.
- Import > SMILES... / Import > InChI... — dialog to input a string, added to the canvas as a 2D structure.
- Import > 3D MOL/SDF (3D View Only)... — loads a MOL/SDF file with 3D coordinates into the 3D view only (clears the 2D editor); enters 3D viewer mode.
- Import > 3D XYZ (3D View Only)... — loads an XYZ file into the 3D view only, with bonds estimated from interatomic distances; enters 3D viewer mode.
-
Export > PME Raw Format... — legacy binary format (
.pmeraw, Python pickle — only open files you created yourself). - Export > 2D Formats > MOL File... — current 2D structure as a MOL file.
- Export > 2D Formats > PNG/SVG Image... — current 2D edit view, with an optional transparent background.
- Export > 3D Formats > MOL File... / XYZ File... — currently displayed 3D structure.
- Export > 3D Formats > PNG Image... — current 3D view, with an optional transparent background.
- Export > 3D Formats > STL File... — current 3D model with no color, for 3D printing.
- Export > 3D Formats > OBJ/MTL (with colors)... — current 3D model as a companion OBJ/MTL pair with color information.
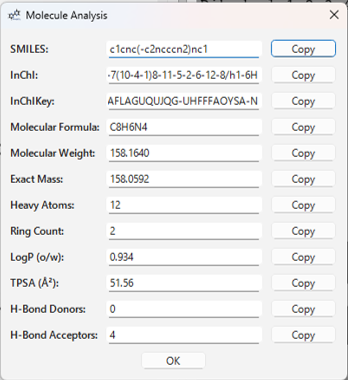
Analysis > Show Analysis... opens a dialog that calculates and displays properties of the molecule currently shown in the 3D view (not available for structures loaded from XYZ files), including:
- SMILES string
- InChI string / InChIKey
- Molecular formula
- Molecular weight
- Exact mass
- Heavy atom count
- Number of rings
- LogP (octanol-water partition coefficient)
- TPSA (topological polar surface area)
- Number of hydrogen bond donors/acceptors
Each value has a Copy button next to it.
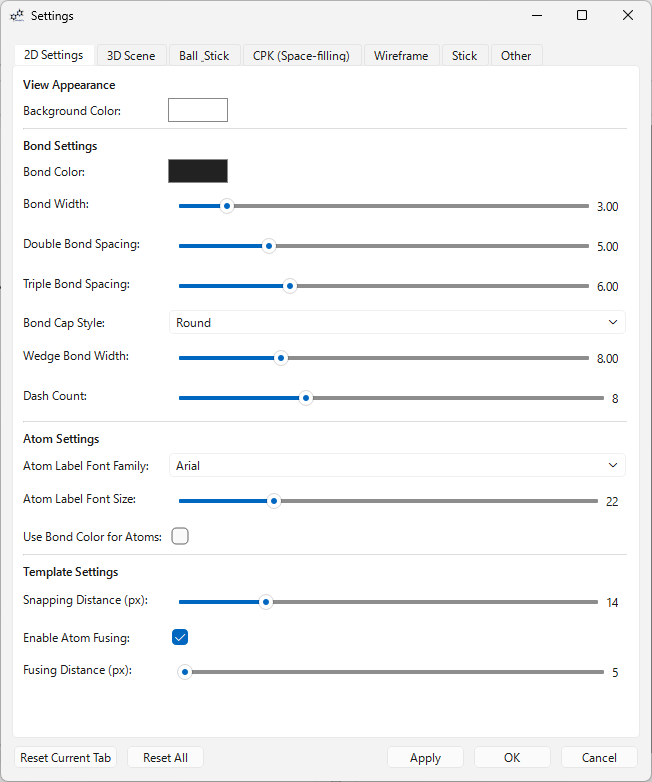
Configure 2D and 3D display settings via Settings > Settings.... Click Apply to reflect changes immediately, or OK to apply and close. Reset Current Tab / Reset All revert to defaults (also available from Settings > Reset All Settings). Settings persist across launches.
2D Settings tab:
| Setting | Default |
|---|---|
| 2D canvas background color | #FFFFFF |
| Bond color | #222222 |
| Bond width | 2.0 |
| Double/triple bond spacing | 3.5 |
| Bond cap style (Round/Flat/Square) | Round |
| Wedge bond width | 6.0 |
| Dash count | 8 |
| Atom label font size | 20 |
| Atom font family | Arial |
| Atom font bold / italic / underline | Bold on, italic/underline off |
| Use bond color for atom labels | Off |
| Template snapping distance (px) | 14.0 |
| Bond (drag) snapping distance (px) | 14.0 |
| Enable atom fusing for templates | On |
| Template fusing distance (px) | 7.0 |
Scene (3D) tab:
| Setting | Default |
|---|---|
| Background color | #919191 |
| Show/hide 3D axes | Shown |
| Lighting enabled | On |
| Light intensity | 1.0 |
| Specular (shininess) / specular power |
0.20 / 20
|
| Camera projection mode | Perspective |
| Mouse rotation sensitivity |
1.0 (window-size independent multiplier) |
| Real-time 3D drag | On — updates the structure continuously while dragging; turn off to only apply the move on release. Structures larger than 300 atoms always use release-only updates |
| Rotate Groups: Follow Mouse | Off — when on, right-drag rotation must start on an atom of the group and that atom follows the cursor |
Display style tabs (Ball & Stick, CPK, Wireframe, Stick):
| Style | Atom scale | Bond radius | Resolution | Notes |
|---|---|---|---|---|
| Ball & Stick | 1.0 |
0.1 |
16 |
Double/triple bond offset factor 2.0; radius factor 0.8/0.75
|
| CPK | 1.0 |
— | 32 |
Space-filling van der Waals spheres |
| Wireframe | — | 0.02 |
6 |
Double/triple bond offset factor 3.0; radius factor 0.8/0.75
|
| Stick | — | 0.15 |
16 |
Double/triple bond offset factor 1.5/1.0; radius factor 0.6/0.4
|
Other tab:
| Setting | Default |
|---|---|
| Skip chemical validity checks on XYZ import | Off |
| Display aromatic rings as Kekulé structures | Off |
| Display aromatic rings as circles (torus) in 3D | Off |
| Aromatic torus thickness factor | 0.6 |
You can also change atom colors via Settings > CPK Colors..., and the default 2D-to-3D conversion / 3D optimization method via Settings > 3D Conversion and Settings > 3D Optimization Settings (see 5.1 and 5.2).
MoleditPy supports extending its functionality through Python scripts.
Open the Plugin Manager via Plugin > Plugin Manager... to view, reload, and remove installed plugins, and see each one's load status. See Using Plugins for the full picture, including safe mode.
-
Drag & drop — open the Plugin Manager and drop a
.py/.zipfile (or folder) onto the window; it shows the SHA-256 hash for you to verify before confirming. -
Command line —
moleditpy --install-plugin PATHinstalls headlessly, with a terminal confirmation prompt. -
Manual install — place custom scripts directly in
~/.moleditpy/plugins.
Browse and download official plugins from the Plugin Explorer, or install and use the Plugin Installer plugin to browse and install updates directly from inside MoleditPy — it verifies the SHA-256 hash of every download against the official registry. See the moleditpy-plugins wiki for the full catalogue.
See Keyboard Shortcuts for the complete reference. The most-used shortcuts:
| Key | Action |
|---|---|
Space |
Select mode / Select All |
1 / 2 / 3
|
Single / double / triple bond |
W / D
|
Wedge / dash bond |
Ctrl+Z / Ctrl+Y
|
Undo / Redo |
Ctrl+J |
Clean Up 2D |
Ctrl+K |
Convert 2D to 3D |
Ctrl+L |
Optimize 3D |
Alt (hold, in 3D view) |
Temporary 3D Drag mode |
- Author: Hiromichi Yokoyama
- License: GPL-3.0
- Repository: https://github.com/HiroYokoyama/python_molecular_editor
- DOI: 10.5281/zenodo.17268532
Check the version from Help > About, or via moleditpy --version on the command line.
- File Formats and Import/Export — full format reference
- Keyboard Shortcuts — every shortcut, including 2D-editor context-sensitive keys
- Using Plugins — installing, managing, and using plugins
- Command-Line Options — every CLI flag and environment variable
- Troubleshooting Common Issues