Configuration editor
-
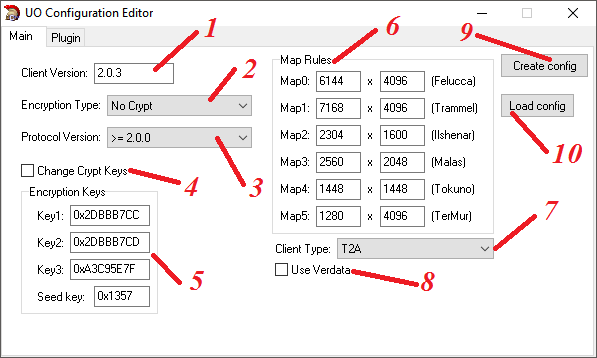
Client version which'll be sent to your server. When you're typing a version number, configurator searches for matches and picks right encryption keys, stadart map sizes and verdata usage flag when there's a match. After you've entered your desirable client version, you can edit those values manually.
-
Client's encryption type.
No Crypt - No encryption.
Old Blowfish - For truly ancient client versions only.
Blowfish (1.25.36 client) - This version only encryption.
Blowfish - For client up to 2.0.0 versions (with the exception of the above one).
Blowfish + Twofish (2.0.3) - For 2.0.0 - 2.0.3 clients.
Twofish - For clients above 2.0.3
- Version of clients protocol. This toggles on/off different packet changes which EA's made over the years. This should correlate with client version.
For example:
If your client version is 2.0.3 - protocol version should be >= 2.0.0
Client version 4.0.3b - client protocol version >= 4.0.0b (because client version is lower than 4.0.5a)
Client version 6.0.14.1 - client protocol version >= 6.0.6.0 (minor's patch version lacked 1 to make 6.0.14.2 viable)
Client version 6.0.14.2 or 6.0.14.3 - client protocol version >= 6.0.14.2
Client version 7.0.29.2 - client protocol version >= 7.0.24.0
-
Manual crypto key input. Use this only if you have changed encryption keys on your server and you know what you're doing.
-
Text input for crypto keys.
-
Map size.
-
Client type. At this moment this is only being sent the server when creating a character.
-
Toggle to make OrionUO read (Verdata.mul) and *.mul files only. If you're willing to use latest client versions which contain *.uop files, you need to toggle this off.
-
Create file with current config. It will be created in the same directory with this exe.
-
Load config file.
-
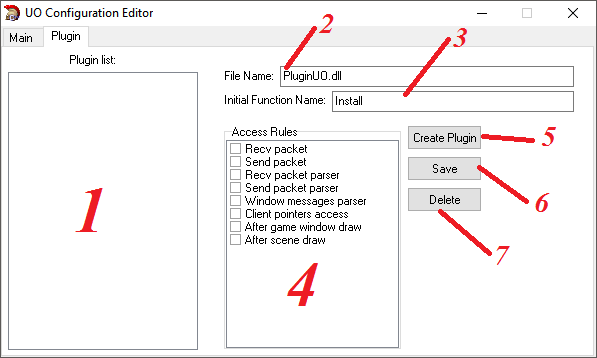
List of enabled plug-ins.
-
Plug-in file name.
-
Main function from the dll to trigger the install.
-
Available functions for data transfer between client and server.
-
Create plug-in with current config.
-
Refresh selected plug-ins config.
-
Delete selected plug-in.