
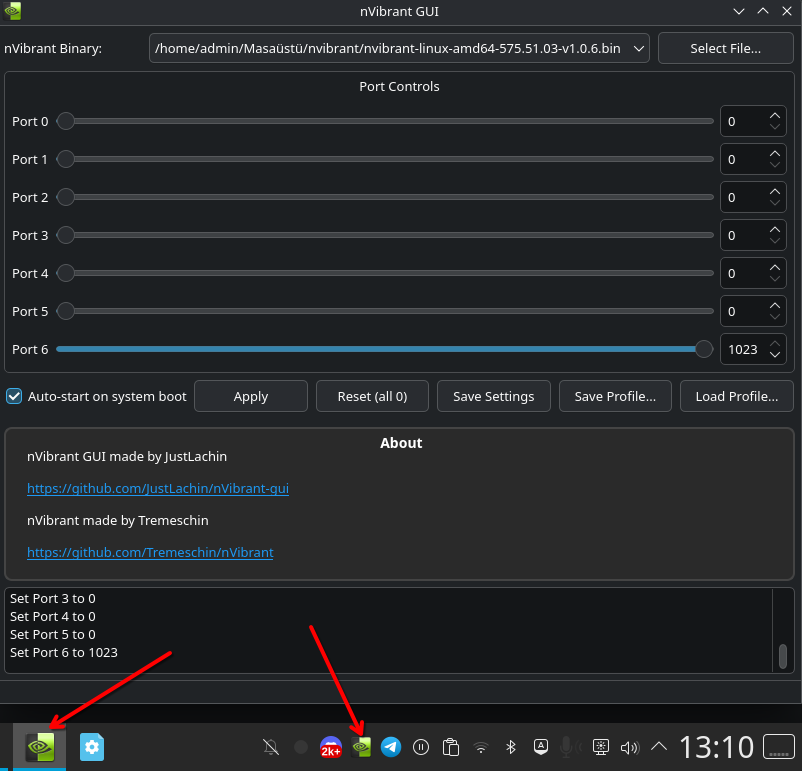
DOWNLOAD v1.0.6 NEW REDUCED EDITION 👇 https://github.com/JustLachin/nVibrant-gui/releases/download/v1.0.6-gui-new-reduced/nvibrant.zip
Important
This repository is a proof of concept that will be improved over time, e.g. proper CLI and distro packaging are WIP. Contributions are welcome, as I'm not primarily a C/C++ developer 🙂
NVIDIA GPUs have a nice feature called Digital Vibrance that increases the colors saturation of the display. The option is readily available on nvidia-settings in Linux, but is too coupled with libxnvctrl. Therefore, it's "exclusive" to the X11 display server and unavailable on Wayland; but I paid for my pixels to glow :^)
An interesting observation is that the setting persists after modifying it on X11 and then switching to Wayland. I theorized [1] [2] it was possible to call some shared library or interface to configure it directly in their driver, independently of the display server. And indeed, it is possible!
This repository uses nvidia-modeset and nvkms headers found at nvidia/open-gpu-kernel-modules to make ioctl calls in the /dev/nvidia-modeset device for configuring display attributes. These headers are synced with the proprietary releases, should work fine if you're on any of nvidia-dkms, nvidia-open or nvidia
Note: A future (and intended) way to will be through NVML, as evident by some nvidia-settings comments
There's multiple ways to get nvibrant:
You can install from your distro's package manager, if available:
| Distro | Installation | Maintainer | |
|---|---|---|---|

|
Arch Linux |
Install the nvibrant-bin AUR package:
|
@Incognitux |
| ... | ... | Help me by packaging for your distro! | You 🙂 |
This method automatically choses the right binary for your driver version, the most convenient.
Install the nvibrant package with any pip compatible tool:
# Note: You might need to use 'pip3', or
# 'python -m pip', or 'python3 -m pip'.
pip install nvibrant
Then run it with::
nvibrant 512 1023Alternatively, install uv and use it as a tool, or run directly with:
# Always uses latest version
uvx nvibrant (args)
Note: Using uvx is highly recommended, it installs at ~/.local/share/uv and ~/.cache/uv.
You can download the latest builds made by GitHub Actions in the Releases page
- Remember to run
chmod +x nvibrant*to mark non tar.gz files as executable!
Pre-requisites: Have git, uv and GCC Compilers installed, then run:
git clone https://github.com/Tremeschin/nVibrant && cd nVibrantgit submodule update --init --recursiveuv run nvibrant-build
You should have the executables for all driver versions located at nvibrant/resources/*.bin, then:
- Either run any compiled executable directly, ideally matching your driver version,
- Install with
pip install .to havenvibrantavailable in the user site packages - Directly run as
uv run nvibrant (args)to handle all of that and python for you
See the Common Issues section for any problems • And here for Autostarting it on login!
Inputs: Vibrance Levels are numbers from -1024 to 1023 that determines the intensity of the effect. Zero being the "no effect" (default at boot), -1024 grayscale, and 1023 max saturation (200%)
The values are passed as arguments to nvibrant's binary, matching the order of physical ports in your GPU (not the index of the video server). For example, I have two monitors on HDMI and DisplayPort in an RTX 3060 first two ports, to set vibrance to 512 and 1023, respectively, I would run:
# Will be './nvibrant-linux-amd64-v1.0.2.bin' instead of 'nvibrant'
# if you're using the prebuilt binaries from the releases page!
$ nvibrant 512 1023

GPU 0:
• (0, HDMI) • Set Vibrance (  512) • Success
• (1, DP  ) • Set Vibrance ( 1023) • Success
• (2, DP  ) • Set Vibrance (    0) • None
• (3, DP  ) • Set Vibrance (    0) • None
• (4, DP  ) • Set Vibrance (    0) • None
• (5, DP  ) • Set Vibrance (    0) • None
• (6, DP  ) • Set Vibrance (    0) • None
Note: You might need to set nvidia_drm.modeset=1 kernel parameter, but I think it's enabled by default on recent drivers.
If a value is not passed for the Nth physical output, nvibrant will default to zero. When no argument is passed, it will effectively clear the vibrance for all outputs. None means the output is disconnected
✅ You might have a display at the later ports, in which case use as:
$ nvibrant 0 0 0 1023

GPU 0:
• (0, HDMI) • Set Vibrance (    0) • None
• (1, DP  ) • Set Vibrance (    0) • None
• (2, DP  ) • Set Vibrance (    0) • None
• (3, DP  ) • Set Vibrance ( 1023) • Success
• (4, DP ) • Set Vibrance ( 0) • NoneIf you have multiple displays on multiple GPUs, it should work too:
# Fictional example, feedback welcome!
$ nvibrant 0 100 512 1023

GPU 0:
• (0, HDMI) • Set Vibrance (    0) • Success
• (1, DP  ) • Set Vibrance (  100) • Success

GPU 1:
• (0, HDMI) • Set Vibrance (  512) • Success
• (1, DP ) • Set Vibrance ( 1023) • SuccessYou can rename and place the binary at ~/.local/bin/nvibrant (or find the distro's one by running which nvibrant) and write a quick Desktop Entry, Systemd Service or other methods to run it on login:
1. Desktop Autostart: Should work on GNOME, KDE, Xfce, etc, maybe not WMs
Create a file at ~/.config/autostart/nvibrant.desktop with the content:
[Desktop Entry]
Type=Application
Name=nVibrant
Exec=/home/tremeschin/.local/bin/nvibrant 1023 1023
X-GNOME-Autostart-enabled=true
NoDisplay=true
Do replace tremeschin with your username!
Or you can also use uv to always grab latest PyPI, in case of driver updates:
[Desktop Entry]
Type=Application
Name=nVibrant
Exec=uvx nvibrant 1023 1023
X-GNOME-Autostart-enabled=true
NoDisplay=true
Or pin it to a specific version as uvx nvibrant==1.0.3 (args), so it's more secure.
2. Systemd Service: Works everywhere if you use systemd (very likely)
Create a file at ~/.config/systemd/user/nvibrant.service with the content:
[Unit]
Description=Set NVIDIA Vibrance
After=graphical.target

[Service]
Type=oneshot
ExecStart=%h/.local/bin/nvibrant 1023 1023

[Install]
WantedBy=default.target
Then run systemctl --user enable nvibrant.service to enable it on login, add --now for immediate effect.
Using uvx could work too per last sections, not sure of the behavior.
3. Window Manager: Search for your WM's autostart method in the configs
Please report unknown or unlisted issues to be added here!
-
If you get a "Driver version mismatch" or
ioctlerrors, maybe try rebooting (if you haven't) since the last driver update. Otherwise, you can force the version withNVIDIA_DRIVER_VERSION=x.y.z. It must match what/dev/nvidia-modesetexpects and is currently loaded in the kernel. -
It's possible that nVibrant may fail on future or older drivers due to differences between the internal structs and enums in the latest
nvkmsheaders. Please report any issues you encounter!
❤️ Consider supporting my work, this took 16 hours to figure out and implement :)
Integrating this work directly in libvibrant would be the ideal solution, although matching the nvidia driver version could be annoying for a generalized solution. Feel free to base off this code for an upstream solution and PR, in the meantime, here's some local improvements that could be made:
- Package the binary in many linux distros (help needed!)
- Save the current values to restore it later
- Add support for other Display Attributes (Dithering et al.)
- Make an actual CLI interface with
--help,--version, etc. - I am probably not doing safe-C code or mallocs right :^)
Contributions are welcome if you are more C/C++ savy than me! 🙂