Detailed Installation Walkthrough
This is the step-by-step deployment guide for the secure-plex-with-tailscale stack. It follows the four-phase High Level Plan from the main README, with the actual commands, config files, and verification steps for each phase.
If something here breaks, check the Deployment Notes page for known gotchas.
Goal: get your host onto the tailnet and turn on Tailscale SSH, so that you can reach the host from any device on your tailnet without using your public SSH port.
This phase delivers value on its own. Even if you stop here and don't deploy the rest of the stack, you've removed one item from your "things bots scan me for" list.
- A Tailscale account (free tier is fine)
- Root or
sudoon the Linux host running your media stack - One other device already on your tailnet (your laptop or phone) so you can test SSH from outside the server
Use the official install script. It auto-detects your distro and handles repo setup:
curl -fsSL https://tailscale.com/install.sh | shVerify the daemon is running:
systemctl status tailscaledYou should see active (running). If not, start and enable it:
sudo systemctl enable --now tailscaledBring the host onto the tailnet with SSH enabled:
sudo tailscale up --sshThe terminal will print a URL. Open it in any browser, log in with your SSO identity (Google / Microsoft / GitHub / etc.), and authorize the device. Once approved in the admin console, the command returns and your host is on the tailnet.
Tip
If you ever need to change settings later without re-authenticating, use tailscale set instead of tailscale up. For example: sudo tailscale set --ssh=true.
Confirm the host's tailnet IP and SSH state:
tailscale ip -4
tailscale debug prefs | grep -E "RunSSH|Hostname"
You should see "RunSSH": true.
Enabling --ssh on the daemon is necessary but not sufficient — Tailscale's ACL must explicitly grant SSH access, or every session will be refused.
For a single-admin homelab, the simplest rule is "I can SSH to my own devices as any user." Add this to your tailnet's policy file (Admin Console → Access Controls):
{
  "ssh": [
    {
      "action": "check",
      "src":    ["autogroup:member"],
      "dst":    ["autogroup:self"],
      "users":  ["root", "autogroup:nonroot"],
    },
  ],
}
A few notes on what's in this block:
-
"action": "check"requires re-authentication via your SSO every 12 hours by default. Audit-friendly. Use"action": "accept"instead if you want passwordless sessions all the time. -
autogroup:selfmeans "the same user owns both ends of the connection" — fine for a homelab, restrictive enough that someone else on your tailnet can't SSH into your host even if they're a tailnet member. -
autogroup:nonrootlets you log in as any non-root user; the explicitrootlets you log in as root too. Droprootfrom the list once you've confirmed your sudo flow still works without it.
Save the policy. Tailscale picks it up immediately.
From your laptop (or any other tailnet device), test the SSH path:
tailscale ssh root@<your-host-hostname>You'll get a check-mode prompt to re-auth via your browser the first time (and every 12 hours after that, with the policy above). Once approved, you land in the host's shell — no SSH key, no password.
If you hit tailscale ssh: ssh denied: tailnet policy does not allow ssh access, your ACL didn't apply. Double-check the ssh block above is in your policy.
You now have two parallel paths into your host: the public SSH on port 22 (with your existing key + UFW config) and Tailscale SSH (over the tailnet, identity-authenticated).
Run them in parallel for at least a week. Audit what depends on the public path:
- Automated deploys? Backups? Cron jobs on remote hosts?
- Other admins who don't have Tailscale on their machines?
- Monitoring or healthcheck scripts hitting port 22?
Once you're confident nothing depends on the public port, close it in UFW:
sudo ufw delete allow 22/tcp
sudo ufw reload
The migration discipline matters more than the end state. Disabling production SSH on day one is a recipe for getting locked out the moment something unexpected breaks. Run both paths in parallel until you're confident, then close the public one.
Goal: stand up a ts-subnet-router Docker container that bridges a dedicated private Docker network (172.30.0.0/24) to your tailnet. Once it's running, anything you drop onto that Docker network becomes reachable from your tailnet, without ever publishing a port to the host.
- Phase 1 complete (host is on the tailnet)
- Docker and Docker Compose installed on the host
- Admin access to your tailnet's policy file
Before generating an auth key, your tailnet's policy needs to know about the tag the router will claim, and it needs to auto-approve the route it advertises. Otherwise you'll be clicking "approve" in the admin console every time the container restarts.
Add these blocks to your policy file (Admin Console → Access Controls). Merge them with the ssh block you added in Phase 1:
{
  "tagOwners": {
    "tag:plex-router": ["autogroup:admin"],
  },

  "autoApprovers": {
    "routes": {
      "172.30.0.0/24": ["tag:plex-router"],
    },
  },

  // ssh block from Phase 1 stays as-is
}
Save. Tailscale picks it up immediately.
The router authenticates itself to your tailnet using an auth key (not your personal SSO).
- Open Admin Console → Settings → Keys: https://login.tailscale.com/admin/settings/keys
- Click Generate auth key
- Configure it:
-
Description: something memorable, like
plex-subnet-router - Reusable: on (so you can recreate the container without burning a fresh key)
- Expiration: 90 days is fine (max). Auth key expiry doesn't affect the device itself once it's tagged, but you'll want a calendar reminder to rotate.
- Ephemeral: off (the subnet router should persist; ephemeral nodes auto-delete when offline)
-
Tags:
tag:plex-router(must match what you put intagOwnersabove)
-
Description: something memorable, like
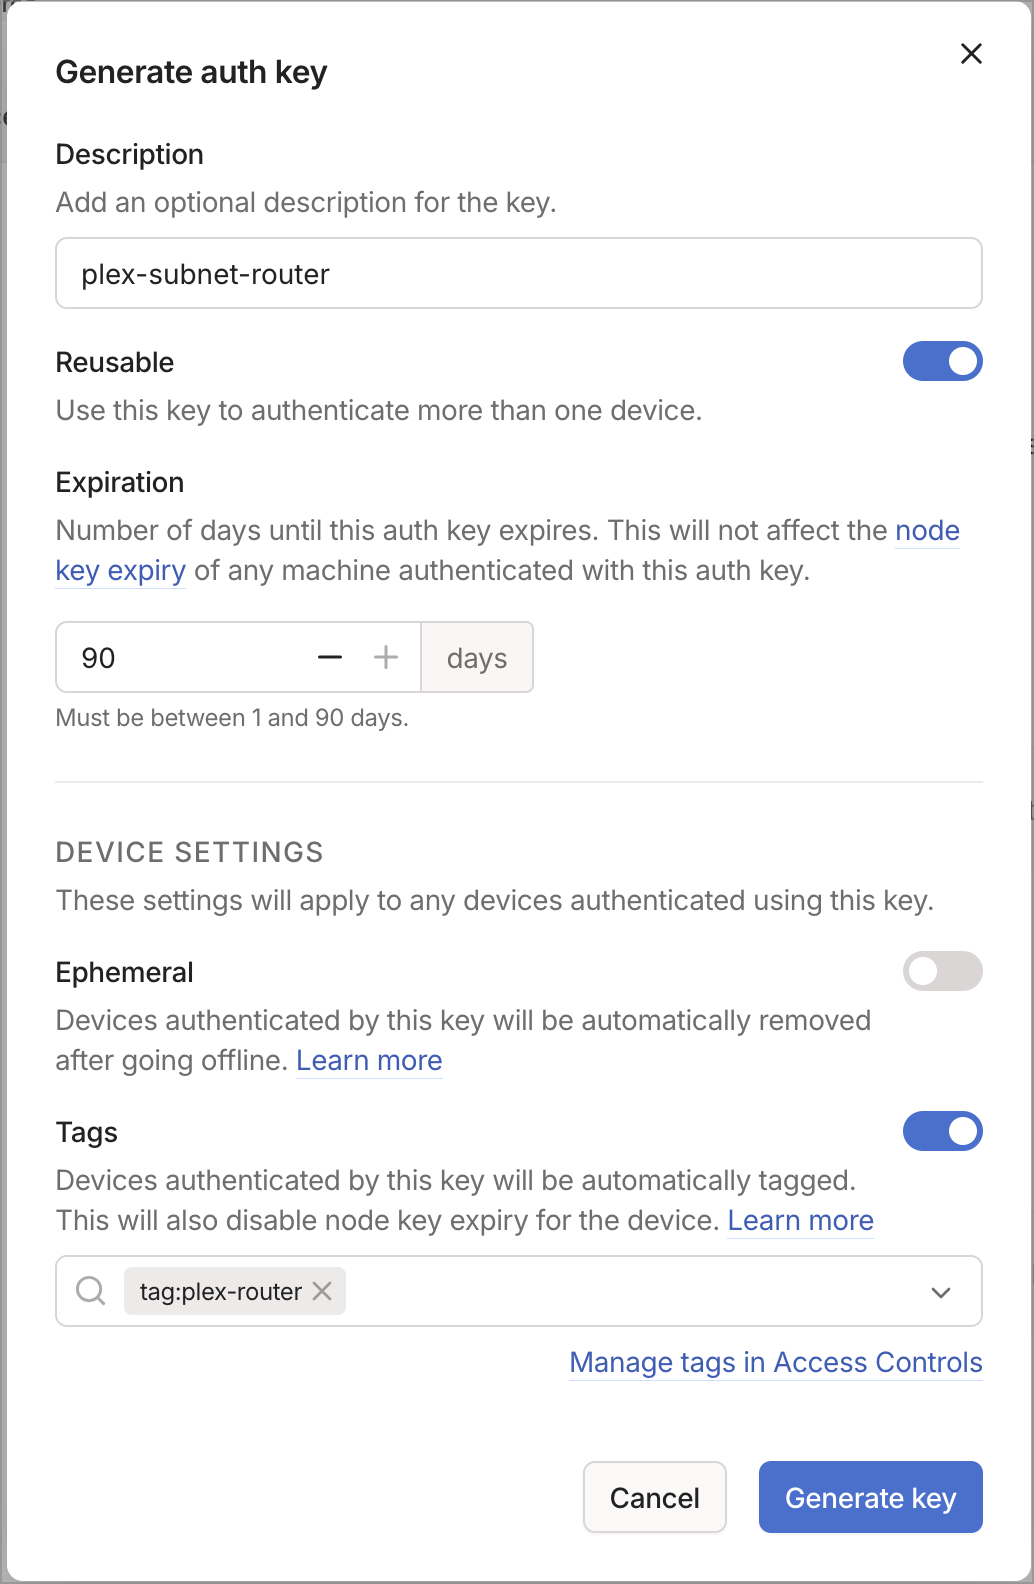
- Click Generate key. Copy the key — Tailscale only shows it once.
Important
Treat this auth key like a password. It can attach any device to your tailnet with the tag:plex-router tag. Don't commit it to git. Keep it in .env (which is already in .gitignore).
Note
If your tailnet has Device Approval turned on (a tailnet-wide setting under Admin Console → Settings → Device Approval), new devices using this auth key will land in "pending" state until an admin approves them in the Machines list. For a single-admin homelab this is usually off. For an org tailnet, expect to approve the device once after first boot.
In the repo root, copy .env.example to .env and fill in the values:
cp .env.example .envThen edit .env:
TS_AUTHKEY=tskey-auth-xxxxxxxxxxxx-xxxxxxxxxxxxxxxxxxxxxxxxxxxxxxxx
TS_ROUTES=172.30.0.0/24
TZ=America/PhoenixAdd the plex-private network and the ts-subnet-router service to your compose file:
networks:
  plex-private:
    driver: bridge
    ipam:
      config:
        - subnet: 172.30.0.0/24

services:
  ts-subnet-router:
    image: tailscale/tailscale:latest
    hostname: app          # becomes the MagicDNS name
    environment:
      - TS_AUTHKEY=${TS_AUTHKEY}
      - TS_ROUTES=${TS_ROUTES}
      - TS_USERSPACE=false                # kernel networking required for subnet routing
      - TS_STATE_DIR=/var/lib/tailscale   # persist state across restarts
      - TS_EXTRA_ARGS=--advertise-tags=tag:plex-router
    volumes:
      - ./tailscale-state/subnet-router:/var/lib/tailscale
      - /dev/net/tun:/dev/net/tun
    cap_add:
      - NET_ADMIN
      - NET_RAW
    networks:
      plex-private:
        ipv4_address: 172.30.0.2
    restart: unless-stopped
A few things to know about this config:
-
TS_USERSPACE=false— the Tailscale Docker image defaults to userspace networking, which doesn't support subnet routing. Setting this tofalseswitches to kernel networking, which is required. -
cap_add: NET_ADMINandNET_RAW— the container needs these to manipulate routes and packets at the kernel level. -
/dev/net/tunmount — the kernel-mode tailscaled needs access to the TUN device. -
The state volume — without
TS_STATE_DIRmapped to a persistent volume, every container restart looks like a new device joining your tailnet. You'd burn through machine slots and clutter your admin console. -
The static IP (
172.30.0.2) — gives the router a stable address on the private network so other services and your reverse-proxy plans have something predictable to talk to.
docker compose up -d ts-subnet-routerWatch the logs to confirm successful authentication:
docker compose logs -f ts-subnet-routerYou should see lines like:
Success.
Some peers are advertising routes but --accept-routes is false
The "Success" line is what matters. The --accept-routes is false warning is benign for a router that only advertises routes — it doesn't need to accept routes from other peers.
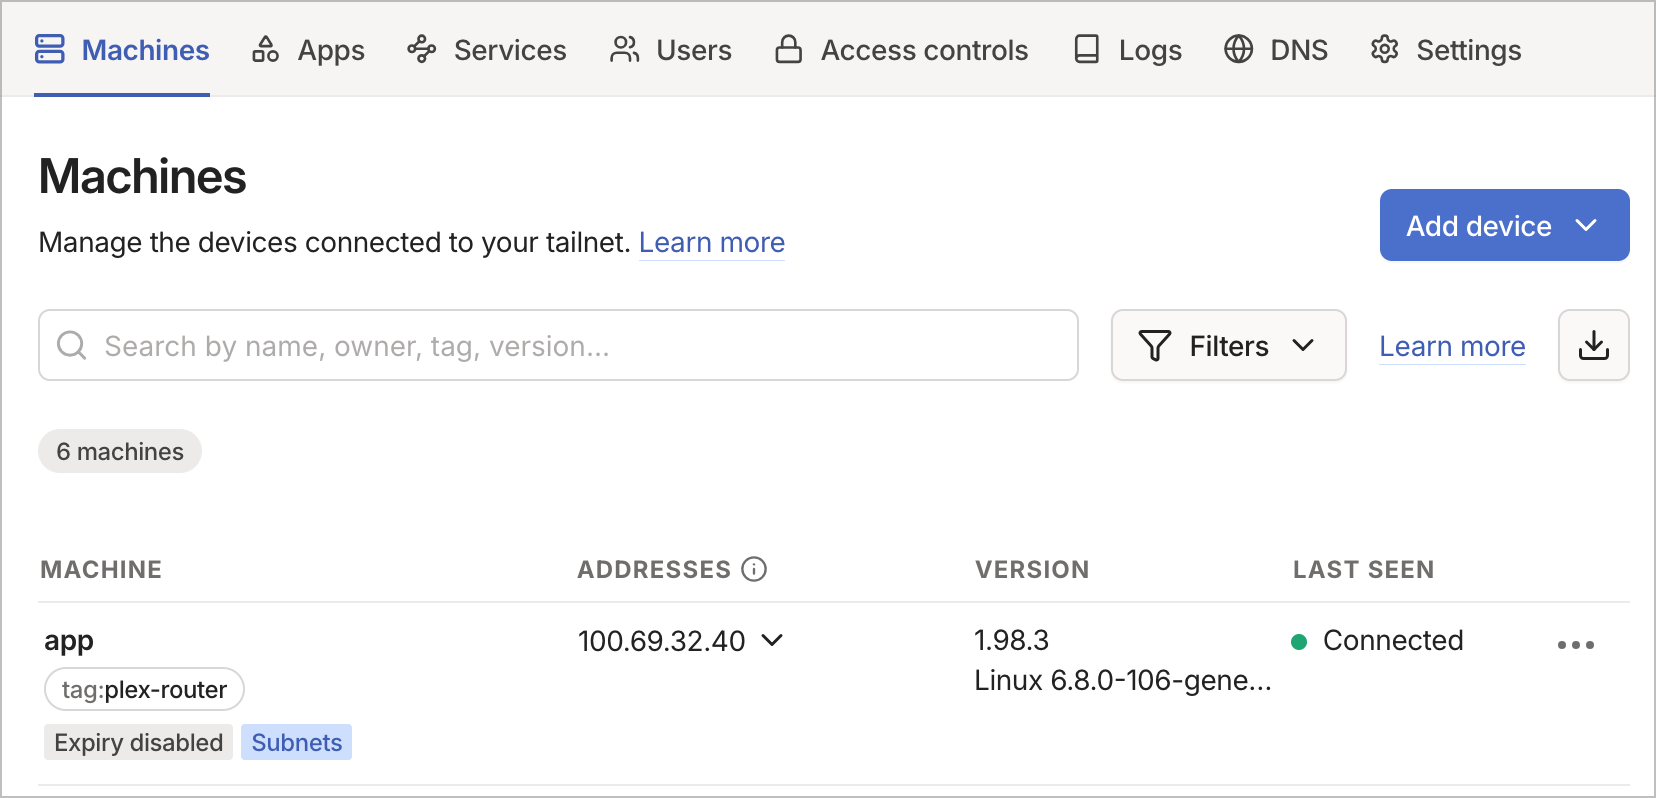
From the host (or any tailnet device), check that the new node shows up:
tailscale statusYou should see a peer named app with state idle or active.
In the admin console Machines page, the new device shows up alongside your existing ones:
Note
"Expiry disabled" is normal for tagged devices. Tailscale automatically disables node-key expiry on devices that join via a tagged auth key (subnet routers, sidecars, automation nodes). These devices represent services rather than users, so they can't go through the normal user re-authentication flow when a key would expire — disabling expiry keeps them on the tailnet indefinitely. If you see "Expiry disabled" on a USER-owned device unexpectedly, that's worth investigating; on a tagged device, it's the intended behavior.
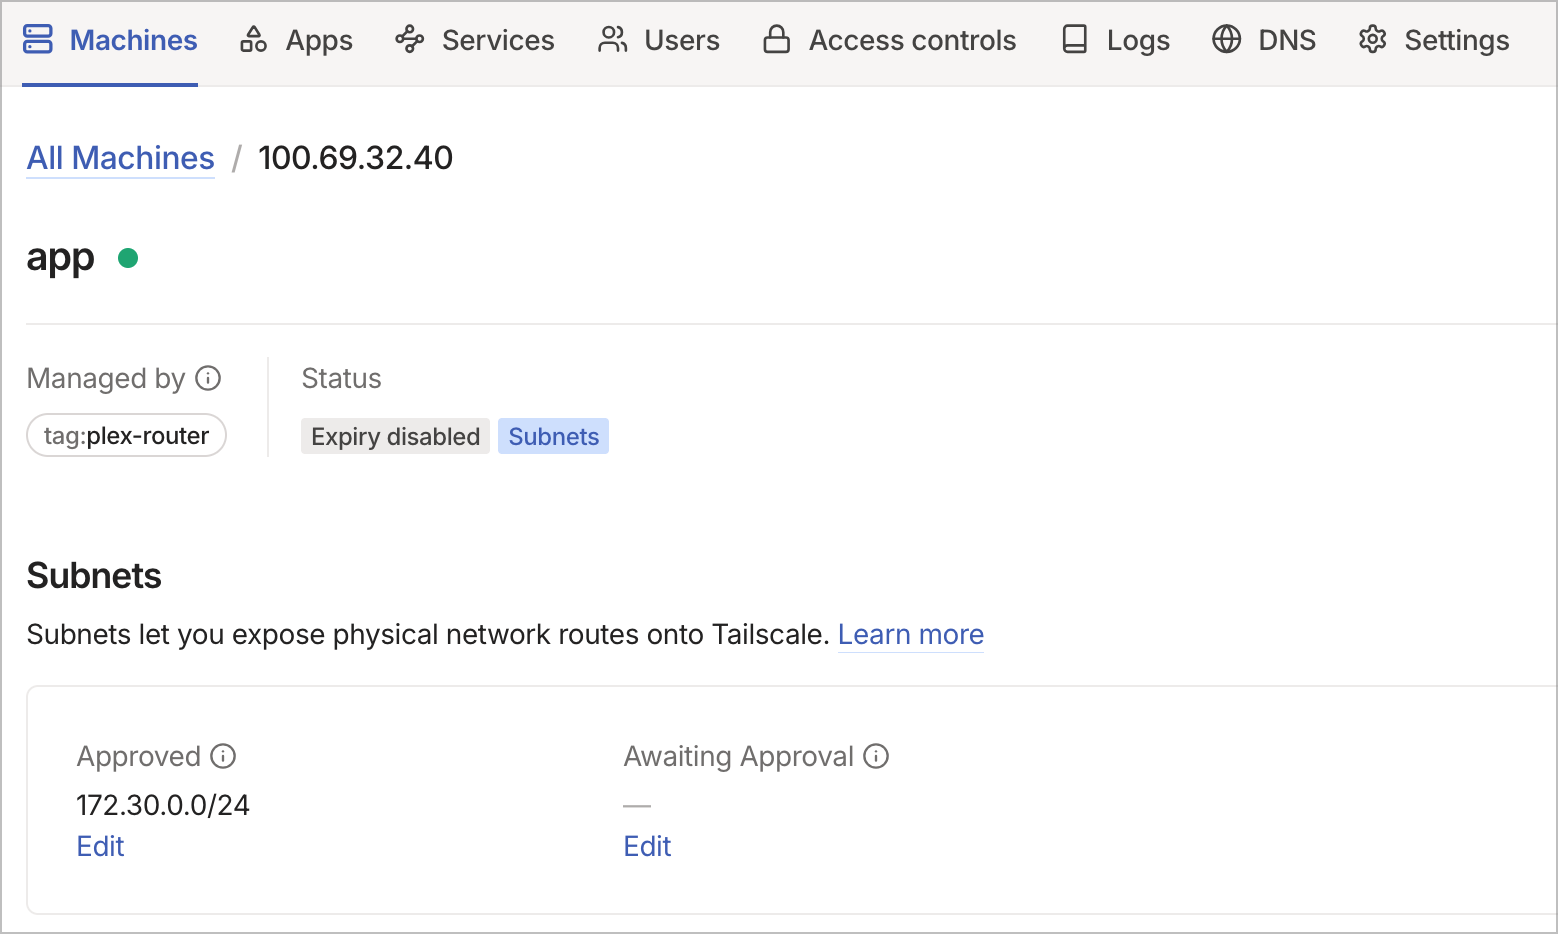
Click into the app device to see the route status. With autoApprovers configured in Step 1, the 172.30.0.0/24 route should show as Approved automatically:
Add a throwaway test container to the private network to confirm packets actually flow through. In docker-compose.yml:
  test-nginx:
    image: nginx:alpine
    networks:
      plex-private:
        ipv4_address: 172.30.0.10
    restart: "no"
Bring it up:
docker compose up -d test-nginxFrom your laptop (on the tailnet), hit it:
curl http://172.30.0.10You should see the default nginx welcome page HTML. That confirms:
- Your laptop's tailscaled is accepting the advertised route
- Packets are reaching the subnet router container
- The subnet router is forwarding into the Docker network
- The destination container is reachable on its private IP
Now from a device not on your tailnet (phone on cellular, a colleague's laptop), try the same curl. It should fail to even resolve the IP — 172.30.0.0/24 doesn't exist on the public internet. That's the security property: the test container has zero public attack surface, but it's perfectly reachable from anywhere on your tailnet.
Tear down the test container before moving on:
docker compose stop test-nginx && docker compose rm -f test-nginx| Symptom | Likely Cause | Fix |
|---|---|---|
Container starts, but tailscale status doesn't show it on other devices |
Auth key was wrong, expired, or didn't have the right tag | Regenerate the key with tag:plex-router and a long expiry; check the container logs for auth errors |
| Container shows online but route is "pending" in admin console |
autoApprovers block missing or tag mismatch |
Verify the tag in TS_EXTRA_ARGS=--advertise-tags=tag:plex-router matches the tagOwners and autoApprovers entries |
Container starts, route approved, but laptop can't reach 172.30.0.10
|
Laptop client isn't accepting advertised routes (default on Linux) | On the laptop: tailscale set --accept-routes (macOS, iOS, Windows accept by default) |
| Container fails to start with "operation not permitted" | Missing NET_ADMIN cap or /dev/net/tun mount |
Verify both are present in docker-compose.yml
|
- Tailscale in Docker
- Subnet routers
- Auth keys (admin console)
Goal: consolidate the ACL fragments you added in Phases 1 and 2 into a single committed policy file, fill in the access rules that actually gate who reaches what, and (optionally) wire up GitOps sync so every future policy change flows through git review.
By the end of this phase, your tailnet's authorization model is captured in a single file in this repo — version controlled, code-reviewable, and reproducible.
Tailscale's policy file (acl.hujson) has five blocks that matter for this stack:
| Block | What it controls |
|---|---|
groups |
Named lists of user identities (e.g. group:admin, group:family) |
tagOwners |
Which users are allowed to claim a given tag (tags are identities for non-human devices) |
autoApprovers |
Routes that get auto-approved when advertised by a tagged device, so you don't have to click "approve" on every container restart |
grants |
The actual access rules: who can reach what, on which ports |
ssh |
Who can tailscale ssh into which devices as which Unix users |
You added partial versions of tagOwners, autoApprovers, and ssh in earlier phases. This phase adds groups and grants, and consolidates everything in the repo's acl.hujson.
Note
Tailscale has two policy syntaxes: the legacy acls block and the modern grants block. Both still work, but new tailnets default to grants and it's the recommended syntax going forward. The two differ mostly in where the port lives: acls puts dst and port together as "10.0.0.0/24:*"; grants separates them into dst and a dedicated ip field.
Open acl.hujson in the repo and replace the contents with the full policy:
{
  // ============================================================
  // GROUPS: identities that share access rules
  // ============================================================
  "groups": {
    "group:admin": [
      "you@example.com",
      // Add other admin identities here as needed
    ],
    "group:family": [
      // People who only need Plex (which lives outside the tailnet anyway)
      // e.g. "spouse@example.com"
    ],
  },

  // ============================================================
  // TAGS: identities for devices that don't represent a human
  // ============================================================
  "tagOwners": {
    "tag:plex-router": ["autogroup:admin"],
  },

  // ============================================================
  // AUTO-APPROVERS: routes that get approved automatically when
  // advertised by a device with the matching tag. Without this,
  // every subnet router restart needs a manual approval click.
  // ============================================================
  "autoApprovers": {
    "routes": {
      "172.30.0.0/24": ["tag:plex-router"],
    },
  },

  // ============================================================
  // GRANTS: who can reach what
  // Default behavior is DENY. Only explicitly-granted paths work.
  // ============================================================
  "grants": [
    // Admins reach the entire private Docker network on any port
    {
      "src": ["group:admin"],
      "dst": ["172.30.0.0/24"],
      "ip":  ["*"],
    },

    // group:family has no grant here, so they cannot reach the
    // private network at all. They get Plex (which is public)
    // and that's it.
  ],

  // ============================================================
  // SSH: who can `tailscale ssh` to what, as which Unix users
  // ============================================================
  "ssh": [
    {
      "action": "check",                          // require SSO re-auth every 12h
      "src":    ["autogroup:member"],             // any tailnet member
      "dst":    ["autogroup:self"],               // their own devices only
      "users":  ["root", "autogroup:nonroot"],    // as root or any non-root user
    },
  ],
}
A few choices in this policy worth understanding:
-
group:adminis the only group that reaches the private network. Everyone else (includinggroup:family) gets implicit deny. That's the whole point — least privilege by default, explicit grants for the rest. -
The
grantsblock usesdst: ["172.30.0.0/24"]withip: ["*"], which means any port on any IP in that range. If you want stricter control later, for example so family group can curl Tautulli but not Sonarr, you'd narrow this to per-IP grants with specific ports in theipfield (e.g."ip": ["tcp:8181"]). Save that for after the stack is working end-to-end. -
tagOwnerswithautogroup:adminmeans any tailnet admin can claim thetag:plex-routertag. For a single-admin homelab this is fine. For a team, you might restrict it to specific users. -
The
sshblock usesautogroup:self, so other tailnet members can't SSH to your devices even though they're on the same tailnet. Strong default.
Two paths. Pick one:
Path A (manual, fastest):
- Copy the contents of
acl.hujson - Go to Admin Console → Access Controls: https://login.tailscale.com/admin/acls/file
- Paste over the existing policy
- Click Preview — Tailscale shows what changes for each device
- Click Save — the new policy applies immediately to every device on the tailnet
Path B (IaC - Infrastructure as Code):
Wire up Tailscale's policy sync so every commit to acl.hujson on main triggers a live policy update via a GitHub Action. This is the move for "I want my authorization model to flow through PR review like the rest of my infrastructure" and is the pattern Tailscale's enterprise customers use.
Tip
Put your real acl.hujson in a separate private GitHub repo, not in this public template repo. Your real policy contains real user emails, real group memberships, and real network CIDRs, none of which should be in a public repo. Create a new private repo (e.g. your-username/tailnet-policy) that contains just the policy file and the workflow that syncs it. The public template repo stays clean as a reference.
- Admin Console → Tailnet Settings → Trust credentials: https://login.tailscale.com/admin/settings/credentials
- Click + Credential
- Choose OAuth (not OpenID Connect — OAuth is the simpler path for service-to-service auth and what Tailscale's docs use)
- Description:
gitops-tailnet-policy - Click Continue →
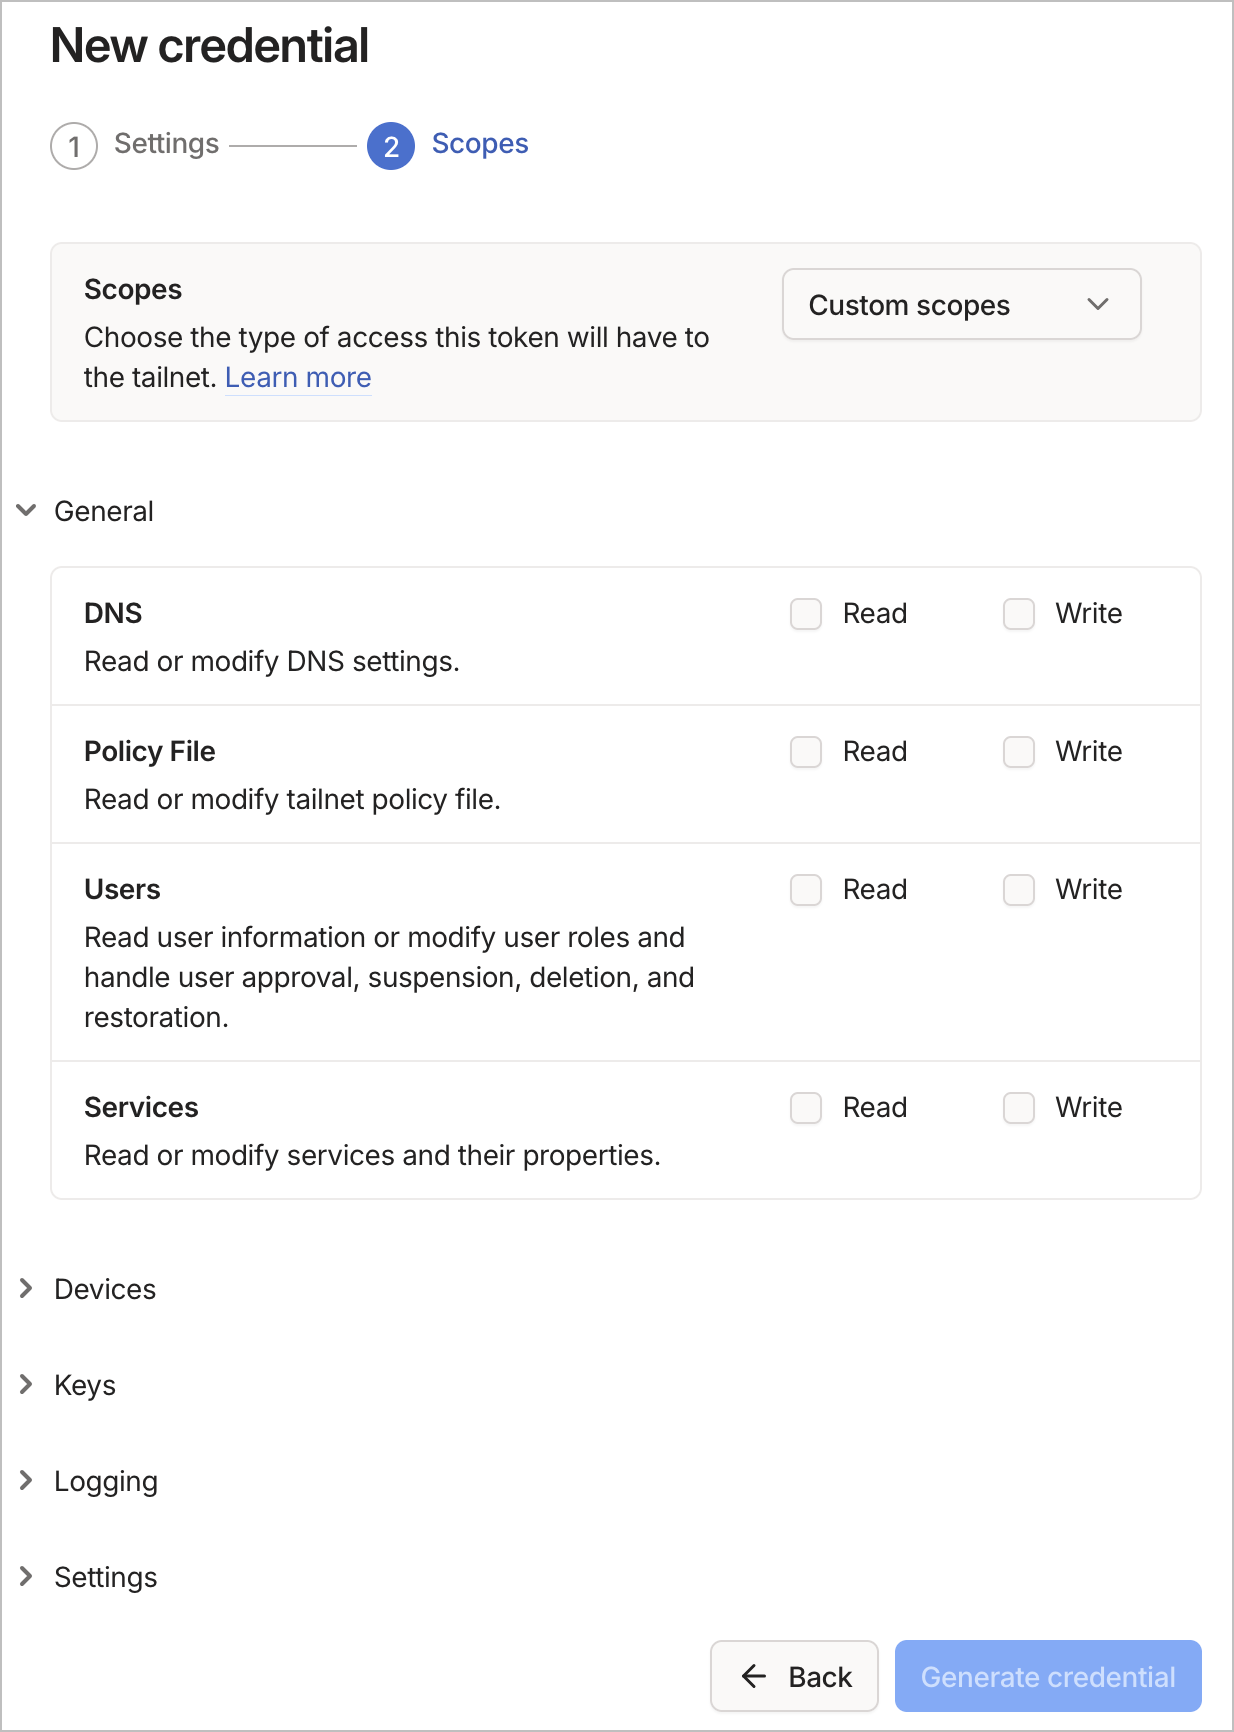
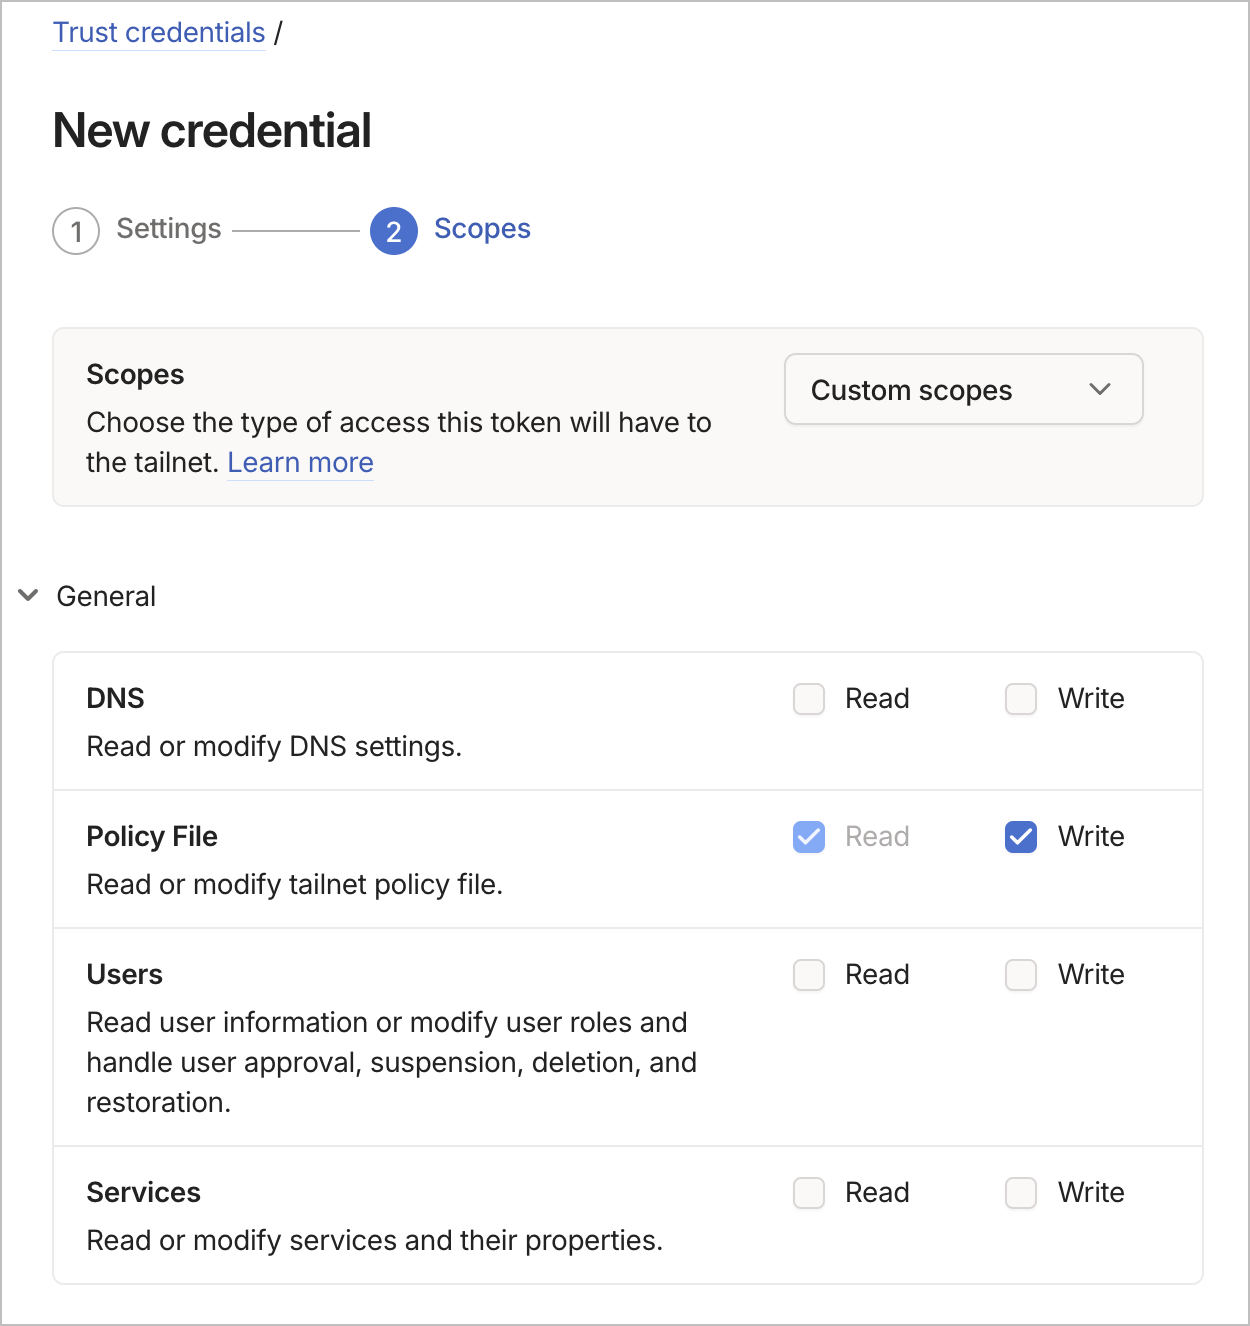
- On the Scopes step, expand General and check ONLY:
- ☑️ Policy File → Read
- ☑️ Policy File → Write
- Leave everything else unchecked (DNS, Users, Services, Devices, Keys, Logging, Settings)
- Click Generate credential
Note
Least privilege in action. The credential's job is to push ACL changes — nothing else. If it leaks tomorrow, the blast radius is bounded to your policy file: an attacker can't add devices, modify DNS, or exfiltrate user data. The same principle applies to every service credential you generate: grant exactly what the job needs, nothing more.
- Tailscale shows the Client ID and Client secret. Copy both immediately — the secret is shown only once.
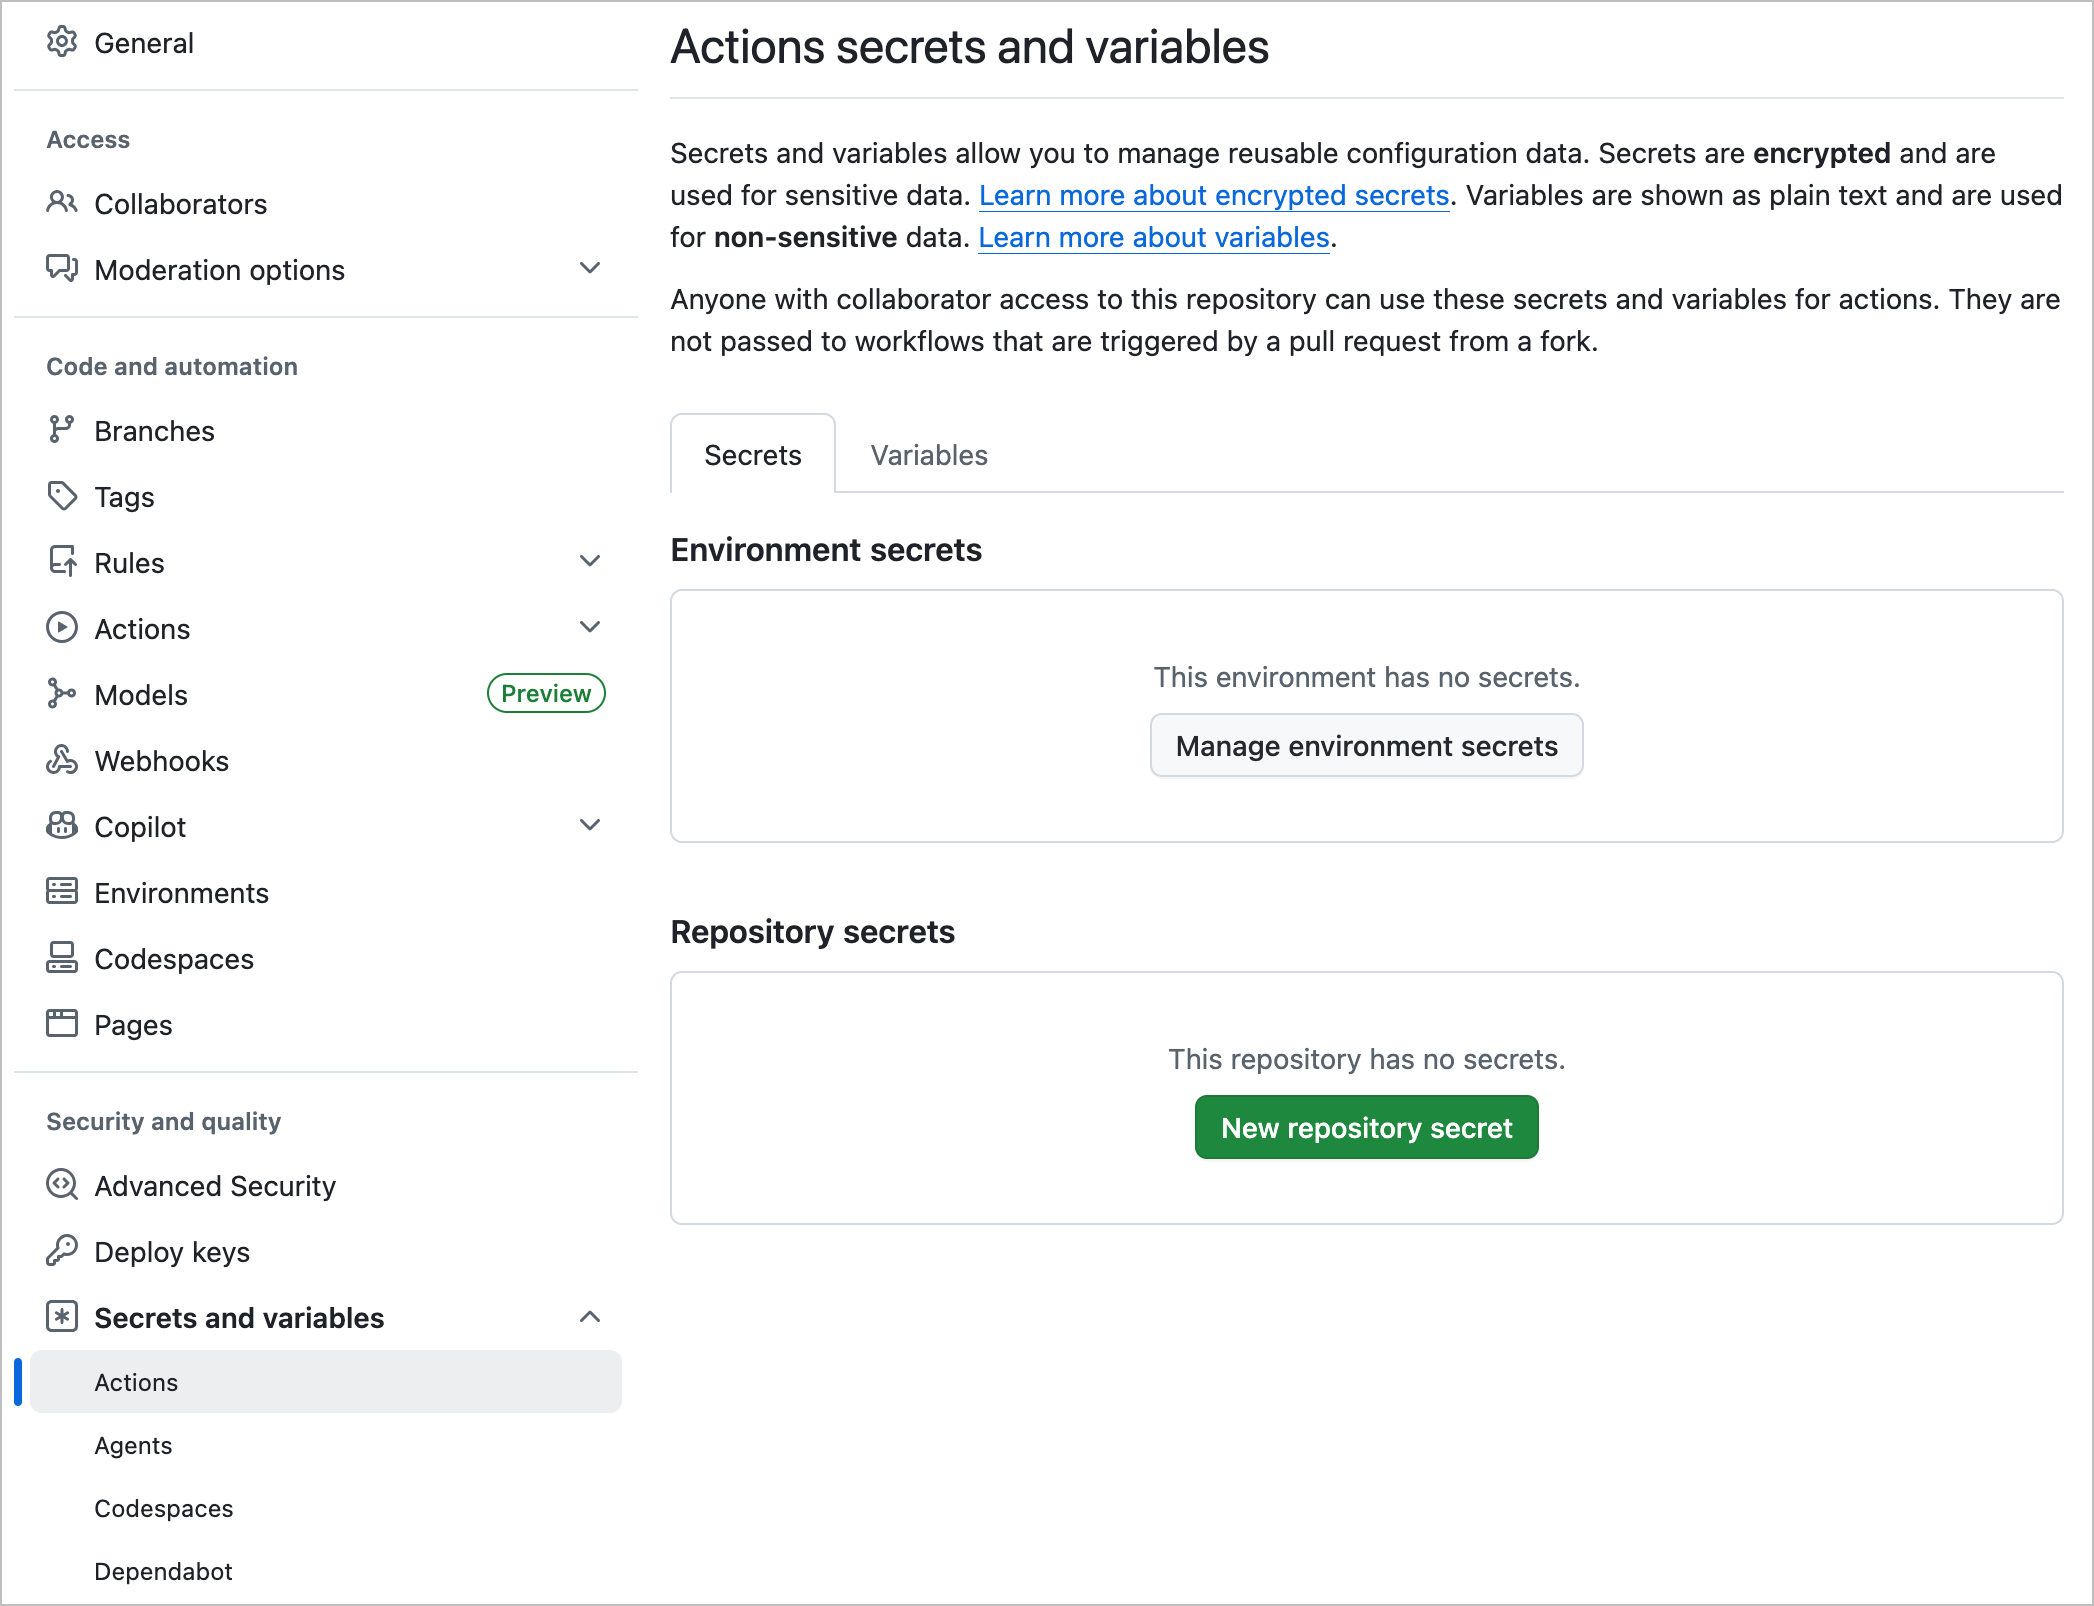
Navigate to https://github.com/YOUR-USERNAME/tailnet-policy/settings/secrets/actions and click New repository secret three times:
| Secret name | Value |
|---|---|
TS_OAUTH_CLIENT_ID |
The client ID from step B1.9 |
TS_OAUTH_CLIENT_SECRET |
The client secret from step B1.9 |
TS_TAILNET |
Your tailnet's name (find it under Admin Console → DNS; looks like tail12345.ts.net for personal tailnets or your domain for org tailnets) |
Create .github/workflows/sync-acl.yml in your private repo:
name: Tailscale ACL syncing

on:
  push:
    branches: ["main"]
    paths: ["acl.hujson"]
  pull_request:
    branches: ["main"]
    paths: ["acl.hujson"]

jobs:
  acls:
    runs-on: ubuntu-latest
    steps:
      - uses: actions/checkout@v4

      - uses: actions/setup-go@v5

      - name: Install gitops-pusher
        run: go install tailscale.com/cmd/gitops-pusher@latest

      - name: Exchange OAuth credentials for an API access token
        id: token
        run: |
          response=$(curl -sS -X POST https://api.tailscale.com/api/v2/oauth/token \
            -d "client_id=${{ secrets.TS_OAUTH_CLIENT_ID }}" \
            -d "client_secret=${{ secrets.TS_OAUTH_CLIENT_SECRET }}")
          access_token=$(echo "$response" | jq -r '.access_token')
          if [ -z "$access_token" ] || [ "$access_token" = "null" ]; then
            echo "Failed to obtain access token. Response: $response"
            exit 1
          fi
          echo "::add-mask::$access_token"
          echo "access_token=$access_token" >> "$GITHUB_OUTPUT"

      - name: Apply ACL (push to main)
        if: github.event_name == 'push'
        env:
          TS_API_KEY: ${{ steps.token.outputs.access_token }}
          TS_TAILNET: ${{ secrets.TS_TAILNET }}
        run: ~/go/bin/gitops-pusher --policy-file ./acl.hujson apply

      - name: Test ACL (pull request)
        if: github.event_name == 'pull_request'
        env:
          TS_API_KEY: ${{ steps.token.outputs.access_token }}
          TS_TAILNET: ${{ secrets.TS_TAILNET }}
        run: ~/go/bin/gitops-pusher --policy-file ./acl.hujson test
What each step does:
- Install gitops-pusher — Tailscale's official CLI tool for syncing policy files
-
Exchange OAuth credentials for an API access token — Tailscale's management API requires a proper OAuth access token, not the raw client secret. This step POSTs the client ID and secret to
/api/v2/oauth/tokenand parses the resulting access token. The token is masked in logs. - Apply on push to main — actually pushes the policy to the live tailnet
- Test on pull request — validates ACL syntax and shows the diff in the PR, but does not apply the change
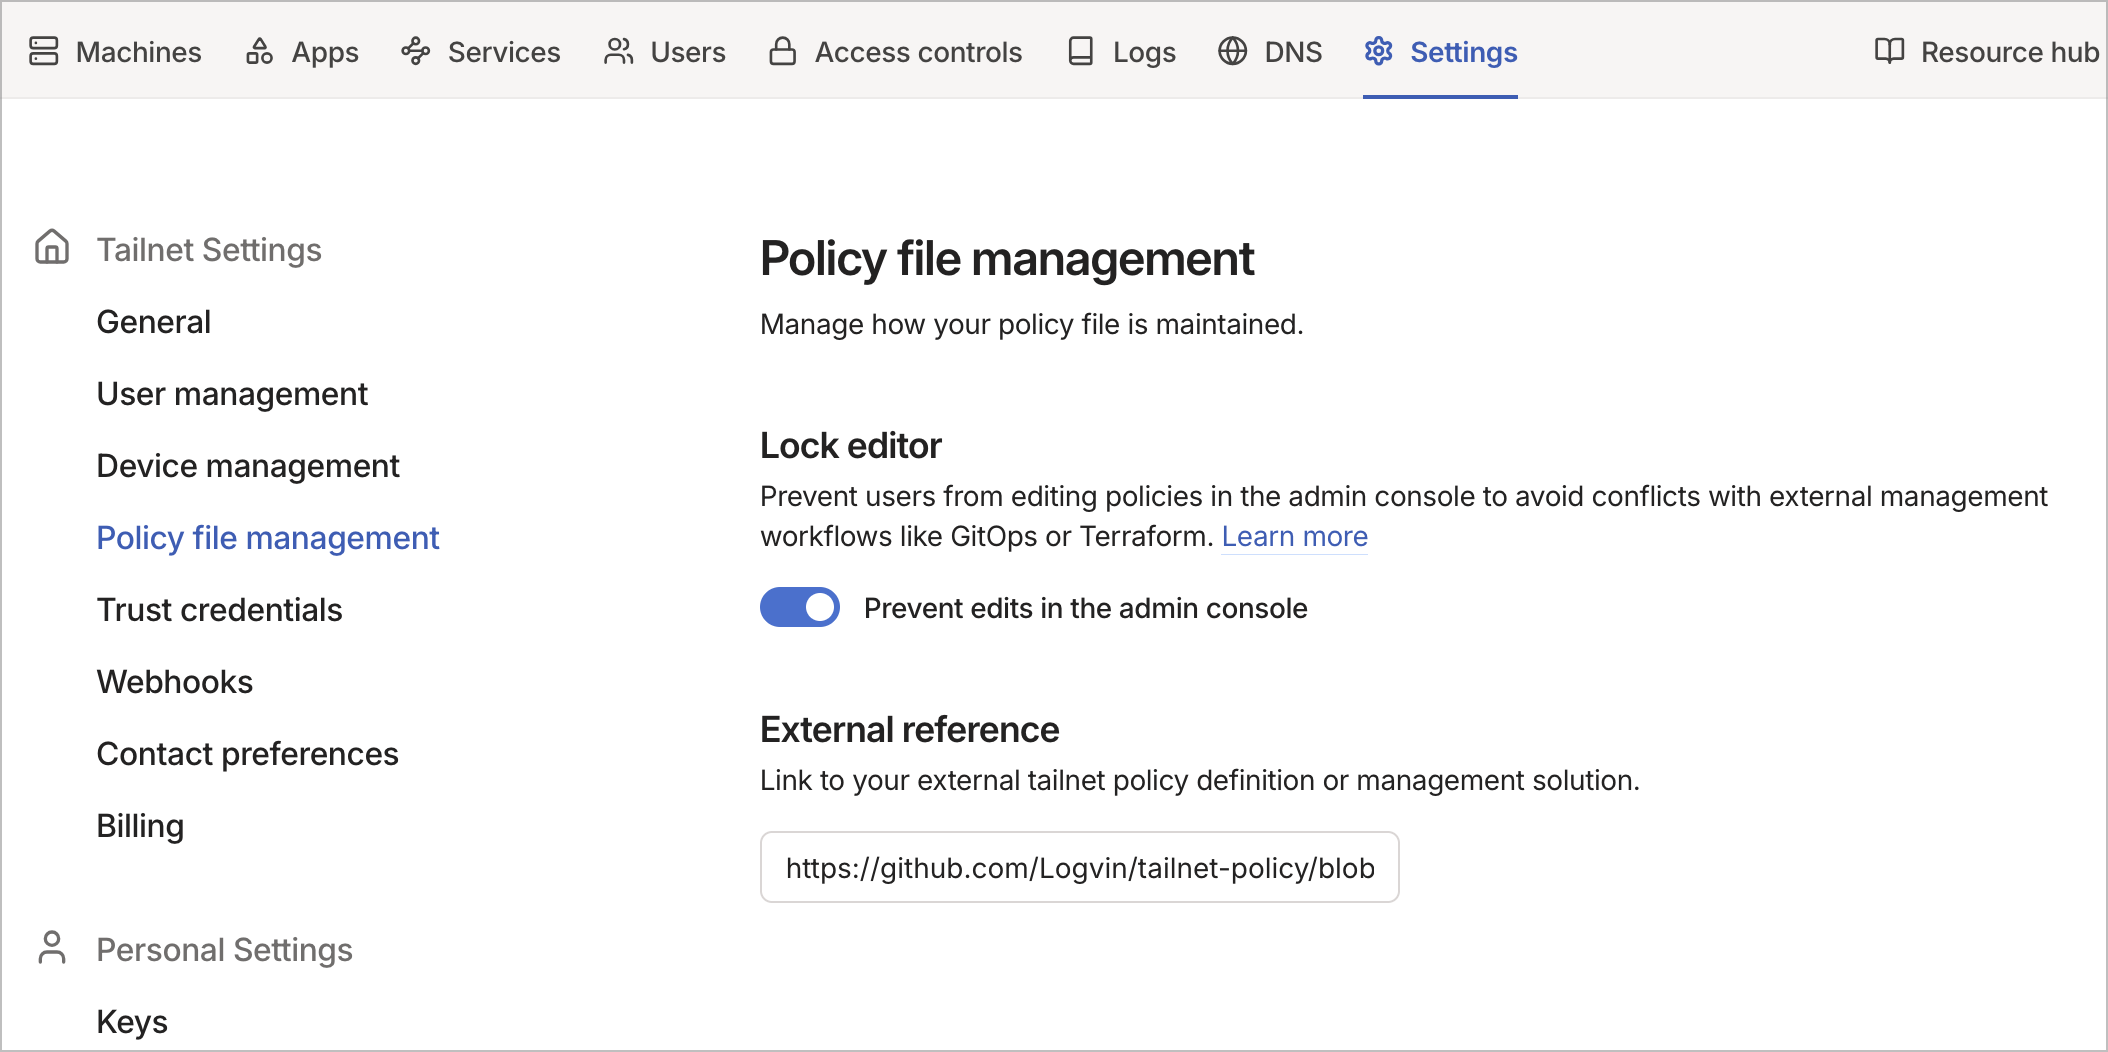
- Admin Console → Tailnet Settings → Policy file management
- Flip Lock editor to on — the admin console becomes read-only for the policy; manual edits via the web UI are rejected
- Fill in External reference with the URL to your policy file in the private repo, e.g.
https://github.com/YOUR-USERNAME/tailnet-policy/blob/main/acl.hujson. This is purely cosmetic but tells anyone looking at the admin console where the source of truth lives.
End state of this page once configured:
Trigger a run by making a trivial commit to acl.hujson:
cd /path/to/your/tailnet-policy
echo "// gitops sync test" >> acl.hujson
git add acl.hujson
git commit -m "test: trigger gitops sync"
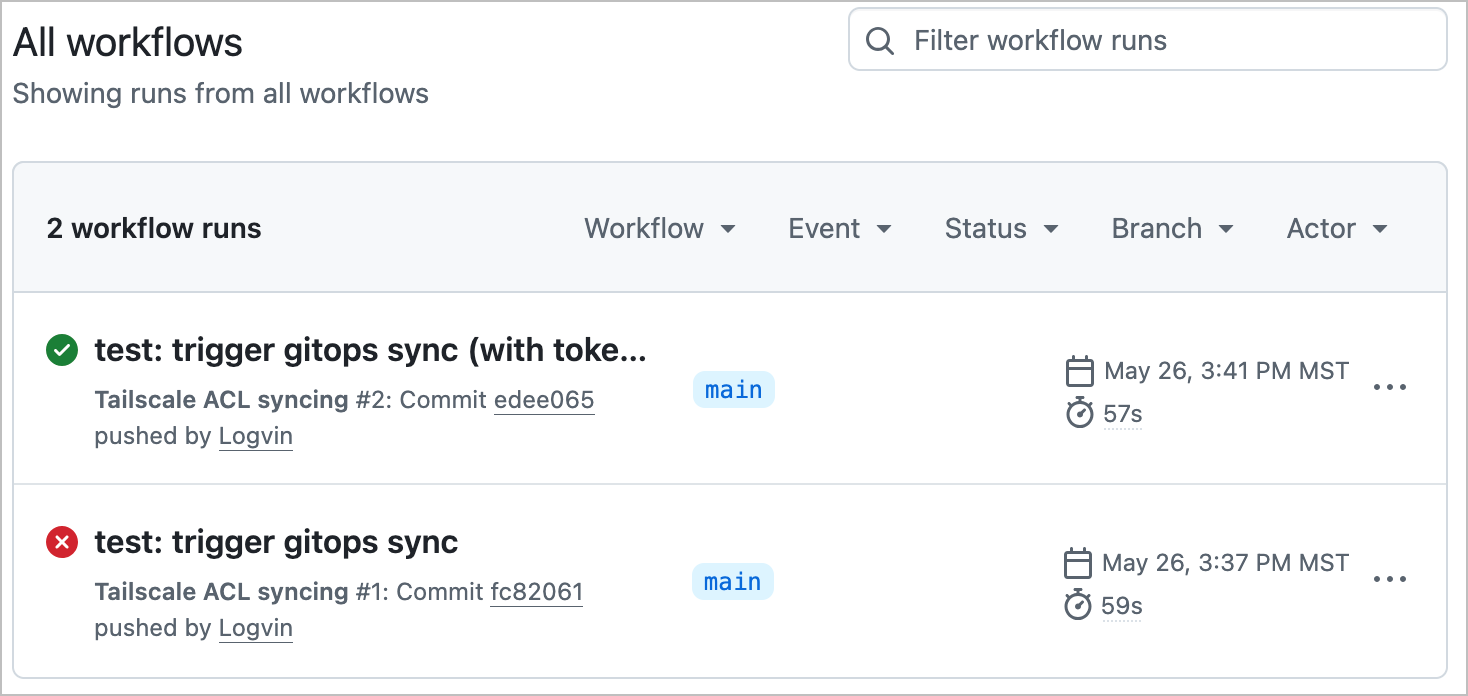
git push origin mainWatch the Action at https://github.com/YOUR-USERNAME/tailnet-policy/actions. If green, check the admin console policy file — your comment should be there.
Tip
Expect a failure on first try. The screenshot above shows a real deployment: the first run (red X) failed with 403: calling actor does not have enough permissions because the OAuth client secret was being passed directly as a bearer token. The second run (green checkmark) succeeded after the workflow was updated to do the proper OAuth client_credentials token exchange — POSTing the client ID and secret to /api/v2/oauth/token and using the resulting access token. This is the OAuth gotcha covered earlier; the failure is the kind of thing every customer hits exactly once.
Once the basic sync works, add branch protection so future changes flow through PRs:
gh api -X PUT \
  /repos/YOUR-USERNAME/tailnet-policy/branches/main/protection \
  -F required_pull_request_reviews.required_approving_review_count=0 \
  -F required_pull_request_reviews.dismiss_stale_reviews=false \
  -F required_status_checks.strict=true \
  -F required_status_checks.contexts[]='acls' \
  -F enforce_admins=false \
  -F restrictions=
Zero required approvals (you're solo) but PRs are required AND the test job must pass before merge. You get the audit-trail and pre-flight-validation benefits of GitOps without slowing yourself down.
| Symptom | Likely cause | Fix |
|---|---|---|
| Action fails at the token-exchange step | Wrong client ID or secret | Verify both secrets are set correctly; regenerate if you lost the secret |
Action fails at apply with 403 calling actor does not have enough permissions
|
OAuth secret is being passed directly as bearer token instead of via token exchange | Confirm the workflow has the token-exchange step (above) before calling gitops-pusher |
Action fails with tailnet not found
|
TS_TAILNET value is wrong |
Try the full name like tail12345.ts.net, or try - (literal dash, means "the OAuth client's own tailnet") |
| Action passes but policy doesn't change in admin console | You pushed a change that doesn't affect acl.hujson
|
The workflow only runs on changes to acl.hujson (per the paths: filter); other commits are intentionally skipped |
See the Tailscale GitOps docs for additional reference.
Tailscale ships a debug subcommand that lets you ask "would this src be allowed to reach this dst on this port?" without actually trying the connection. Useful for sanity-checking rules before you trust them.
From any device on your tailnet:
# Should be allowed (admin reaching the private network)
tailscale debug acl-check --src you@example.com --dst 172.30.0.10:8989

# Should be denied (family reaching the private network)
tailscale debug acl-check --src spouse@example.com --dst 172.30.0.10:8989
For each one, the output tells you whether the policy permits that traffic and (if denied) which rule was the closest match. Good way to catch typos in group names or CIDR ranges before you spend an hour debugging "why can't I reach my own server."
Since you've replaced the entire policy in step 3, double-check the SSH path you set up in Phase 1 still works:
tailscale ssh root@<your-host-hostname>If you hit ssh denied: tailnet policy does not allow ssh access, the ssh block isn't right — check syntax, check that autogroup:self applies to the device you're connecting to, check that the destination's owner matches the source's identity.
- Policy file syntax
- ACL examples
- Tailscale autogroups (see "autogroup" sections)
Goal: replace the IP-and-port URLs from Phase 2 (http://172.30.0.10:8989) with friendly HTTPS hostnames (https://app.your-tailnet.ts.net/sonarr/), backed by auto-provisioned Let's Encrypt certs. No reverse proxy. No cert renewal. No per-app DNS records.
Tailscale Serve runs inside the same app container you already deployed in Phase 2. One more env var, one more mounted file, one restart.
-
Phase 2 complete (subnet router container is up;
tailscale statusshows it on the tailnet) -
MagicDNS enabled (Admin Console → DNS → MagicDNS — on by default for new tailnets)
-
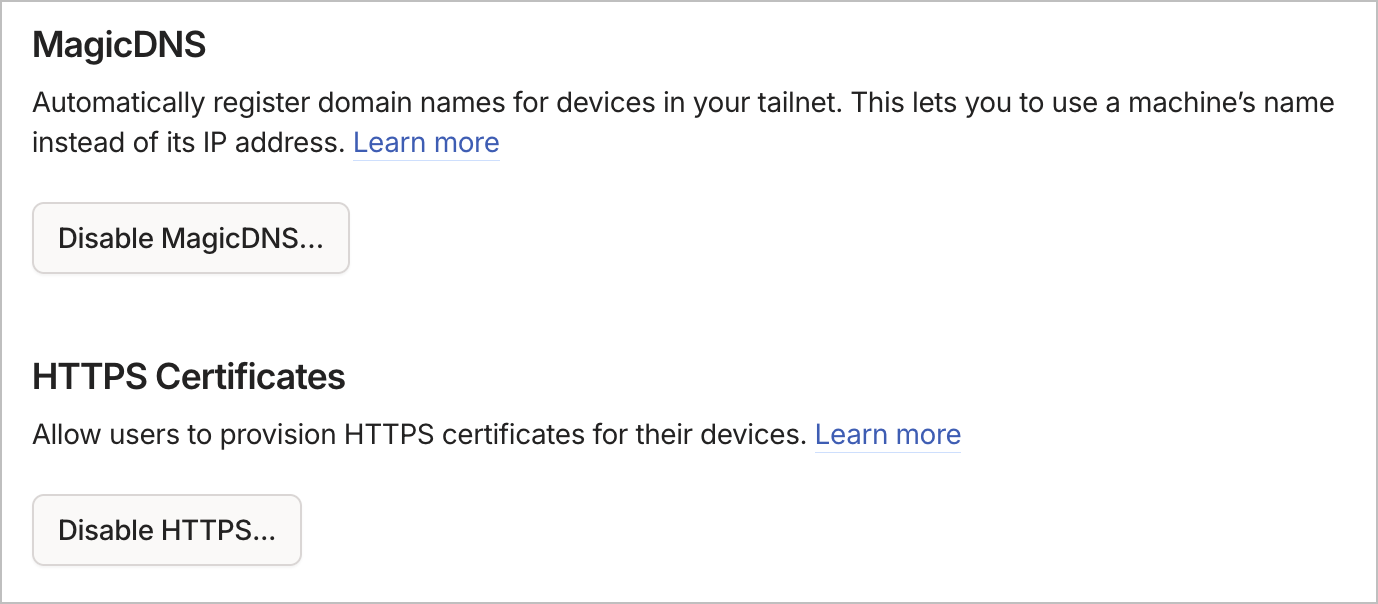
HTTPS Certificates enabled (Admin Console → DNS → HTTPS Certificates → Enable). This authorizes Tailscale to provision Let's Encrypt certs for
*.<your-tailnet>.ts.net. Required.Once enabled, the DNS page shows a Disable HTTPS... button (i.e., the feature is currently on). That's the state you're looking for before continuing:
The Serve config has to be told the exact hostname to listen on. Get it from any tailnet device:
tailscale status --self --json | jq -r '.Self.DNSName'Example output: app.fluffy-otter.ts.net. (note the trailing dot, you'll drop it).
For the rest of this phase, substitute your actual tailnet name (e.g. fluffy-otter) wherever you see YOUR-TAILNET.
Create serve.json at the repo root:
{
  "TCP": {
    "443": {
      "HTTPS": true
    }
  },
  "Web": {
    "app.YOUR-TAILNET.ts.net:443": {
      "Handlers": {
        "/":          { "Path": "/config/index.html" },
        "/sonarr/":   { "Proxy": "http://172.30.0.10:8989/sonarr/" },
        "/radarr/":   { "Proxy": "http://172.30.0.11:7878/radarr/" },
        "/prowlarr/": { "Proxy": "http://172.30.0.12:9696/prowlarr/" },
        "/tautulli/": { "Proxy": "http://172.30.0.13:8181/tautulli/" }
      }
    }
  }
}
What's in there:
-
TCP.443.HTTPS: true— terminate TLS on port 443 with an auto-provisioned cert -
Webkeyed by<hostname>:<port>— has to match the device's actual MagicDNS name exactly (case-sensitive) -
Handlers— path-prefix-to-backend mapping. Path order matters: more specific paths must come before generic ones if they overlap. -
/handler withPath— serves a static file (with auto-detectedContent-Type). Set up the matchingindex.htmlfile in Step 3. -
Each
/<app>/handler withProxy— reverse-proxies to the *arr app. Note the trailing path in the proxy URL — that's load-bearing; explained in the IMPORTANT below.
Edit the hostname to match your tailnet, save, and commit it. The hostname isn't a secret.
Important
Tailscale Serve strips the matched URL prefix before forwarding to the backend. If the match is /sonarr/ and the proxy target is http://172.30.0.10:8989 (no path), the backend receives the request at /, not /sonarr/. Sonarr (with URL Base = /sonarr) then responds with a redirect back to /sonarr/, Serve strips the prefix again, and you get an infinite redirect loop.
Fix: include the same path in the proxy target URL: http://172.30.0.10:8989/sonarr/. Serve preserves the path through to the backend, the backend matches its URL Base correctly, and the request resolves on first hop.
This applies to every backend that runs under a URL base or path prefix (the entire *arr stack, Jellyfin behind a sub-path, anything self-hosted that supports URL Base configuration). For a vanilla web app that lives at root, the trailing path isn't required.
Note
The Text handler serves content as text/plain, not text/html. If you want an HTML landing page, you must use a Path handler pointing at a real HTML file (as shown above). Inline HTML in a Text handler shows up in the browser as raw source code.
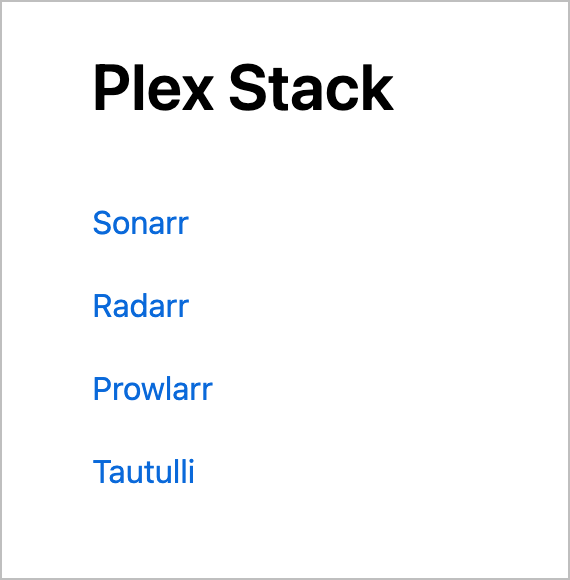
Create index.html at the repo root with whatever you want shown at /:
<!DOCTYPE html>
<html>
<head>
<title>Plex Stack</title>
<style>
body { font-family: system-ui, -apple-system, sans-serif; max-width: 32rem; margin: 4rem auto; padding: 0 1rem; line-height: 1.6; }
h1 { font-weight: 600; }
a { display: block; padding: 0.5rem 0; color: #0969da; text-decoration: none; }
a:hover { text-decoration: underline; }
</style>
</head>
<body>
<h1>Plex Stack</h1>
<a href="/sonarr/">Sonarr</a>
<a href="/radarr/">Radarr</a>
<a href="/prowlarr/">Prowlarr</a>
<a href="/tautulli/">Tautulli</a>
</body>
</html>
Then modify the app service in docker-compose.yml to add the TS_SERVE_CONFIG env var and mount both files:
  app:
    image: tailscale/tailscale:latest
    hostname: app
    environment:
      - TS_AUTHKEY=${TS_AUTHKEY}
      - TS_ROUTES=${TS_ROUTES}
      - TS_USERSPACE=false
      - TS_STATE_DIR=/var/lib/tailscale
      - TS_SERVE_CONFIG=/config/serve.json          # NEW
      - TS_EXTRA_ARGS=--advertise-tags=tag:plex-router
    volumes:
      - ./tailscale-state/app:/var/lib/tailscale
      - ./serve.json:/config/serve.json:ro          # NEW
      - ./index.html:/config/index.html:ro          # NEW
      - /dev/net/tun:/dev/net/tun
    cap_add:
      - NET_ADMIN
      - NET_RAW
    networks:
      plex-private:
        ipv4_address: 172.30.0.2
    restart: unless-stopped
Restart the container so the new config takes effect:
docker compose up -d --force-recreate app
docker compose logs -f app
Watch the logs for cert provisioning. The first start takes 5-30 seconds while Tailscale obtains the Let's Encrypt cert. You should see something like:
serve: started
http: TLS handshake error ... acme: ...
http: TLS handshake error ... acme: ...
serve: TLS certificate obtained for app.YOUR-TAILNET.ts.net
The TLS handshake errors during provisioning are normal — they're Tailscale's ACME client negotiating with Let's Encrypt. Once the "certificate obtained" line appears, you're live.
The *arr apps assume they live at / by default. When Serve proxies /sonarr/... to Sonarr, Sonarr generates internal links starting with /, which then 404. Every *arr app has a URL Base setting that fixes this.
For each app, set its URL Base to match the path prefix Serve uses:
| App | Setting | Value |
|---|---|---|
| Sonarr | Settings → General → URL Base | /sonarr |
| Radarr | Settings → General → URL Base | /radarr |
| Prowlarr | Settings → General → URL Base | /prowlarr |
| Tautulli | Settings → Web Interface → HTTP Root | /tautulli |
Important
The URL Base needs the leading slash (/sonarr, not sonarr). Sonarr and Radarr pick up the change live; Prowlarr and Tautulli usually want a restart. Restart each container after the change to be safe:
docker compose restart sonarr radarr prowlarr tautulliFrom your laptop on the tailnet, open https://app.YOUR-TAILNET.ts.net/ in a browser. You should see the landing page:
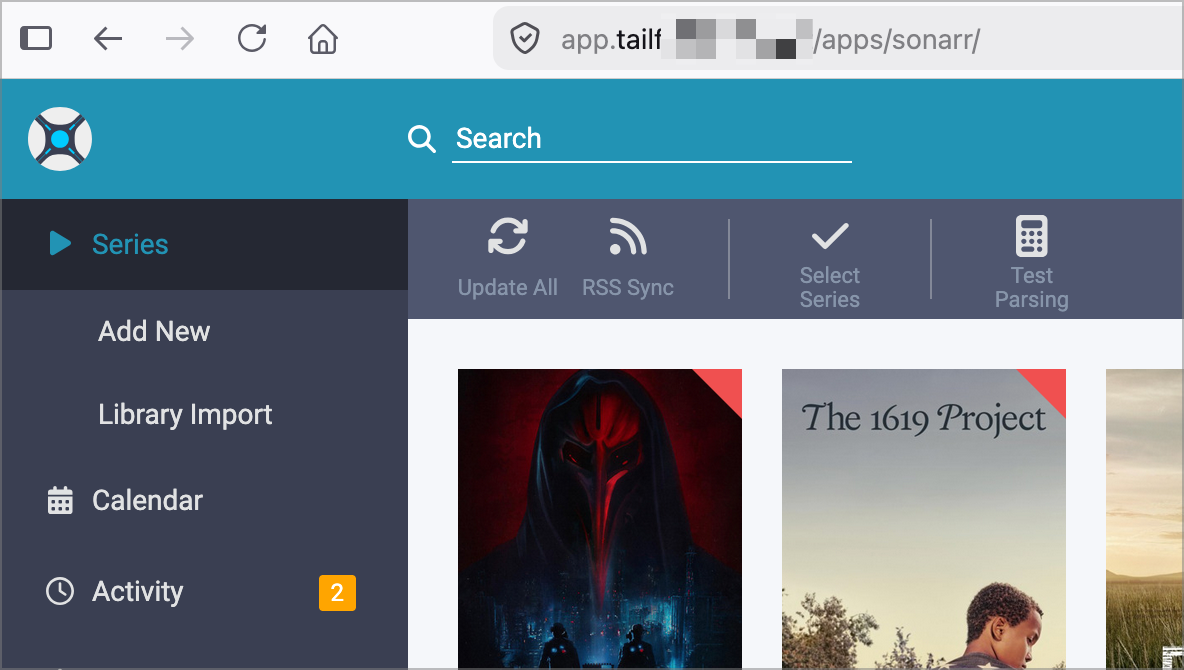
Click through to each app:
https://app.YOUR-TAILNET.ts.net/sonarr/https://app.YOUR-TAILNET.ts.net/radarr/https://app.YOUR-TAILNET.ts.net/prowlarr/https://app.YOUR-TAILNET.ts.net/tautulli/
Each one should load with a valid Let's Encrypt cert (no browser warnings) and the app's actual UI:
If the page loads but CSS is missing or nav links 404, URL Base for that app isn't set correctly. If you get an infinite redirect loop instead, the proxy URL in serve.json doesn't include the path prefix (see the IMPORTANT callout in Step 2).
From a device not on your tailnet, try the same URLs. They should fail to resolve — the *.ts.net hostname doesn't exist outside the tailnet's view. That's the security property: the apps have a real URL, but only tailnet members can reach it.
| Symptom | Likely Cause | Fix |
|---|---|---|
| Browser shows "your connection is not private" or connection times out on port 443 | HTTPS Certificates feature not enabled in admin console | Admin Console → DNS → HTTPS Certificates → Enable. Then restart the app container — Serve doesn't retry cert provisioning automatically after the feature is enabled. |
Infinite redirect loop on /<app>/ URLs (browser shows ERR_TOO_MANY_REDIRECTS) |
Serve strips the matched prefix; the *arr app receives the request at / instead of /<app>/ and keeps redirecting |
Include the path in the proxy target URL: "Proxy": "http://backend:port/sonarr/" instead of "http://backend:port"
|
| Landing page shows raw HTML source instead of rendering |
Text handler serves text/plain, not HTML |
Use a Path handler pointing at an HTML file mounted into the container |
| Cert provisions but page loads with broken CSS / 404 internal links | URL Base not set on the *arr app, or doesn't match the path prefix in serve.json
|
Set URL Base for the affected app, restart its container. The URL Base value, the serve.json prefix, and the path in the proxy URL all have to match. |
| Serve doesn't start at all; container logs show errors about hostname | The Web key in serve.json doesn't exactly match the device's MagicDNS name (case-sensitive!) |
Run tailscale status --self --json | jq -r '.Self.DNSName' on the host and copy the value into serve.json exactly (drop the trailing dot) |
| Loading is slow first time | Tailscale negotiating Let's Encrypt cert | Wait 30 seconds, check docker compose logs app for "certificate obtained" |
| Container logs show "this node is configured as a proxy that exposes an HTTPS endpoint to tailnet... but it is not able to issue TLS certs" | HTTPS Certificates feature not enabled when the container started | Enable HTTPS Certificates in admin console, then restart the container |
End-to-end smoke test once all four phases are complete. The point isn't just "do the apps work" — it's "can I prove the security boundary actually exists?" Run these checks from your laptop on the tailnet AND from a device not on the tailnet (your phone on cellular is the easiest). The differential between the two is the value prop.
-
Nmap your public IP. Only Plex's port should be open:
nmap -p 22,32400,7878,8181,8989,9696 <your.public.ip>
Expected:
32400/tcpopen (Plex), everything else closed or filtered. -
Try to load any app URL in a browser:
https://app.YOUR-TAILNET.ts.net/sonarr/Expected: DNS fails to resolve, or the connection times out. The
.ts.nethostname only exists inside the tailnet's view. There is no public path to this URL.
-
Tailscale SSH into the host:
tailscale ssh root@<your-host-hostname>
Expected: check-mode SSO re-auth in the browser, then a root shell on the host. No SSH key in your terminal.
-
Load each app URL in the browser:
https://app.YOUR-TAILNET.ts.net/sonarr/https://app.YOUR-TAILNET.ts.net/radarr/https://app.YOUR-TAILNET.ts.net/prowlarr/https://app.YOUR-TAILNET.ts.net/tautulli/
Expected: each loads with a valid Let's Encrypt cert (no browser warning) and the app's actual UI.
-
Hit a container by its private IP (proves the subnet router path still works underneath Serve):
curl -I http://172.30.0.10:8989
Expected: an HTTP response (probably a redirect, since Sonarr's UI lives at
/sonarrnow). Proves the subnet router is bridging traffic even though you usually access via Serve.
When all five checks pass, the deployment is solid. If any of them fail, jump to the relevant phase's pitfall table.
At this point, the full stack is up:
- Host is on the tailnet with Tailscale SSH (Phase 1)
- Subnet router exposes the private Docker network to the tailnet (Phase 2)
- ACL controls who reaches what, version-controlled in this repo (Phase 3)
- Serve provides friendly HTTPS URLs with auto-provisioned TLS (Phase 4)
Five public TCP ports became one. Admin UIs that used to be on the internet now aren't. Access is gated by identity, not by passwords. And the whole authorization model is captured in a single file in this repo.
See the Deployment Notes wiki page for real-world gotchas you might hit after the initial deployment.