안드로이드 앱 만들기 #1 (TextView) - 쉽게 앱 만드는 방법 (현직 개발자 설명) , android studio easy tutorial - YouTube
MainActivity.java를 건들이지 않고 activity_main.xml의 내부 코드를 수정 및 작성하여 작업하였다.
초반에 android.support.constraint.ConstraintLayout 을 LinearLayout으로 바꾸었다.
이후 내부에 를 선언하여
<?xml version="1.0" encoding="utf-8"?>
<LinearLayout xmlns:android="http://schemas.android.com/apk/res/android"
    xmlns:app="http://schemas.android.com/apk/res-auto"
    xmlns:tools="http://schemas.android.com/tools"
    android:layout_width="match_parent"
    android:layout_height="match_parent"
    android:orientation="vertical"
    tools:context=".MainActivity">

    <TextView
        android:layout_width="match_parent"
        android:layout_height="wrap_content"
        android:text="인정...?"
        android:textColor="#ff0000"
        android:textSize="40sp" />

    <TextView
        android:layout_width="match_parent"
        android:layout_height="wrap_content"
        android:text="안녕하신지요?"
        android:textColor="#3CBC06"
        android:textSize="20sp" />

</LinearLayout>
다음과 같이 코드를 작성하였다.
    <TextView
        android:layout_width="match_parent"
        android:layout_height="wrap_content"
        android:text="인정...?"
        android:textColor="#ff0000"
        android:textSize="40sp" />
이 부분에서
android:layout_width는 가로 길이 설정, android:layout_height는 세로 길이 설정, android:text는 보여지는 텍스트 설정, android:textColor는 텍스트 색상 설정, android:textSize는 텍스트 크기 설정이다.
EditText & Button에 대해서 배운다.
.java 파일에서는 동적으로, .xml은 정적으로 이루어지는 공간이다.
<?xml version="1.0" encoding="utf-8"?>
<androidx.constraintlayout.widget.ConstraintLayout xmlns:android="http://schemas.android.com/apk/res/android"
    xmlns:app="http://schemas.android.com/apk/res-auto"
    xmlns:tools="http://schemas.android.com/tools"
    android:layout_width="match_parent"
    android:layout_height="match_parent"
    tools:context=".MainActivity">

    <TextView
        android:layout_width="wrap_content"
        android:layout_height="wrap_content"
        android:text="Hello World!"
        app:layout_constraintBottom_toBottomOf="parent"
        app:layout_constraintEnd_toEndOf="parent"
        app:layout_constraintStart_toStartOf="parent"
        app:layout_constraintTop_toTopOf="parent" />

</androidx.constraintlayout.widget.ConstraintLayout>
아이디, 비밀번호를 입력하는 것이 EditText의 용도이다.
버튼의 기능을 하는 것이 Button이다.
<?xml version="1.0" encoding="utf-8"?>
<LinearLayout xmlns:android="http://schemas.android.com/apk/res/android"
    xmlns:app="http://schemas.android.com/apk/res-auto"
    xmlns:tools="http://schemas.android.com/tools"
    android:layout_width="match_parent"
    android:layout_height="match_parent"
    android:orientation="vertical"
    tools:context=".MainActivity">

    <EditText
        android:id="@+id/et_id"
        android:layout_width="300dp"

        android:layout_height="wrap_content"
        android:hint="아이디를 입력하세요..."
        />

    <Button
        android:id="@+id/btn_test"
        android:layout_width="wrap_content"
        android:layout_height="wrap_content"
        android:text="Button 버튼" />

</LinearLayout>
<?xml version="1.0" encoding="utf-8"?>
<LinearLayout xmlns:android="http://schemas.android.com/apk/res/android"
xmlns:app="http://schemas.android.com/apk/res-auto"
xmlns:tools="http://schemas.android.com/tools"
android:layout_width="match_parent"
android:layout_height="match_parent"
android:orientation="vertical"
tools:context=".MainActivity">
<EditText
android:id="@+id/et_id"
android:layout_width="300dp"
android:layout_height="wrap_content"
android:hint="아이디를 입력하세요..."
/>
<Button
android:id="@+id/btn_test"
android:layout_width="wrap_content"
android:layout_height="wrap_content"
android:text="Button 버튼" />
</LinearLayout>
package com.example.edittextandbutton1;

import androidx.appcompat.app.AppCompatActivity;
import android.os.Bundle;
import android.view.View;
import android.widget.Button;
import android.widget.EditText;
public class MainActivity extends AppCompatActivity {

    EditText et_id;
    Button btn_test;

    @Override
    protected void onCreate(Bundle savedInstanceState) {
        super.onCreate(savedInstanceState);
        setContentView(R.layout.activity_main);

        et_id = findViewById(R.id.et_id);
        btn_test = findViewById(R.id.btn_test);

        btn_test.setOnClickListener(new View.OnClickListener() {
            @Override
            public void onClick(View v) {
                et_id.setText("Try this 192");
            }
        });


    }
}
차후 정리합시다. 그리고 집에서 정리해요.
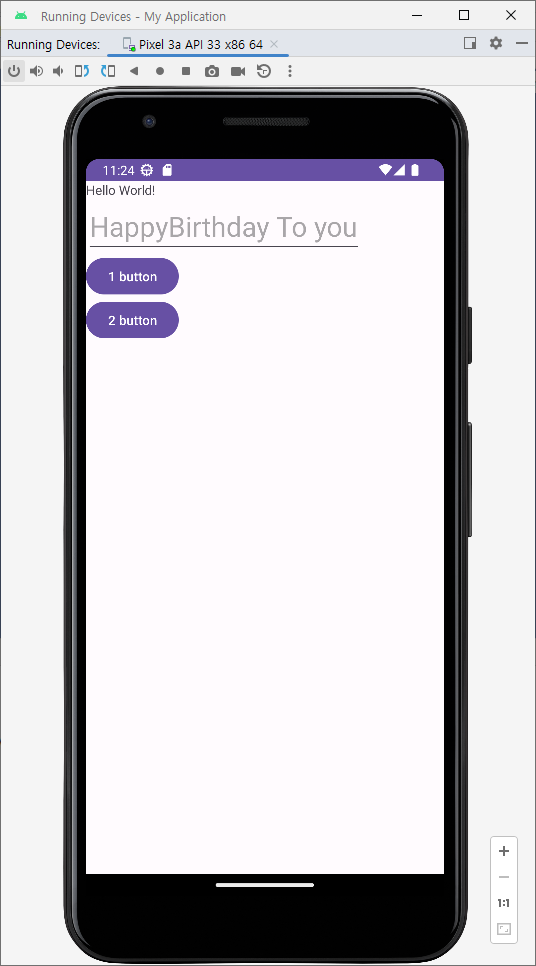
그리고 실제로 작업을 돌려보았습니다.
<?xml version="1.0" encoding="utf-8"?>
<LinearLayout xmlns:android="http://schemas.android.com/apk/res/android"
    xmlns:app="http://schemas.android.com/apk/res-auto"
    xmlns:tools="http://schemas.android.com/tools"
    android:layout_width="match_parent"
    android:layout_height="match_parent"
    android:orientation="vertical"
    tools:context=".MainActivity">

    <TextView
        android:layout_width="wrap_content"
        android:layout_height="wrap_content"
        android:text="Hello World!"
        app:layout_constraintBottom_toBottomOf="parent"
        app:layout_constraintEnd_toEndOf="parent"
        app:layout_constraintStart_toStartOf="parent"
        app:layout_constraintTop_toTopOf="parent" />

    <EditText
        android:id="@+id/et_id"
        android:layout_width="wrap_content"
        android:layout_height="wrap_content"
        android:hint="값을 입력하세요"
        android:textSize="30dp"
        />

    <Button
        android:id="@+id/btn_test"
        android:layout_width="wrap_content"
        android:layout_height="wrap_content"
        android:text="1 button"
        />

    <Button
        android:id="@+id/btn_test1"
        android:layout_width="wrap_content"
        android:layout_height="wrap_content"
        android:text="2 button"
        />

</LinearLayout>
package com.example.myapplication;
import androidx.appcompat.app.AppCompatActivity;
import android.os.Bundle;
import android.view.View;
import android.widget.Button;
import android.widget.EditText;
public class MainActivity extends AppCompatActivity {
EditText et_id;
Button btn_test;
Button btn_test1;
String data ="HappyBirthday To you";
@Override
protected void onCreate(Bundle savedInstanceState) {
super.onCreate(savedInstanceState);
setContentView(R.layout.activity_main);
et_id = findViewById(R.id.et_id);
btn_test = findViewById(R.id.btn_test);
btn_test1 = findViewById(R.id.btn_test1);
btn_test.setOnClickListener(new View.OnClickListener() {
@Override
public void onClick(View v) {
et_id.setText("Yes Try this!!");
}
});
btn_test1.setOnClickListener(new View.OnClickListener() {
@Override
public void onClick(View v) {
et_id.setText("");
et_id.setHint(data);
}
});
}
}