kidoju.widgets.vectordrawing
The objective is to add drawing features to Kidoju as in Microsoft PowerPoint or Google Docs Slide Presentations. There is a difference though: we are not directly drawing to a slide (Kidoju Page). We are drawing on a drawing surface which is then added to the Kidoju stage of a page. All elements drawn on that surface are part of the same image. From a UX perspective, this approach is similar to inserting a drawing canvas in Microsoft Word.
Among the benefits of such an approach:
- a better separation of concerns between vector drawing and the kidoju stage and as a consequence streamlined code;
- the ability to power vector drawing with advanced features like bezier curve anchors and control points.
- the ability to enhance an image with arrows, text and callouts.
The kendo.ui.VectorDrawing widget shall be built with jQuery and Kendo UI professional only, especially using the kendo drawing API. No third party library should be used including D3, RaphaelJS, PaperJS or else.
kendo.ui.VectorDrawing is a custom widget as described in the Kendo UI docs.
The widget targets all web browsers and mobile devices supported by jQuery and Kendo UI (latest versions).
Code should lint with ESLint as we will switch from JSHINT + JSCS.
Check our coding guidelines about asserts, comments and logs.
VERY IMPORTANT: We have a specific technical requirement that the widget should support being embedded in a scaled div (See CSS 2D Transforms), so mouse coordinates should be converted into scaled drawing surface coordinates as implemented in the prototype available at https://github.com/kidoju/Kidoju-Widgets/blob/master/src/kidoju.widgets.vectordrawing.html.
The vector drawing widget is actually two widgets:
- a drawing surface which can be embedded in a scaled div,
- a drawing toolbar which can be located anywhere on the page by targeting a CSS selector in the widget options.
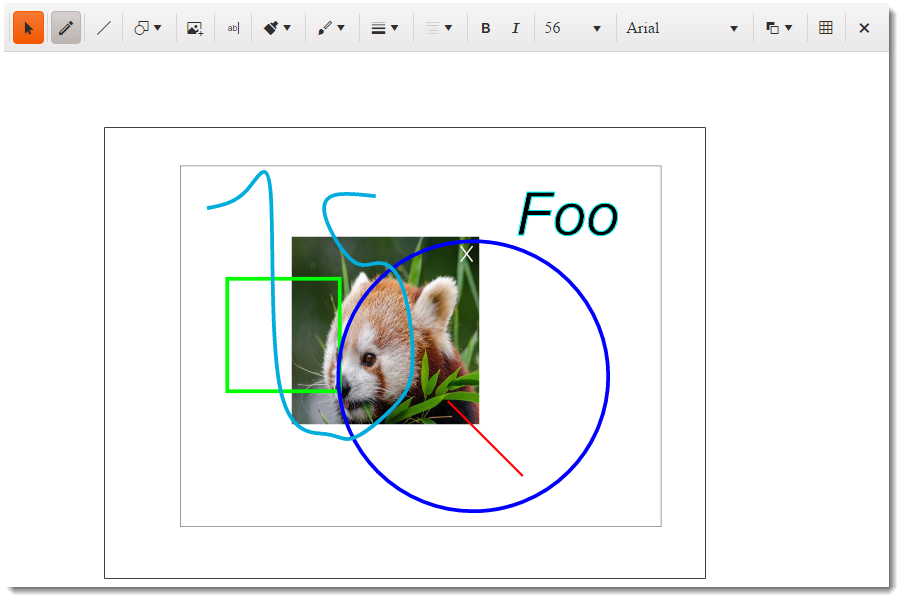
The drawing surface receives mouse/touch events and displays the drawing. In the following requirements:
- mousedown is actually mousedown or touchstart,
- mousemove is actually mousemove or touchmove,
- mouseup is actually mouseup or touchend, considering this widget will not support multitouch (only single touch).
The toolbar comprises the following tools:

- Selection tool
- Pen tool
- Line tool
- Shape tool
- Image tool
- Text tool
- Fill color configuration
- Stroke (border) color configuration
- Stroke (border) width configuration
- Stroke (border) dash type configuration
- Opacity configuration (not represented)
- Bold and Italic configuration
- Text size configuration
- Text font configuration
- Arrange commands (bring to front, send to back)
- Snapping Grid command
- Delete command
Optionally (and not represented), we are considering:
- A crop/clipping command (see below).
- Arrow heads
Any of these tools can be hidden by defining a list of toolbar items on the vector drawing widget in a similar way as the kendo.ui.Spreadsheet widget does.
For future versions, we are also considering:
- Undo Redo
- Cut, Copy, Paste,
- Connectors,
- Layouts as available via the drawing API,
- A zooming command,
- A grouping command,
- A remove transformations command (maybe undo/redo is enough) especially to restore image proportions,
- Union and intersection commands.
The selection tool selects any clicked (mousedown) kendo ui drawing element (path, shape, image, text, ...) on the drawing surface and displays a bounding box (rectangle) with 9 handles:
- n = north
- s = south
- e = east
- w = west
- ne = north-east
- nw = north-west
- se = south-east
- se = souith west
- r = rotation.
Each handle is represented as a white rectangle surrounded by a dark stroke (see Background).

The cursor changes (like Google Docs Slide Presentations):
- inside the selected shape: move
- hovering any x handle: x-resize (preferably should find the best match according to rotation)
- hovering the r handle: crosshair (or better, a custom rotation.cur)
When several elements are piled the select tool selects the front element (last drawn). The arrange tool changes the order to allow the selection of any back element (drawn before). Selecting another tool or clicking an area of the surface without drawing element simply deselects the currently selected element.
Dragging the bounding box translates the corresponding element on the drawing surface.
Dragging the rotation handle rotates the corresponding element on the surface around its center (intersection of bounding box diagonals) by the angle formed between the lines
- element center to handle center
- element center to the surface point under mouseup
Dragging any of the ne, nw, se or sw handles resizes the element on the surface proportionally and the drawing element expands or reduces in size between the handle that is dragged and the diagonally opposite handle which should not move.
Dragging any of the n, s, e and w handles resizes the element respectively on the n-s or w-e axis between the handle that is dragged and the opposite handle which should not move.
Any selection should update the toolbar with the formatting configuration of the selected element (fill, font, opacity and stroke). When not set, kendo UI default options should apply (be careful they are not the same for path, image and text).
Note that the handle box (including handles) should be translated (moved), scaled (resized) and rotated with the corresponding element. In particular we do not want't the behavior of https://www.autodraw.com/ where the handle box does not rotate with the corresponding element.
Such interactions are well known and can be experienced on many web sites including Google Docs slide presentations. The only difference is we want the corner (nw, sw, ne, se) handles to resize elements proportionally as in http://zwibbler.com/ where as the other handles (n, s, e, w) allow resizing without keeping proportions.
Note that translation (already done) and rotation are very easy to implement. Resizing of rotated elements is the complicated part. Algorithms can be found at:
- https://github.com/kidoju/Kidoju-Widgets/blob/master/test/samples/move-resize-rotate.md
- https://github.com/kidoju/Kidoju-Widgets/blob/master/test/samples/move-resize-rotate.html
The pen tool is for free drawing. It is extensively implemented in the existing prototype including simplification and snoothing.
When the pen tool is selected in the toolbar:
- mousedown on the drawing surface starts a path (path.moveTo)
- mousemove on the drawing surface continues the path (path.lineTo)
- mouseup on the drawing surface ends the path and displays a dialog box: Close and fill this path? YES/NO.
Note: We are not keen on the dialog box, so we are open to suggestions as regards optionally closing paths to fill them with color.
Path is drawn with current format configuration options set in the toolbar for stroke and fill.
Paths drawn with the pen tool are simplified and smoothed on mouseup. If algorithms implemented in kendo.drawing.pathex are idempotent, maybe this can be done one mousemove for a better user experience.
After drawing a path with the pen tool (mouseup), the path is selected and the handle box is displayed around it.
The line tool is for drawing shapes made of straight lines.
When the line tool is selected in the toolbar:
- mousedown on the drawing surface starts a line (path.moveTo)
- mousemove does nothing,
- mouseup does nothing,
- another mousedown after 300ms (click) starts a new line (path.lineTo)
- another mousedown within 300ms (double click) ends the current path and displays a dialog box: Close and fill this path? YES/NO.
Note: We are not keen on the dialog box and we are open to suggestions as regards optionally closing paths to fill them with color.
Path is drawn with current format configuration options set in the toolbar for stroke and fill.
After drawing a path with the line tool (mouseup), the path is selected and the handle box is displayed around it.
Although mentioned here, the path modification tool is not part of the toolbar. It is activated by double clicking (double tapping) an existing path. A double click can be handled as two mousedown events within 300ms (on the same drawing element or alternatively within a radius of the first mousedown event).
The path modification tool draws handles on anchors of segments, so that they can be moved to correct a path. The path modification tool also draws handles on control points of segments, so that they can be moved to correct curves. An example of such handles is available at http://jsfiddle.net/m1erickson/98G9F/.
We will abide the following convention (as in Adobe Illustrator and other tools):
- anchor handles are plain dark rectangles (to distinguish them from the handle box handles);
- control point handles are plain dark discs with lines to anchor handles.
See also http://paperjs.org/features/#selection-outlines
TODO: Specify (with scaling and touch devices in mind):
- Adding anchors points,
- Removing anchor points,
- Converting anchor points (add/remove control points)
The shape tool is for adding shapes.
The shape tool displays a pop up with a list of shapes. Selecting one of these shapes, then clicking the drawing surface adds the shape to the drawing surface at the mouse position (top, left).
If the mouseup occurs immediately, the shape is added with a predefined size configured in the widget options. Otherwise, mousemove/mouseup events are used to size the shape as if dragging the se handle. In case of any doubt check Microsoft Powerpoint and Google Docs slide presentations.
These shapes are recorded as paths. Note that there is an obvious benefit in not using drawing.Rect and drawing.Circle to draw rectangles and circles but using drawing.Path instead if we develop the optional Path modification tool.
The image tool is for embedding bitmap images. Clicking the image tool opens our asset manager (kidoju.widgets.assetmanager) to select an image (after possibly uploading it).
Dark/light
The general architecture of an mvvm kendo ui widget is: On mouse down and mouse mouse, draw on screen, On mouse up, persist to bound observable which should trigger the refresh method.
Value or source binding.
Keyboard events are only relevant in selection mode.
Del deletes selected element, Arrows move selected element, Shift + arrows resize selected element around center, Alt/options + r and Page up rotate elements counter clockwise r and page down rotate elements clockwise Plus (+) bring an element forward Minus (-) sends en element backward
Any doubt, consider in the following order: Adobe comp on iOS adobe illustrator.
The opacity in the toolbar applies to the drawing element (stroke and fill). In the future, we might want to apply opacity either to the stroke or to the fill or both.
Kendo UI allows other stroke options which we might want to implement in the future, including lineCap and lineJoin. See http://docs.telerik.com/kendo-ui/api/javascript/drawing/stroke-options.
We need to be able to edit images in the asset manager, including resizing and cropping images. It is not yet clear whether this is the purpose of this widget or another widget.