Installing rock chms
There are a few ways to "install" Rock. If you're a developer, you may want to jump down to the section "For Developers" below.
Download the Rock website zip file here.
TODO: Additional steps are TBD.
These are instructions meant for developers to setup Rock-ChMS in their local dev environment. You'll also need to make sure you've met the requirements. We also did a walk-through-presentation at RefreshCache 2012.
Clone the Rock-ChMS repo or download the latest Rock website zip file, and then unzip it.
Create an empty "RockChMS" database on your local system with a default user (owner) of "RockUser". When you run Update-Database (described below), the EF framework will create all the needed tables and data.
If it does not exist, create an empty web.ConnectionStrings.config file under your RockWeb project. Add a connectionStrings section for a RockContext with the password you created in step 2:
<?xml version="1.0"?>
<connectionStrings>
    <add name="RockContext" connectionString="Data Source=localhost; Initial Catalog=RockChMS;
        User Id=RockUser; password=<PASSWORD>; MultipleActiveResultSets=true"
        providerName="System.Data.SqlClient" />
</connectionStrings>
Replace
<PASSWORD>with the one you created in the Database step above.
If you are developing using the newer SQL Server 2012 LocalDB Edition, you can use the following connection string:
<?xml version="1.0"?>
<connectionStrings>
  <add name="RockContext" connectionString="Server=(localdb)\v11.0; Initial Catalog=RockChMS;
  Integrated Security=true; MultipleActiveResultSets=true" providerName="System.Data.SqlClient" />
</connectionStrings>Start Visual Studio and open the Package Manager Console window and run Update-Database as shown below. Make sure that the Start-up project for your solution is set to RockWeb and your Default project in the package manager is set to Rock as shown here in this screenshot.
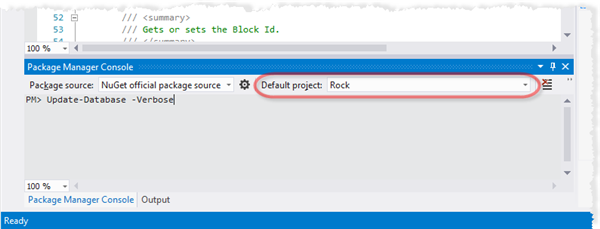
Once you do this, your RockChMS database will have all the required tables and initial seed data required to be able to run Rock as the Administrator user.
In the event that you pull down the lastest
developbranch of Rock, you will probably need to run theUpdate-Databasecommand again. This is needed in order to synchronize your development database with the changes that have been made to the core project.
Press F5 to launch Rock in Debug mode and then login to rock using the default administrator login (admin) and password (admin).
You can create your own stuff as you wish, but if you want to play around with Rock using some fake test data there are some SQL scripts in the Dev Tools\Sql folder that you can run which populate various tables with data. WARNING: Don't run them in your actual, production Rock database unless you want a real mess on your hands. I don't even know if it's wise to run them multiple times, so I would not do that either. I might recommend you try executing the following in this order:
- Populate_Plethora_of_Person_wRandomNames.sql
- Populate_Groups.sql
- Populate_Three_Families.sql
- Populate_WorkflowTypeAndCategory.sql
- Populate_Checkin_Data.sql
- Populate_DataViewCategory.sql
- Populate_ReportCategory.sql
- Populate_MarketingCampaignAds.sql