Basic Installation Guide using Docker for Score Application Release 1.1.2 and up
This document is a deployment guide for Score using Docker.
This guide is targeted at novice users who need basic deployment configuration.
- To install Score using Docker, a user requires a Docker Hub account with permission to access oagi1docker repositories.
If the account does not have permission to access the repositories, this link oagi1docker will not show any repository when it is opened. Please email member.services@oagi.org to request permission.
- To install Score using Docker, the user needs to have Docker Desktop Edition. For more advanced installation scenarios, you might prefer to use Docker Compose, which is available as a plugin for Linux, and as a standalone (deprecated) product for Linux and Windows Server.
As of June 2019, the free Docker CE supports most host operating systems for desktop users such as Windows, Mac, and popular Linux distributions. However, there are other options; Docker Toolbox, and Docker EE (Enterprise Edition). Docker Toolbox is a legacy solution for older operating systems that do not meet the requirements of Docker CE, and Docker EE (Enterprise Edition) is designed for enterprise development. See Docker Docs for details. It is recommended that Docker Toolbox be avoided as it has been deprecated.
Release 1.1.2 of the application uses four containers that interact as shown in the figure below.
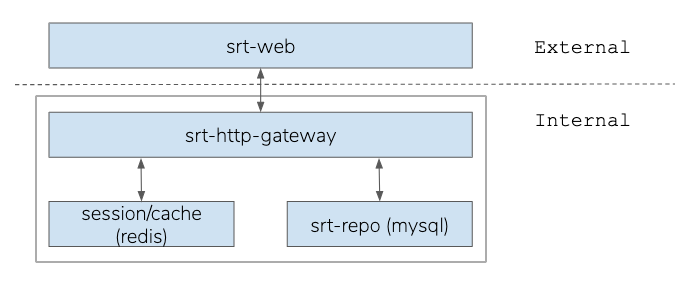
The simple approach to handle with multiple containers in the same context is to use the docker-compose tool. The following is an example of the compose file for deploying Score.
version: "3.0"
services:
  frontend:
    image: oagi1docker/srt-web:3.5.2
    ports:
      - 4200:4200
    links:
      - backend
    environment:
      - GATEWAY_HOST=backend
      - GATEWAY_PORT=8080
    depends_on:
      - backend

  backend:
    image: oagi1docker/srt-http-gateway:3.5.2
    ports:
      - 8080:8080
    links:
      - db
      - redis
    environment:
      - DB_HOST=db
      - DB_PORT=3306
      - REDIS_HOST=redis
      - REDIS_PORT=6379
      - JAVA_OPTS="-Xmx4096m"
    depends_on:
      - db
      - redis
    deploy:
      resources:
        limits:
          memory: 8192M
        reservations:
          memory: 8192M

  db:
    image: oagi1docker/srt-repo:3.5.2
    ports:
      - 3306:3306
    volumes:
      - db-volume:/var/lib/mysql

  redis:
    image: redis:7.4
    ports:
      - 6379:6379
    volumes:
      - redis-volume:/data

volumes:
  db-volume:
  redis-volume:
Using a text editor, create a file named docker-compose.yml with the content above. Start your Docker Engine. Change directory to where your yml file is. From that directory, start up the application by executing docker-compose up command. If you are running the Docker Desktop application, you'll need to enable the Docker Terminal and change the directory to where you hml file is, and then execute the docker-compose up command.
It may take a while for all of the docker images to download and start running.
Note: Score release 1.1.2 database is compatible with the prior release 1.1.1.2d. In other words, switching between release 1.1.2 and 1.1.1.2d web applications is possible. This is possibly useful if the new 1.1.2 release prevented you from completing tasks you were able to do with 1.1.1.2d. If you expect to switch between the releases, please read the next Updating section before executing the docker-compose.
$ docker-compose up
Creating network "srt_default" with the default driver
Creating srt_db_1    ... done
Creating srt_redis_1 ... done
Creating srt_backend_1 ... done
Creating srt_frontend_1     ... done
Attaching to srt_redis_1, srt_db_1, srt_backend_1, srt_frontend_1
redis_1    | 1:M 25 Apr 18:32:23.679 * The server is now ready to accept connections on port 6379
db_1       | [Entrypoint] Initializing database
backend_1  | 25-Apr-2019 18:33:01.499 INFO [main] org.apache.catalina.startup.Catalina.start Server startup in 34220 ms
After installation: (Since Score 2.1) To continuously upgrade the developer core components, distinguish between end-user core components and developer core components. Download the After installation script and execute to the Score database.
Here's the guide for Connect to Score database.
Type http://localhost:4200 in your browser to check the application is running. The default credentials are Username = "oagis" and Password = "oagis".
Release 1.1.2 and 1.1.1.2d uses the same database schema, so you can switch the web applications between the two releases. If you are running release 1.1.1.2d and would like to be able to run it again, there are two strategies. 1) Use only one yml file with the default name docker-compose.yml. 2) Uses two yml files, one for starting 1.1.2 and the other for starting 1.1.1.2d.
In the case of using one yml file, you need to keep updating yml file when switching between the releases as shown in the diff file below assuming you are starting from the yml file for 1.1.1.2d. In this case, you can use docker-compose up command to start the application.
In the case of keeping two yml file, you may name the yml file containing release 1.1.2 compose script above as docker-compose-v1.1.2.yml, and rename the existing yml file for the 1.1.1.2d release as docker-compose-v1.1.1.2d.yml. Then to start the application in a specific release, execute docker-compose with the --file option as.
$ docker-compose --file docker-compose-v1.1.1.2d.yml up
...

$ docker-compose --file docker-compose-v1.1.2.yml up
...
Diff file:
version: "3.0"
services:
  db:
    image: oagi1docker/srt-repo:1.1.1.2d-mysql
    ports:
      - 3306:3306
+   volumes:
+     - db-volume:/var/lib/mysql

  web:
-   image: oagi1docker/srt-web:1.1.1.2d-mysql
+   image: oagi1docker/srt-web:1.1.2
    ports:
-     - 8080:8080
+     - 4200:80
    links:
-     - db:srt-repo
+     - backend
    depends_on:
-     - db
+     - backend
+   environment:
+     - GATEWAY_HOST=backend
+     - GATEWAY_PORT=8080

+ backend:
+   image: oagi1docker/srt-http-gateway:1.1.2
+   ports:
+     - 8080:8080
+   links:
+     - db
+     - redis
+   environment:
+     - DB_HOST=db
+     - DB_PORT=3306
+     - REDIS_HOST=redis
+     - REDIS_PORT=6379
+   depends_on:
+     - db
+     - redis

+ redis:
+   image: redis:6
+   ports:
+     - 6379:6379
+   volumes:
+     - redis-volume:/data

+ volumes:
+   db-volume:
+ redis-volume:Caveat:
- It is recommended that you don't have two web applications running at the same time and switching them during creating or updating an entity.
-
docker-composecreates containers with the default prefix using the working directory name. For example, if the compose file is located at thesrtdirectory, every container's name has thesrt_prefix. If you do not have knowledge of managing volumes or naming containers, we recommend that you never change the directory location and its name where the compose files locate.
For some other tips on starting, ending, or deleting containers, visit the previous deployment guide..