一切开始前先检查自己的onnx版本
pip list | grep onnx期待的4个主要的SDK是
onnx                          1.14.0
onnx-graphsurgeon             0.3.27
onnxruntime                   1.15.1
onnxsim 0.4.33定义一个模型, 这个模型实质上是一个线性层 (nn.Linear)。线性层执行的操作是 y = x * W^T + b,其中 x 是输入,W 是权重,b 是偏置。
class Model(torch.nn.Module):
    def __init__(self, in_features, out_features, weights, bias=False):
        super().__init__()
        self.linear = nn.Linear(in_features, out_features, bias)
        with torch.no_grad():
            self.linear.weight.copy_(weights)

    def forward(self, x):
        x = self.linear(x)
        return x
定义一个infer的case, 权重的形状通常为 (out_features, in_features),这里复习一下矩阵相乘, 这里的in_features(X)的shape是[4], 而我们希望模型输出的是[3], 那么y = x * W^T + b可以知道W^T需要是[4, 3], nn.Linear会帮我们转置, 所以这里的W的shape是[3, 4]
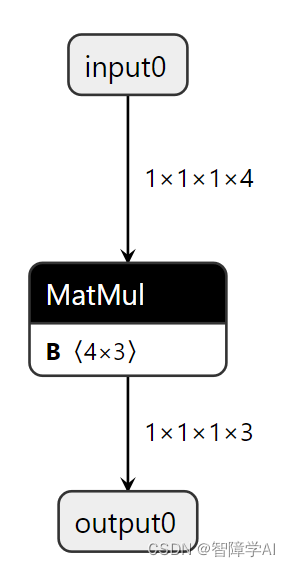
def infer():
    in_features = torch.tensor([1, 2, 3, 4], dtype=torch.float32)
    weights = torch.tensor([
        [1, 2, 3, 4],
        [2, 3, 4, 5],
        [3, 4, 5, 6]
    ],dtype=torch.float32)

    model = Model(4, 3, weights)
    x = model(in_features)
print("result is: ", x)这里就是infer完了之后export onnx, 重点看一下这里的参数,
-
model (torch.nn.Module): 需要导出的PyTorch模型,它应该是
torch.nn.Module的一个实例。 -
args (tuple or Tensor): 一个元组,其中包含传递给模型的输入张量,用于确定ONNX图的结构。在您的代码中,您传递了一个包含一个张量的元组,这指示您的模型接受单个输入。
-
f (str): 要保存导出模型的文件路径。在您的代码中,该模型将被保存到“../models/example.onnx”路径。
-
input_names (list of str): 输入节点的名字的列表。这些名字可以用于标识ONNX图中的输入节点。在您的代码中,您有一个名为“input0”的输入。
-
output_names (list of str): 输出节点的名字的列表。这些名字可以用于标识ONNX图中的输出节点。在您的代码中,您有一个名为“output0”的输出。
-
opset_version (int): 用于导出模型的ONNX操作集版本。
def export_onnx():
    input   = torch.zeros(1, 1, 1, 4)
    weights = torch.tensor([
        [1, 2, 3, 4],
        [2, 3, 4, 5],
        [3, 4, 5, 6]
    ],dtype=torch.float32)
    model   = Model(4, 3, weights)
    model.eval() #添加eval防止权重继续更新

    # pytorch导出onnx的方式,参数有很多,也可以支持动态size
    # 我们先做一些最基本的导出,从netron学习一下导出的onnx都有那些东西
    torch.onnx.export(
        model         = model,
        args          = (input,),
        f             = "../models/example.onnx",
        input_names   = ["input0"],
        output_names  = ["output0"],
        opset_version = 12)
print("Finished onnx export")当然可以。以下是torch.onnx.export函数中参数的解释:
torch.onnx.export(
    model         = model,
    args          = (input,),
    f             = "../models/example.onnx",
    input_names   = ["input0"],
    output_names  = ["output0"],
    opset_version = 12)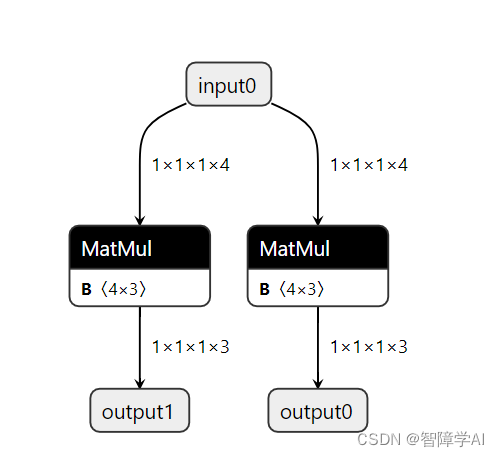
模型的定义上就要有多个
class Model(torch.nn.Module):
    def __init__(self, in_features, out_features, weights1, weights2, bias=False):
        super().__init__()
        self.linear1 = nn.Linear(in_features, out_features, bias)
        self.linear2 = nn.Linear(in_features, out_features, bias)
        with torch.no_grad():
            self.linear1.weight.copy_(weights1)
            self.linear2.weight.copy_(weights2)


    def forward(self, x):
        x1 = self.linear1(x)
        x2 = self.linear2(x)
        return x1, x2
输出的时候只要更改output_names的参数就可以了
def export_onnx():
    input    = torch.zeros(1, 1, 1, 4)
    weights1 = torch.tensor([
        [1, 2, 3, 4],
        [2, 3, 4, 5],
        [3, 4, 5, 6]
    ],dtype=torch.float32)
    weights2 = torch.tensor([
        [2, 3, 4, 5],
        [3, 4, 5, 6],
        [4, 5, 6, 7]
    ],dtype=torch.float32)
    model   = Model(4, 3, weights1, weights2)
    model.eval() #添加eval防止权重继续更新

    # pytorch导出onnx的方式,参数有很多,也可以支持动态size
    torch.onnx.export(
        model         = model,
        args          = (input,),
        f             = "../models/example_two_head.onnx",
        input_names   = ["input0"],
        output_names  = ["output0", "output1"],
        opset_version = 12)
    print("Finished onnx export")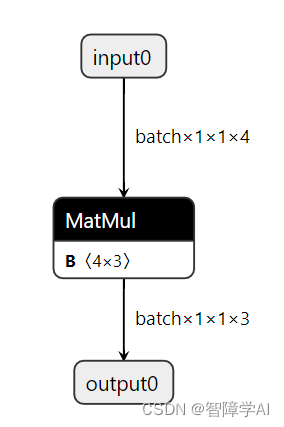
model定义跟之前的一样的,就是后面加了要给动态轴, 告诉ONNX运行时, 第0维(通常是批处理维)可以是动态的,意味着它可以在运行时更改
同时,输出的维度通常是依赖于输入的维度的,所以这里输出也是动态的
torch.onnx.export(
    model         = model,
    args          = (input,),
    f             = "../models/example_dynamic_shape.onnx",
    input_names   = ["input0"],
    output_names  = ["output0"],
    dynamic_axes  = {
        'input0':  {0: 'batch'},
        'output0': {0: 'batch'}
    },
    opset_version = 12)
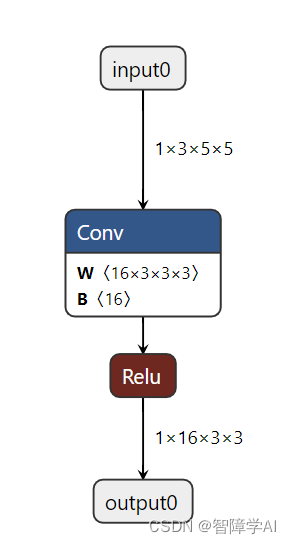
print("Finished onnx export")重点看一下这里,这里的BN是被conv合并了的,torch导出的时候自动做了合并
import torch
import torch.nn as nn
import torch.onnx

class Model(torch.nn.Module):
    def __init__(self):
        super().__init__()
        self.conv1 = nn.Conv2d(in_channels=3, out_channels=16, kernel_size=3)
        self.bn1   = nn.BatchNorm2d(num_features=16)
        self.act1  = nn.ReLU()

    def forward(self, x):
        x = self.conv1(x)
        x = self.bn1(x)
        x = self.act1(x)
        return x

def export_norm_onnx():
    input   = torch.rand(1, 3, 5, 5)
    model   = Model()
    model.eval()

    # 通过这个案例,我们一起学习一下onnx导出的时候,其实有一些节点已经被融合了
    # 思考一下为什么batchNorm不见了
    file    = "../models/sample-cbr.onnx"
    torch.onnx.export(
        model         = model,
        args          = (input,),
        f             = file,
        input_names   = ["input0"],
        output_names  = ["output0"],
        opset_version = 15)
    print("Finished normal onnx export")

if __name__ == "__main__":
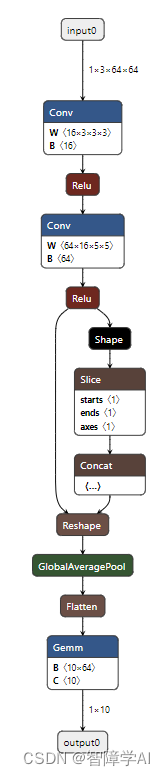
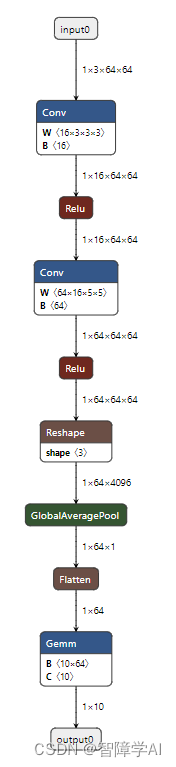
export_norm_onnx()在工程上一个比较好的做法就是直接用onnxsim这个工具就可以了, 举个例子, 在onnx里面没有很好的torch.flatten的支持, onnx就直接把flatten的计算过程以节点的形式体现了出来(图一),这样子的话就会有更多的节点, 计算图就很麻烦了, 用了onnxsim之后就把他们融合成一个节点,也就是Reshape(图二)
# 理解onnx中的组织结构
#   - ModelProto (描述的是整个模型的信息)
#   --- GraphProto (描述的是整个网络的信息)
#   ------ NodeProto (描述的是各个计算节点,比如conv, linear)
#   ------ TensorProto (描述的是tensor的信息,主要包括权重)
#   ------ ValueInfoProto (描述的是input/output信息)
# ------ AttributeProto (描述的是node节点的各种属性信息)碰到onnx导出的算子不支持还是比较常见的, 解决的办法有从简单到复杂
- 调整opt的版本, 这里从https://github.com/onnx/onnx/blob/main/docs/Operators.md可以找到哪些算子在哪些opt被支持
- 更改onnx的算子排列组合
- 注册算子
- 有些是onnx的doc里面有的但是并没有和torch绑定
- onnx的doc没有实现的, 后面需要自己写插件去实现相关功能
- 使用了onnx-surgeon修改onnx, 创建plugin
- onnx的doc里面有的但是并没有和torch绑定
asinh在torch里面有在onnx文档里面显示opt9以上就支持了, 但是没有跟onnx绑定所以会出错, 因为没有绑定,下面看torch里面写好的绑定案例
@_onnx_symbolic("aten::reshape_as")
@symbolic_helper.quantized_args(True)
@_beartype.beartype
def reshape_as(g: jit_utils.GraphContext, self, other):
    shape = g.op("Shape", other)
    return reshape(g, self, shape)
这里关注_onnx_symbolic, 这个负责绑定ONNX的aten命名空间下算子上。可以在这里看到asinh是没有写的,我们就自己写一个_onnx_symbolic绑定我们ONNX的计算图(g.op)
# 创建一个asinh算子的symblic,符号函数,用来登记
# 符号函数内部调用g.op, 为onnx计算图添加Asinh算子
#   g: 就是graph,计算图
#   也就是说,在计算图中添加onnx算子
#   由于我们已经知道Asinh在onnx是有实现的,所以我们只要在g.op调用这个op的名字就好了
#   symblic的参数需要与Pytorch的asinh接口函数的参数对齐
#       def asinh(input: Tensor, *, out: Optional[Tensor]=None) -> Tensor: ...
def asinh_symbolic(g, input, *, out=None):
    return g.op("Asinh", input)

# 在这里,将asinh_symbolic这个符号函数,与PyTorch的asinh算子绑定。也就是所谓的“注册算子”
# asinh是在名为aten的一个c++命名空间下进行实现的

# 那么aten是什么呢?
# aten是"a Tensor Library"的缩写,是一个实现张量运算的C++库
register_custom_op_symbolic('aten::asinh', asinh_symbolic, 12)
这里也需要做一个验证, 用onnxruntime和torch去对比, 精度对齐才能说明成功了。
def validate_onnx():
    input = torch.rand(1, 5)

    # PyTorch的推理
    model = Model()
    x     = model(input)
    print("result from Pytorch is :", x)

    # onnxruntime的推理
    sess  = onnxruntime.InferenceSession('../models/sample-asinh2.onnx')
    x     = sess.run(None, {'input0': input.numpy()})
print("result from onnx is: ", x)-
自定义算子
-
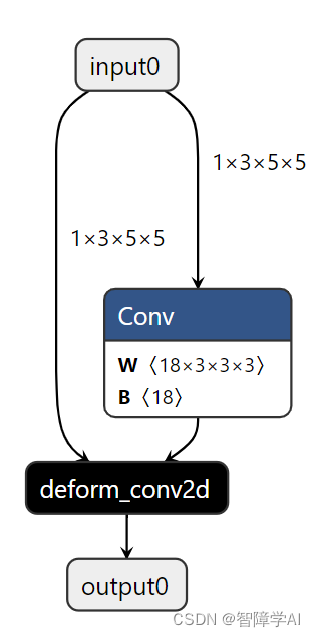
对于不支持的算子,如何自定义算子 DeformConv2d并不支持, 但是可以写一个customers先导出再用TensorRT Plugin实现
@parse_args("v", "v", "v", "v", "v", "i", "i", "i", "i", "i","i", "i", "i", "none")
def dcn_symbolic(
        g,
        input,
        weight,
        offset,
        mask,
        bias,
        stride_h, stride_w,
        pad_h, pad_w,
        dil_h, dil_w,
        n_weight_grps,
        n_offset_grps,
        use_mask):
    return g.op("custom::deform_conv2d", input, offset)

register_custom_op_symbolic("torchvision::deform_conv2d", dcn_symbolic, 12)
结果图
简称gs, 可以理解为是onnx.helper更上层的封装, 类似onnx中symbolic, 有点像CUDA Driver和CUDA Runtime, 比较方便修改创建onnx
- gs创建的onnx