- Buy 4 Poke Balls
- Get the hidden Tree Potion
- Get the Antidote
- Weedle [1-4 Potion, 1-6 on good pace]
- TW x2 + spam Tackle
- Swap Squirtle and Nido
- 1-11 HP: Potion Squirtle
- 12+ HP: Don't Heal
- Antidote (use or toss)
- Buy 8 Potions
- Geodude: [1-7 Potion]
- Swap + Bubble spam
- Onix: [1-6 Potion; 1-13 after Screech]
- Swap + Bubble spam
- (TW x2 if turn-1-Bide)
Options: Battle Style to Set before leaving Brock's gym
- Caterpie:
- Leer + HA x2
- Weedle: [1-9 Potion]
- Leer + Tackle x3
- Caterpie:
- Leer + Tackle + HA
- Potion to 28+ HP
- Rattata: [1-9 Potion; 1-15 if @-1 (or on good pace)]
- Leer + HA x2
- Ekans: [1-3 HP: Potion; 1-4 if @-1; 1-5 @-2]
- Leer + HA x2
- Potion immediately if hit by Wrap and dead to a 5 turn
BC2 Weedle:
If decent HA roll into SS, then Tackle Turn 2.
Always Tackle turn 2 if HP is as shown below (favorable range)
Use HA turn 2 whenever in doubt.

- Weedle: HA x2
- Kakuna: HA x2-3 + Tackle x1-2
- Caterpie: [1-3 Potion]
- HA x2
- Tackle turn 2 only if 2 SS before 1st HA hits
- Metapod: HA x2 + Tackle
1-3 HP: Potion before the next fight
- Caterpie: HA x2
- Metapod: HA x3-4 + Tackle x1-2
- L8 Pidgey: Leer + Tackle
- Any other Bird: Tackle
- Heal to 36+ HP before saving.
- Do Leo's Moon Manip (Hold a palette swap)
Grogir's Backup (Hold A on Bios)

- Rattata: [1-9 Potion]
- HA x2 (+PS)
- Zubat:
- 3 HA: HA x3
- 2 HA: Leer + HA x2
- 1 HA: Leer + Tackle + HA
| DEF | Not confused | Confused |
|---|---|---|
| -0 | 1-7 | 1-16 |
| -1 | 1-11 | 1-26 |
| -2 | 1-13 | yolo |
Menu 1-2 steps after defeating Moon Man:
- Toss Pokeballs (if you haven't already & have a Paras)
- use Rare Candy
- teach TM12 (WG) over Tackle (slot 2)
- use Moon Stone
- teach TM01 (MP) over Leer (slot 1)
If you encounter a Paras or a Geodude, KO it for EXP (PS for Paras, WG for Geodude).
This Moon EXP will improve Bridge ranges, let you HA both Bridge Zubat, + usually Thrash 2nd Oddish before Bill.
- Grimer:
- MP + WG (or MP/HA)
- Voltorb:
- MP + PS
- Koffing:
- MP x2 or HA + MP
- WG turn 2 if turn 1 crit
If you still need Paras: Post Nerd Backup Paras
- Use the same intro buffer as Route 3 Manip (Hold a palette swap)


- Use the Center and get Instant Text.
- Pick up the hidden Rare Candy
- Pidgeotto:
- HA x2 + HA or MP
- Abra: HA
- Rat: MP
- Bulba: MP + HA (or MP if growl)
BC:
- MP (+ PS)
- MP (or HA if hit by String Shot)
Lass:
- MP (+ PS)
- HA x2
Youngster:
- MP
- MP (+ PS)
- MP (or HA w/ Moon Exp)
Lass:
- MP (+ PS)
- HA x2
| HP | Strategy |
|---|---|
| 1-7 | MP (+PS) or Potion turn 1 (do not reget IT) |
| 8-15 | HA + HA/PS or MP (+PS) |
| 15+ | HA + HA/PS |
Rocket:
- MP
- MP (or HA w/ Moon Exp)
Bottom Hiker:
- WG
Lass:
- MP
- HA x2
Hiker:
- Geodude 1
- WG
- Geodude 2
- WG
- Machop
- MP (+ PS)
- or HA + PS, if 16-20 HP
- Geodude 3
- WG
1-3 HP: Potion turn 1 on Lass
Lass:
- MP
- HA
- MP (or HA w/Moon Exp)
- Teach Thrash over WG (slot 2)
Center after Bill or Potion to ~65+ HP if good pace (-45 seconds or better)
| HP @ L23 | Risky Healing Strategies |
|---|---|
| 1-14 | 3 Potion |
| 15-34 | 2 Potion |
| 35-54 | 1 Potion |
Bill Menu:
- Use Slot 1 - Potion x1-3 (or Center)
- Use Slot 5 - Rare Candy
- Use Slot 3 - Escape Rope
- Get Instant Text again.
Dig Rocket: Thrash
Jr Trainer F: Thrash
If somehow under 23 HP, Potion x1 before Misty. Get IT back after Misty.
Misty:
- Staryu: Thrash x1
- Starmie: Thrash x2-3
- Confused after X-Defend --> swap to Bird and let it be KO'd if pace allows otherwise yolo w/ Thrash
- Potion and reget Instant Text
If zero potions left get the hidden Full Restore:
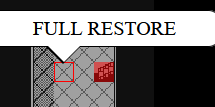
later on, sell Nugget & Full Restore, keep TM34 to take the
place of Potion in the bag for menus

Jr Trainer F: Thrash
Jr Trainer M: Thrash
Before Boat Rival:
- Potion to 13+ HP before Boat Rival (always worth losing IT to not be mega dead)
- Pidgeotto:
- HA x2
- Raticate:
- 1-6 HP: Potion
- 7-22 HP: MP (or Thrash if only 0-1 MP left)
- 23+ HP: HA x2
- Kadabra:
- 1-6 HP: HA Kadabra & Potion turn 1 on Ivysaur, then Thrash Ivy
- 7+ HP: Thrash
- Ivy:
- Thrash x2
Talk to the Captain to get HM01.
Depending of your HP, you may fight the Gentleman in the 3rd Cabin from the Right with Thrash then pick up the Rare Candy
| HP | Strategy |
|---|---|
| under 9 | Gentleman Candy (3rd door from the Right side) |
- Sell
- S2 TM34
- S3 Nugget
- (S7 Full Restore, if you have it)
- Buy
- 6 Repel
- 3 Parlyz Heal
- Teach TM11 (BB) over Slot 4 (PS)
- use Rare Candy, if you fought the Gentleman
- Teach HM01 (Cut) to Paras
- Up 1 - Teach TM28 (Dig) to Paras
- Use Cut
- Voltorb:
- 1-20 HP: Thrash
- 21-24 HP: HA + BB
- 25+ HP: BB x2
- Pikachu:
- Thrash
- Pika QA is 4 reg or 6-7 crit
- Raichu:
- Thrash x2
- Swap to Bird or Squirtle only if dead to hit self (see below)
| Surge's Raichu | Hit Self | w/gentleman candy |
|---|---|---|
| 14 | 15 | |
| w/Growl | 9 | 10 |
| w/Screech | 29 | 31 |
| w/Screech & Growl | 17 | 18 |
Exit gym, Cut the tree, get the Bike Voucher, and Dig out.
- Get the Bike and exit shop.
- Swap Slot 1 - Potion, d7 w/ Bike
- Up 1 Teach TM24 (TB) over Slot 3 (HA)
- Bike
- MP
- Thrash x3
| HP | Strategy |
|---|---|
| 1-14 | BB + Thrash |
| 15-19 | BB x4 |
| 20+ | BB + Thrash |
Quick Reference
Slot 5: Repel
Slot 6: Parlyz Heal
Slot 7: Potion
| HP @ L28 | Strategy |
|---|---|
| 1-19 | play normal |
| 20-22 | 1st Slowpoke: BB + TB |
| 23-27 | 1st Slowpoke: Thrash |
| 28-38 | Cubone: TB + BB |
| 39-43 | 1st Slowpoke: BB x2 + TB |
| 44+ | TB Cubone and Thrash Slowpoke |
23-31 HP: If you crit 1st slowpoke (@ 23-27) or got Cubone Bone Club Miss turn 1 (@28-31),
then Strategy = 2nd Slowpoke: BB + TB

- Pokemaniac 1: BB, TB
- Pokemaniac 2: TB
- 1-17 or 23+ HP ---> Thrash turn 1
- 18-22 HP ---> TB + Thrash
- Sleep ---> 1-13 HP: Potion
- Para'd ---> keep Thrashing, but 1-14 HP: Potion
- Do not Para Heal in fight, use it in the next Repel Menu instead.
1-5 HP: Potion before Jr. Trainer (to live reg QA)
Get the hidden Max Ether
1-4 HP: Potion before Gambler
Gambler:
- Growlithe: BB (+ Thrash)
- Vulpix: Thrash
- Get the hidden Elixer
- Get the hidden Nugget
If you fought Gentleman, you can buy +1 X Accuracy
Celadon Mart:
- Floor 2:
- Buy TM07
- 7 Super Repels
- 4 Super Potions
- Floor 4:
- Poke Doll
- Roof:
- Soda Pop and trade it to the girl
- Fresh Water
- Floor 5:
- 11 X Accuracy
- 5 X Special
- 3 X Speed
Take the elevator and get HM02 (Fly)
- Helix w/ TM07
- D1 use Super Repel
- D4 teach TM48 (RS) over Slot 1 (MP)
- Swap S.S.Ticket D13 w/ X Accuracy
- D3 Teach HM02 to bird
- Fly (D3) to Lavender
Lavender Tower Rival:
Pidgeotto QA is reg 7-8; crit 15-17 (ignoring 1/39 rolls)
Avoid using your last potion, either yolo or use Super Potion instead.
- Pidgeotto:
- 1-8 HP: Potion, (Up 4 X Accuracy only if Sand attack hits), TB
- 9+ HP: TB
- Gyarados: TB
- Growlithe: (1-8 HP: Potion), BB
- Kadabra: Thrash x1
- Ivy: Thrash x2
Channeler 1: RS x2
Get the Elixer and the hidden Elixer.
Channeler 2: RS
Channeler 3: RS
Get the Rare Candy
Menu before Ghost:
- S2 - teach TM07 (HD) over Slot 1 (RS)
Ghost Encounter:
- Swap S3 HM01 d7 w/ Super Repels
- d3 use Poke Doll
Rocket 1:
- TB, TB, TB (+ BB)
Rocket 2:
- X Accuracy + HD x2
Rocket 3:
- TB, TB, Thrash
Get the Poke Flute and Fly (D1) to Celadon.
- Use the Pokemon Center
- Then Bike East into Saffron City
Enter Silph Co and take the stairs to the 5th Floor
- Get the hidden tree Elixer
Rocket w/Arbok:
- Thrash x2-3
If under ~80 HP and Parlyzed: Menu + use Parlyz Heal Slot 5 before the next fight.
otherwise: delay using Para Heal until in the next fight.
Get the Card Key
Rival:
- Pidgeot:
- X Accuracy
- (+ Parlyz Heal, if needed)
- d13 - X Speed (3 below Revive)
- HD x5
If under 78 HP, then Menu before the next fight:
use Slot 8 - Elixer (3 below Parlyz Heal)Silph Rocket - under 78 HP:
- Cubone: X-Accuracy + BB
- Drowzee: HD
- Marowak: HD
Silph Rocket - with 78+ HP:
- Cubone:
- X Accuracy
- if Bone Club hits, then use Elixer (3 below Parlyz Heal)
- BB
- Drowzee:
- use Elixer (3 below Parlyz Heal) [if you haven't already]
- HD
- Marowak:
- HD
Consider healing to 16+ HP if needed, but don't use your last potion.
Giovanni:
- X Accuracy + HD
- HD
- Rhyhorn: BB
- HD
Go back to the elevator and go to the 10th Floor to get TM26 (Earthquake) and the Rare Candy
Dig out w/ Paras
- Bike West to Snorlax
Menu before Snorlax:
- Slot 4 - Repel
- swap Parlyz Heal d11 w/ Rare Candy
- use Poke Flute
- Get the hidden Rare Candy
EQ Menu:
- Slot 4 - Repel
- swap Potion w/ X Special
- d5 teach TM26 (EQ) over Slot 2 (Thrash)
- Use Bike
if we ran out of either potions or para heals after Surge, then modify EQ Menu as follows:
S4 - Repel, d4 swap Helix w/ X-Special, teach TM26 (EQ) over S2 (Thrash)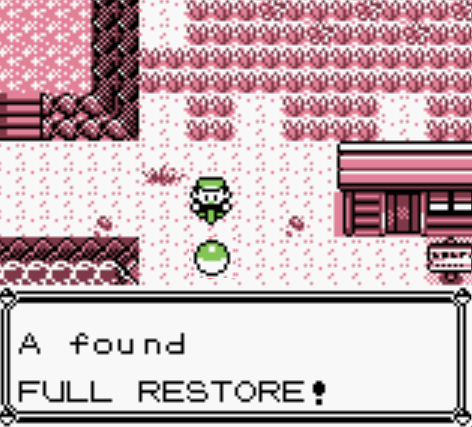
in this case, pick up Safari Full Restore to fill the bag space

-
Use Super Repel in Zone 2 around the tile shown below:
-
-
Pick up the Gold Teeth and get HM03 (Surf) in the house.
-
Exit the house, Dig out of the Safari Zone
-
Fly (D2) back to Fuschia City, and walk into the gym.

Juggler 1:
- EQ x4
Consider healing to 47+ HP.
Juggler 2:
- Drowzee: EQ
- Hypno: EQ + TB (if TB is disabled, then finish with EQ or BB)
Koga:
- EQ x3
- Weezing:
- Elixer (3 below Rare Candy)
- If X Attack, spam Bubblebeam until Self Destruct
- Elixer (3 below Rare Candy)
| HP after SD on Koga | Red Bar Lost on... | Overview of Strategy |
|---|---|---|
| 0-1 | Bruno's Machamp | Normal Strats |
| 2-6 | Lorelei's Lapras / Cloyster | Normal until Bruno; Use Max Ether turn 2 on Onix |
| 7-14 | BB's Machop / VR's Growlithe | X Special on Giovanni's Nidoking |
| 15-22 | Blaine's Rapidash | Poké Flute on Vileplume |
| 23+ | Beauty's Exeggcute | Poké Flute on Victreebel |
Candy Menu (after exiting Koga's Gym):
- Slot 5 - Use all Rare Candies
- Bike East to get Strength
- Fly to Pallet Town
Walk to the bottom left, face the water, and Menu.
Surf Menu:
- Super Repel
- d5 swap Helix Fossil d5 w/ X Speed
- d5 teach HM03 (Surf) to Squirtle
- use Surf
- Pick up TM14 (Blizzard)
Blizzard Menu:
- d1 teach HM04 (Strength) to Squirtle over Slot 1 (Tackle)
- d1 teach TM14 (Blizz) over Slot 4 (BB)
- Slot 4 - Repel (this is the last repel)
Pick up the Rare Candy and Secret Key.
- Dig out
Bike to the gym, cut the trees.
Beauty:
- Blizz
| HP after Exeggcute | Overview of Strategy for Erika |
|---|---|
| 1-24 | Normal Strats: EQ, Blizz, EQ |
| 25-32 | Poké Flute on Vileplume until hit |
| 33+ | Poké Flute on Victreebel until hit |
| Poké Flute is Slot 15 (2 below HM02) |
Erika:
- EQ
- Blizz
- EQ
Cut the middle tree to exit the gym.
- Fly (D2) back to Cinnabar Island
Quiz answers: A B B B A B
Blaine:
- X Accuracy + EQ
- HD x3
Dig out and Bike East to Sabrina's gym
Puzzle: Diagonal, Diagonal, Down
(i.e. Top Left, Bottom Left, Bottom Left)
Sabrina:
- EQ x4
Walk back to the teleporter and Dig out.
- Fly (U1) to Viridian and Bike to the Gym.
Cooltrainer's Rhyhorn
- EQ
[Save before Blackbelt]
Blackbelt:
- Machoke: X Accuracy + HD
- Machop: Blizz (or EQ if somehow 0 Blizz are left)
- Machoke: HD
Leave the gym to reset the trainer
Take one step up and buffer Start to Menu
Elixer Menu:
- Slot 6 - Elixer
Backup Boom Strats note:
If 27+ HP, then use X Special - Slot 4 turn 1 against Nidoking - Giovanni's 4th Pokemon,
(TB stall if he doesn't hit you), then once hit use EQ and play normal.
Giovanni:
- Rhyhorn: EQ
- Dugtrio: EQ
- Nidoqueen: EQ
- Nidoking: EQ
- Rhydon: Blizz (+ Blizz) (+EQ if only 2 Blizz are left)
Menu after leaving the gym and hopping the ledge:
- Bike
Menu before the Nido grass (cursor is on items):
- Use Super Repel - Slot 3
This next fight (Viridian Rival) is simple in PB attempts since we can:
Turn 1: X Accuracy; Turn 2: X Speed; then Blizz (+TB)
then HD spam the rest
Viridian Rival:
- Pidgeot:
- X Accuracy + X Speed + Blizz (+TB)
- Rhyhorn: HD x5
- Get on Bike.
- When using Surf: Up 1 to Pkmn, D1 to Squirtle, D1 to Surf.
- Pick up the hidden Max Ether from the water.
- Get back on Bike
Menu one step up into cave - "Boulder #1"
- Use Super Repel
- then use Strength
Boulder #2
- Use Strength
Boulder #3
- Use Super Repel
- Use Strength
Boulder #4 after droping through the hole:
- Use Strength.
- d2 use Max Ether on (U1) Nido on Slot 1 (HD)
- u2 use last Super Repel
- Bike
- Deposit Squirtle and Paras
- Dewgong:
- Swap to the bird turn 1
- Swap back to Nido and X Accuracy
- HD x5
Backup Boom Strat note:
If you lost red bar during Lorelei, then skip the Menu before Bruno
Backup Bruno: X Accuracy, d2 Max Ether on HD, + HD x5
Menu before Bruno:
- use Slot 4 - Max Ether on HD
Bruno:
- X Accuracy + HD x5
Menu before Agatha:
- Slot 7 - Super Potion x2
- d10 use Rare Candy (2 below HM03)
Agatha:
- Gengar: Slot 3 - X Special + EQ
- Hypnosis hit --> d10 Poke Flute (2 below HM02)
- Golbat: Blizz
- Haunter: EQ
- Arbok: EQ
- Gengar: EQ
Blizz miss on Golbat into Haze:
- Golbat: TB x2
- if 1-24 or 61+ HP: spam EQ after Golbat
- if 25-60 HP: use X Speed on Arbok and otherwise spam EQ
| HP | ITEMS |
|---|---|
| 4-7 | Super Pot x2 + Pot x2 |
| 8-26 | Super Pot x2 + Pot |
| 27-48 | Super Pot x2 |
| 49-56 | Super Pot + Pot x2 |
| 57-76 | Super Pot + Pot |
| 77-98 | Super Pot |
| 99-106 | Pot x2 |
| 107-127 | Pot |
- Use Slot 4 - Elixer
- Heal to 128+ HP
- (Slot 6 - Super Potion; Slot 9 - Potion as needed)
If you need red bar to PB, be prepared to stall if Hydro Pump misses
Stall with X Accuracy if you have 2 left (otherwise, use EQ)
- Gyarados:
- Slot 3 - X Special
- TB
- Dragonair 1:
- Blizz
- Dragonair 2:
- d1 X Speed (if zero left, use an X Special instead)
- Blizz
- Aerodactyl:
- TB
- Dragonite:
- Blizz
| HP | Standard Strat | Alternate Strat |
|---|---|---|
| 4-17 | Potion | Super Potion |
| 18-21 | Super Potion | yolo if you need red bar to win |
| 22-37 | Don't heal | Super Potion |
| 38-44 | Don't heal | Potion or Super Potion |
| Any HP | Heal to 45+ for safety | or yolo if required |
Menu before Champ:
- Heal to 22+ or 45+ HP
Champion:
- Pidgeot Turn 1:
- use X Special
- Pidgeot Turn 2:
- If Pidgeot does NOT use Sky Attack turn 1:
- Pidgeot: UP 1 X Acc + HD
- Alakazam: HD
- Rhydon: HD (or Blizz w/out red bar)
- Gyarados: Thunderbolt (or HD, if Blizz Rhydon)
- Arcanine: HD
- Venusaur: HD
- If Pidgeot begins to use Sky Attack turn 1 (Pidgeot is glowing):
- Pidgeot: Blizz
- Alakazam: EQ
- Rhydon: Up 1 X Acc + HD x4
- If Pidgeot does NOT use Sky Attack turn 1: