001 Game Dump Guide
If you're looking to create mods for Nintendo Switch games, or use mods for games with changelog-based mod managers (such as BotW or TotK), you'll need to have a dump of your game. In the context of Nintendo Switch games, a dump refers to the files extracted from your cartridge and/or installation of a game.
It is assumed in this tutorial that you already have a modded Nintendo Switch system. If you don't, this guide will help you set it up.
- Download Lockpick_RCM.bin
- Put your Modded Switch into RCM and use TegraRCM GUI to inject the Lockpick_RCM.bin payload
- Navigate the menu using Volume Up to move up, Volume Down to move down, and Power to select
- Select
Dump From Emunand - Return to the menu, and select
Reboot (RCM)
- Download
TegraExplorer.bin - Inject the payload using the same method as above
- Navigate the menu using the JoyCon Controllers
- Navigate to
FirmwareDump.tein the Scripts section - Select the script and choose
Dump emummc, press A to confirm. This may take a few minutes, however the progress is visible onscreen - Press any button to return to the main screen once the process has completed, and select
Reboot to RCMto prepare for the next step
-
Click here to download
nxdt_rw_poc.nro -
Connect to the MicroSD card of your modded Nintendo Switch either directly or using Hekate's USB Mass Storage feature
-
To use USB Mass Storage, navigate to the
Toolstab, then selectUSB Tools, thenSD Cardas shown in the images below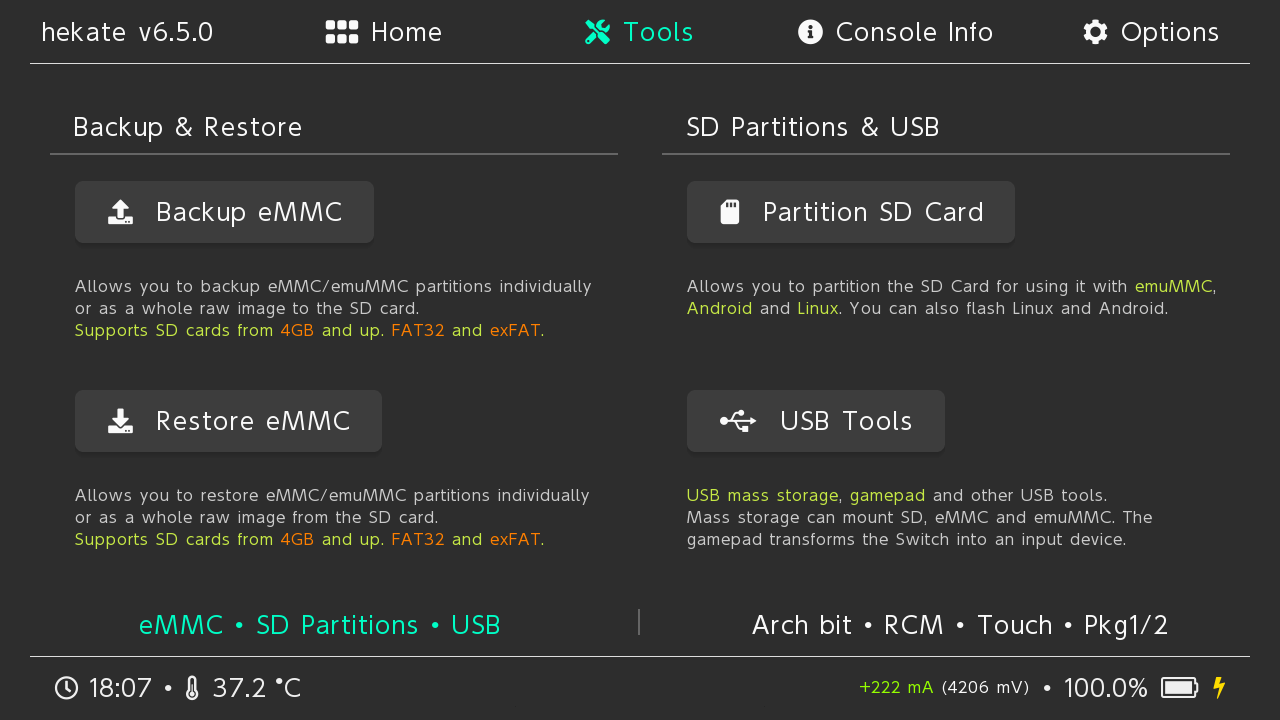
-
-
Move
nxdt_rw_poc.nrointo theswitch\folder located at the root of the MicroSD Card
-
Move
prod.keysandtitle.keysfrom theswitch\folder to your PC, you'll need them later. -
Return to the root of the MicroSD Card navigate to the
tegraexplorer\Firmwarefolder. Copy the folder to your PC, you'll need this later. -
Eject the MicroSD within the file explorer
- If you did not use Hekate's USB Mass Storage, at this point you can eject the MicroSD Card, put it back in your Nintendo Switch, and boot into Hekate.
-
Launch back into Atmosphere
- Download and install Zadig Drivers
- Download and extract
nxdt_host.7z - Launch
nxdt_host.exefrom where you extracted the .7z to
- Download
nxdt_host_mac.zip - Extract
nxdt_host_mac.zipinto yourApplicationsfolder - The first time you launch the app, you'll need to right click the .app folder, select
Openand thenOpenonce again on the dialog that appears- For subsequent launches you will be able to open it normally
- Set the
Output directoryto a location of your choosing, you'll need it later
Linux users will need Flathub
- Run
flatpak install flathub org.v1993.NXDumpClient - If it doesn't appear on your desktop, you can launch it by running
flatpak run org.v1993.NXDumpClient, and follow any additional onscreen instructions - Optionally, press
Ctrl + Pto open a Preferences window and set the destination directory for the game dump
On your modded Nintendo Switch, navigate to the Homebrew Menu by holding R on your controller while launching any game. Navigate to nxdt_rw_poc as shown below and launch it.
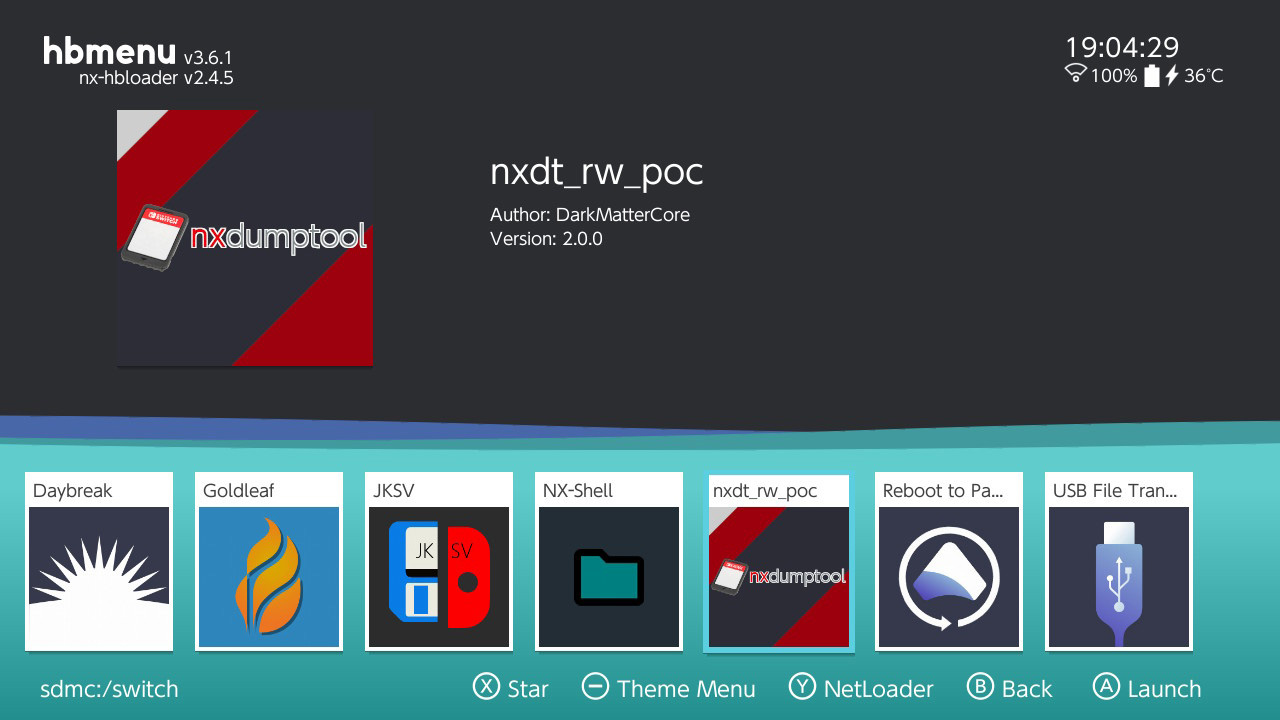
You should be presented with a screen similar to the one below:
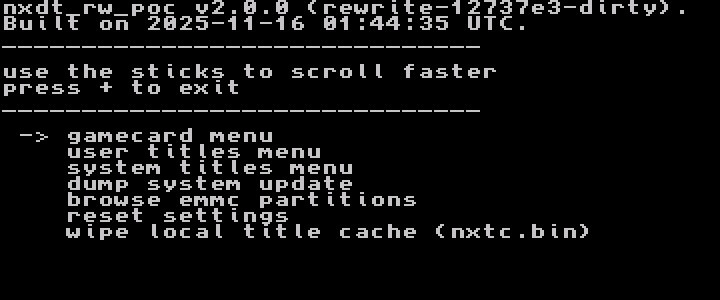
Depending on what you want to dump, you will either select gamecard menu, user titles menu, or possibly both. The gamecard menu is for dumping from a cartridge. This will include a .xci file containing the basegame and any bundled updates and/or DLC. The user titles menu is for anything digitally installed to your system. This will result in you performing multiple dumps to extract the basegame, installed update, DLC, and DLC update where applicable.
If you want to dump The Legend of Zelda: Tears of the Kingdom, for example, and you bought the physical version on its release date, you'll need to go through the gamecard menu to dump the .xci containing the base version of the game, and the user titles menu to dump the .nsp containing the update that's installed on your system.
Regardless of what dump you're making, ensure that on your PC you have the NX Dump Tool Host Client open that you set up earlier, and that your Nintendo Switch is connected via USB to your PC, and click Start Server if the prompt appears.
-
Choose
gamecard menu -
Ensure that
output storageis set tousb host (pc)as shown below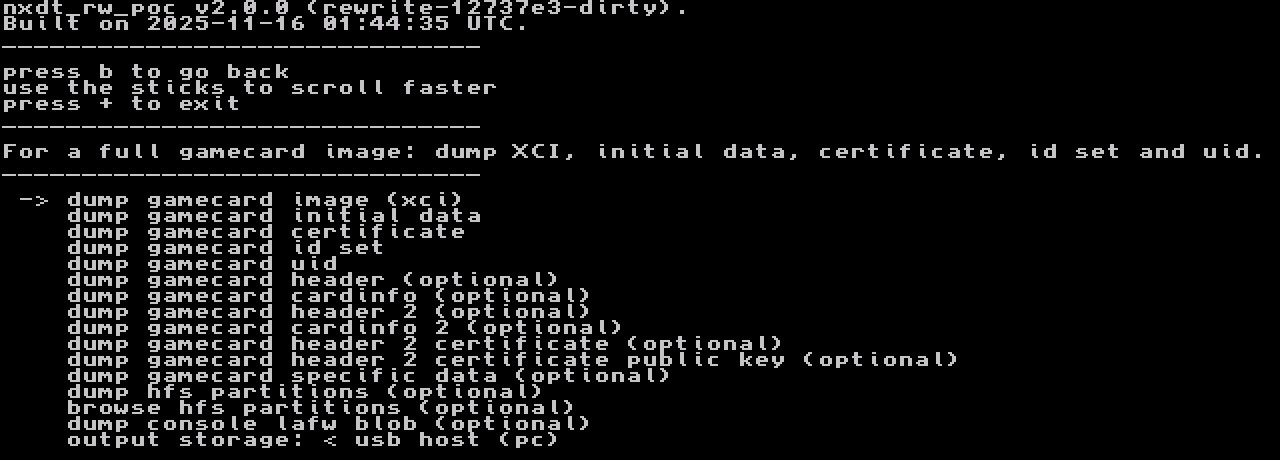
-
Select
dump gamecard image (xci)
Wait for the process to complete. Both the Nintendo Switch and Host Client will display the progress of the dump.
-
Choose
user titles menu -
Select the title you'd like to dump content for from the list
-
Choose
nsp dump options -
Choose the content type you'd like to dump. You will need at least the
base application, and it is recommended to dump the latest update as well, as the update only contains the modified files relative to the basegame, not the full game -
Ensure that
output storageis seto tousb host (pc)as shown below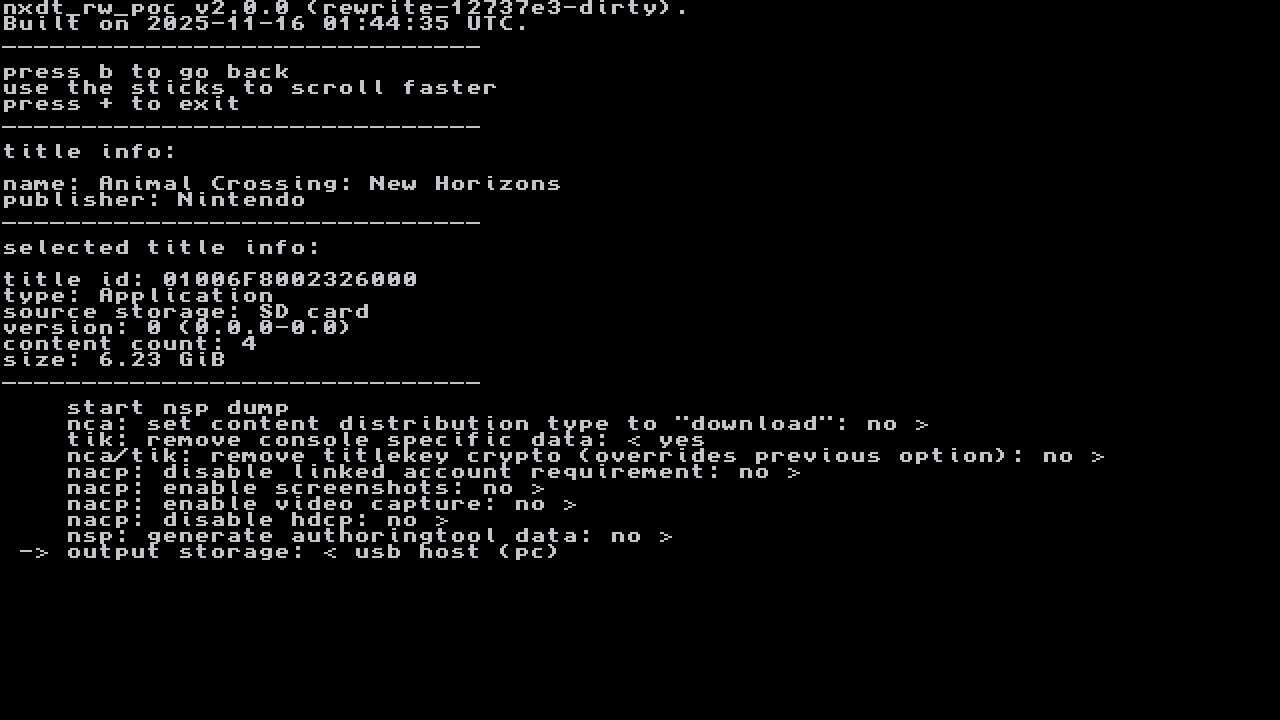
-
Select
start nsp dump
Repeat the above steps for all content you'd like to have copies of on your PC.
Once the game dump process completes, locate the produced files and move them to a location of your choosing, which will be referred to as the Game Executables folder. On MacOS and Linux, you should have set these up earlier. On Windows, the files will be located in subfolders within the directory containing nxdt_host.exe.
Now that we have the game executables, we'll set up the emulator Ryubing to extract their contents, which are needed to create mods.
The amazing team behind Ryubing has already created a comprehensive setup guide, so I'm not going to try and replace it. During setup, you'll need to be able to locate your Game Executables folder alongside the Firmware folder and .keys files that you copied off of the MicroSD Card earlier in this guide. Come back once you've followed that guide.
At this point, you should see your games in Ryubing. Right click on a game and hover over Extract Data. For all games, you will see the ExeFS, RomFS, and Logo options. For games that you have installed DLC for, you will also see the DLC RomFS option. See the below image for reference:
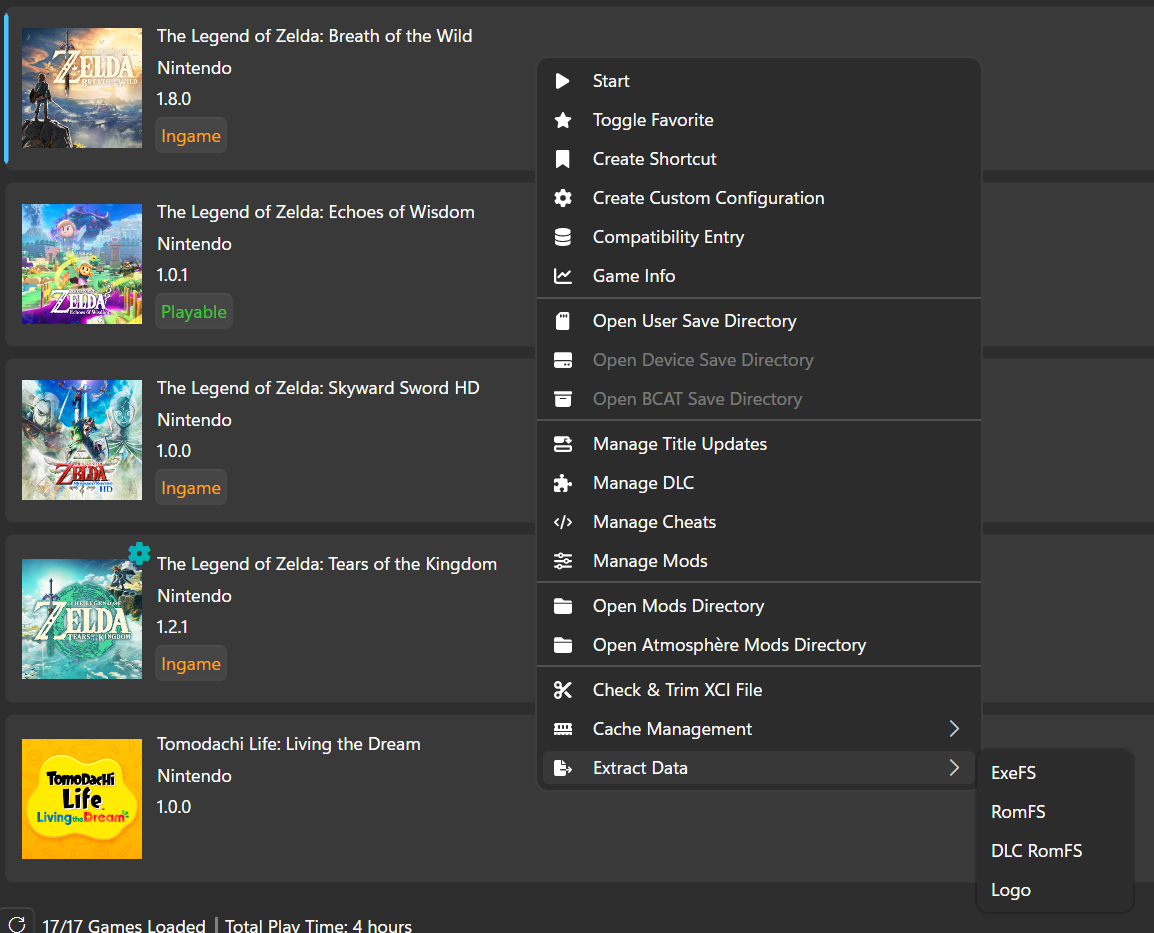
Regardless of what type of mods you make, you should create a RomFS dump. For creating mods that involve writing and compiling code, you will also need to create an ExeFS dump. After selecting the type of dump you'd like to make, create a folder for the files to go in. Each dump type should go in a separate empty folder.
Congratulations, you now have a dump of your game ready to create mods with!