Linux installation
System requirements:
- Linux (Ubuntu confirmed, please let us know results from other flavors)
- Chrome, Firefox or similar web browser Hardware requirements:
- XBee USB adaptor (XBee Explorer, Parallax, Adafruit, Digi XBee Evaluation board or similar)
- USB cable
- 802.15.4 (Series 1) or ZigBee ZB (Series 2) XBee radio Hardware configuration 802.15.4 (Series 1):
- For 802.15.4 XBee radios, pick a PAN ID between 0x0 and 0xFFFE. This will need to be set the same for all radios in your network.
- We recommend updating your XBee to the latest firmware in X-CTU
- Use X-CTU or a terminal program to configure your 802.15.4 radio with the following settings: * ATRE (to factory reset the radio…alternately use the Reset button in X-CTU) * ATID 1966 (please replace 1966 with your chosen PAN ID!) * ATAP 1 (sets your radio to basic API mode) * ATD6 1 (turns on monitoring for RTS) * ATBD 6 (sets baud rate to 57,600 which is currently the highest supported baud rate) * ATWR (saves these as the startup settings) Hardware configuration ZB ZigBee (Series 2):
- For ZigBee XBee radios, picking a PAN ID is optional, so we'll skip that for now.
- You will need to update your radio to use the ZigBee Coordinator in API mode firmware in X-CTU.
- Use X-CTU or a terminal program to configure your ZigBee Coordinator radio with the following settings: * ATRE (to factory reset the radio…alternately use the Reset button in X-CTU) * ATD6 1 (turns on monitoring for RTS) * ATBD 6 (sets baud rate to 57,600 which is the highest supported baud rate) * ATWR (saves these as the startup settings) Software Installation:
- Install Python 2.7 (see http://www.python.org/getit/)
- Download the latest version of the software from https://code.google.com/p/xig/wiki/DownloadFiles?tm=2 .
- Unzip and untar the file
- Move the xig_1_5_0 folder to the directory where you would like to install it.
- From the src directory, start the xig_app Python script in the gui directory:
*
xig/src> python gui/xig_app.py* (to run the application as a headless server, use "python gui/xig_app.py --no-browser" as the command to start the script and then go to http:// youripaddress :8000 to administer it.) - You will see a command-line window open in the background:
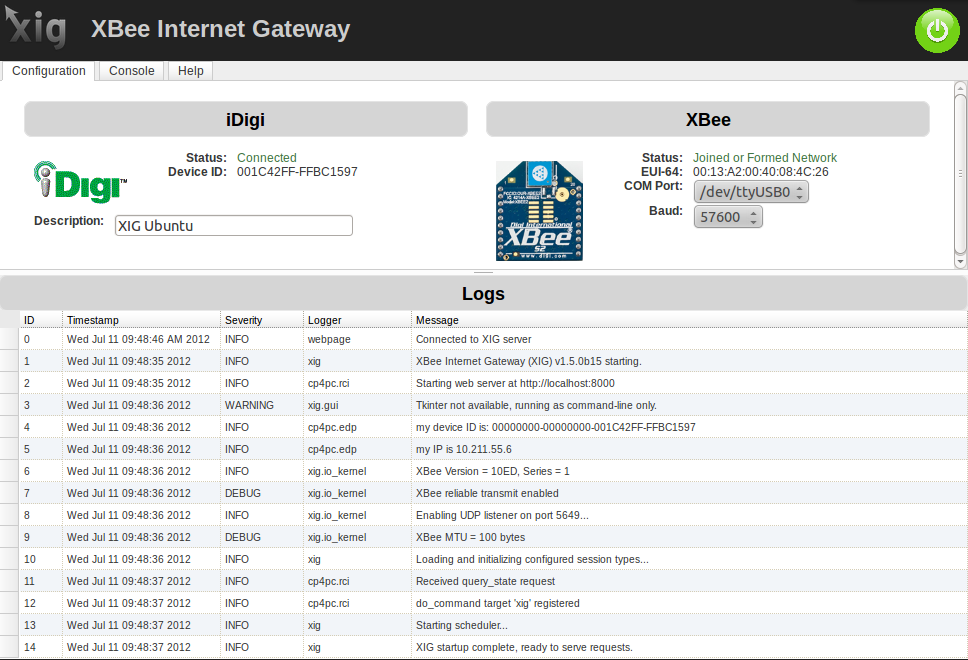
* then your default web browser will be launched and directed to http://localhost:8000 to display the online user interface for the XIG (below). 1. Select the correct COM port for your XBee USB adaptor in the pop-up list 1. Select the correct baud rate for your XBee, typically 57,600. With the correct COM port and baud rate, your XBee Status should change to a green "Joined or Formed Network" indicator. 1. Enter a friendly name for your XBee Internet Gateway in the Description field.
 * then your default web browser will be launched and directed to
 - Create a FREE account on Device Cloud.
- Log in to your new account.
- Select the Devices tab, to see the Devices panel:
- Click on Add Devices:
- Click on the Add Manually button:
- On the pop-up list, switch from MAC Address to Device ID. Then enter the Device ID that shows in the XIG Admin dashboard:
- Click the Add button to add that device to the list, then click the OK button at the bottom of the window:
- Your device should show up in the list, it might still appear as Disconnected:
- Wait a few moments, then click on the circling yellow arrows to Refresh the list:
- You should now see your device listed as Connected:


(By default you will be connected to the login.etherios.com server. If you would like to use a different server you can edit the address in xig/src/settings.json) CONGRATULATIONS, you're done! Here's a quick tour of the important Device Cloud features:
- Getting Data: Click on the Data Services tab. This is where data uploaded from your XIG will appear. The data you send will become available in a series of XML-formatted files. See the UserDocumentation under "Sending Sample Data to Device Cloud" for more information.
- Sending Data and Commands: Click on the Web Services Console. This is where you can send test sending ASCII text and AT commands directly from the Internet to your XBees. See the UserDocumentation under "Sending Messages from the Internet to an XBee Using Device Cloud " and "Setting or Getting Remote XBee AT Settings via Device Cloud" for more information.
- Follow the XIGproject on Twitter.
- Join the XBee Internet Gateway discussion group
See the XBee Internet Gateway UserDocumentation for further information.