Dual‐Boot Installation (Zen3 Wayland X11)
Important
Use this guide only if you need the Zen3 image.
Zen3 Dual-Boot exists so you can run Zen3 Wayland on an HD monitor (or Steam Deck built-in display) and X11 on a CRT, and switch between them with the HD/CRT Mode Switcher app.
If you DO NOT plan on switching between HD/Handheld and CRT monitors using the Mode Switcher ONLY a CRT, then Zen3 Dual-Boot is a waste of time and you should follow X11 Exclusive Installation instead
The HD/CRT Mode Switcher is also available on X11 Exclusive Installation. Dual-Boot is not required.
Caution
Dual-Boot requires stricter setup steps than X11 Exclusive. Unlike the X11-only path, you must set VIDEO OUTPUT to your HD display before connecting your CRT output. This prevents black-screen issues on Zen3 Wayland systems.
Same as standard installation. See Batocera CRT Script Installation Guide.
For handheld devices like Steam Deck, ROG Ally, and other portable systems with USB-C and DisplayPort Alt Mode support:
You will need adapter(s) to connect your handheld device's USB-C output to your CRT. DisplayPort Alt Mode support is required.
For complete adapter chain details, compatibility lists, and device-specific information, see Handheld & Portable Device Support
Key points:
- Most modern handheld devices support DisplayPort Alt Mode over USB-C
- A multi-step adapter chain is required (USB-C → DisplayPort → VGA → CRT)
- On Steam Deck,
DP-1only appears in the output list when a display is plugged into the USB-C port
See the pre-installation checklist on the main installation guide, plus:
- HD monitor or handheld built-in display for Zen3 Wayland
- CRT with the adapter chain from Handheld & Portable Device Support if applicable
-
Download Steamdeck (download) batocera.org/download
- Yes, you can use this on a PC as well
-
Flash the Zen3 image using BalenaEtcher or similar
-
Install the drive into your device
-
Before powering it on, unplug the USB-C or other output to your CRT. Failure to do so may cause your HD screen to black out.
Tip
Steam Deck Users: You may need to go into the Steam Deck BIOS to boot Batocera from your drive.
-
Once Batocera has fully booted and you see the Emulation Station main page, press START to go into Main Menu
- For PC users and not Steam Deck go to SYSTEM SETTINGS > MULTISCREENS > BACKGLASS > VIDEO OUTPUT and assign it to NONE
- Exit back to the Emulation Station main page
-
Go to SYSTEM SETTINGS > VIDEO OUTPUT and assign it to your HD Output
- For Steam Deck users, this is eDP-1 (the built-in display)
- You will see the screen blink and come back
-
Exit back to the Emulation Station main page
- Now you will be able to plug in the output to your CRT without the screen turning black
-
SSH into your Batocera system:
ssh root@batocera.local
(Default password:
linux) -
Install the CRT Script via SSH using either command below:
You can install the script using either of the commands below.
They are functionally identical — just different URLs pointing to the same script.-
Option 1 – bit.ly (short link): copy and paste into your SSH session:
bash <(curl -Ls https://bit.ly/batocera-crt-script | sed 's/\r$//') -
Option 2 – Pastebin (direct link): copy and paste into your SSH session:
bash <(curl -s https://pastebin.com/raw/iC21J0W6 | sed 's/\r$//')
Optional: scan the QR code on your phone to open the script link:
This command chain downloads the latest version, extracts its contents, moves the folder, sets script permissions, preserves backups (if any), and runs the installer.
-
-
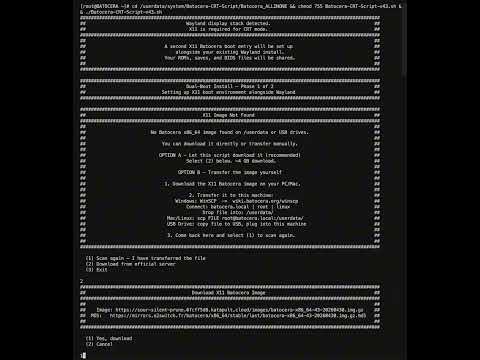
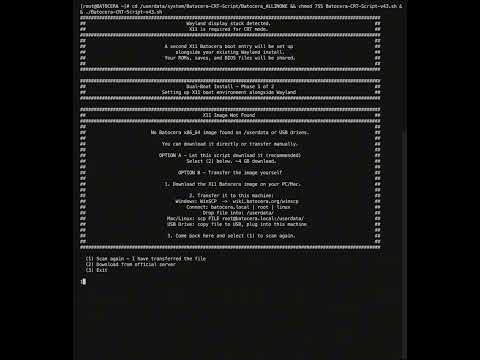
The script will detect that your system is Zen3 Wayland and present two options:
OPTION A - Let this script download the x86_64 X11 image
- The script will download x86_64 X11 directly from Batocera Linux
OPTION B - Transfer the x86_64 X11 image yourself
- Download both files from Batocera Linux:
-
Desktop PC, Laptop, NUC and Intel-based Apple Computers (download & md5)
batocera-x86_64-43-*.img.gzbatocera-x86_64-43-*.img.gz.md5
-
Desktop PC, Laptop, NUC and Intel-based Apple Computers (download & md5)
- Transfer both files to
/userdataon your Batocera device - The script will verify the MD5 checksum and then extract the image for dual-boot
If you prefer to manually transfer the CRT Script files instead of using SSH:
-
Download the CRT Script via the bash command on a PC, or extract from the GitHub repository
-
Access Batocera over your network via SMB: 📎 Batocera Network File Transfer Guide
-
Drag and drop the
Batocera-CRT-Scriptfolder into/userdata/system -
Then proceed with SSH to run the script:
cd /userdata/system/Batocera-CRT-Script/Batocera_ALLINONE
chmod 755 Batocera-CRT-Script-v43.sh
./Batocera-CRT-Script-v43.sh
Note: The dual-boot process will still use OPTION A or OPTION B (from Step 3 above) to obtain the x86_64 X11 image and MD5 file. This manual transfer is only for the CRT Script itself.
The script will now extract the x86_64 X11 boot configuration. Follow the onscreen prompts:
-
If you chose OPTION A, the script will download and validate the x86_64 X11 image
- It will run an MD5 check to ensure you have a supported version
- Unsupported images will be rejected and the script will exit
-
The script will begin extracting X11 boot files to
/boot/crt/- This may take 1-2 minutes—be patient
-
After extraction, you'll be asked if you want to keep or delete the downloaded image to save storage space
-
You will be prompted that a shutdown is required
- Shutting down may take up to 30 seconds (Steam Deck shutdown is slower, this is normal)
- Wait until the fan is completely off and the screen is black
After shutdown, power on your device. It will now boot in X11 mode. Follow these steps:
-
SSH back into your Batocera system:
ssh root@batocera.local
-
Run the CRT Script again:
cd /userdata/system/Batocera-CRT-Script/Batocera_ALLINONE
chmod 755 Batocera-CRT-Script-v43.sh
./Batocera-CRT-Script-v43.sh
Important
3. Follow the onscreen instructions for configuring your CRT output: See How to CRT Script Configuration
-
You will be prompted that a shutdown is required
- Again, shutting down may take up to 30 seconds for handheld devices
-
After shutdown, power on your device
- Wait 1 minute for the system to fully initialize
- Then turn on your CRT Monitor
-
You should now see Emulation Station on your CRT
Verify the configuration: Go to MAIN MENU > SYSTEM SETTINGS. You should see that VIDEO OUTPUT and VIDEO MODE are already set.
- eDP-1 = Handheld built-in screen (HD Mode / Zen3 Wayland)
- DP-1 = USB-C DisplayPort output (CRT Mode / X11)
For complete handheld device information, output names, and troubleshooting, see Handheld & Portable Device Support
- Flash Zen3 image and power on WITHOUT CRT connected
- Set VIDEO OUTPUT to HD output (eDP-1 for Steam Deck) in Emulation Station
- Plug in CRT output (now safe without blacking out HD screen)
- Run CRT Script via SSH
- Choose Option A (download) or Option B (transfer) for x86_64 X11 extraction
- Let script extract X11 boot files to
/boot/crt/and shutdown (Phase 1) - Power back on in X11 mode, run CRT Script again
- Select CRT output (DP-1 for Steam Deck) and configuration profile (Phase 2)
- Reboot when script completes
- Verify VIDEO OUTPUT & VIDEO MODE are set
- Emulation Station should appear on your CRT
You skipped Step 2. Go back and set VIDEO OUTPUT to your HD output (eDP-1 on Steam Deck) before connecting the CRT cable.
- The built-in display will appear black (CRT timings don't work on LCD)
- SSH in and manually edit the boot configuration, or use USB recovery
- See Handheld & Portable Device Support for device-specific troubleshooting
On Steam Deck and similar handhelds, DP-1 only appears when a display is plugged into the USB-C port. Connect your adapter chain before running the script in Phase 2.
Return to: Batocera CRT Script Installation Guide