ถ้าคุณใช้ FastAPI และวางแผนให้รองรับทั้ง Vercel (สำหรับ Serverless) และ Kubernetes (Production Scale) ผมแนะนำให้จัดโครงสร้างโปรเจกต์ตั้งแต่แรกเลย เพื่อไม่ต้องแก้ภายหลัง FastAPI คือ เว็บเฟรมเวิร์ก (Web Framework) ประสิทธิภาพสูงสำหรับสร้าง API ด้วยภาษา Python 3.8+ ที่กำลังได้รับความนิยมอย่างมากในปัจจุบัน โดยถูกออกแบบมาให้ทำงานได้อย่างรวดเร็ว เขียนโค้ดง่าย และพร้อมสำหรับนำไปใช้งานจริง (Production-ready) [1, 2]
/*
- ความเร็วสูง (High Performance): ทำงานได้รวดเร็วเทียบเท่ากับ NodeJS และ Go เนื่องจากรันบน Starlette และ Pydantic [3]
- สร้างเอกสารอัตโนมัติ (Automatic Docs): มีระบบ Interactive Documentation (เช่น Swagger UI และ ReDoc) ให้ตรวจสอบและทดลองเรียกใช้งาน API ได้ทันทีโดยไม่ต้องเขียนโค้ดเพิ่ม [4]
- ลดข้อผิดพลาด (Fewer Bugs): มีการตรวจสอบความถูกต้องของข้อมูล (Data Validation) อัตโนมัติผ่าน Python Type Hints ทำให้ลดโอกาสเกิด Error จากมนุษย์ได้ประมาณ 40% [2, 4]
- รองรับ Async: รองรับการเขียนโค้ดแบบ Asynchronous (async/await) ช่วยประมวลผลงานพร้อมกันจำนวนมากได้อย่างมีประสิทธิภาพ [5] */
คุณสามารถเริ่มต้นสร้างระบบ API อย่างง่ายได้ภายในไม่กี่ขั้นตอน ดังนี้:
ติดตั้ง FastAPI และ dependencies มาตรฐานผ่านคอมมานด์ไลน์: [6]
pip install "fastapi[standard]"
สร้างฟังก์ชันสำหรับรองรับคำขอ GET Request: [7]
from fastapi import FastAPI app = FastAPI()
@app.get("/")def read_root(): return {"Hello": "World"}
สั่งรันเซิร์ฟเวอร์ด้วยคำสั่งสำหรับโหมดพัฒนาพัฒนาระบบ: [7]
fastapi dev main.py
หลังจากรันคำสั่งนี้ คุณสามารถเปิดเบราว์เซอร์ไปที่ http://127.0.0.1:8000 เพื่อดูผลลัพธ์ หรือเข้าที่ http://127.0.0 เพื่อใช้งานระบบ Swagger UI ในการทดสอบ API [8] หากคุณต้องการต่อยอดระบบ คุณสนใจที่จะให้ผมแนะนำในหัวข้อใดเป็นพิเศษไหมครับ?
- การเชื่อมต่อกับ Database (เช่น PostgreSQL หรือ MySQL ด้วย SQLModel/SQLAlchemy)
- การทำระบบลงทะเบียนและยืนยันตัวตนด้วย JWT Token / OAuth2
- การสร้างโครงสร้างโปรเจกต์ขนาดใหญ่แบบแยกไฟล์ (Bigger Applications)
[1] https://github.com [2] https://en.wikipedia.org [3] https://fastapi.tiangolo.com [4] https://fastapi.tiangolo.com [5] https://fastapi.tiangolo.com [6] https://fastapi.tiangolo.com [7] https://fastapi.tiangolo.com [8] https://www.youtube.com
Fetch the complete documentation index at: https://auth0.com/llms.txt Use this file to discover all available pages before exploring further.
Key ConceptsLearn how the Authorization Code flow with Proof Key for Code Exchange (PKCE) works and why you should use it for native and mobile apps.
- Learn about the OAuth 2.0 grant type, Authorization Code Flow with Proof Key for Code Exchange (PKCE).
- Use this grant type for applications that cannot store a client secret, such as native or single-page apps.
- Review different implementation methods with Auth0 SDKs.
When public clients (e.g., native and single-page applications) request access tokens, some additional security concerns are posed that are not mitigated by the Authorization Code Flow alone. This is because:
Native apps
- Cannot securely store a Client Secret. Decompiling the app will reveal the Client Secret, which is bound to the app and is the same for all users and devices.
- Are vulnerable to authorization code interception and injection attacks. Without a client secret, an attacker who intercepts the authorization code can exchange it for tokens.
- May make use of a custom URL scheme to capture redirects (e.g., MyApp://) potentially allowing malicious applications to receive an Authorization Code from your Authorization Server. Because of this risk, Auth0 strongly discourages the use of custom URI schemes. To learn more, read Measures Against Application Impersonation.
Single-page apps
- Cannot securely store a Client Secret because their entire source is available to the browser.
Given these situations, OAuth 2.0 provides a version of the Authorization Code Flow which makes use of a Proof Key for Code Exchange (PKCE) (defined in OAuth 2.0 RFC 7636).
The PKCE-enhanced Authorization Code Flow introduces a secret created by the calling application that can be verified by the authorization server; this secret is called the Code Verifier. Additionally, the calling app creates a transform value of the Code Verifier called the Code Challenge and sends this value over HTTPS to retrieve an Authorization Code. This way, a malicious attacker can only intercept the Authorization Code, and they cannot exchange it for a token without the Code Verifier.
Because the PKCE-enhanced Authorization Code Flow builds upon the standard Authorization Code Flow, the steps are very similar.
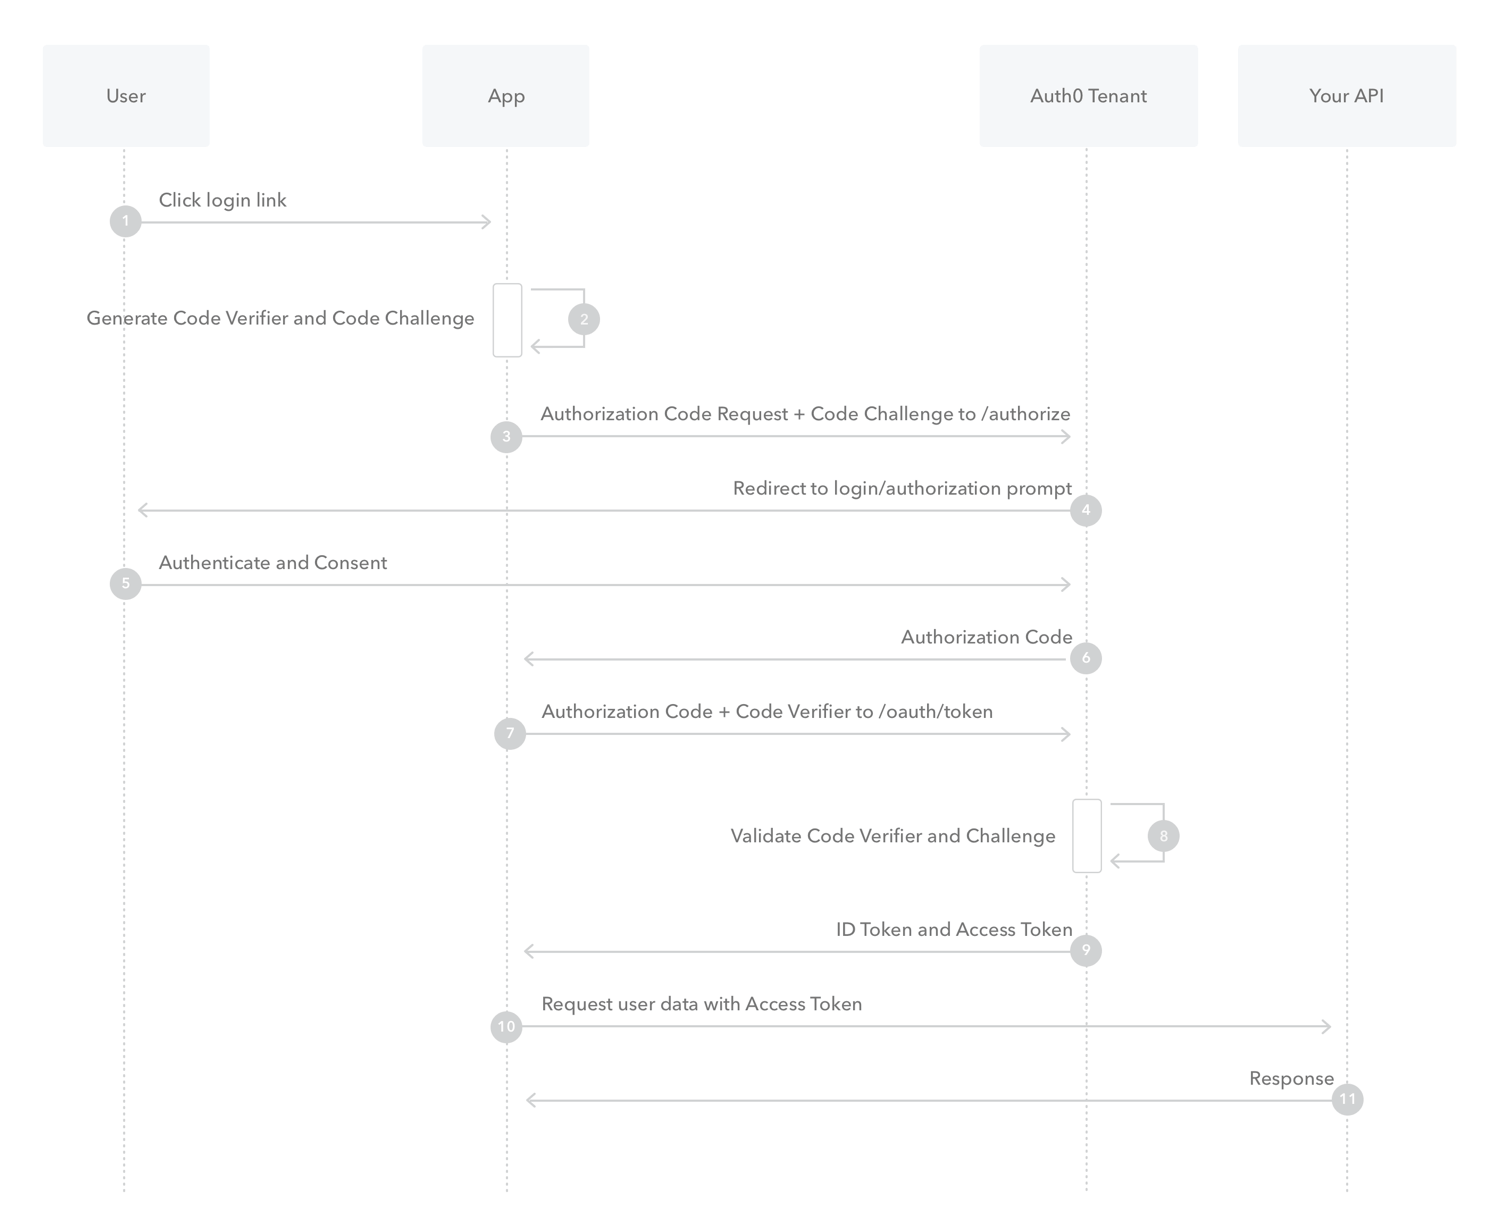
- The user clicks Login within the application.
- Auth0's SDK creates a cryptographically-random
code_verifierand from this generates acode_challenge. - Auth0's SDK redirects the user to the Auth0 Authorization Server (
/authorizeendpoint) along with thecode_challenge. - Your Auth0 Authorization Server redirects the user to the login and authorization prompt.
- The user authenticates using one of the configured login options and may see a consent page listing the permissions Auth0 will give to the application.
- Your Auth0 Authorization Server stores the
code_challengeand redirects the user back to the application with an authorizationcode, which is good for one use. - Auth0's SDK sends this
codeand thecode_verifier(created in step 2) to the Auth0 Authorization Server(/oauth/tokenendpoint). - Your Auth0 Authorization Server verifies the
code_challengeandcode_verifier. - Your Auth0 Authorization Server responds with an ID token and access token (and optionally, a refresh token).
- Your application can use the access token to call an API to access information about the user.
- The API responds with requested data.
The easiest way to implement the Authorization Code Flow with PKCE is to follow our Native Quickstarts or follow our Single-Page Quickstarts.
Depending on your application type, you can also use our mobile or single-page app SDKs:
Mobile
Single-page
Recent advancements in user privacy controls in browsers adversely impact the user experience by preventing access to third-party cookies; therefore, browser-based flows must use [Refresh Token Rotation](/docs/secure/tokens/refresh-tokens/refresh-token-rotation), which provides a secure method for using refresh tokens in SPAs while providing end-users with seamless access to resources without the disruption in UX caused by browser privacy technology like ITP.You can follow our tutorials to use our API endpoints to Add Login Using the Authorization Code Flow with PKCE or Call Your API Using the Authorization Code Flow with PKCE.
oauth-fastapi/
│
├── app/
│   ├── api/
│   │   ├── auth.py
│   │   ├── callback.py
│   │   └── health.py
│   │
│   ├── services/
│   │   ├── oauth_service.py
│   │   ├── token_service.py
│   │   └── user_service.py
│   │
│   ├── core/
│   │   ├── config.py
│   │   ├── security.py
│   │   └── logging.py
│   │
│   └── main.py
│
├── api/
│   └── index.py              # Vercel Entry
│
├── docker/
│   └── Dockerfile
│
├── k8s/
│   ├── namespace.yaml
│   ├── deployment.yaml
│   ├── service.yaml
│   ├── ingress.yaml
│   ├── configmap.yaml
│   └── secret.example.yaml
│
├── helm/
│   └── oauth-app/
│
├── .github/
│   └── workflows/
│       ├── ci.yml
│       ├── docker.yml
│       ├── vercel.yml
│       └── kubernetes.yml
│
├── vercel.json
├── requirements.txt
├── Dockerfile
├── docker-compose.yml
└── README.md
from app.main import app

handler = app{
"version": 2,
"builds": [
{
"src": "api/index.py",
"use": "@vercel/python"
}
],
"routes": [
{
"src": "/(.*)",
"dest": "api/index.py"
}
],
"functions": {
"api/index.py": {
"maxDuration": 60
}
}
}สำหรับ Hobby Plan สามารถใช้ maxDuration: 60 ได้ (ขึ้นกับข้อจำกัดของแพ็กเกจในช่วงเวลานั้น)
FROM python:3.13-slim

WORKDIR /app

COPY requirements.txt .

RUN pip install --no-cache-dir -r requirements.txt

COPY . .

CMD ["uvicorn","app.main:app","--host","0.0.0.0","--port","8000"]version: "3.9"
services:
api:
build: .
ports:
- "8000:8000"
env_file:
- .envapiVersion: apps/v1
kind: Deployment
metadata:
name: oauth-api
spec:
replicas: 2
selector:
matchLabels:
app: oauth
template:
metadata:
labels:
app: oauth
spec:
containers:
- name: oauth
image: ghcr.io/your-org/oauth-api:latest
ports:
- containerPort: 8000apiVersion: v1
kind: Service
metadata:
name: oauth-service
spec:
selector:
app: oauth
ports:
- port: 80
targetPort: 8000
type: ClusterIPapiVersion: networking.k8s.io/v1
kind: Ingress
metadata:
name: oauth
spec:
rules:
- host: oauth.example.com
http:
paths:
- path: /
pathType: Prefix
backend:
service:
name: oauth-service
port:
number: 80Push
↓
Lint (ruff)
↓
Black
↓
Pytest
↓
Bandit
↓
Build Docker
↓
Push GHCR
↓
Deploy Vercel
↓
Deploy Kubernetes
ตัวอย่างไฟล์ workflow:
.github/workflows/

ci.yml
docker.yml
vercel.yml
kubernetes.yml
security.yml
ใช้ Environment Variables แทนการฝังค่าลงในโค้ด
CLIENT_ID
CLIENT_SECRET
REDIRECT_URI

JWT_SECRET

DATABASE_URL

REDIS_URL
บน Kubernetes ให้เก็บไว้ใน Secret ส่วนบน Vercel ให้กำหนดผ่าน Environment Variables ของโปรเจกต์
แนะนำเพิ่ม endpoint
GET /health
GET /ready
GET /metrics
พร้อมรองรับ
- Prometheus
- Grafana
- OpenTelemetry
- Loki
- Jaeger
Phase 1
✓ FastAPI
✓ OAuth2 + PKCE
✓ Docker
✓ GitHub Actions

Phase 2
✓ Vercel Deployment
✓ GHCR Image
✓ PostgreSQL
✓ Redis

Phase 3
✓ Kubernetes
✓ Helm Chart
✓ Horizontal Pod Autoscaler
✓ Prometheus
✓ Grafana
✓ Loki

Phase 4
✓ Terraform
✓ GitOps (Argo CD หรือ Flux)
✓ Secrets Manager
✓ Multi-environment (dev / staging / production)
แนวทางนี้ช่วยให้โปรเจกต์เดียวสามารถพัฒนาและทดสอบบน Vercel ได้อย่างรวดเร็ว และเมื่อระบบเติบโต ก็สามารถย้ายไป Kubernetes โดยแทบไม่ต้องปรับโครงสร้างโค้ดใหม่ เพราะแยกส่วนของแอป การตั้งค่า และการ deploy ไว้ตั้งแต่ต้น.