1. Forms
Let’s create a movie rating component and make it possible to use two way data binding for its.
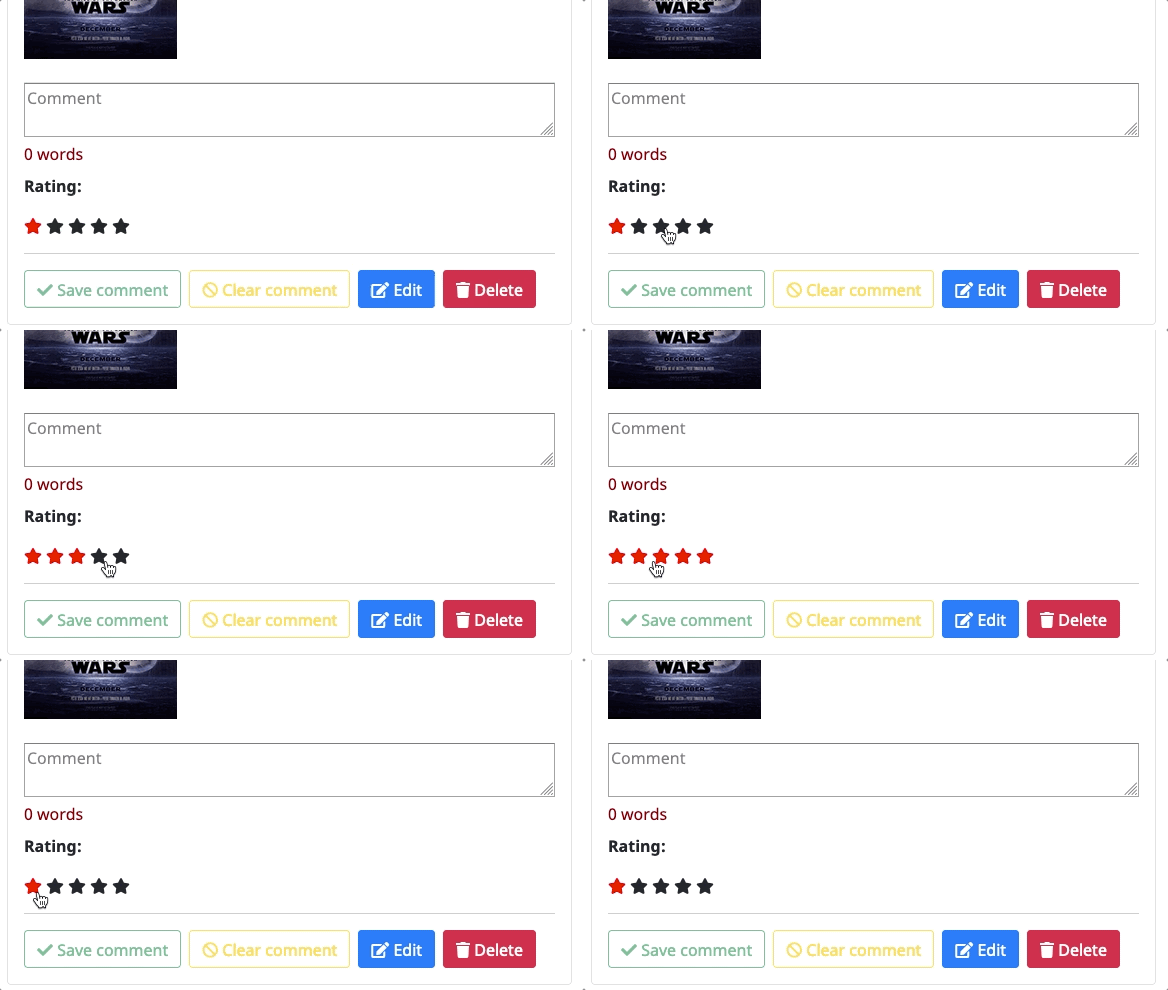
- First, let's create the rating component, in the
componentsfolder using the following cli command:
ng generate component movies/components/rating --module movies
TIP: you can use the --dry-run flag in the CLI command to see what files will get created/updated without actually running the command.
- If we inspect the newly created component we see that the selector for the rating component is
ngi-rating. Thus, in order to use the new rating component, in theMovieItemtemplate, just above the comment section:
<div>
  <p><b>Rating:</b></p>
  <ngi-rating></ngi-rating>
</div>- In the
RatingComponentclass, our rating component should hold 5 stars each with a binary state (colored or not). We can hold the state of the stars in an array:
starStates = [ false, false, false, false, false ];
- Add a first start icon to the template
<i class="fas fa-star"></i>
- Apply an
*ngFordirective on the star and iterate thestarStatesarray, keeping track of the index in a variable as well. - Use
ngClass/[class](orngStyle) binding to give the star a color if the value for the certain index in the array istrue(keep in mind that the values you're iterating over are booleans). You can create a class that should be applied if the star should be filled:
.filled-star {
  color: red;
}- Create a click handler on each star called
handleRatingClick()and pass it theindexof the iteration. The click handler should iterate through thestarStatesarray and givetruevalues to those of lower index andfalseof higher index (keep in mind that the array is 0 indexed). Example:
Index = 2 => ratings = [ true, true, true, false, false ];
HINT: for fast manipulation, use Array.map() on the starStates array;
-
Extract this functionality in a function called
updateRating(newRating)so that we can reuse it. -
Check to see if everything is working ok in the browser.
Next, we need to communicate with the MovieItemComponent and have the rating passed down from this component. We do this using Inputs and Outputs. Here is how the communication should work:
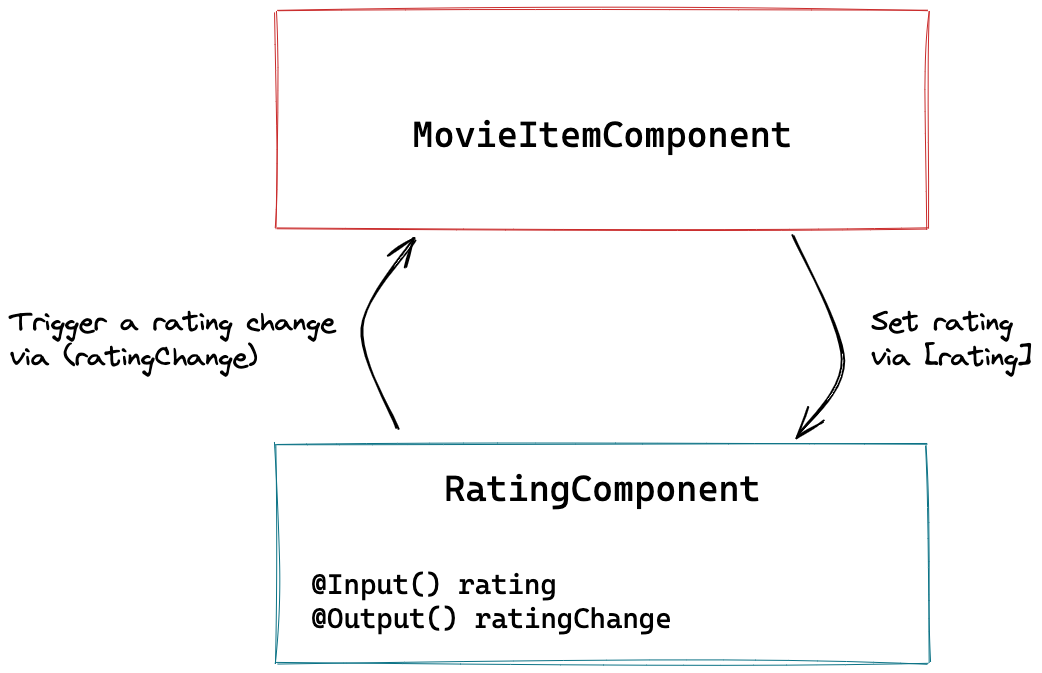
-
In the
MovieRatingComponentadd:- An
Inputcalledratingwith a type ofnumber - An
OutputcalledratingChangeinitialized with a newEventEmitter<number>(don't forget to importEventEmitterfrom@angular/core)
- An
-
In order to set the color of the stars every time the rating Input changes, we use
ngOnChanges(changes)and call theupdateRatingmethod with the changed value of theratinginput. This will also run for the initialization of the component (instead of just usingngOnInit) -
In the
handleRatingClickmethod, replace the call toupdateRatingwith a call to theemitfunction of theratingChangeoutput passing in the received new rating. This way, the component will not change the index internally, but rather tell the parent component that a new rating star has been clicked and send the new rating value. SincehandleRatingClickis a one line function we can further optimize the code by removing it from the class and making the call to theratingChangeemitter directly from the template:
(click)="ratingChange.emit(i+1)"- In the
MovieItemComponent, add amovieRatingproperty initialized with the value1and add a two-way binding in the template at the rating component:
<ngi-rating [(rating)]="movieRating"></ngi-rating>You can test that the binding works by debugging and temporarily displaying the value of movieRating ({{movieRating}}).
So at the moment, the two way binding works this way:
-
MovieItem->Rating- set the initial value of the rating (you can test this by modifying the initial value ofmovieRating) -
Rating->MovieItem- each time a star is pressed, the value ofmovieRatingis updated.
- Add
ReactiveFormsmodule toMoviesModule
import { FormsModule, ReactiveFormsModule } from '@angular/forms';

@NgModule({
  imports: [
    ...
    ReactiveFormsModule,
    ...
  ],
  ...
})
export class MoviesModule {}- In the
MovieListComponentcomponent- Remove the
@ViewChildproperty - Add a
searchFieldproperty of typeFormControl:
- Remove the
public searchField = new FormControl('');- Link the property to the
inputelement by using theformControldirective (removing the template variable):
<input [formControl]="searchField" placeholder="Search movies">- In
ngOnInitreplacefromEventwith thevalueChangesobservable or the form control; also remove themapoperator, since we don't need to transform the event object:
this.searchField.valueChanges
.pipe(...)-
We are going to refactor the
MovieDetailcomponent and create the movie edit form. First, we need to modify a few things in the movie service. -
In the
MovieService, add/modify the following methods:-
createMovie(movie: Movie)- adds a movie to the movie array ->POSTto${this.apiUrl} -
updateMovie(movie: Movie)- updates the movie with the specific id (found in the movie object) ->PUTto${this.apiUrl}/${movie.id} -
getMovie(movieId: string)- get a certain movie (with a specificid) -> GET${this.apiUrl}/${movieId}- if nomovieIdis provided, you should return an observable that emits an emptyMoviemaking the query more uniform (using theoffunction imported from'rxjs')
-
if (!movieId) {
  return of({
    id: uuid(),
    title: '',
    genre: '',
    plot: '',
    year: '',
    comment: '',
    poster: ''
  });
} else {
  // return existing get movie by id call
}- In order to have access to the
uuidmethod, we need to import the method form the library. Add the following import statement:
import { v4 as uuid } from 'uuid';One optimization opportunity here is extracting the empty movie properties in a constant so we can use it in other places if we need it. Also, the service doesn't need to know the exact structure of the movies object.
- create a new
constvariable inmovies/model/movie.tscalledEMPTY_MOVIE:
export const EMPTY_MOVIE: Omit<Movie, 'id'> = {
  title: '',
  genre: '',
  plot: '',
  year: '',
  comment: '',
  poster: '',
};
Read more about
Omithere
- Use this new constant in the
getMoviemethod in theMovieService:
if (!movieId) {
  return of({
    ...EMPTY_MOVIE,
    id: uuid(),
  });
}
// return existing get movie by id call- In the
MovieDetailComponenttemplate, create a form for editing movie objects. - The form should contain the following components:
-
Title- text (input) -
Year- number (input) -
Genre- text (input) -
Plot- long text (textarea) -
Poster- text (input) - A
SUBMITand aCANCELbutton
-
If you don't want to mess with writing the template, you can use the following sample:
Template:
<div class="card">
  <div class="card-header">
    Edit/Create movie form
  </div>
  <div class="card-body">
    <div class="row">
      <form class="col-9" (ngSubmit)="onSubmit()">
        <div class="form-group mb-2">
          <label for="movieTitle">Title</label>
          <input name="title" class="form-control" id="movieTitle" placeholder="Enter title">
        </div>
        <div class="form-group mb-2">
          <label for="movieGenre">Genre</label>
          <input name="genre" class="form-control" id="movieGenre" placeholder="Enter genre">
        </div>
        <div class="form-group mb-2">
          <label for="movieYear">Year</label>
          <input name="year" class="form-control" id="movieYear" placeholder="Enter year">
        </div>
        <div class="form-group mb-2">
          <label for="moviePlot">Plot</label>
          <input name="plot" class="form-control" id="moviePlot" placeholder="Enter plot">
        </div>
        <div class="form-group mb-4">
          <label for="moviePoster">Poster</label>
          <input name="poster" class="form-control" id="moviePoster" placeholder="Enter poster">
        </div>
        <button type="submit" class="btn btn-primary me-2">Save or create</button>
        <a [routerLink]="['/movies']" class="btn btn-outline-secondary">Cancel</a>
      </form>
      <div class="col-3">
        <img class='w-100'>
      </div>
    </div>
  </div>
</div>
Styles:
:host {
  display: block;
}

.card {
  width: 750px;
}-
In the
MovieDetailComponentclass, create a new prop calledmovieFormof typeFormGroup. -
In the
ngOnInit()lifecycle method:- create the
FormGroupin themovieFormvariable - create
FormControl's for each property
- create the
-
In the component template:
- add
[formGroup]andformControlNamedirectives to corresponding template elements - for image
[src]="movieForm.controls.poster.value"
- add
-
Now that we created our form elements we can switch to a more declarative method of creating the form by using the
FormBuilder:- inject
FormBuilderservice in the component - in the
movieFormcreation, replaceFormGroupandFormControlwith calls tofb.groupandfb.control
- inject
-
inject (and import) the
ActivatedRoute,Router,MovieServiceservices in the constructor. -
in the
ngOnInitlifecycle method- get the movie id passed through the
paramsMapobservable; then, using aswitchMapcall thegetMoviemethod from theMovieServiceand subscribe - the existence of
movieIdwill let us know if we are in edit or create mode, so we need to save it using atapoperator. - in the subscription
- use
patchValue(movie)to fill in values . - we also need to keep a copy of the retrieved movie, since we'll use it to override the form value
- use
- get the movie id passed through the
this.route.paramMap
  .pipe(
    map((paramsMap) => paramsMap.get('id')),
    tap((movieId) => (this.movieId = movieId)),
    switchMap((movieId) => this.movieService.getMovie(movieId))
  )
  .subscribe((movie) => {
    this.movie = movie;
    this.movieForm.patchValue(movie);
});- submit form with
(ngSubmit)="onSubmit()"- create a property called
modifiedMovieand override themovieobject initially retrieved with theform.value. - if a movie
idexists (you are in edit mode - themovieIdproperty is defined) call theupdateMoviemethod on theMovieService, passing in themodifiedMovie. - if you are in create mode, call the
addMoviemethod passing themodifiedMovieas a parameter. - in th e
subscribemethod, navigate back to'/movies'-> inject theRouterservice from@angular/routerand use the.navigate()method.
- create a property called
onSubmit() {
    const { value } = this.movieForm;
    const modifiedMovie = {
        ...this.movie,
        ...value,
    };
    if (!this.movieId) {
        this.movieService.createMovie(modifiedMovie).subscribe(/* go back */);
    } else {
        this.movieService.updateMovie(modifiedMovie).subscribe(/* go back */);
    }
}- extra TODO: Make the title and the submit button display Create or Edit movie based on how the use navigated to this page.
-
We need to add the following validation rules in our form. Add them to the form definition:
-
Title- required -
Year- required -
Genre- required -
Plot- required
Example:
title: this.fb.control('', Validators.required),- Also add appropriate errors in the template:
<div class="invalid-feedback" *ngIf="movieForm.controls.title.invalid && movieForm.controls.title.dirty">
  Title required
</div>
TIP: you can save some space by saving the form controls into variables:
movieForm.controls.title->title
- Also add this extra style:
.invalid-feedback {
  display: block;
}- Next, disable submit button based on the form validity.
[disabled]="movieForm.invalid"- We'll create a validation service that will provide de validator methods. We use a service because in the next chapter we'll need to use dependency injection to get the genre list asynchronously. But for this example we'll just create a function and export it.
ng generate service movies/services/movies-validators- First, in the service, add a genre array that we'll check against:
export const GENRES = [
  'action',
  'adventure',
  'comedy',
  'crime',
  'drama',
  'fantasy',
  'historical',
  'horror',
  'mystery',
  'romance',
  'satire',
  'science fiction',
  'thriller',
  'western',
];- Next we need to add a validator for
genre. We can create a function calledgenrethat will test if the supplied genres, separated by comma, are present in the genres array:
export const genreValidator: ValidatorFn = (
  ctrl: AbstractControl
): ValidationErrors | null => {
    // test if genre values (separated by comma) are in the genre list
    // return { wrongGenre: true }; <- if validation error
    // return null; <- if validation ok
}- Inject the service in the
MovieDetailComponentand add the validator in the form group creation:
genre: this.fb.control('', [Validators.required, genreValidator]- And in order to validate the two types of errors (required and appropriate genre), we need to add two separate errors:
<!-- required error -->
<div class="invalid-feedback" >Genre required</div>
<!-- wrongGenre error -->
<div class="invalid-feedback" >Not a genre category</div>- Use
*ngIfto properly show/hide errors by checking theerrorproperty on thegenrecontrol fot the specific type of error. Also make sure to take into consideration if the form control is dirty so we won't show validation errors before the user interacts with the control.
Now we want to validate the genre property in the form against the genre and check if it is contained in a predefined set of values found in an array we retrieve from the backend.
-
We start by creating a method in
MovieServiceto get the genres from the server, calledgetGenresthat makes aGETcall to the/genresendpoint on the backend. -
Rename the
MoviesValidatorsServiceintoMovieGenreAsyncValidatortop make it more explicit. Next we create an arrow function property calledvalidateGenreAsync(we use an arrow function so we won't have trouble binding tothiswhen called from the component) (don't forget to inject theMovieServicein the service in order to make the call):
validateGenreAsync = () => (formControl: FormControl): Observable<ValidationErrors> => {
  // Validator code
  // Get genres array form the backend and check the form control value if all the genres are found in that array.
  // must return observable.

  return this.movieService.getGenres().pipe(
      map(genres => {
        ...
        // compare against form control value
        // return validation errors, if any or null
      }))
};- Add async validator to the form builder:
genre: this.fb.control('', [Validators.required, this.movieValidator.validateGenreAsync]),- You can limit http calls by running validation only when we exit the form element:
genre: this.fb.control('', {
  updateOn: 'blur',
  validators: Validators.required,
  asyncValidators: this.movieValidator.validateGenreAsync,
}),,Next we want to introduce a cross field validation that checks the following condition:
-
if the movie has a
sci-figenre, its year can't be earlier than1902, the year A trip to the moon was released, which is considered the first Sci-fi movie ever made. -
First we create the validator function in the
movies-validator.service.tsfile calledsciFiGenreYearValidator. This will be aValidatorFnand will take anAbstractControlas a parameter only this time (as opposed to the previous examples) it will receive aFormGroupsince the validator will be applied on theFormGrouplevel (more on that in a moment). This allows us to get reference to the group controls using the.get(/*form control name*/)method (which can returnnull).
export const sciFiGenreYearValidator: ValidatorFn = (
  ctrl: AbstractControl
): ValidationErrors | null => {
  // the ctrl is the form -> store the genre and year controls to get their values (make sure you check for null values)
  // check if genre contains 'sci-fi' (you might want to apply trim and toLowerCase to the value in order to eliminate false negatives)
  // if condition is ok, return null else return 'wrongSciFiYear' error
};- Next we add the validator in the
FormGroupdeclared in theMoviesDetailComponent, but at the form level:
public movieForm: FormGroup = this.fb.group({
      // form controls declarations
    },
    { validators: sciFiGenreYearValidator, updateOn: 'blur' }
);- Finally we show the error with the text
Sci-Fi movies were introduced after 1902in the template by verifying the presence of errors on the control and also making sure that the form state isdirty
movieForm.errors?.wrongSciFiYearAt the moment we can add genres to a movie by filling in a free-text input, and we have to make sure that we both spell the genre correctly and that genre is in the accepted array of genres, otherwise the form will be invalid (thanks to the validators we wrote for this field). We can improve the experience by providing a way for the user to select one or more genre from a set of dropdowns with a fixed set of options, correctly spelled and in the genre array. Here is a sample of how that would look:
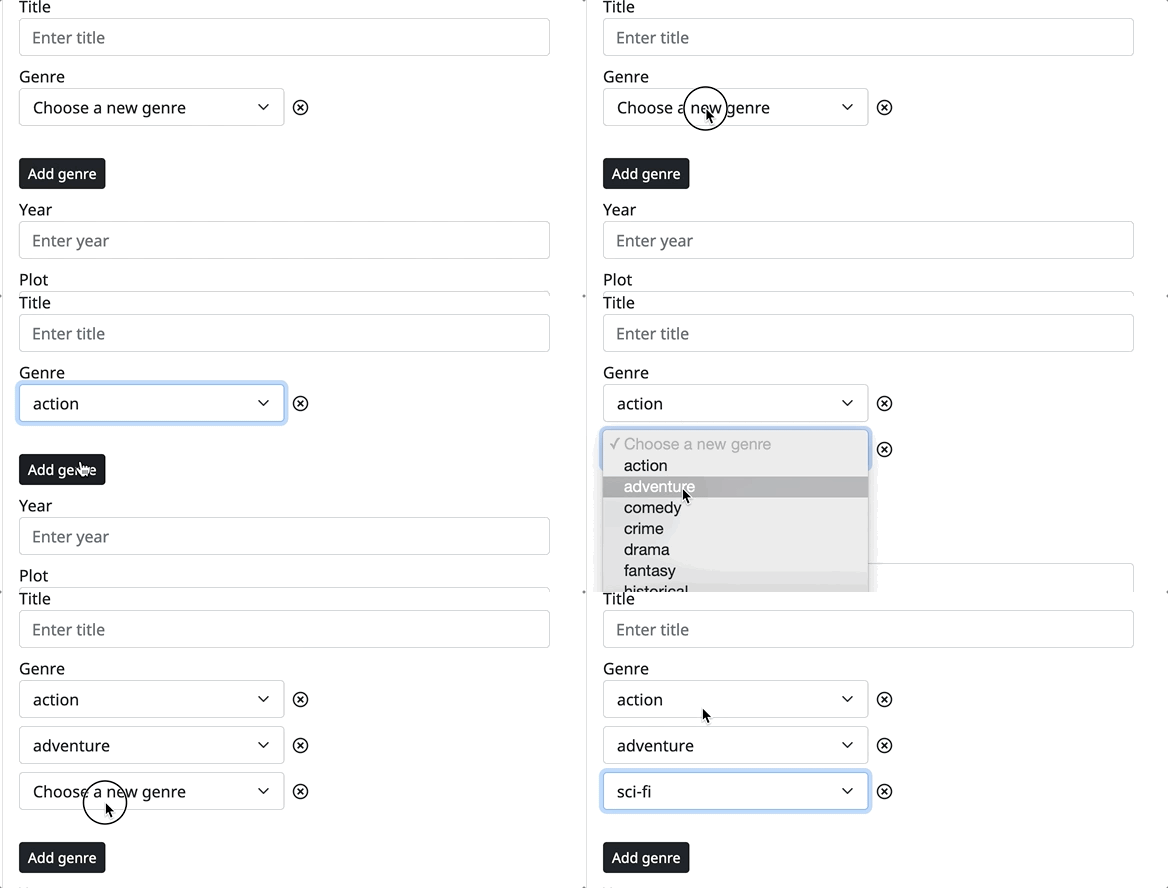
This is a typical use case for the FormArray. Each time we click on Add genre we will add a new control that we render as a dropdown option in the UI. The result will be an array of genres strings, that we need to concatenate in order to save it to the "database" because that is the expected format:
 RECEIVED FROM THE FORM            |   FORMAT TO SAVE
-----------------------------------------------------------------
 ['action', 'adventure', 'drama']  |  'action, adventure, drama'
- We start by changing the control type in the form declaration, in the
MovieDetailsComponent:
genre: this.fb.array([], {
  validators: genreValidator,
  updateOn: 'change',
}),- We're going to reference this control a lot, so we can create a getter method to get a reference and a quick access method to the form array. Use the
getmethod on the form to get the control:
get genreCtrls(): FormArray {
  // return genre control from the form
}- Next, we need to create ways to add/remove genres in the array (actions that we'll later atach to the add/remove buttons in the template). Create the following methods in the class file and fill in the functioality using the
pushandremovemethods on the control:
public addGenre(): void {
  // push a new control in genreCtrls
}

public removeGenre(index: number): void {
  // remove the control from genreCtrls located at the index
}- We also need to alter the code that sets the initial value, by transforming the genre string to an array with the genre values, so we can feed them to its own controls.
ngOnInit(): void {
  this.route.paramMap
    ...
    .subscribe((movie) => {
      this.movie = movie;
      // transform the genre string received on the model in an array:
      // ex: 'action, sci-fi, drama' => ['action', 'sci-fi', 'drama']
      // for each of the elements in the array, push a control in the genre form array
      // finally fill the form with the initial values of the movie plus the genres in the new format
      this.movieForm.patchValue({ ...movie, genre });
  });
}- Finally we need to make the final transformation to the genres property, from array to string in order to correctly persist it to the database:
onSubmit() {
  ...
  const modifiedMovie = {
    ...this.movie,
    ...value,
    genre: value.genre.filter((g: string) => g).join(', '), // transform the array into a string, removing empty values first (dropdowns without a selection)
  };
  ...
}- In the template, we remove the existing genre markup and replace it with a div that binds to the
genrefield of the form usingformArrayName:
...
<div formArrayName="genre" class="mb-2">
</div>- Because
genreis an form array, we can iterate through the controlcontrolsproperty using*ngForin order to display template elements and bind to them. We also need to keep track of the index we're iteration on, since we'll use that and binding it toformControlName.
*ngFor="let genreCtrl of genreCtrls.controls; index as i"- To get the genre values that we display in the dropdown, we can import the
GENREScollection and set it to a property we can later use and iterate on in the template:
import {
  GENRES,
  genreValidator,
  sciFiGenreYearValidator,
} from '../../services/movies-validators.service';
...

export class MovieDetailComponent implements OnInit {
...
public genres = GENRES;
...
}- Inside the form array item, we create the
<select>element that will display the genres and a button that removes the genre (using theremoveGenre(index)method we created earlier):
<select class="form-select w-50 d-inline me-2" [formControlName]="i">
  <option disabled value="">Choose a new genre</option>
  <option *ngFor="let genre of genres" [ngValue]="genre">
    {{genre}}
  </option>
</select>
<i class="far fa-times-circle" role="button" (click)="removeGenre(i)"></i>- And finally, outside the form array element, we add a button that will be responsible for adding more genres (basically adding a new form control in the array using the
addGenremethod we defined earlier and triggering a template re-render with the new set of controls):
<a class="btn btn-dark btn-sm" (click)="addGenre()">Add genre</a>- Since we also attach a validator to the form array, we can show a validation if the genre has not been filled in (at least one dropdown with a value set):
genreCtrls.errors?.wrongGenreTODO: what is the condition that we need to add in order for the error to not show initially, but only after we've interacted with the control?
- Finally we need to fix the validators. Since we don't need to check for correctness of genre names because they come for a specific list of accepted value, we can just check if the list is empty or not, making this just a more sophisticated version of
Required. Update the initial condition in thegenreValidator(we'll keep the rest of the condition as a way to code defensively):
if (
    !ctrl.value // no actual value for the field
    ||
    !ctrl.value.join() // not a single field with a value (dropdown with option selected)
) {
    return { wrongGenre: true };
}- We also need to update the
sciFiGenreYearValidatorto accommodate for the change from string to array of strings:
const hasSciFi = (genreCtrl.value as string[])
  .map((g) => g.trim().toLowerCase())
.includes('sci-fi');For our final exercise we'll create a custom form control for genre where the user can toggle selected genres form a visual tag list, like so:
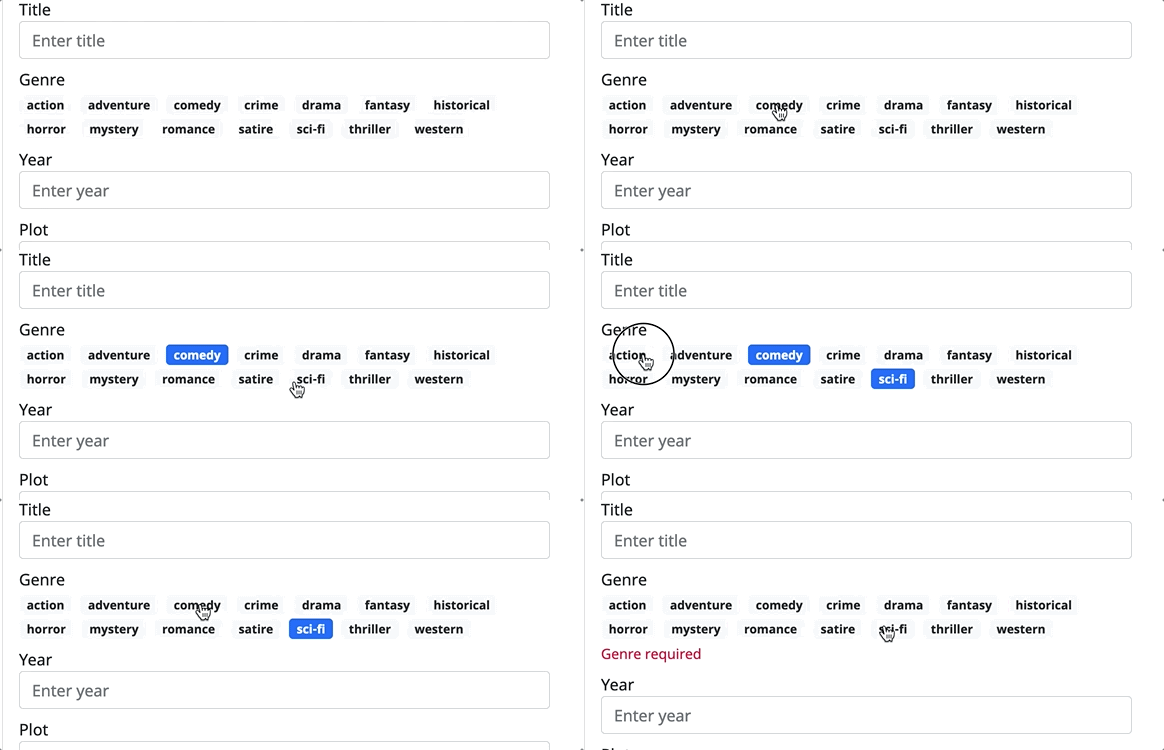
- First we create the
genre-controlcomponent
ng generate component movies/components/genre-control --module movies
- The main idea of the component will be that we will render a list of elements and toggle their selected state. So inside the component class we need to create a map of the genres - an object where the
keyis the genre name and thevalueis the selected state:
public genres: Genres = {
  action: false,
  adventure: false,
  comedy: false,
  crime: false,
  drama: false,
  fantasy: false,
  historical: false,
  horror: false,
  mystery: false,
  romance: false,
  satire: false,
  'sci-fi': false,
  thriller: false,
  western: false,
};- Next we iterate the property in order to display the values. Since the property is not an array or an iterable type, we can use the
keyvaluepipe provided by the Angular framework in order to transform the object to an iterable that contains thekeyandvaluepair for each element:
<span
  class="badge bg-primary me-2"
  *ngFor="let genre of genres | keyvalue"
>
  {{genre.key}}
</span>- The display value will be
keyand the selected state of each key will be thevalueproperty. We can use thisvalueproperty to style the element accordingly:
[class.bg-primary]="genre.value"
[class.bg-light]="!genre.value"
[class.text-dark]="!genre.value"- Finally each element should have a callback when clicked by sending the selected
keyto thetoggleGenremethod that will modify the corresponding value on the property.
(click)="toggleGenre(genre.key)"- In the class, add the method that handles the genre click:
public toggleGenre(genreKey: string): void {
  // toggle the value in the genre object for the given key
}- Next, in order to make the component usable in a form, we need to implement the
ControlValueAccessorinterface, and define theNG_VALUE_ACCESSORprovider at the component level:
@Component({
  ...
  providers: [
    {
      provide: NG_VALUE_ACCESSOR,
      multi: true,
      useExisting: GenreControlComponent,
    },
  ],
})
export class GenreControlComponent implements ControlValueAccessor{
  onChange: (genres: string) => {};
  onTouched: () => {};

  registerOnChange(fn: any): void {
    this.onChange = fn;
  }
  registerOnTouched(fn: any): void {
    this.onTouched = fn;
  }

  writeValue(obj: string): void {
    // this method will be called when the form sets the value (either by initialization or calling setValue)

    // the received genres string value should be split into singular genres so we can set each value in the local genre property to 'true'

    // ex: if 'action, sci-fi, drama' is the genre string, then 'action', 'sci-fi' and 'drama' should be set to true
  }
}- Finally, in order to make the component forward changed values to the form, add a call to
onChangeand pass the string in the correct format:
public toggleGenre(genreKey: string): void {
  ...
  // get all the keys that have a 'true' value form the genre object and crete a coma separated string with those values
  // ex: if 'action', 'sci-fi' and 'drama' are true then the resulting string should be -> 'action, sci-fi, drama'
  this.onChange(/*resulting string*/);
}- Next in the
MovieDetailComponentreplace the existing genre controls with the newngi-genre-controland bind it to thegenreformControlName. Also add validation:
<ngi-genre-control formControlName="genre"></ngi-genre-control>
<div class="invalid-feedback" *ngIf="movieForm.controls.genre.invalid">Genre required</div>- Update the code in the class and replace the existing form array with a regular form control:
public movieForm: FormGroup = this.fb.group(
  {
    ...
    genre: this.fb.control('', Validators.required),
    ...
  },
  { validators: sciFiGenreYearValidator }
);- Finally, update the submit code, since we'll receive the genre string in the correct format from the control:
onSubmit() {
  ...
  const modifiedMovie = {
    ...this.movie,
    ...value,
  };
}- And update the
sciFiGenreYearValidatorfor the same reason:
const hasSciFi = (genreCtrl.value as string)
  .split(',')
  .map((g) => g.trim().toLowerCase())
  .includes('sci-fi');
TODO: Make sure the validation error on the genre field doesn't appear unless the control has ben interacted with (TIP: make use of the onTouched callback and the dirty property on the control)