Admin Quickstart
This guide follows the actual administration workflow from initial system configuration to browser Chat, compatible APIs, and embedded Chat. The screenshots come from an Agent4API demonstration environment. Replace the example source names, model names, URLs, and business Tools with your own values.
Recommended order: Settings → Providers → API Sources → Tools → Skills → Agent → Chat verification.
Prepare the following:
- an OpenAI-compatible or Anthropic-compatible model service;
- the model service Base URL, model name, and API key;
- a Swagger 2.0 or OpenAPI 3.x document, supplied as a file or accessible URL;
- OAuth 2.0 client details or a login operation that returns a token if the business API requires authentication;
- the public HTTPS address that will be used in production.
Special cautions:
- Never place model API keys, OAuth client secrets, business passwords, or access tokens in the Wiki, screenshots, or chat messages.
- Check that
servers,host, andbasePathin the OpenAPI document point to the intended environment. - Complete the workflow with read-only operations in a test environment before enabling write or delete Tools.
- Open
https://your-domain.example/admin. - Enter the administrator username and password.
- Use the language control in the lower-left corner if you need to switch the interface language.
- Confirm that the status at the top of the page says the system is healthy.
- Confirm that the navigation contains Settings, Users, Providers, APIs, Tools, Skills, Agents, and Chat.
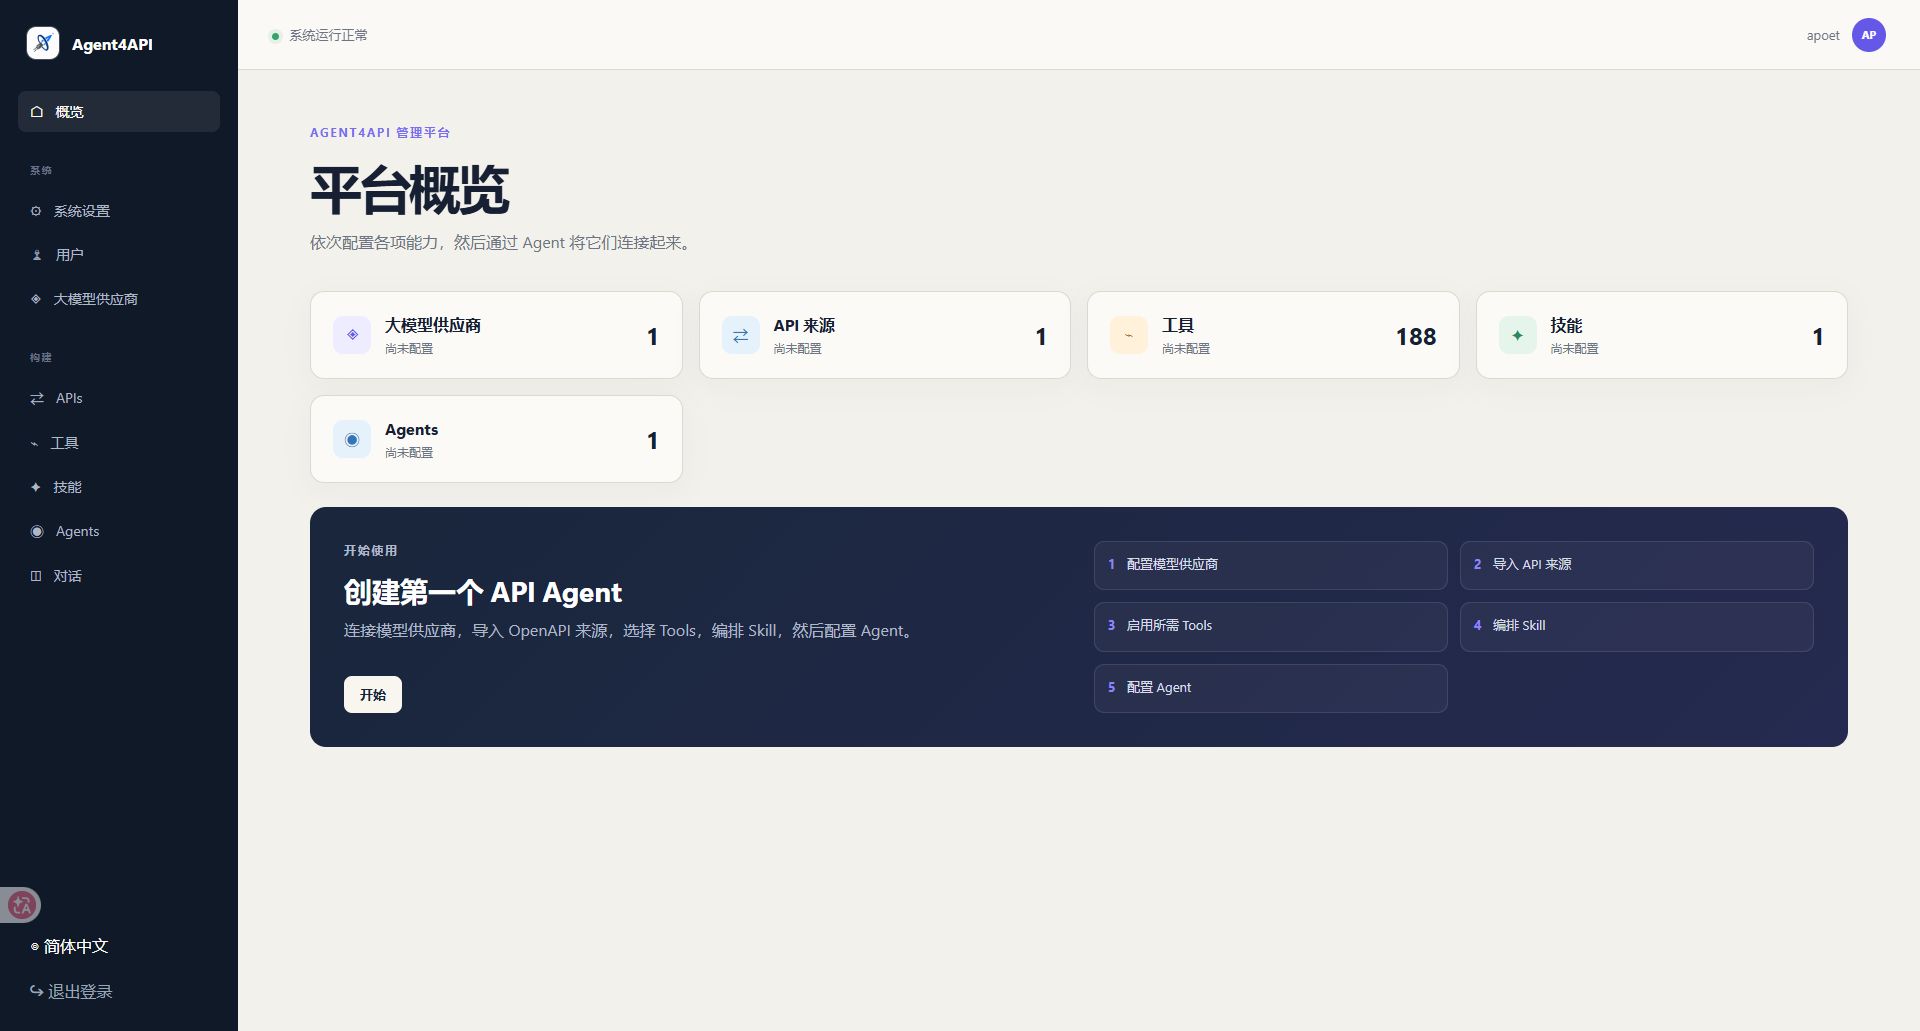
Success criterion: the Overview page loads without redirecting back to Sign in, and the system status is healthy.
Special cautions:
- The administrator session and public browser Chat identity are separate. Access to Chat does not grant administration permission.
- Do not save the administrator password in a browser on a shared computer. Sign out when finished.
- On a new installation, complete the setup wizard first. Administrator usernames are 3–128 characters and passwords are 6–256 characters.
- Select Settings.
- Enter the externally reachable Agent4API origin in System Base URL, for example
https://agent.example.com. - Include only the scheme, host, and optional port. Do not include
/admin, a query string, or a fragment. - Select Save settings.
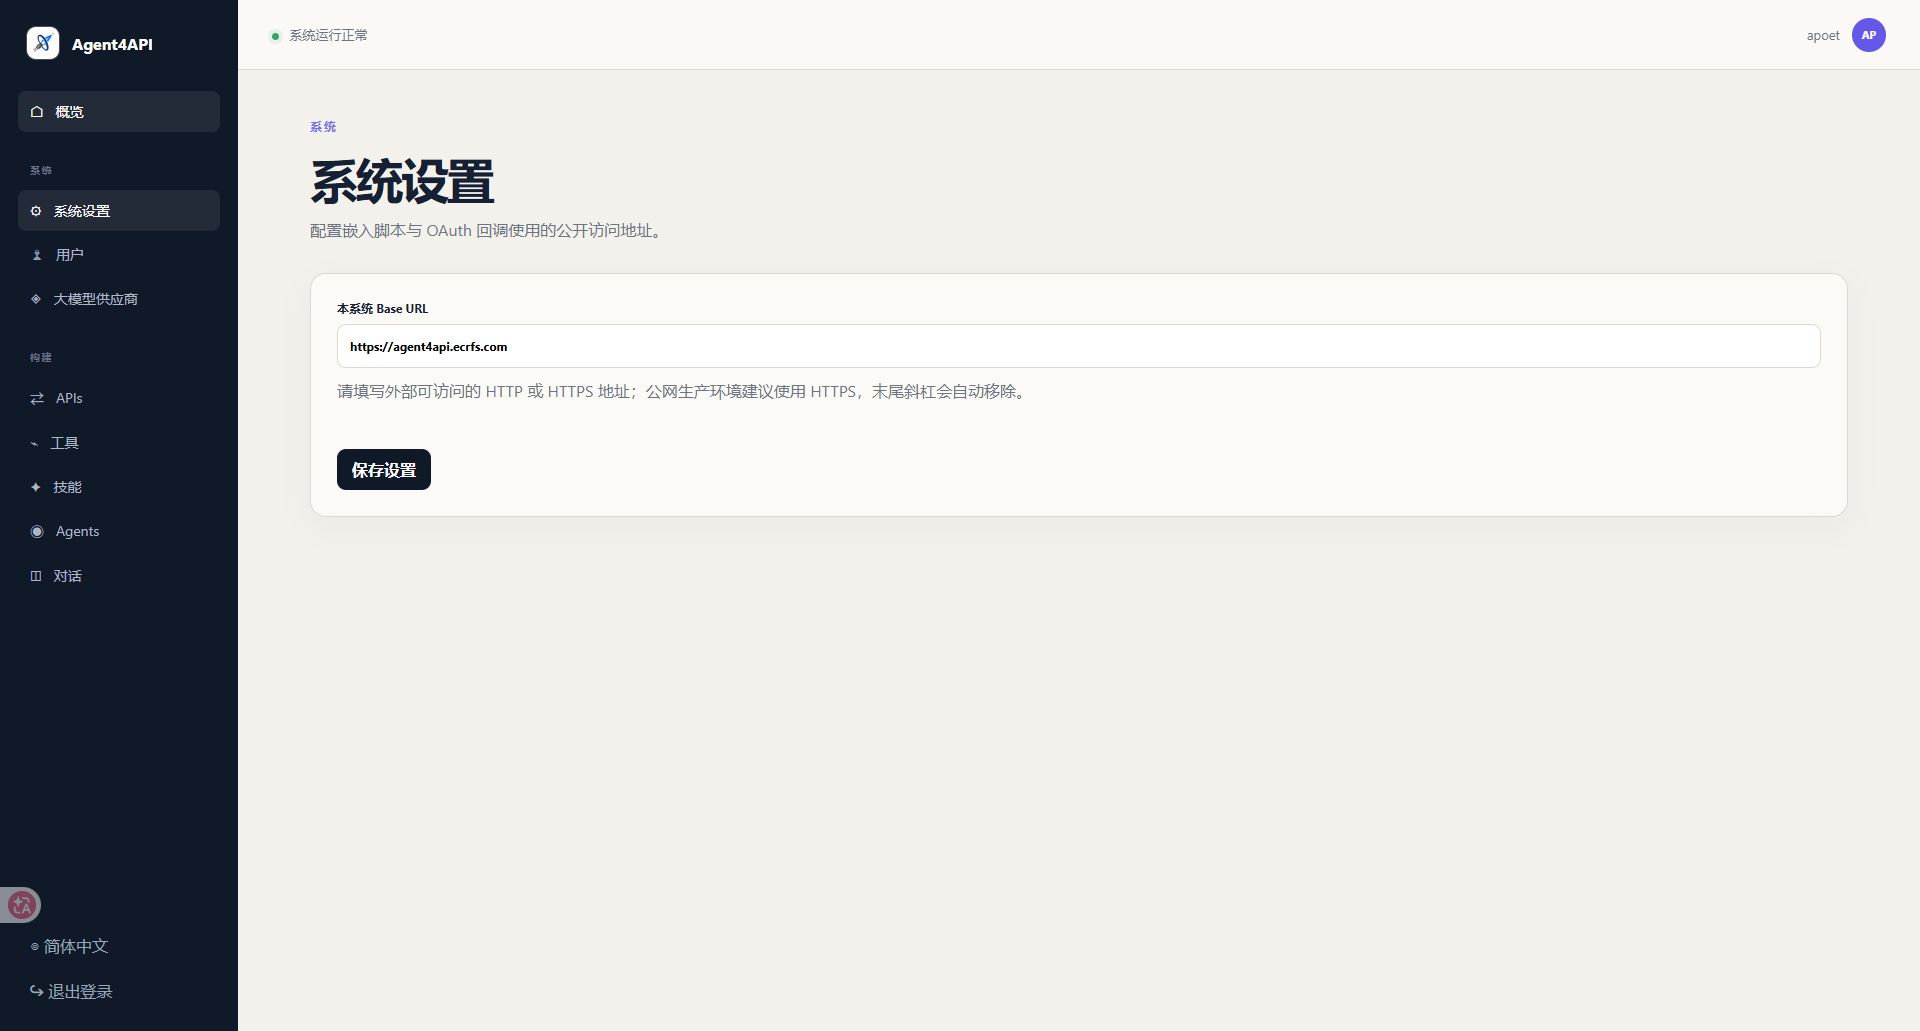
Success criterion: the saved public address remains in the field after refreshing the page.
Special cautions:
- Use HTTPS in production and set
CHAT4OPENAPI_SECURE_COOKIES=true. - The reverse proxy must route the frontend,
/api/*,/v1/*,/anthropic/*, and/embed/*to the same Agent4API service. - Agent4API uses this value for Embed scripts and OAuth callback addresses. After changing the domain, copy new Embed snippets and review every registered OAuth callback.
- A trailing slash is removed automatically.
Administrators can create standard users that are limited to the Build area.
- Select Users.
- Enter a unique username.
- Enter and confirm the password.
- Choose the user's default interface language.
- Leave Allow sign in selected.
- Select Create user.
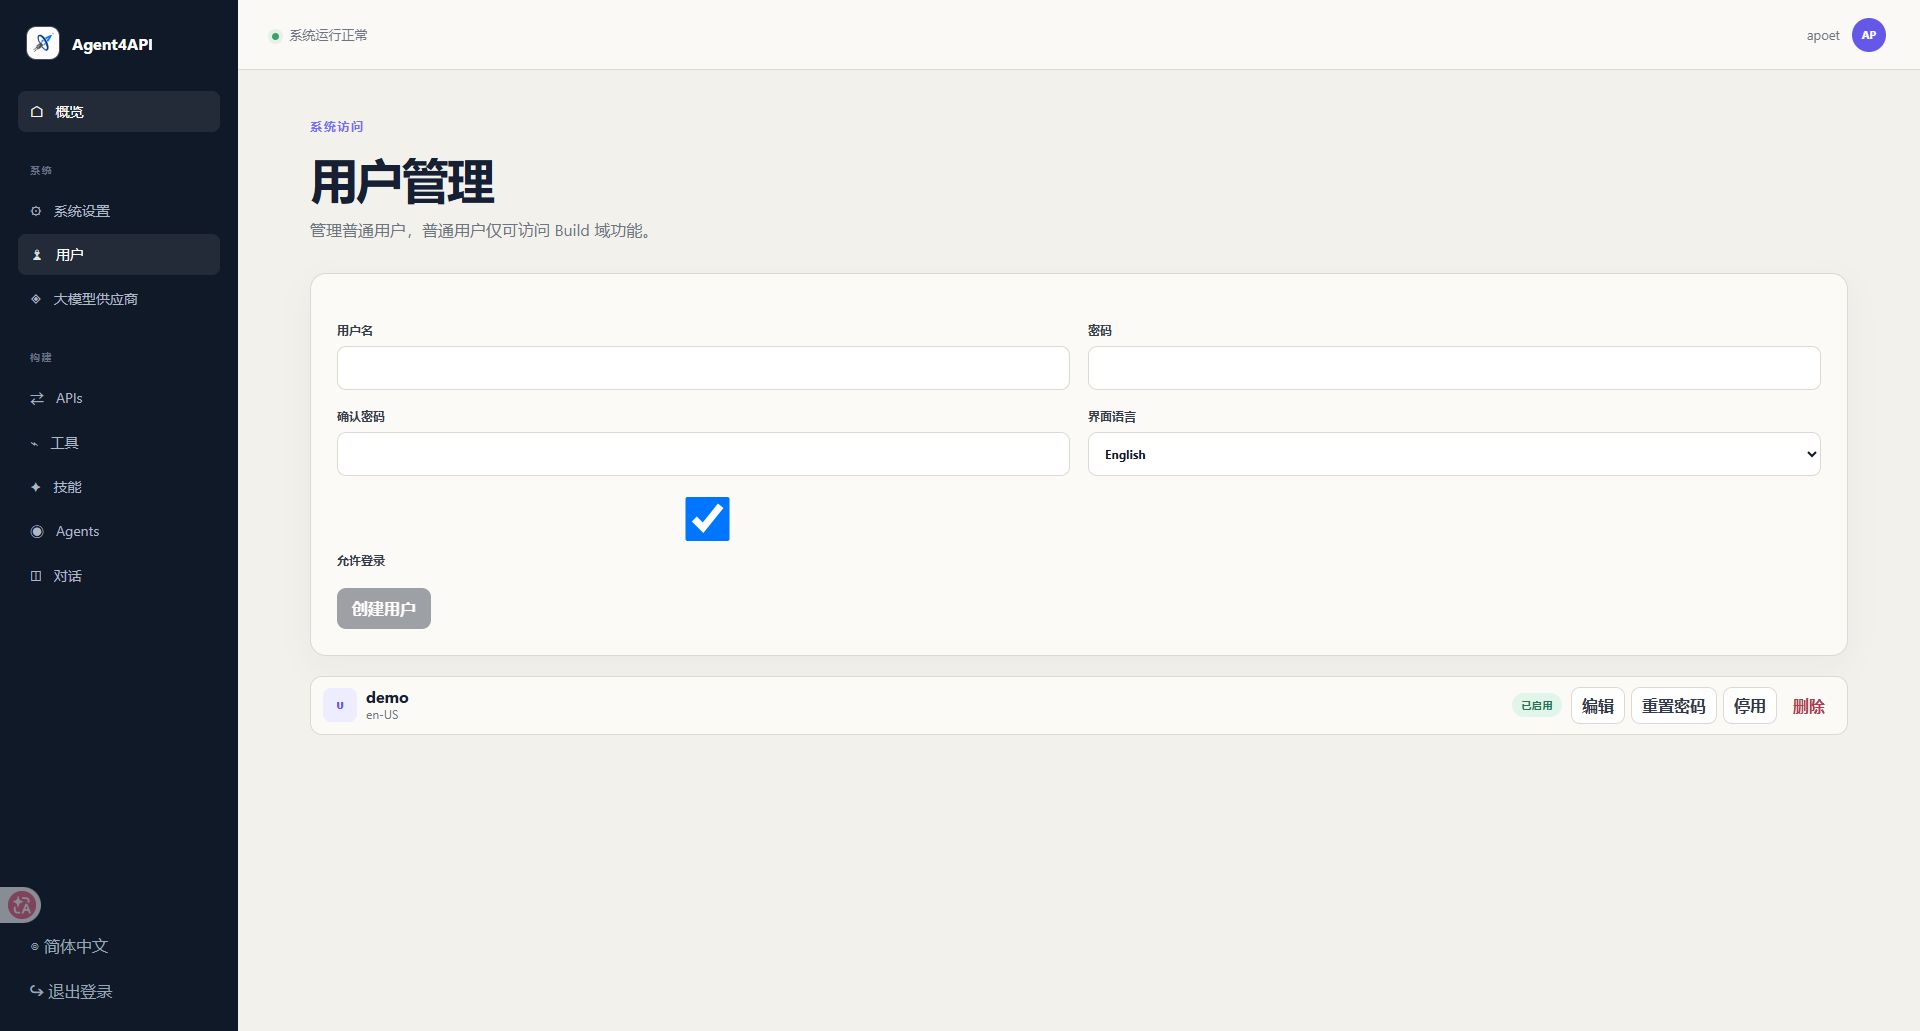
Success criterion: a card for the new user appears and shows an enabled state.
Special cautions:
- Give standard users only the access required for their daily build workflow. Keep system configuration and account governance with administrators.
- Do not share one account between multiple people. Individual accounts can be disabled and audited independently.
- Resetting a password replaces the old password. Deliver temporary credentials through a secure channel.
- Prefer disabling an account for a temporary absence. Delete it only when it is no longer needed.
- Select Providers.
- Enter a recognizable provider name, such as
Production OpenAI. - Choose a protocol:
- OpenAI compatible for an OpenAI-compatible endpoint;
- Anthropic compatible for an Anthropic-compatible endpoint.
- Enter the provider Base URL, for example
https://api.openai.com/v1. - Enter the exact default model identifier accepted by the provider.
- Enter the API key.
- Select Add provider.
- On the new provider card, select Test.
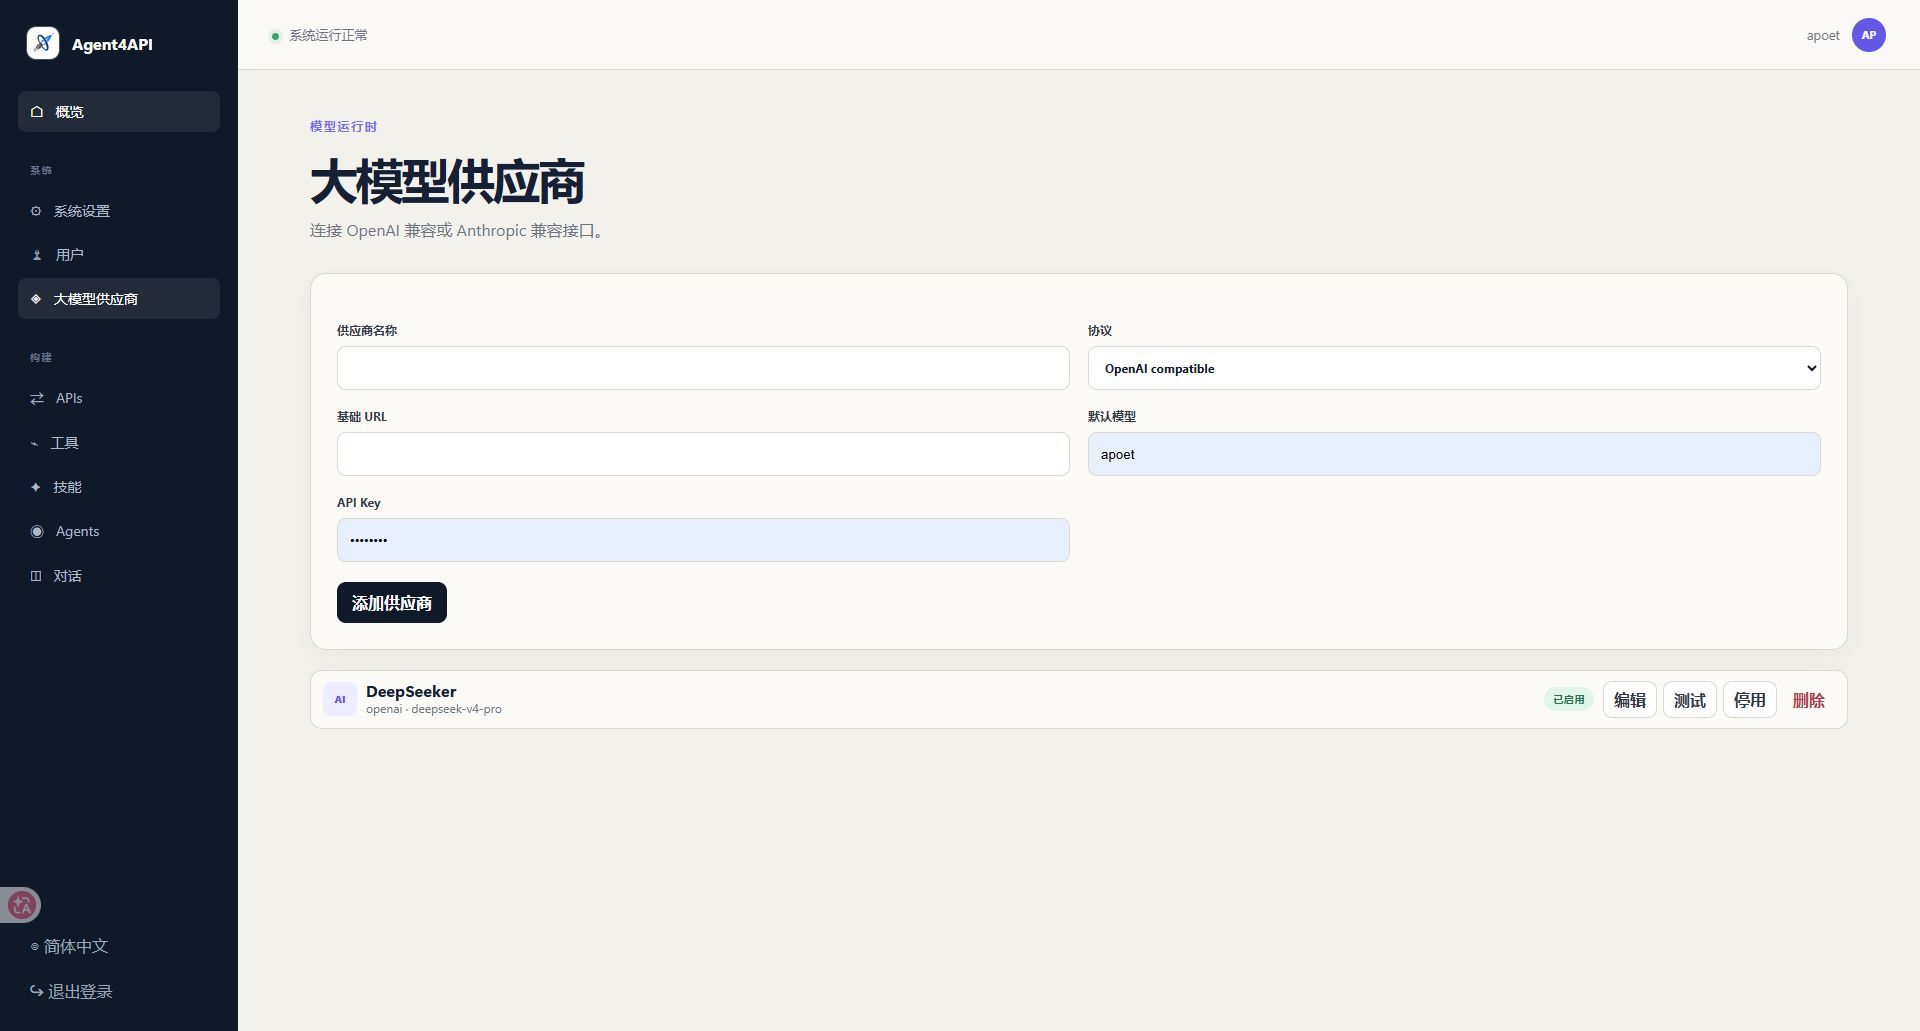
Success criterion: the connection test succeeds and the provider card is enabled.
Special cautions:
- Whether the Base URL includes
/v1depends on the compatible service. Follow that provider's documentation. - A model's display name may differ from its API identifier. Enter the exact identifier accepted by the API.
- When editing a provider, leaving the secret field empty normally preserves the encrypted existing key.
- If the test fails, check network access, Base URL, protocol, model name, account quota, and API key permissions.
- Before deleting a provider, confirm that no Agent depends on it. Prefer disabling it during temporary maintenance.
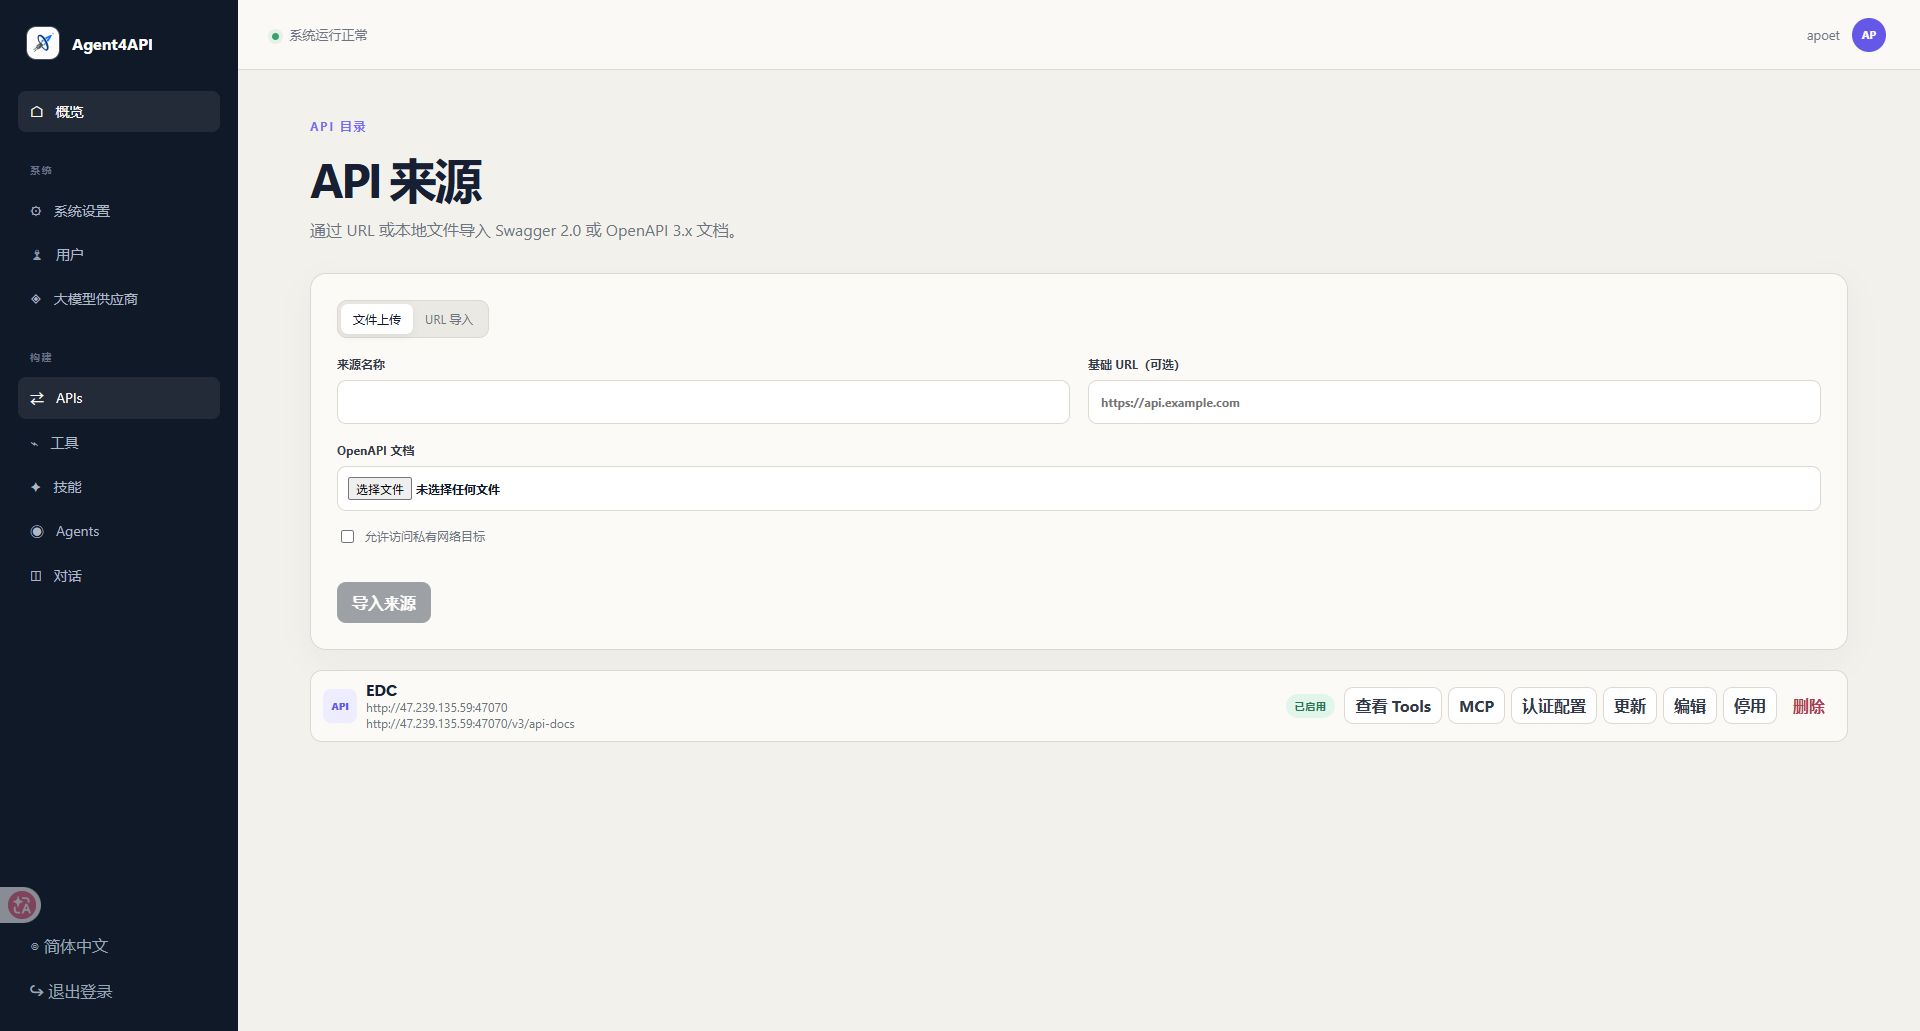
Agent4API supports file upload and URL import.
- Select APIs.
- Choose File upload.
- Enter a recognizable source name.
- If the document does not declare the correct server, enter an optional Base URL override.
- Select OpenAPI document and choose a
.json,.yaml, or.ymlfile. - Select Allow private network targets only when the target is a trusted internal service.
- Select Import source.
- Choose URL import.
- Enter the source name.
- Enter an optional Base URL override when required.
- Enter the complete document URL, such as
https://api.example.com/openapi.json. - Configure private-network access only when necessary.
- Select Import from URL.
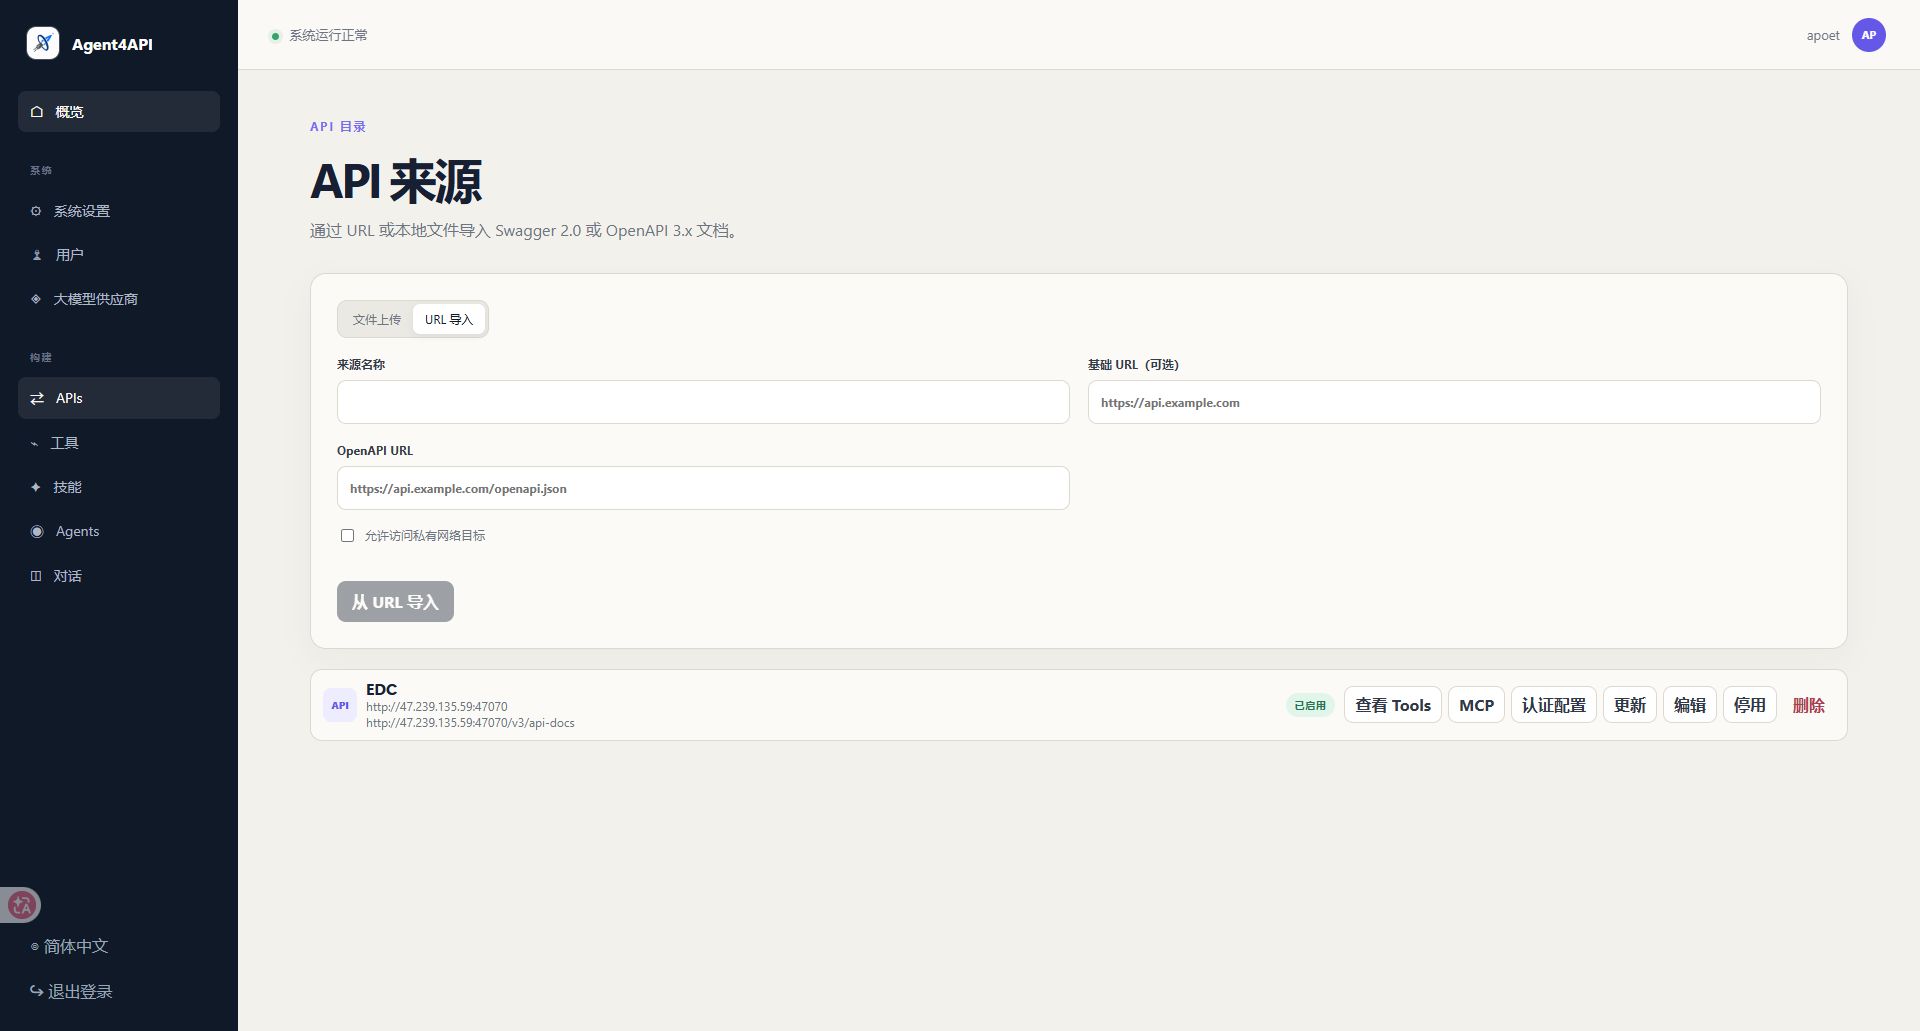
Success criterion: a source card appears and its View Tools action is available.
Special cautions:
- OpenAPI documents are limited to 5 MiB. Split larger specifications by business domain.
- The URL must return an OpenAPI document directly, not a Swagger UI HTML page.
- Private-network access is an SSRF security boundary. Enable it only after verifying the host, IP address, and redirect targets.
- Stable, unique
operationIdvalues produce clearer Tool names. - Importing a source does not automatically approve every operation. Review Tools before enabling them.
Skip to Step 7 if the business API is public. Otherwise, select Authentication on the source card and configure OAuth 2.0 or Tool authentication.
- Open the OAuth 2.0 tab.
- Enter the Client ID.
- Enter the Client Secret if the client is confidential.
- Choose an authorization mode:
- Authorization code for interactive browser authorization with PKCE;
- Client credentials for service-to-service or non-interactive compatible API calls.
- Choose the Token endpoint authentication method. Use Auto first unless the provider specifies another method.
- Enter any required Token request headers and parameters as valid JSON objects.
- Enter the authorization URL, Token URL, and optional Device Authorization URL.
- Enter scopes separated by spaces or commas.
- Review the recommended and effective callback addresses.
- Register the effective callback with the OAuth provider.
- Select Save OAuth configuration, then Test authentication.
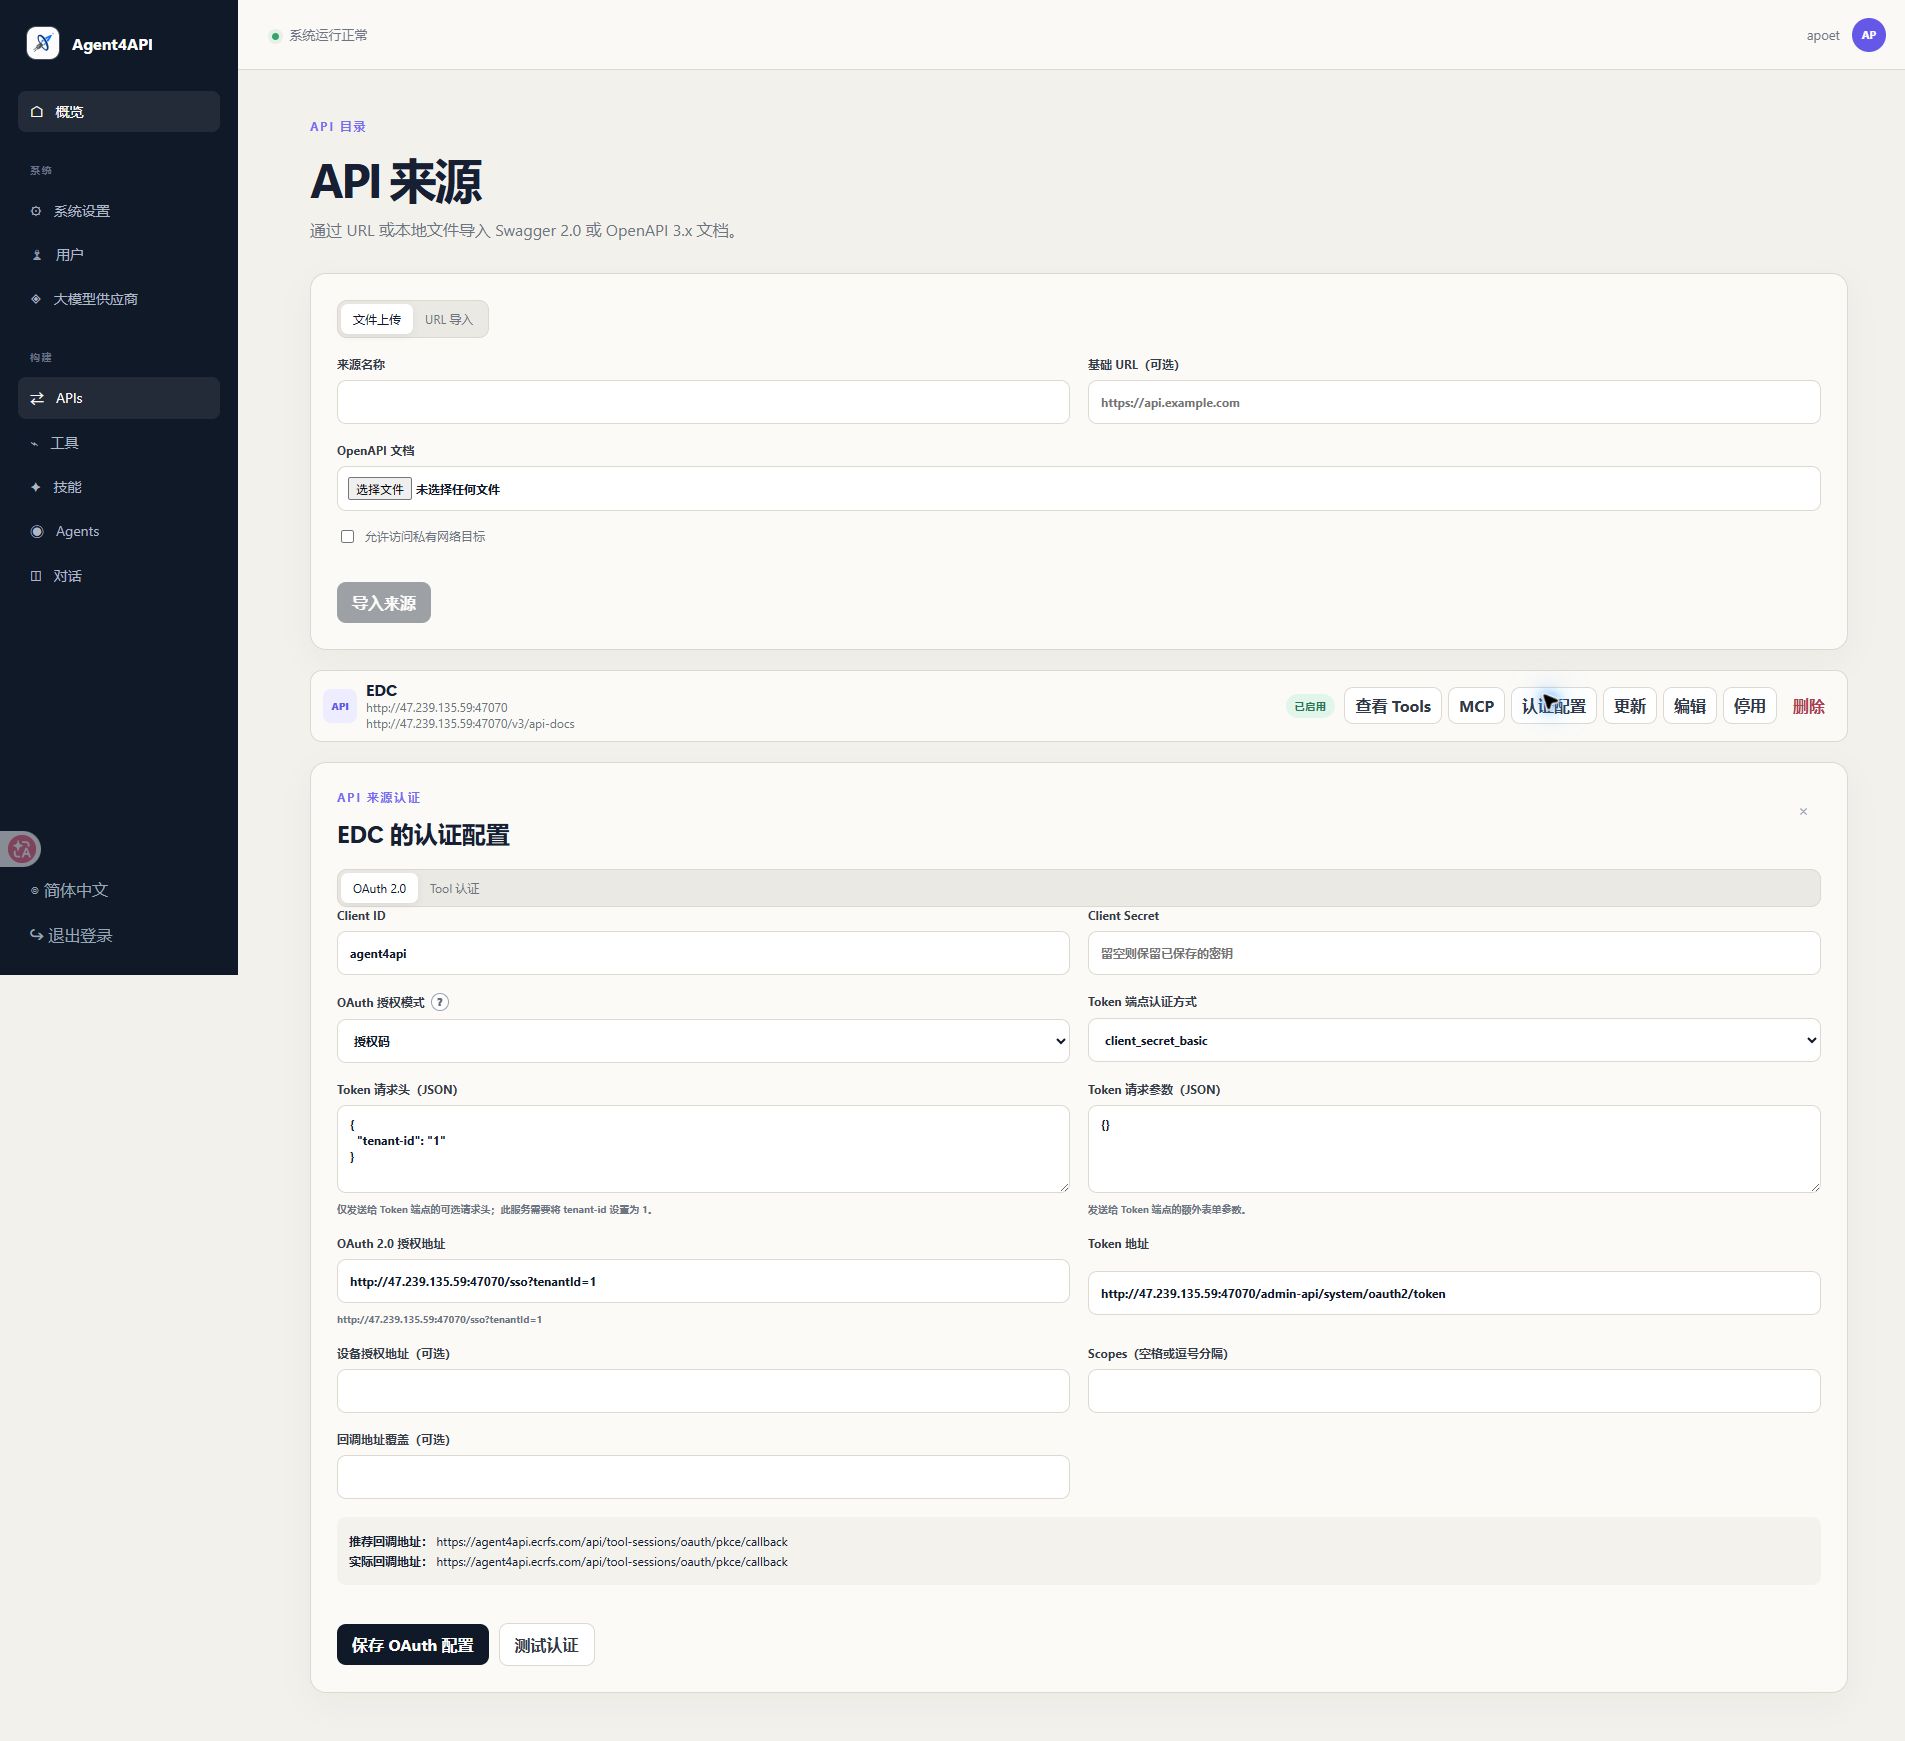
Success criterion: the configuration is saved and the test either reaches the provider's authorization screen or successfully obtains credentials.
Special cautions:
- A compatible API request has no browser in which to complete an Authorization Code redirect. Use Client Credentials or create a Tool Session in advance.
- The callback registered with the provider must exactly match the effective address, including scheme, host, port, and path.
- Client secrets are encrypted. Leaving the field empty during an edit preserves the existing secret.
- Token headers and parameters are sent only to the Token endpoint. Do not put unrelated business data there.
- Request only the scopes the Agent actually needs.
- Open the Tool authentication tab.
- Select an enabled login operation in Login Tool.
- Enter the Token JSON path. For
{"data":{"accessToken":"..."}}, usedata.accessToken. - Enter the request field names used for the username and password.
- Add optional login parameters and headers as valid JSON objects.
- Configure idle and absolute expiry limits.
- Enter test credentials only in the test section.
- Select Save authentication configuration, then Test authentication.
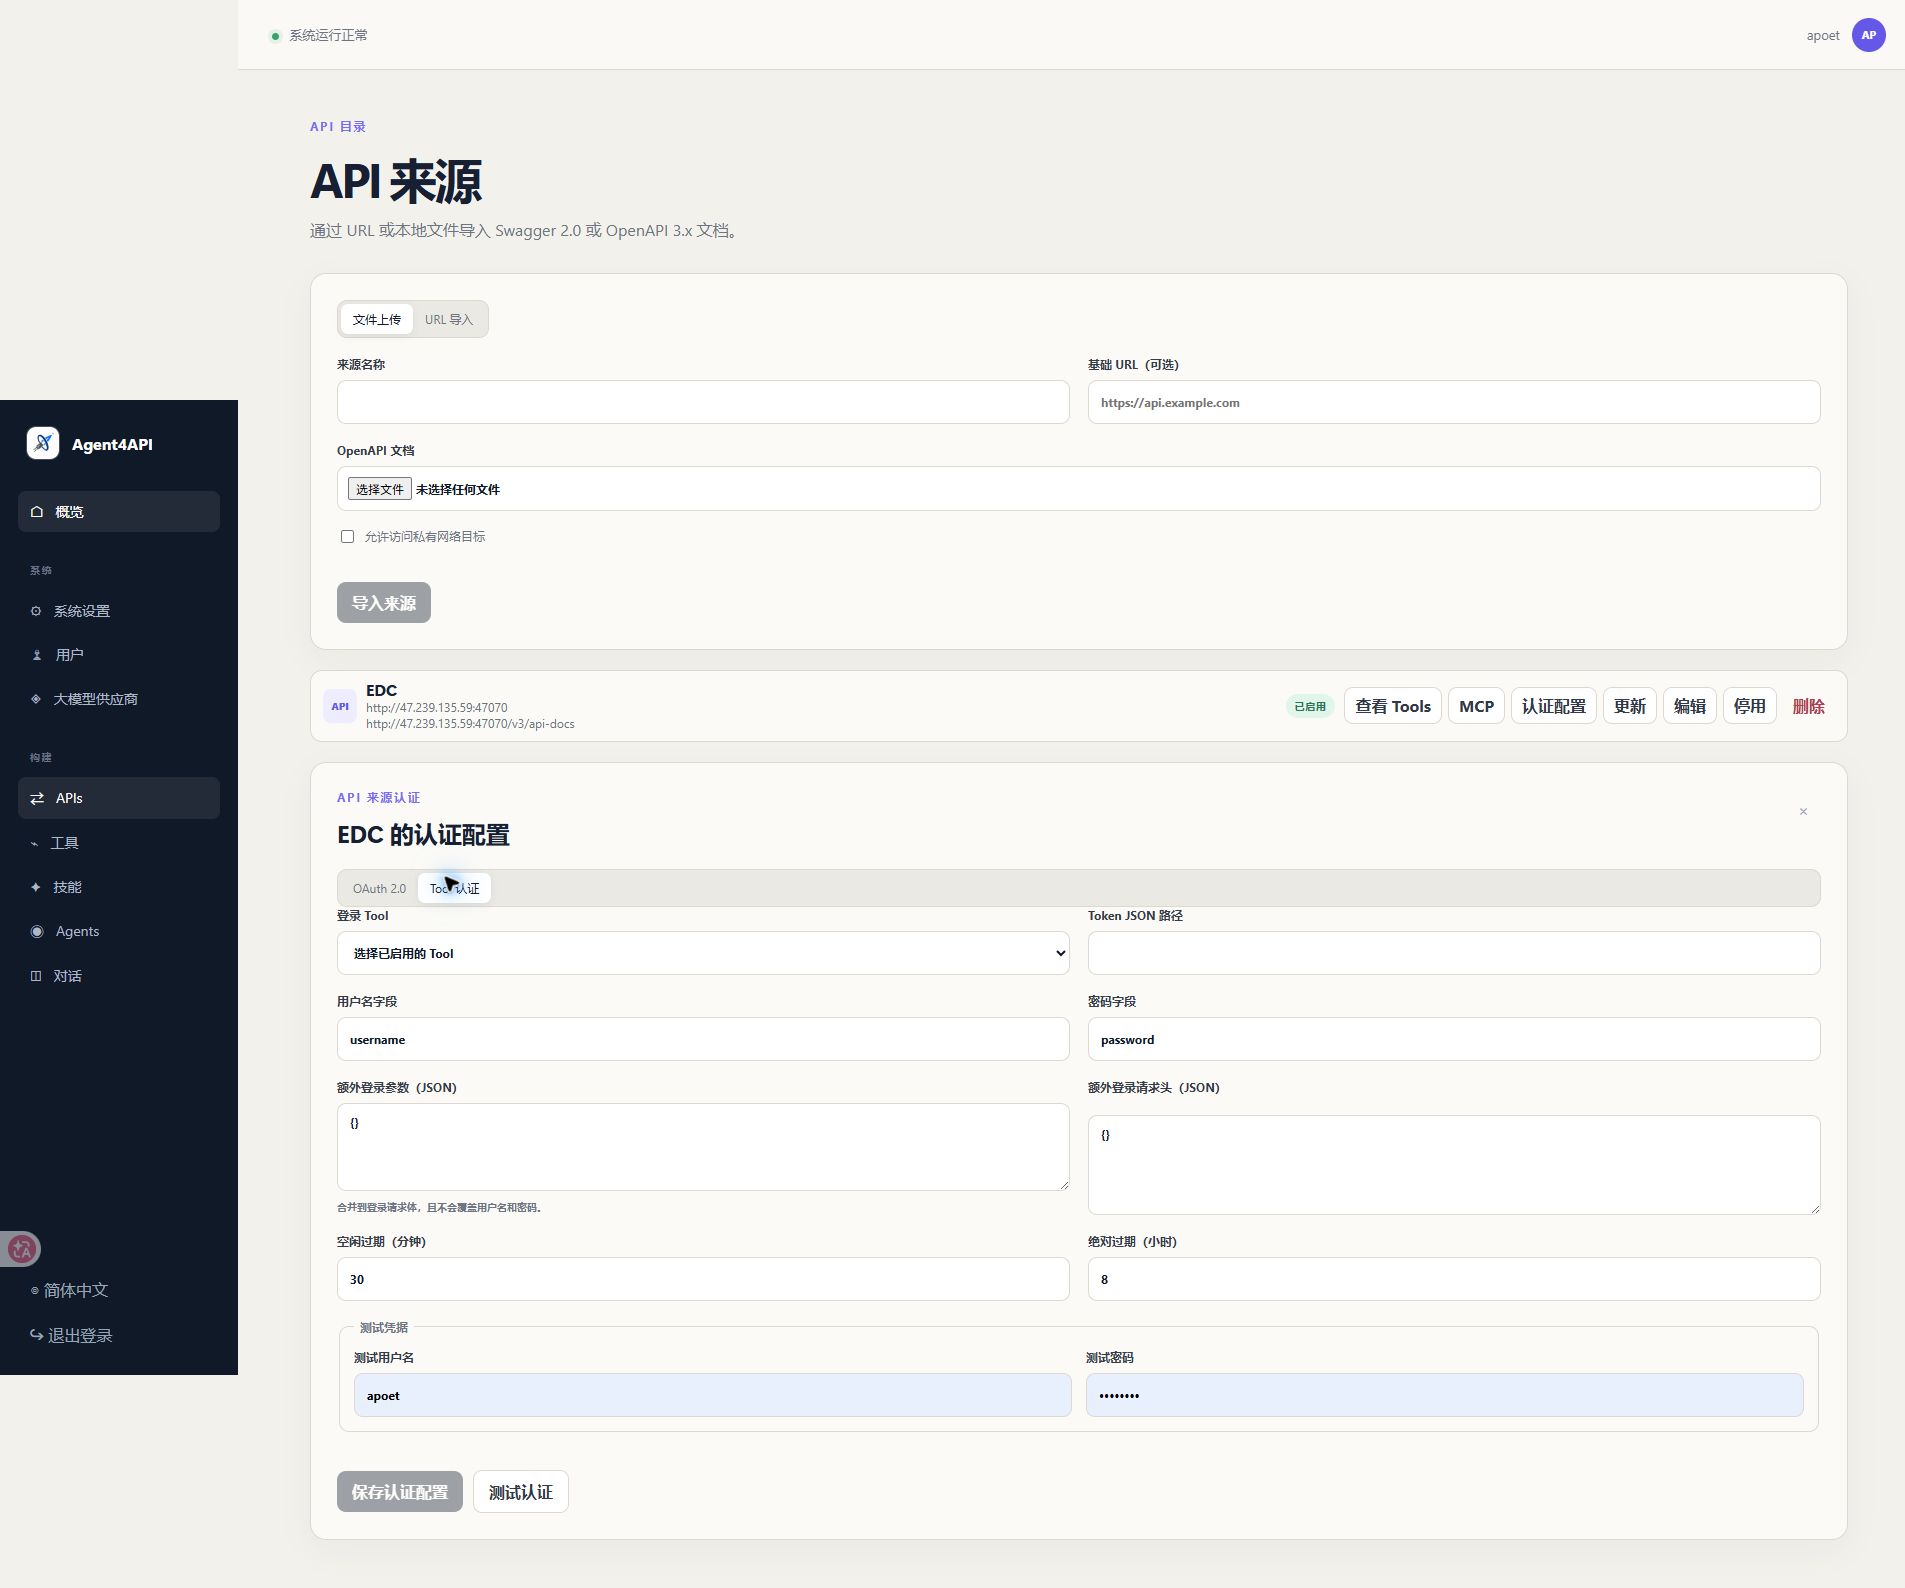
Success criterion: the test succeeds and Agent4API extracts the credential from the configured response path.
Special cautions:
- The login operation must already be enabled on the Tools page.
- Use a low-privilege test account for verification, not a production administrator account.
- Additional login parameters do not override the configured username and password fields.
- Login Tools cannot bypass CAPTCHA, MFA, consent screens, or other interactive challenges. Use an OAuth flow or external credential injection instead.
- Keep Agent4API expiry limits short and no longer than the upstream token lifetime.
- Select View Tools on the source card, or open Tools from the navigation.
- Locate the required operations by API Source and Swagger tag.
- Review the HTTP method, Tool name, description, and parameter count.
- Use Edit description to document unclear purpose, preconditions, or limits.
- Enable one Tool directly, or perform a bulk operation:
- select the required Tool checkboxes;
- confirm the N Tools selected count;
- select Enable selected.
- Use the Enabled filter to review the final allow-list.
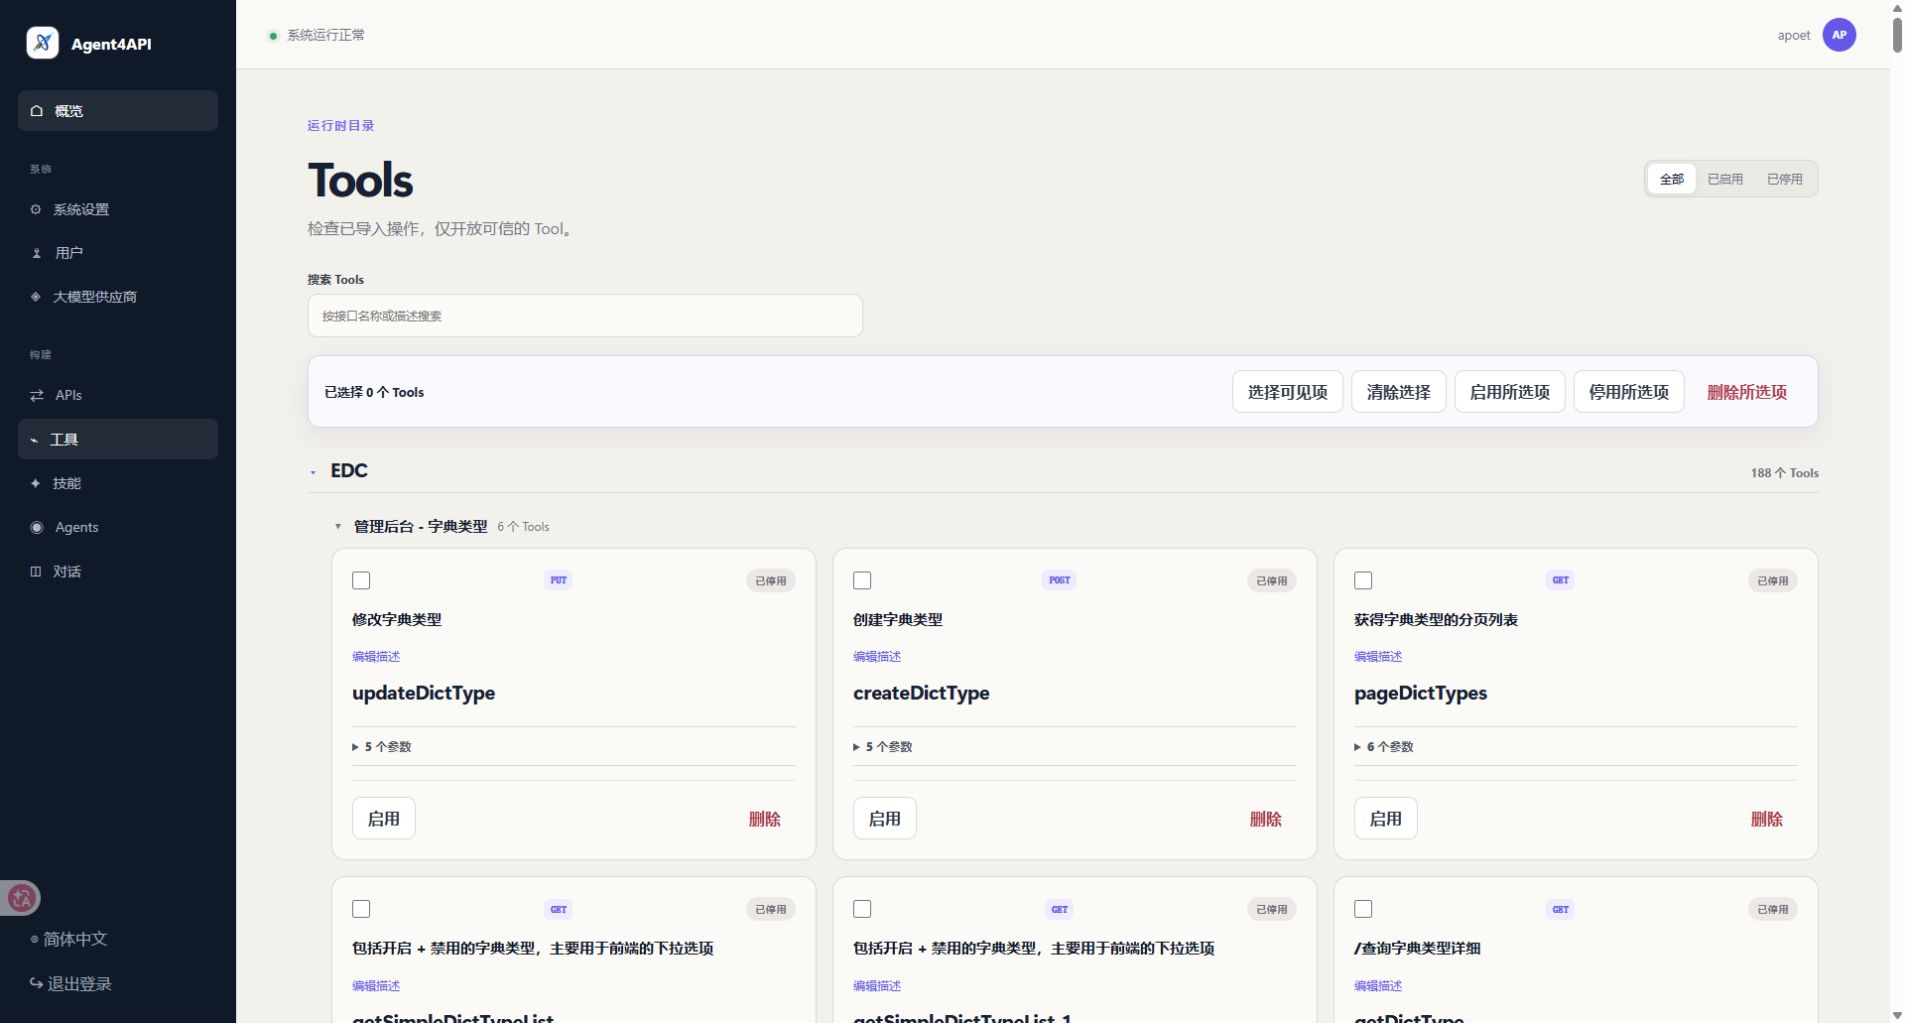
Success criterion: every required Tool shows an enabled state and appears under the Enabled filter.
Special cautions:
- Start with read-only
GEToperations. Review create, update, delete, export, upload, and job-trigger operations separately. - Select visible affects only currently rendered rows, not every Tool in the source.
- A bulk request accepts at most 200 unique Tool IDs.
- Parameter overrides may change descriptions and examples only. Imported types, required state, locations, and execution mappings remain authoritative.
- Disabling the API Source makes all of its Tools unavailable at runtime, even if individual Tool cards remain enabled.
- Prefer disabling over deleting when taking a Tool temporarily offline.
- Select Skills.
- Enter a business-oriented Skill name, such as
Order lookup. - Describe precisely when the Agent should load the Skill.
- In the system prompt, define execution rules, required inputs, output format, and prohibited behavior.
- Filter the Tool catalog by search text, API Source, Swagger tag, and enabled state.
- Select the Tools the Skill may use.
- Type
@in the prompt or select the Tool's@action to insert a canonical{{tool:name}}reference. - Confirm that the bound Tool count is correct.
- Select Save Skill.
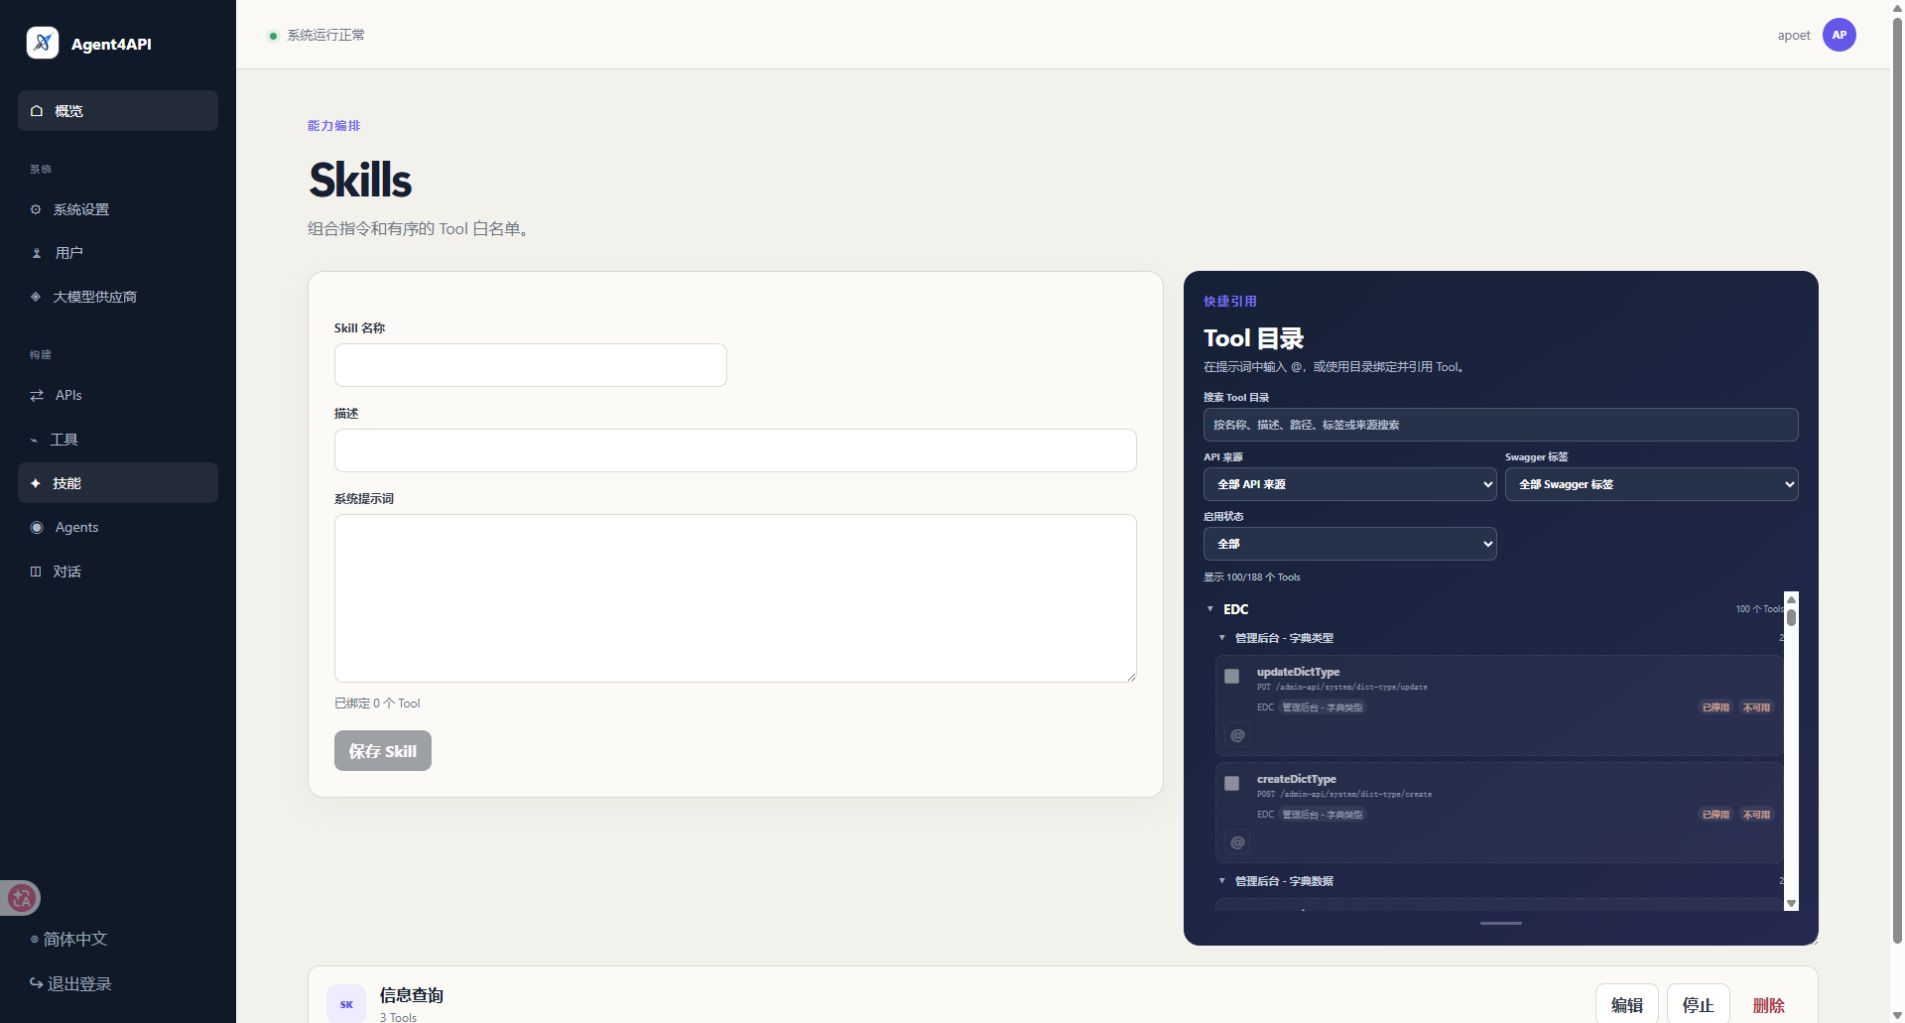
Success criterion: a Skill card appears with the expected Tool count and running state.
Special cautions:
- The Skill description drives Agent routing. State the business object, use case, and boundary rather than writing a generic description such as “for queries.”
- Only enabled Tools from an enabled source can be newly bound. Login-only Tools are not ordinary business Tools.
- One Skill may bind at most 128 Tools. Split broad catalogs by business domain.
- Insert Tool references with
@to avoid misspellings or references to nonexistent Tools. - A stopped Skill remains visible in Agent bindings but cannot load at runtime.
- Select Agents.
- Select New Agent.
- Enter the Agent name.
- Choose an enabled, tested provider.
- Leave Model override empty to use the provider default, or enter another valid model identifier.
- Choose a mode:
- Human in the loop asks the user for materially missing business input;
- ReAct continues non-interactively and should disclose necessary assumptions.
- Set the maximum iterations from 2 to 32.
- Write a system prompt covering role, language, Tool usage, and failure behavior.
- Search for and bind the required Skills.
- Use the arrow controls to put Skills in the intended evaluation order.
- Select Save Agent.
- Enable the Agent after reviewing it. Set it as default when it should serve new default conversations.
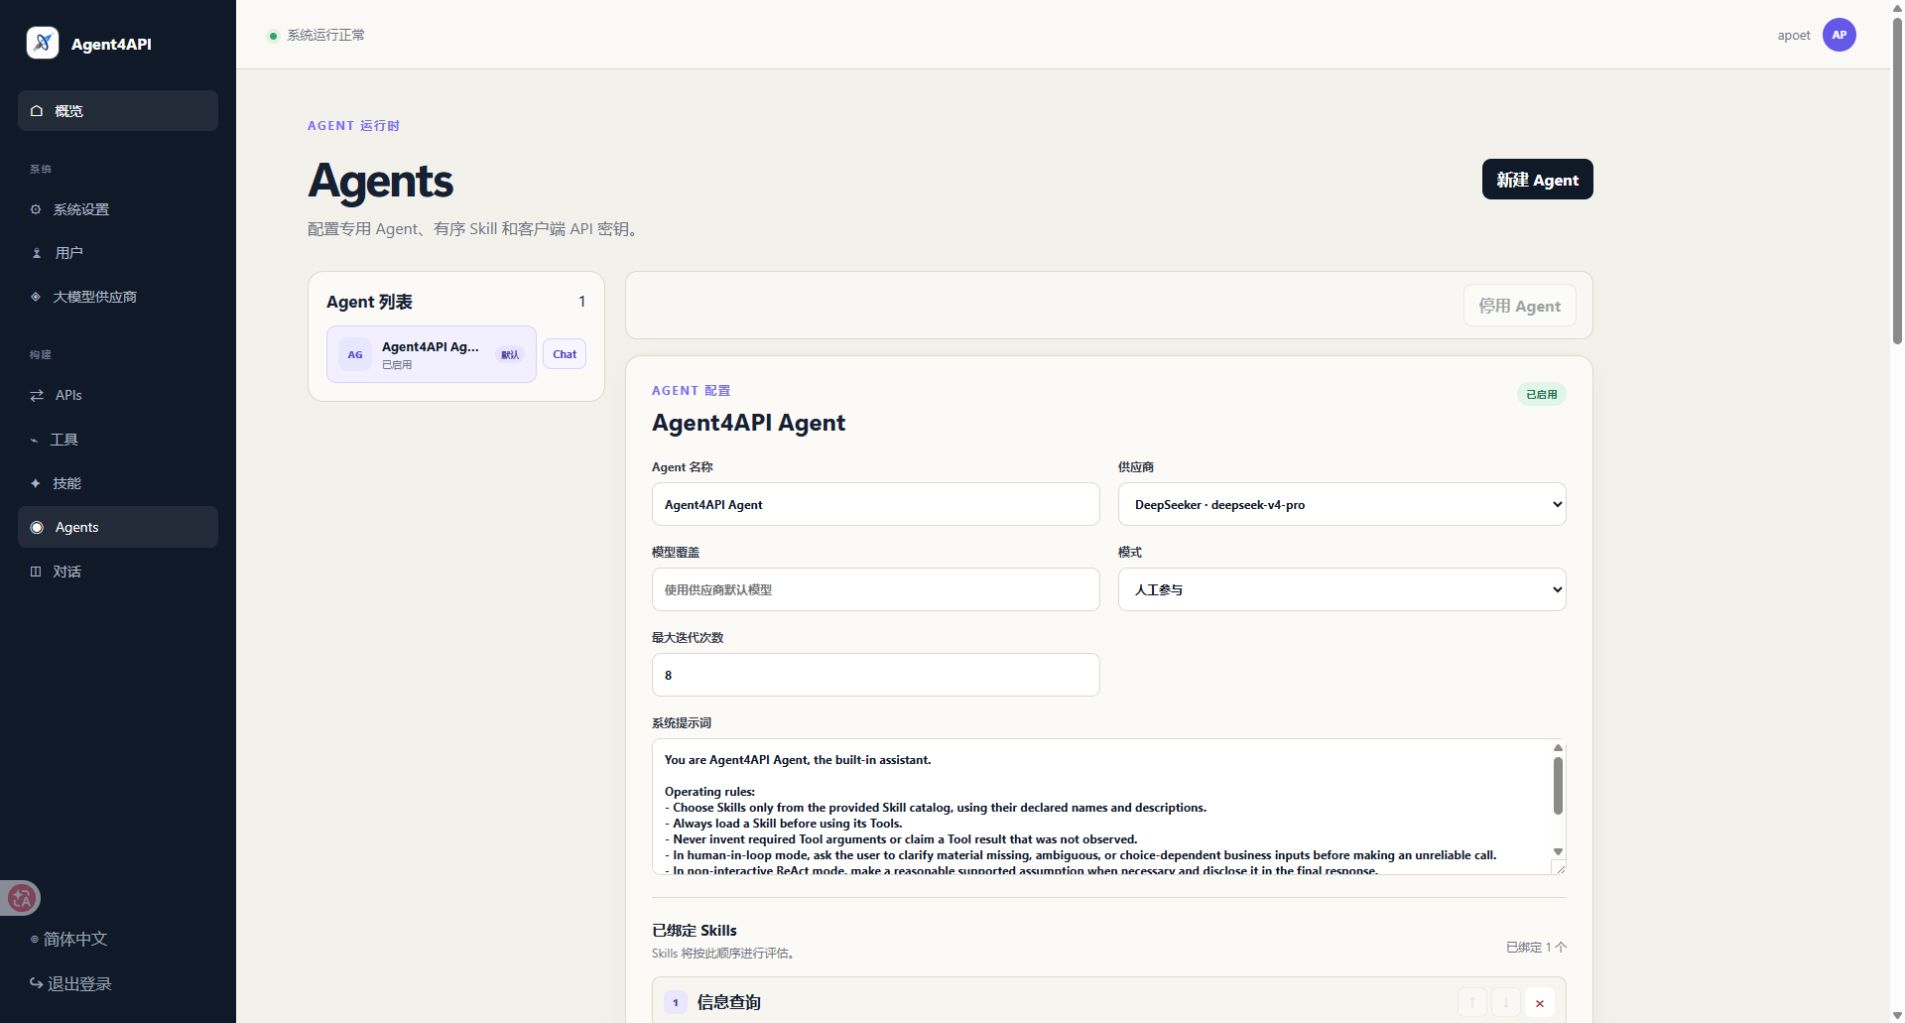
Success criterion: the Agent card is enabled and, when intended, marked as default.
Special cautions:
- An Agent needs an available provider and at least one running bound Skill before it can be enabled.
- Skill order affects evaluation. Put more specific and commonly used Skills earlier.
- Higher iteration limits can increase latency and model cost. Start around 8 and adjust from observed Tool chains.
- The current default Agent cannot be disabled or deleted until another available Agent becomes default.
- Never instruct the model to invent Tool results. Require it to explain failures when no result was observed.
- Select Chat next to the Agent, or open Chat from the navigation.
- Before the first message, confirm that the intended Agent is selected.
- Send a small, read-only question with unambiguous parameters.
- Confirm that the expected Skill is shown as loaded.
- Verify that the answer is based on an observed Tool result.
- Test the following cases:
- a missing required parameter;
- an empty upstream result;
- an upstream 4xx or 5xx response;
- a request requiring login or OAuth;
- a follow-up turn that reuses earlier conditions.
- Start a new chat before testing another Agent.
Success criterion: the expected Skill and Tool are used, and successful, empty, and failed operations all produce responses consistent with the prompts.
Special cautions:
- The Agent is fixed after the first message in a conversation. Start a new chat to choose another Agent.
-
human_in_loopgathers missing or ambiguous business input; it is not Tool-call approval. - Use anonymized test data. Do not place real patient, customer, or employee information in screenshots or documentation.
- A plausible answer without evidence of a Tool result should be treated as a failed test.
- Select the Agent on the Agents page.
- Enter a key label such as
production-backend. - Set an expiry time when appropriate.
- Select Create API key.
- Copy the complete
c4o_...key immediately and store it in a secret manager. - Test with the OpenAI or Anthropic example displayed on the page.
OpenAI-compatible example:
curl "https://agent.example.com/v1/chat/completions" \
  -H "Authorization: Bearer <AGENT_API_KEY>" \
  -H "Content-Type: application/json" \
  -d '{
    "model": "agent-default",
    "messages": [
      {"role": "user", "content": "List the projects"}
    ],
    "stream": false
  }'
Success criterion: the endpoint returns a valid compatible response containing the Agent's answer.
Special cautions:
- The complete secret is shown once. Agent4API retains only a hash and short prefix.
- Never commit the key to Git or place it in frontend code, logs, or screenshots.
- An Agent key authorizes only its own Agent and cannot select Skills from another Agent.
- When upstream user identity is required, create a Tool Session and pass its identifier or header as documented.
- Give keys clear labels, reasonable expiries, and a rotation policy.
See Compatible APIs and Tool Session Authentication for request fields and Tool Session examples.
- Confirm that Step 2 contains a reachable HTTPS Base URL.
- Select the target Agent.
- Scroll to Embedded Chat.
- Enter a configuration name.
- Choose the bottom-right or bottom-left logo position.
- Enter one exact allowed host Origin per line, such as
https://portal.example.com. - Select Create Embed configuration.
- Copy the generated
<script>into the host page. - Use Preview or the real host page to verify the integration.
Success criterion: the Agent4API logo appears on the host page and opens a Chat panel fixed to the configured Agent.
Special cautions:
- An Origin contains only scheme, host, and optional port. Paths, wildcards, credentials, query strings, and fragments are invalid.
- An empty allowed-origin list permits any site to frame the Agent. Use it only for intentionally public Agents.
- The host Content Security Policy must allow the generated script and iframe.
- Disabling the Embed or Agent prevents new sessions but does not switch an existing session to another Agent.
See Embedding Agents for the full integration and security model.
- The administration page reports a healthy system.
- System Base URL is the real public HTTPS origin.
- The provider test succeeds and no API key appears in documentation.
- The OpenAPI document and Base URL point to the intended environment.
- Only reviewed Tools are enabled.
- Write, delete, upload, export, and job-trigger Tools received separate review.
- Skill descriptions route precisely and Tool references were inserted with
@. - Every enabled Agent has at least one running Skill.
- Browser Chat passed success, empty-result, missing-input, and failure tests.
- Agent API keys are stored in a secret manager and have a rotation plan.
- Effective OAuth callbacks exactly match provider registrations.
- Embed configurations use exact Origins, and CSP and proxy routing were tested.
- The database and encryption key are backed up as one set.
Check that its provider is enabled, at least one bound Skill is running, and the latest Agent configuration was saved.
Check that both the API Source and Tool are enabled, that the Tool is not reserved as a login Tool, and that catalog filters are not hiding it.
Check the source authentication configuration, Tool Session state, and upstream token expiry. Compatible API calls never open an interactive OAuth window.
Copy the effective callback displayed by Agent4API. Verify the Base URL, reverse-proxy protocol headers, and the exact provider registration.
Narrow the Skill, make its routing description more specific, insert Tool references with @, and confirm that the Tool is enabled.
Check the script URL, Embed and Agent states, exact allowed Origin, CSP, content blockers, and reverse-proxy routing for /embed/*.