The document is to illustrate the setup process of UI Integration Testing with Selenium, Cucumber, Maven and Jenkins.
- Install JDK, Eclipse, Git, Maven, Tomocat
- Download Jenkins and deploy it to Tomcat Put jenkins.war under %TOMCAT_HOME%/webapps/.
####Create Project
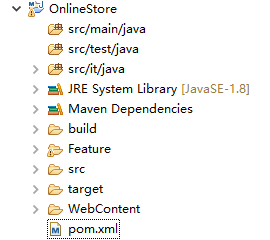
- Create a Dynamic Web Project and convert it to Maven project Right click -> Configure -> Convert to Maven Project
- Add src/it/java source folder for Integration Testing
- Add Feature folder for Cucumber feature files
####Add dependencies
- selenium-java Enable project to run selenium test scripts.
- cucumber-picocontainer cucumber-picocontainer is a Dependency Injection module allows us to share state between Step Definitions without resorting to static variables (a common source of flickering scenarios).
- cucumber-junit cucumber-junit which allow us to write the step definitions with annotations.
<dependencies>
	<dependency>
		<groupId>org.seleniumhq.selenium</groupId>
		<artifactId>selenium-java</artifactId>
		<version>2.53.0</version>
		<scope>test</scope>
	</dependency>
	<dependency>
		<groupId>info.cukes</groupId>
		<artifactId>cucumber-picocontainer</artifactId>
		<version>1.2.4</version>
		<scope>test</scope>
	</dependency>
	<dependency>
		<groupId>info.cukes</groupId>
		<artifactId>cucumber-junit</artifactId>
		<version>1.2.4</version>
		<scope>test</scope>
	</dependency>
</dependencies>
####Add integration test folder to Maven
Use build-helper-maven-plugin to add test folder to the Maven project. Then Maven would look for files suffixed with "IT", e.g. OnlineStoreIT.class, under the folder and run at integration-test phase.
<plugin>
	<groupId>org.codehaus.mojo</groupId>
	<artifactId>build-helper-maven-plugin</artifactId>
	<version>1.10</version>
	<executions>
		<execution>
			<id>add-source</id>
			<phase>generate-sources</phase>
			<goals>
				<goal>add-test-source</goal>
			</goals>
			<configuration>
				<sources>
					<source>src/it/java</source>
				</sources>
			</configuration>
		</execution>
	</executions>
</plugin>
####Add execute integration tests steps The Failsafe Plugin is used during the integration-test and verify phases of the build lifecycle to execute the integration tests of an application. The Failsafe Plugin has only two goals:
- "integration-test" runs the integration tests of an application.
- "verify" verifies that the integration tests of an application passed.
<plugin>
	<groupId>org.apache.maven.plugins</groupId>
	<artifactId>maven-failsafe-plugin</artifactId>
	<version>2.19.1</version>
	<executions>
		<execution>
			<goals>
				<goal>integration-test</goal>
				<goal>verify</goal>
			</goals>
		</execution>
	</executions>
</plugin>
####Add Jetty container Use jetty-maven-plugin to add Jetty container for deploying project build.
<plugin>
	<groupId>org.eclipse.jetty</groupId>
	<artifactId>jetty-maven-plugin</artifactId>
	<version>9.4.0.M0</version>
	<configuration>
		<httpConnector>
			<port>9999</port>
		</httpConnector>
		<stopPort>10086</stopPort>
		<stopKey>mavenjetty</stopKey>
	</configuration>
	<executions>
		<execution>
			<id>start-jetty</id>
			<phase>pre-integration-test</phase>
			<goals>
				<goal>deploy-war</goal>
			</goals>
			<configuration>
				<daemon>true</daemon>
			</configuration>
		</execution>
		<execution>
			<id>stop-jetty</id>
			<phase>post-integration-test</phase>
			<goals>
				<goal>stop</goal>
			</goals>
		</execution>
	</executions>
</plugin>
####Create a feature file Add a file named "Login.feature" into Feature folder. A Feature File is an entry point to the Cucumber tests. This is a file where you will describe your tests in Descriptive language, like English ,Chinese , etc. using grammar. It is an essential part of Cucumber, as it serves as an automation test script as well as live documents. A feature file can contain a scenario or can contain many scenarios in a single feature file but it usually contains a list of scenarios.
@lougin_F
Feature: User Login and Logout

@login_S
Scenario Outline: User successfully Login with Valid Credentials
Given User is on the home page
When User clicks the login button, nevigates to login page
And User enters valid <username> and <password>
Then User successfully login
When User clicks the logout button
Then User successfully Logout

Examples:
    | username  | password |
    | "hugotest" | "N17dNE^QpEz3HdfA" |
####Create a JUnit test runner class Cucumber uses Junit framework to run, so we need to have a Test Runner class. This class will use the Junit annotation @RunWith(), which tells JUnit what is the test runner class. This class just need annotations to understand that cucumber features would be run through it and you can specify feature files to be picked up plus the steps package location. Import statement ‘cucumber.api.CucumberOptions‘ imports the @CucumberOptions annotation. Main Options of Cucumber which can be printed by mvn test -Dcucumber.options="- -help":
| Option Type | Purpose | Default Value |
|---|---|---|
| dryRun | true: Checks if all Steps have the Step Definition | false |
| features | set: The paths of the feature files | {} |
| glue | set: The paths of the step definition files | {} |
| tags | instruct: What tags in the features files should be executed | {} |
| monochrome | true: Display the console Output in much readable way | false |
| plugin | set: What all report formatters to use | false |
| strict | true: Will fail execution if there're undefined steps | false |
| For plugin option, various options that can be used as formatters: |
- pretty: Prints the Gherkin source with additional colours and stack traces for errors. Use below code: plugin = {“pretty“}
- html: This will generate a HTML report at the location mentioned in the for-matter itself. Use below code: format = {“html:Folder_Name“}
- json: This report contains all the information from the gherkin source in JSON Format. This report is meant to be post-processed into another visual format by 3rd party tools such as Cucumber Jenkins. Use the below code: format = {“json:Folder_Name/cucumber.json“}
- junit: This report generates XML files just like Apache Ant’s JUnit report task. This XML format is understood by most Continuous Integration servers, who will use it to generate visual reports. use the below code: format = { “junit:Folder_Name/cucumber.xml“}
- testng, progress, usage, rerun can also be used.
package test.main;

import org.junit.runner.RunWith;

import cucumber.api.CucumberOptions;
import cucumber.api.junit.Cucumber;

@RunWith(Cucumber.class)
@CucumberOptions(
		features = "Feature",
		glue = {"test/stepdef"},
		plugin = {"pretty", "json:target/report.json"}
//		,dryRun = true
		)
public class OnlineStoreIT {
}
####Create definitions for the feature file We run the JUnit file, Cucumber would suggest that we should implement these methods so that the Steps mentioned in the Feature file can be traced to Java methods, which can be executed while executing the feature file.

package test.stepdef;

import java.util.concurrent.TimeUnit;

import org.junit.Assert;
import org.openqa.selenium.By;
import org.openqa.selenium.WebDriver;
import org.openqa.selenium.WebElement;
import org.openqa.selenium.chrome.ChromeDriver;

import cucumber.api.java.After;
import cucumber.api.java.Before;
import cucumber.api.java.en.Given;
import cucumber.api.java.en.Then;
import cucumber.api.java.en.When;

public class Login{
	private static WebDriver driver = null;

	@Before
	public void init(){
		System.setProperty("webdriver.chrome.driver", "D:/Documents/Downloads/chromedriver.exe");
		driver = new ChromeDriver();
		driver.manage().timeouts().implicitlyWait(10, TimeUnit.SECONDS);
	}

	@Given("^User is on the home page$")
	public void user_is_on_the_home_page() throws Throwable {
		driver.get("http://www.store.demoqa.com");
		Assert.assertEquals(0, driver.findElements(By.id("account_logout")).size());
	}

	@When("^User clicks the login button, nevigates to login page$")
	public void user_clicks_the_login_button_nevigates_to_login_page() throws Throwable {
		WebElement btnLogin = driver.findElement(By.id("account"));
		btnLogin.click();
		Assert.assertNotEquals(0, driver.findElements(By.id("login_form")).size());
	}

	@When("^User enters valid \"([^\"]*)\" and \"([^\"]*)\"$")
	public void user_enters_valid_and(String username, String password) throws Throwable {
		driver.findElement(By.id("log")).sendKeys(username);
		driver.findElement(By.id("pwd")).sendKeys(password);
		driver.findElement(By.id("login")).click();
	}

	@Then("^User successfully login$")
	public void user_successfully_login() throws Throwable {
		Assert.assertNotEquals(0, driver.findElements(By.id("account_logout")).size());
	}

	@When("^User clicks the logout button$")
	public void user_clicks_the_logout_button() throws Throwable {
		driver.findElement(By.id("account_logout")).click();
	}

	@Then("^User successfully Logout$")
	public void user_successfully_Logout() throws Throwable {
		Assert.assertNotEquals(0, driver.findElements(By.id("login_form")).size());
	}

	@After
	public void clean(){
		driver.close();
	}
}
####Run tests Run the JUnit class, Cucumber will launch a new browser instance and operate the web page exactly as what feature files and step definitions describe. And as a result, Cucumber produces two test reports, one in JUnit format and the other is in Json format, under target/, which would be used by Cucumber-JVM report plugin in Jenkins.
####Create a repository for the project Create a new repository on GitHub, name it "OnlineStore" and push the code into it.
####Download and configure Jenkins
-
Download Jenkins and Apache Tomcat
-
Deploy Jenkins within Tomcat
-
Install Jenkins plugins
- Cucumber-jvm reports plugin
- Git plugin
- Git client plugin
- GitHub plugin
- GitHub API plugin
-
Configure Jenkins
Go to Manage Jenkins -> Configure System
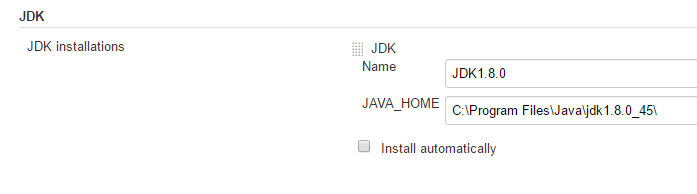
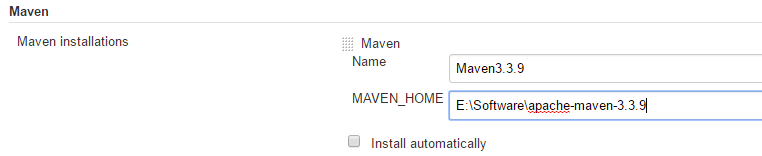
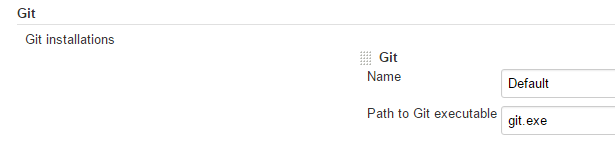
- Configure path for JDK, Maven and Git
- Create and configure a freestyle project
Create a freestyle project and name it "IntegrationDemo".
Firstly, tick the GitHub project and add the https:// url for your repository in the "GitHub project" textfield under the general settings.
Secondly, enable Git under "Source Code Management" sector. Use the SSH style syntax for the URL repository: git@github.com:user/repo.git (this is required as it’s a private repo), and specify a branch if needed. The advanced settings are optional.
Under "Build Triggers" sector, tick "Build when a change is pushed to Github".
-
Add "Invoke top-level Maven targets" to Build Step sector
-
Add "Cucumber-JVM reports" to Post-build Action sector
-
Trigger Jenkins builds by pushing to Github
Thirdly, go to target GitHub repository -> Setting -> Webhooks&Services, then add a "Jenkins (GitHub plugin)" service. Insert your jenkins url to "Jenkins hook url" and end it with "github-webhook/".
Finally, we can push a code change into the GitHub repository, then the Jenkins project will be triggered and runs integration tests automatically.
A great tutorial of Cucumber : http://toolsqa.com/cucumber/cucumber-tutorial/