Repository navigation
Using SSH to Access the Pi (Advanced)
In addition to using the remote desktop, the Pi can also be accessed entirely from your computers terminal through a protocol called Secure Shell (SSH). This requires a steeper learning curve compared to using the remote desktops, but in turn can be a lot less clunky.
Before you proceed, make sure you've reviewed all of the Linux Tutorials if you haven't already.
To SSH into the Pi, open a terminal/command prompt on your host machine and simply run the following command:
ssh pi@192.168.2.2That's it. You can now run any command that has a Command-Line Interface (CLI).
What if you want to run to run commands that use Graphical User Interfaces (GUIs)? Well now it gets a little bit more complicated.
First we have to add a flag:
ssh -X pi@192.168.2.2The -X flag simply tells the Pi to allow for X-Forwarding. Easy, right?
...Wrong! We also need to make sure our host machine has an X11 Server running, or commands for GUI programs will error out, even with the -X flag.
First, we need to make sure we have an X11 server on our host machine. X11 is a protocol Linux uses to display graphical applications, and so the Pi needs an X11 server it can connect to on your computer to send the graphical programs to.
Links on how to install X11-servers on Windows and Mac can be found below.
The recommended way to get an X11-server running on Windows is to install the Windows Subsystem for Linux or (WSL). This is a lightweight Linux VM that is built by Microsoft to integrate directly into Windows. WSL2 includes a built-in X11 server.
Instructions on how to install WSL2 can be found here: https://learn.microsoft.com/en-us/windows/wsl/install
Once installed, you will use WSL to SSH into the Pi, instead of cmd/PowerShell.
If you do not want to install WSL2, you can also install and configure a standalone X11 Server: VcXsrv.
Mac uses XQuartz as it's once-official (but now community supported) X11 Server. Luckily, setting XQuartz is a lot easier than whatever those Windows people have to do. The steps are as follows:
- Download XQuartz from www.xquartz.org.
- Install XQuartz.
- Make sure XQuartz is running whenever you SSH into the Pi.
Now that you have the an X11-server up and running you can test it by SSHing into the Pi
ssh -X pi@192.168.2.2and running
xeyesIf you've done everything correctly you should see a pair of eyes that are always looking at your mouse.
Congratulations! You can now run any command on the Pi
Not only are passwords inconvenient, but they are also relatively insecure, being susceptible to keyloggers and depending on network security to stay secret. SSH's solution to this is to allow users to login using private-public keypairs.
To generate a keypair use run
ssh-keygenYou can create a password to protect your key, but I usually skip this by pressing enter until the command finishes. Note that if you're using WSL to SSH into the Pi, this command must be run in an WSL shell.
To use this key, we must send our public key to the server. This is done with
ssh-copy-id pi@192.168.2.2This will prompt for the Pi's password, but once you put it in you will be able to SSH into the Pi without being prompted for a password.
If this doesn't work, it's most likely because of a permissions issue.
Are you tired of typing out pi@192.168.2.2 every time you want to SSH into the Pi? Well I got some good news for you! With the SSH Config File(TM) you won't have to anymore!
Simply use a text editor of your choice to create a new file at $HOME/.ssh/config on your host machine. The file should contain the following
Host cps_pi
    Hostname 192.168.2.2
    User pi
    ForwardX11 yes
You are free to replace cps_pi with whatever you'd like.
After saving this configuration, this
ssh -X pi@192.168.2.2becomes this
ssh cps_piThis step is completely optional, as it really only saves a handful of keystrokes, but those keystrokes can get pretty burdensome after 100 SSH sessions.
So now you can run any command, CLI- or GUI-based, over SSH without even so much as having to put in a username, IP address, or even a password. Only one thing remains. How the %#$!@ do you edit files?
One way is to run GUI based editors over SSH forwarding using commands like geany& or kate&. But this is the very kind of thing we're trying to get away from by using SSH.
Another way is by using a CLI-based editor, such as vim, that has archaic shortcuts and commands, but after you spend 3 months learning and customizing it, you will be able to boast a 10% productivity increase over your peers. (Plus, can you really call yourself a hacker unless your screen looks like this:)

Luckily, for those of us who still want to keep a little bit of our sanity intact, there's a better option: VS Code!
VS Code is a lightweight IDE (not to be confused with Visual Studio Code) that allows you to add functionality through extensions. One such extension is the Remote - SSH extension. This extension allows you to access and edit files and directories over SSH using VS Code running on your host machine.
Here's how to get SSH w/ VS Code up and running:
- Download and install VS Code.
- Install the "Remote - SSH" extension
- Click on the remote explorer icon in the sidebar:
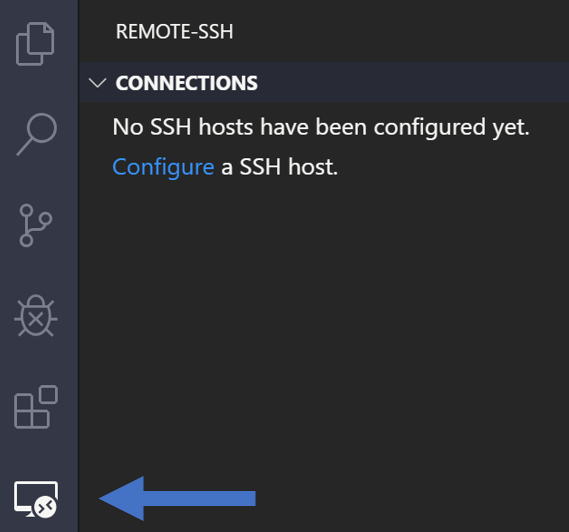
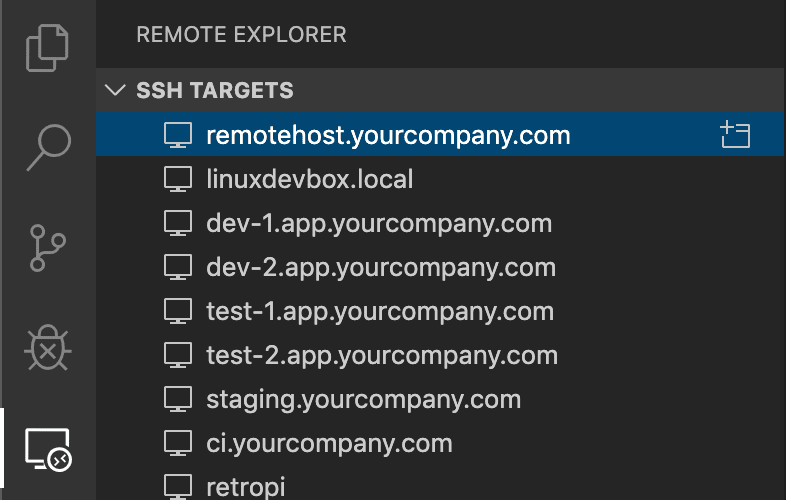
- If you've set up an SSH config file, the Pi's connection will appear in this window automatically. Alternatively you can add it manually with the plus button at the top of the remote explorer window.
- Click on the + window icon next to the Pi's name to open up a remote VS Code session.
VS Code is a (mostly) open-source created by Microsoft that includes a little bit of proprietary code to allow for things like built-in AI-assistance, Setting Sync, and telemetry. If you don't feel comfortable having Microsoft collecting telemetry, then here are some alternatives:
- VSCodium--A privacy-focused project that bundles all the open-source features of VSCode while leaving out all of the proprietary stuff. Missing a lot of convenient features like Settings-Sync.
- Zed--A editor written in Rust that is gaining popularity. Still might be a little rough around the edges compared to VS Code
- Google's AntiGravity IDE--If you'd rather sell your soul to Google than Microsoft, This Google fork of VS-Code might be for you!
- Vim/Emacs--They're not for me, but if you decide you want to live that life, more power to you!