2 SoléBot Basics
The aim of this project is to create a simple, scaleable and adaptable set of hardware and firmware tools to allow almost any drumkit or percussion to be operated via a MIDI signal from any drum machine, sequencer or Digital Audio Workstation (DAW) with MIDI capabilities. To this end, this wiki will provide instruction and explanation of the how and why of each step in the process.
To be simple, the mechanical hardware needs to readily available, have as few moving or electronic parts as possible per drum or percussion instrument. The firmware (software that is "hard coded" into a microcontroller's memory) has to be concise and readable, it also has to be easy to explain to a novice. All parts need to be readily available, online or locally to a person wishing to follow this project and build their own. To this end, I'm using free, open source tools to create the part designs and the firmware to operate them. Namely, OpenSACD and Arduino IDE. At a later stage, I may also expand the project to FreeCAD and PlatformIO on Visual Studio Code for broader accessibility. A project is neither simple nor accessible if it requires expensive subscription tools.
To be scaleable, the project needs to be modular, with reusable part designs that are easy to make and fit to each drum or percussion instrument. These modular components need to be controlled centrally but mounted specifically on each drum they're built for, while the central microcontroller needs to be mounted front and centre for easy wiring and distribution of control signals to the mechanisms which will operate the drums and percussion. If you can understand the signal paths of a guitar effects pedal array, especially one with multiple "loops" to different pedal arrays, you will be able to understand the control wiring of this project.
To be adaptable, brackets to mount beaters will need to be flexible in design, as will brackets to mount control hardware and facilitate cabling between the controller and beater hardwares. A Tama kit has different rim dimensions to a Pearl kit so, while the current brackets are designed specifically for my compact (16" kick), four-piece kit, the design files should eventually accomodate a wide range of drum and percussion architectures.
This is not an original idea. The robotic heavy metal covers band Compressorhead is probably the state of the engineering arts involved. At a less advanced level there are several other robotic drum and percussion projects, both here on GitHub and further afield. The aim of this project is to generalise the tools to allow musicians to create something more than a "band in a box" with their DAW. The example I will come back to to illustrate this is my Alesis SR18 drum machine. This device has a bass track as well as its various drum and percussion tracks. If I were to do a show backed by this machine, while the sound would be great, the staging would be just one guy singing and playing guitar. Attach this drum machine to a robotic drum set and a robotic bass guitar, where there are moving parts playing beats and notes, and those individual control tracks are also triggering lighting effects, the show becomes almost as dynamic as a human live band. It becomes an opportunity for a single musician to compete on price point with a DJ, while making the same money. More musicians making live music! I'm a dreamer, if nothing else.
Now, I mention a robotic bass in that previous paragraph. Yes, I have plans to create one of those, too, but am focussing on the drums first. The concepts at play in the drumming robot are adaptable to bass, guitar, keys, even wind and brass. While most of these are beyond the scope of this project, they'd be more than doable by anybody who begins learning how to with this project. What we learn making a robotic drum kit will teach us how to make any instrument a part of a robotic band.
Meanwhile, if you've not seen them before, check out Compressorhead's cover of "Ace Of Spades" by Motörhead...
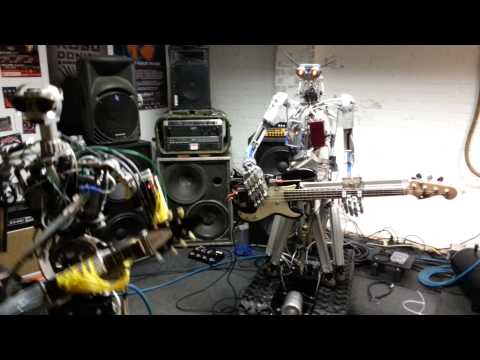
Other robo kits I've looked at when doing my initial research at the start of this "madness" used pneumatic actuators (super expensive, but very effective, as per Compressorhead video above) or car door lock actuators. I've tried the latter and found them to be weak and latent, they're also a bit inconsistent with timing, because, being a rotary electric motor moving a rack by turning a pinion, the gear reduction gives them plenty of force, but not enough velocity. The time between receiving a trigger and hitting the drum skin is pushing up towards 20mS, which is approaching the limit of where a note sounds behind the beat or not.
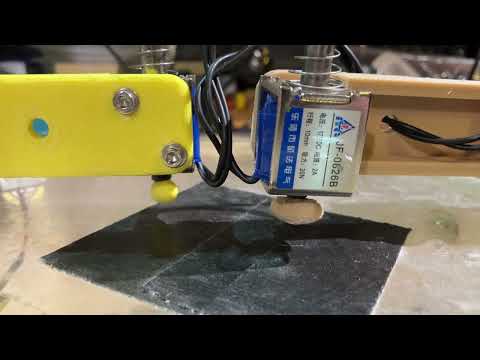
Kicking a solenoid with twice it's rated voltage (hence, twice the current and 4 times it's rated power), at a duty cycle below 50%, pulls the actuator really quickly. Also, because the throw is very short and the momentary power is 4x the nominal power, huge force is applied to the beater in a very short time - around 10mS, even at low MIDI velocity values. Velocity = 1 results in a 5 volt RMS signal, the near minimum needed to operate the solenoid, and this is still a really quick motion, as the actuator and plastic "stick tip" or kick beater have a low mass. There's little to accelerate.
The Solenoids used are the JF-0826B, 12V, 2A stall current, 20N devices for drums and percussion, and the JF-1250B, 12v, 360mA, 60N devices for lifting the twin clutches of the hi-hats
At present, this project is configured for a simple, four piece kit, with a single beater per instrument. By using a larger microcontroller, like a Mega2560, larger, more complex kits can be accomodated. One goal is to develop a "two hands, two feet" mode - where there are 2 beaters on the snare and 2 on the hi-hat such that if the left hi-hat beater coincides with the left snare beater, the hi-hat gets priority and the same would also work for the right hand beaters. Where a tom coincides with a snare, the snare would get priority.
These priorities could be switched to different instruments by using MIDI control codes, or the priorities can also be coded into a drum machine's patterns. Those using Apple's Logic Pro DAW as their MIDI source have access to "Drummer Tracks", which are algorithms that play like humans, and have this prioritisation intelligently built-in.
Lots of brackets. You're going to be smelling a warm drill press motor, if building metal mounting hardware, or a 3D printer will be running hot for at least a week.
The OpenSCAD CAD files have metric dimensions.
Nuts, bolts and screws, you're gunna need buckets of 'em. As well as conventional hardware and fastenings, the dual clutch hi-hat will need 2 M10 externally threaded hollow tubes to allow the lifting mech for each hat to be adjustable. This is a moderately standard lamp fitting and isn't too hard to find if you know what you're looking for. Find a lighting store that sells it and ask if they have it in 250mm length. This is the top end of sizing, so you might want to try electricians' suppliers, too. This image might help you.
 250mm M10 threaded tube lamp cable feed. Of course, my local electrical suppliers don't carry these, but there are a whole range of M10 and M12 (equivalent to the 1/2 inch of a cymbal clutch) threaded tubes on temu, ali and amazon. All places I try to avoid.
You'll also need all the usual tools and hardware you'll usually need to maintain and tune a drum kit, too. These were probably supplied with your kit. You kept them, right?
Presently, the code (see below) should work on Uno, Nano, Mega and most other Arduini, clones and most other Arduino IDE compatible micros.
The printed circuit board is designed for use with stand alone AOD4184 MOSFET switch modules. These have two 4184 MOSFETs on them and should be robust enough for even quite industrial sized, drum busting solenoids. They're good for up to 40v, so you could even kick 12v solenoids with 36v, provided you limit your maximum duty cycle to 30%. (ie: at your fastest tempo, the maximum pulse width of your maximum analogWrite() (255, or MIDI velocity x2) or a digitalWrite() is no more than 1/3 of the time between notes. You can find these modules on eBay and some electronics specialty suppliers for between $3 and $15 each. Buy the $3 ones, seriously.
You'll need lots of wire, in lots of different colours! The MOSFET switches have terminal blocks for their power control side and can be fitted with headers for the control input, but running the switched power to the solenoids on the drums will need 12 different coloured wires, one colour for each drum or percussion and one for ground. If you can make instrument cables for your guitars or keyboards, you'll already know enough soldering to make this. You may want to use spiral wrap to build a wiring loom from the controller housing to the drums and you'll probably want a 2 wire screw terminal block at each solenoid.
Screwdrivers, flat and phillips, a soldering tool, some basic workshop tools to drill a (large) diecast or plastic housing, as well as for making metal brackets. If you have a reliable 3D printer, that should make brackets an easy build, allowing you to work on the electronics while the printer makes the hardware for you.
Definitely a digital multimeter, possibly an oscilloscope or a logic analyser, possibly both.
Arduino IDE is the firmware development tool we'll use for this project. It allows us to write C/C++ code, manage "standard libraries" to add hardware specific functions to our code and to upload code to many different Arduino and 3rd party microcontrollers.
MIDI stands for Musical Instrument Digital Interface and has been around as an international standard for all instrument manufacturers since the late 70s. The MIDI firmware uses the Arduino MIDI standard library, by Francois Best and lathoub, allowing us to drive our robotic drums from an old skool drum machine or a modern DAW such as Ableton Live, Logic Pro X, ProTools and many others besides, both software or standalone hardware. the plan is to also bring in USB and Bluetooth MIDI as this system is improved.
This is the main heart of the project's firmware. It takes a MIDI signal, reads the channel, note and velocity data, the sends this data to analog and digital outputs to operate the solenoids that operate the drum kit. There's a Fritzing file for the PCB layout that holds an Arduino Nano (that the solebot.ino firmware runs on) and 11 MOSFET switches allowing control of solenoid operation to play rhythms on a real drum kit. It's just enough to operate a basic, four-piece kit. There's also a Gerber file for sending to Next PCB, PCB Way or your choice of manufacturer.
The drums and cymbals are hit with short, 50mS pulses of PWM output via analogWrite() to the analog pins. Digital pins are used to operate the hi-hat lifters and some percussion that doesn't need too much velocity dynamics, such as the crash cymbal. Using a board with more pins, such as a Mega, will allow more analog outputs for more nuance over more percussion instruments. The circuit board has the analog inputs broken out for use to alter settings and features that may be added later, or as digital outputs.
One of the first features I want to add, moving beyond this first version, is for a sort of pseudo analog, where a digital output can be hit with either a pulse of digitalWrite() (full power, hard hit) or tone() commands (half power, light hit), providing a simple dynamic beating of drums driven by digital pins, decided by a breakpoint value that the MIDI velocity data is compared to, to decide which drive is applied to the pin assigned to that instrument. A tone() is a 50% duty cycle square wave (half the RMS of a DC voltage), a digitalWrite() is DC on (hit) or off (not hit), explaining why one hits harder than the other.
The testTool.ino project is a simple, repetitive loop that, when uploaded to an Arduino Uno or Nano board will play a simple drumbeat over and over again when connected to an array of solenoid drivers and solenoids. Lines 34 to 44 define the arduino pins that will be used to strike each particular drum or cymbal, or lift which hi-hat clutch to open or close the hi-hats. Lines 51 to 62 establish a multidimensional array containing a simple pattern to play. The main loop of the program counts through each step of the array, pulsing each piece of percussion according to the velocity set for that step and instrument...
Zero equals no note, 128 to 255 are soft to hard hits on analog outputs, respectively and, where the notes are only 0 or 1, these are digital outputs, rather than analog outputs, and are hit/lifted or not with no middle states. HiHats are either half open (no lift), open (lift top) or closed (lift bottom) and have no analog values, the HiHat stick hits with a velocity, which is an analog value. The crash cymbal is also on a digital output because you just whack that in testing mode, there aren't enough analog channels on a basic Arduino to give it nuance.
This final tool is intended to test basic hardware before setting up the heart of the drums, the microcontroller.