Repository navigation
English documentation
NodOcean for HA brings NodOn EnOcean products into Home Assistant. Pick your product from a list, follow the on-screen pairing step, and Home Assistant does the rest: no EEP profile to look up, no ID to copy, no YAML, no MQTT. The user interface is available in English, French and German (it follows Home Assistant's language).
Independent project, not affiliated with or endorsed by Home Assistant / Nabu Casa.
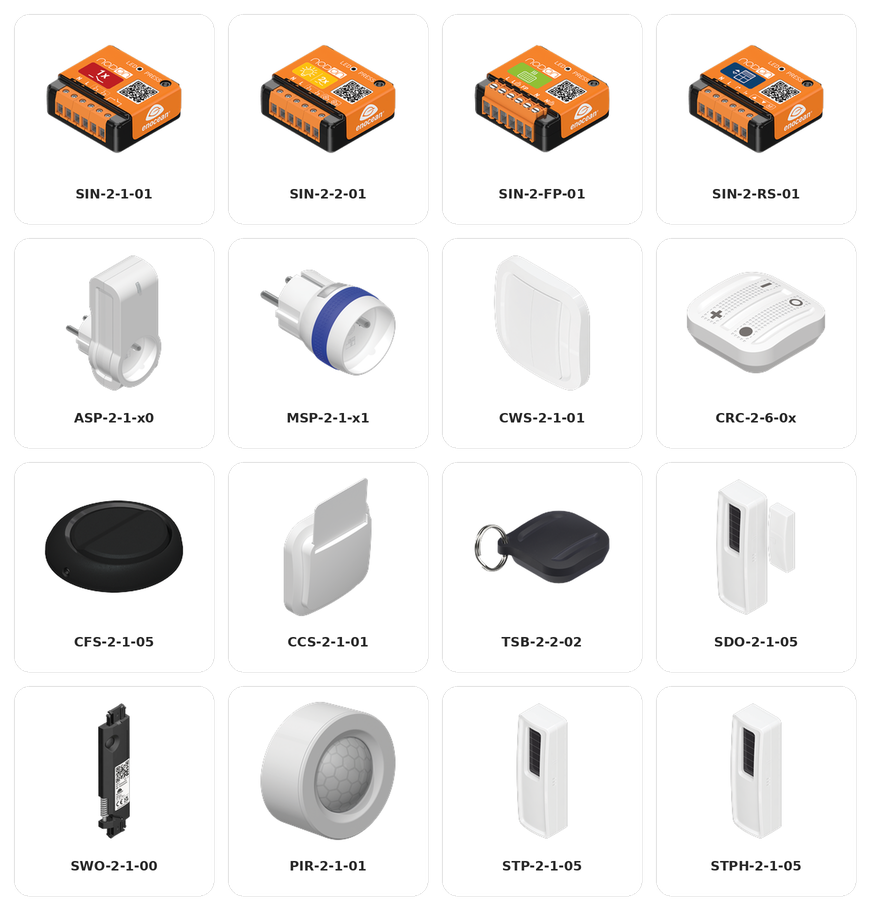
Contents: Installation · Stick setup · Adding a product · Pairing per product · Entities · Settings · Automations · Help and troubleshooting · FAQ · MQTT bridge
| Requirement | Details |
|---|---|
| Home Assistant | 2025.3 or newer, any installation type (OS, Supervised, Container, Core). |
| EnOcean USB stick | USB300 (recommended) or any ESP3-compatible stick (TCM310, USB500…). A generic USB-serial adapter (FTDI, CH340) is not an EnOcean stick. |
| HACS | For one-click install and updates (manual install also possible). NodOcean for HA is added as a custom repository. |
Free the stick first. A stick can only serve one integration. Remove Home Assistant's native EnOcean integration and stop any EnOcean add-on. If Home Assistant offers the stick under Discovered for the native integration, click Ignore.
With HACS (custom repository): NodOcean for HA is not yet in the default HACS catalog (inclusion request pending), so searching HACS directly will not find it. Add it once as a custom repository:
- Open HACS, click ⋮ (top right) → Custom repositories.
- Repository:
https://github.com/eHomeLabs/NodOcean-for-HA, Type: Integration, click Add, then close the dialog. - Search NodOcean for HA, click Download, then restart Home Assistant.
Shortcut: this button opens HACS and offers to add the custom repository for you.

Once NodOcean for HA is accepted into the default catalog, the custom repository keeps working: nothing to redo.
Manually: copy custom_components/nodon_enocean from the latest release into config/custom_components/, then restart.
Updates appear in Settings → Updates (or HACS). Paired products, names, areas and settings are kept.
- Plug the USB300 stick in.
- Settings → Devices & services → Add integration → NodOcean for HA (a plugged-in USB300 is often discovered automatically: click Add).
- Pick the stick's port. Prefer
/dev/serial/by-id/usb-EnOcean_GmbH_EnOcean_USB_300_...: it never changes. Use manual entry if it is not listed.
| Message | Meaning |
|---|---|
| Cannot open the serial port | Another integration or add-on is using the stick. |
| The stick does not answer | The port is not an EnOcean stick, or an add-on talks to it. |
| The native EnOcean integration is active | Remove it first. |
Change port or stick (Reconfigure): on the EnOcean stick row, open ⋮ → Reconfigure and pick the new port. Same stick: everything keeps working. New stick: sensors and switches keep working; relay modules and plugs are bound to the old stick and must be removed and added again.
- Settings → Devices & services → NodOcean for HA → Add a NodOn product.
- Choose the product (the picture board at the top helps you recognise it and its reference).
- Read the pairing instructions, click Submit, then do the pairing step on the product. Home Assistant listens for 60 seconds; for relay modules and plugs it answers the pairing request itself.
- Product detected! Give it a name and pick an area (existing, or type a new name to create it).
If nothing is detected: Retry pairing (closer than 10 m, product powered or solar sensor charged), or for sensors and switches Enter the ID manually (8-character EnOcean ID printed on the product).
To remove a product: ⋮ → Delete on its row. Up to 127 relay modules and plugs per stick.
| Product | Pairing step |
|---|---|
| SIN-2-1-01 Multifunction relay switch | Module powered: 3 quick presses on its button (LED flickers red, then blinks green twice). |
| SIN-2-2-01 2-channel lighting relay | 3 quick presses (both channels paired at once). |
| SIN-2-FP-01 Pilot wire heating module | 3 presses within 2 s. |
| SIN-2-RS-01 Roller shutter module | 3 quick presses. Then calibrate if needed: 5 short presses (up/down/up cycle). |
| ASP-2 Smart plug (ASP-2-1-00 FR / ASP-2-1-10 DE) | Plug in, hold the button 2 s until the LED turns red, release. |
| MSP-2 Micro smart plug + metering (MSP-2-1-01 FR / MSP-2-1-11 DE) | Same: hold 2 s until the LED turns red. |
| CWS-2-1 Wall switch | Press any key firmly. |
| CRC-2 Soft Remote | Press any button. |
| CFS-2 Floor switch | Press the switch (foot or hand). |
| CCS-2 Card switch | Insert a card. |
| TSB-2 Soft Button | 5 short presses in a row. |
| SDO-2 Door/window sensor | 1 press on the pairing button at the back (expose a new sensor to light first). |
| SWO-2 Invisible opening sensor | Hold LRN and actuate the spring. |
| PIR-2 Motion sensor | 1 short press on Pairing (a 3 s press changes the time-out). |
| STP-2 / STPH-2 Temperature (+ humidity) | 1 press on the pairing button at the back. |
Factory reset: SIN-2 modules, press > 5 s (orange LED) then a short press; ASP-2 / MSP-2, press 5 s until orange. User guides: Visit link on each device page, or support.nodon.fr.
| Product | Main entities |
|---|---|
| SIN-2-1-01 | Switch |
| SIN-2-2-01 | 2 lights |
| SIN-2-FP-01 | Pilot wire mode select (Off, Comfort, Comfort -1, Comfort -2, Eco, Frost protection), power, energy |
| SIN-2-RS-01 | Cover with position |
| ASP-2 | Outlet |
| MSP-2 | Outlet, power, energy (Energy dashboard ready) |
| CWS-2-1 / CRC-2 | Button event (keys and combinations) |
| CFS-2 | Event (press, release) |
| CCS-2 | Card inserted (on/off) |
| TSB-2 | Event (single, double, long, long release), battery |
| SDO-2 / SWO-2 | Opening sensor |
| PIR-2 | Motion, illuminance (lx), battery voltage |
| STP-2 / STPH-2 | Temperature (+ humidity) |
Every device page also has a Diagnostic card (NodOn help button, product picture, firmware version for modules, Signal RSSI sensor disabled by default) and a Visit link to the product user guide. Relay modules and plugs are polled every 60 s.
Settings are in the Configuration card of each device page.
| Setting | Products | Values |
|---|---|---|
| Status LED (day/night mode) | SIN-2-1-01, SIN-2-2-01, SIN-2-FP-01, ASP-2, MSP-2 | On / off |
| State after power failure | same | Previous / on / off |
| Local button | SIN-2-1-01, SIN-2-2-01, SIN-2-FP-01, ASP-2, MSP-2 | Enabled / disabled |
| Wired switch type (v0.7) | SIN-2-1-01, SIN-2-2-01 | Auto-detect / switch / 2-state switch (closed = on) / push button |
| Directly paired remotes (v0.7) | SIN-2-1-01, SIN-2-2-01 | Active / ignored |
| Wired switch type (v0.7, Remote Commissioning) | SIN-2-RS-01 | Type 1 (bistable/tristable) / 2 / 3 / 4 (push buttons) |
| Start calibration / full calibration / stop (v0.7) | SIN-2-RS-01 | Buttons |
| Travel time (v0.7) | SIN-2-RS-01 | 5–300 s, replaces calibration; the module then assumes the shutter is open: move it to the top first |
| Power failure detection | ASP-2, MSP-2 | Enabled / disabled |
| Auto off timer | SIN-2-1-01, SIN-2-2-01 (per channel), ASP-2, MSP-2 | 0–3600 s (0 = off) |
| Delayed radio off | SIN-2-1-01, SIN-2-2-01 (per channel) | 0–3600 s |
| EnOcean repeater | all relay modules and plugs | Off / level 1 / level 2 |
| Reset energy | MSP-2, SIN-2-FP-01 | Button |
| Temperature / humidity offset | STP-2, STPH-2 | ±5 °C / ±20 % |
| Unavailable after | SDO-2, STP-2, STPH-2, PIR-2 | 0–1440 min without a message (0 = never) |
| Faceplate | CWS-2-1 | 4 buttons / 2 buttons |
Products cannot report their settings back: Home Assistant shows the last value it sent and restores it after a restart. Metering reports (MSP-2, SIN-2-FP-01) are set up automatically: every 10 min at the latest, or on a 5 W / 10 Wh change.
Remote Commissioning (v0.7). SIN-2 modules and the ASP-2 plug (not the MSP-2, whose firmware does not answer Remote Commissioning) are read and configured over the air with the EnOcean Remote Commissioning protocol:
- Paired remotes sensor (Diagnostic card): remotes, switches and sensors paired directly in the product; the list is in the attributes. Press Read paired remotes to refresh it.
- Manage them: Settings → Devices & services → NodOcean for HA, then ⋮ → Reconfigure on the product row: add a remote by its 8-character ID (no button press needed), remove paired remotes, or (calibrated SIN-2-RS-01) set the opening reached by a remote button.
- SIN-2-RS-01: switch type, calibration type and calibrated opening / closing times are read at startup.
-
Security code (v0.7.4). After each power-up (new product or power cut), a product without a code accepts Remote Commissioning for 15 minutes; a product that already has a code stays locked and needs it. During that window the integration assigns it a random security code, saved in Home Assistant (included in backups), never displayed and masked in logs and diagnostics; the Security code sensor shows whether one is assigned. The Unlock (Remote Commissioning) button (Diagnostic card) unlocks the product with its code; if it has none, power the product off and on and press Unlock within 15 minutes to assign one. If the code is lost or unknown (Home Assistant reinstalled without backup, product coded by another system), a power cut is not enough: factory-reset the product (see its manual), which clears the ReCom code and its pairings, then remove it from Home Assistant and add it again; a code is assigned right after it is added (otherwise press Unlock within 15 minutes of powering it up). Some products have a factory code in their QR code (the 8 characters after
11Z, e.g. SIN-2-FP). If Unlock reports that the product answers but stays locked, open ⋮ → Reconfigure on the product card and enter that code. When Unlock fails it runs a Ping test (answered even when locked) to tell a locked product from one that does not answer at all. Limitation: these products do not support encrypted Remote Management, so the code is sent in clear during an unlock; it is random so it cannot be guessed from the product ID.
Switches and remotes provide device triggers: Settings → Automations → Create → Add trigger → Device, pick the switch, then the trigger (e.g. "Top left pressed", "Double press"). For other products use the usual entity triggers (motion detected, opened, card inserted…).
YAML example — wall switch, top left = on, bottom left = off:
triggers:
  - trigger: state
    entity_id: event.living_room_switch_keys
actions:
  - choose:
      - conditions: "{{ trigger.to_state.attributes.event_type == 'left_up' }}"
        sequence:
          - action: light.turn_on
            target: { entity_id: light.living_room }
      - conditions: "{{ trigger.to_state.attributes.event_type == 'left_down' }}"
        sequence:
          - action: light.turn_off
            target: { entity_id: light.living_room }
event_type values: left_up, left_down, right_up, right_down, combinations such as left_up_right_up, release; 2-button faceplate: up, down; Soft Button: single, double, long, long_release; floor switch: press, release. Duplicate telegrams sent by modules in repeater mode are filtered automatically.
- NodOn help button (Diagnostic card): press it, then open Notifications for the user guide, NodOn support, contact form and the product's EnOcean ID.
- Download diagnostics: ⋮ on the EnOcean stick row (whole integration) or on a device page (one product). The file contains versions, products, settings and the last 100 radio telegrams — attach it to bug reports.
- Repairs: "EnOcean stick unreachable" or "stick used by the native EnOcean integration" alerts appear in Settings → System → Repairs and disappear once the stick answers.
-
Debug logs (
configuration.yaml):
logger:
  logs:
    custom_components.nodon_enocean: debug
Report problems with the bug report form.
I can't find NodOcean for HA when searching HACS. It is not yet in the default HACS catalog (inclusion pending). Add it first as a custom repository: HACS → ⋮ → Custom repositories → https://github.com/eHomeLabs/NodOcean-for-HA, type Integration.
Do I need MQTT, an add-on or an EnOcean hub? No, just a USB300 (or ESP3-compatible) stick.
Can I keep the native EnOcean integration? Not on the same stick.
My products are paired with another hub. Sensors and switches can be paired to several receivers. For relay modules and plugs, pair from Home Assistant; if it fails, factory-reset the product first.
Do direct links still work (switch → module without Home Assistant)? Yes, and Home Assistant shows the module's new state.
Are NodOn Zigbee products supported? No, use ZHA or Zigbee2MQTT.
Radio range? About 30 m indoors depending on walls; enable the repeater of a module placed in between.
Since v0.5.0, NodOcean for HA can also publish the state of your NodOn products to an MQTT broker (local or remote) and accept commands, like Zigbee2MQTT. Use it to reach your products from another system: Jeedom, Node-RED, a remote server, a script… The bridge is optional and off by default. It comes on top of the integration: products stay in Home Assistant, and Home Assistant keeps working if the broker is down (the bridge reconnects by itself).
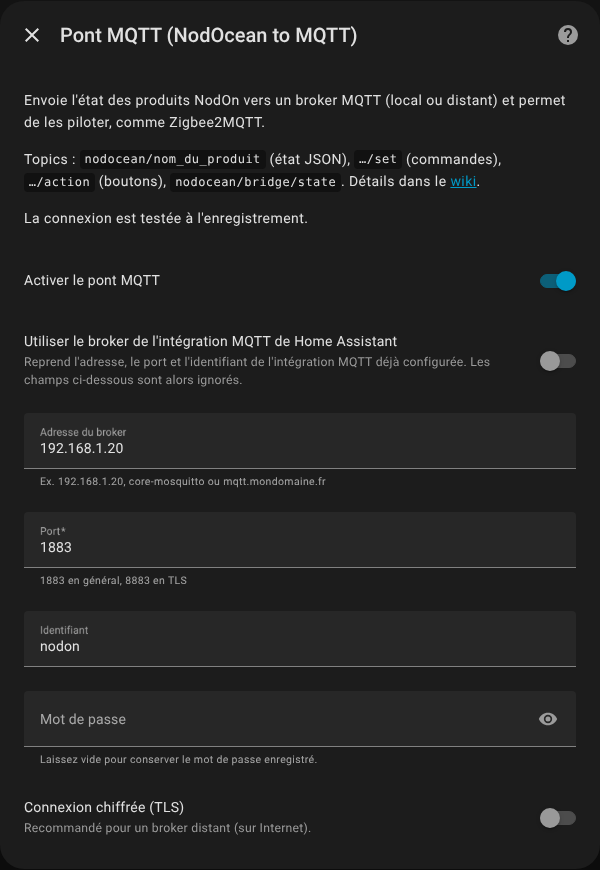
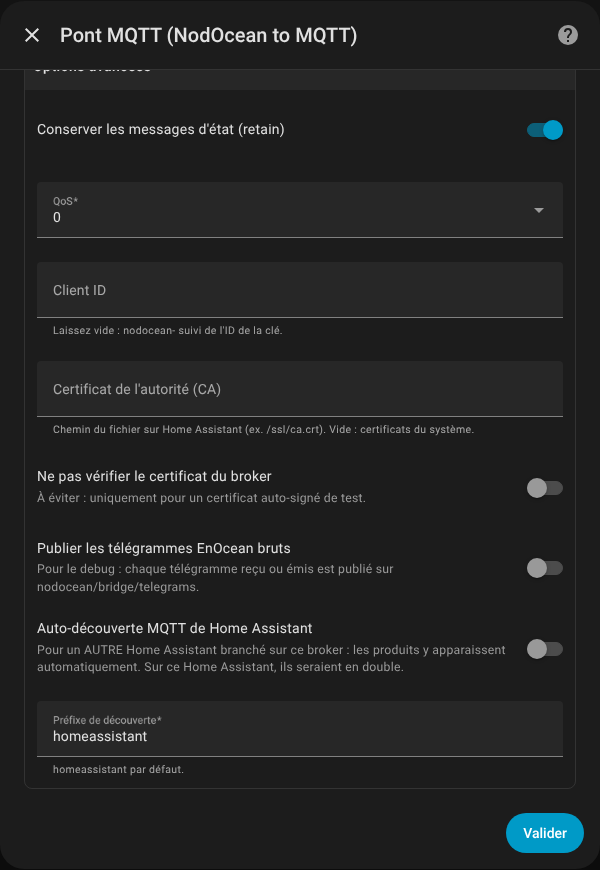
Enable it: Settings → Devices & services → NodOcean for HA, then the ⚙ Configure (gear) icon on the EnOcean stick row. Fill in broker address, port (1883, or 8883 with TLS), username, password, TLS and base topic (nodocean by default), or tick Use the broker of the Home Assistant MQTT integration. The connection is tested when you submit. Products appear in topics by name (nodocean/living_room_plug, changes if you rename the product) or by EnOcean ID (nodocean/0194A3F2). Advanced options: retain (on by default), QoS, client ID, CA certificate file, skip certificate check, raw telegrams, Home Assistant MQTT discovery and its prefix (v0.6.0).
Published topics:
| Topic | Content | Retained |
|---|---|---|
nodocean/bridge/state |
online / offline (last will) |
yes |
nodocean/bridge/info |
Version, stick ID, products and their topics (JSON) | yes |
nodocean/<product> |
Product state (JSON) | retain option |
nodocean/<product>/availability |
online / offline (from the "Unavailable after" setting) |
yes |
nodocean/<product>/action |
Button press: left_up, single, press… |
no |
nodocean/bridge/telegrams |
Raw EnOcean telegrams (option) | no |
State fields: state (ON / OFF) for SIN-2-1-01, ASP-2, MSP-2; state_l1 / state_l2 for SIN-2-2-01; position (0 closed – 100 open) and state (OPEN / CLOSED) for SIN-2-RS-01; mode (off, comfort, eco, frost_protection, comfort_1, comfort_2) for SIN-2-FP-01; power (W), energy (kWh); temperature, humidity (offsets applied); open (SDO-2, SWO-2); motion, illuminance, voltage (PIR-2); card (CCS-2); battery (TSB-2); for all: rssi, last_seen, available; modules and plugs: firmware, repeater.
Commands: publish to nodocean/<product>/set:
| Product | JSON | Plain text |
|---|---|---|
| SIN-2-1-01, ASP-2, MSP-2 |
{"state": "ON"}, "OFF", "TOGGLE"
|
ON, OFF, TOGGLE
|
| SIN-2-2-01 | {"state_l1": "ON", "state_l2": "OFF"} |
— |
| SIN-2-RS-01 |
{"position": 50}, {"state": "OPEN"}, "CLOSE", "STOP"
|
OPEN, CLOSE, STOP, 50
|
| SIN-2-FP-01 | {"mode": "eco"} |
eco |
Publish anything to nodocean/<product>/get to read a module or plug's state again. Sensors ignore commands. A command received over MQTT also updates the Home Assistant entity, and the other way round.
Raw telegrams (v0.6.0): advanced option. Every telegram received or sent by the stick is published to nodocean/bridge/telegrams as JSON (time, dir rx/tx, sender, destination, rorg, data, status, dbm, duplicate, product), including unknown senders and repeater duplicates. Meant for debugging: keep it off otherwise.
Home Assistant MQTT discovery (v0.6.0): advanced option (prefix homeassistant by default). The bridge publishes a description of each product, so another Home Assistant on the same broker creates the devices and entities automatically (switches, lights, cover, pilot wire mode, sensors, opening, motion, buttons as an event entity, signal, bridge status) and controls them through /set.
Not available yet: changing product settings over MQTT.