Setting Up Netskope for Access Control Integration
This guide provides step-by-step instructions for configuring Netskope with the EDAMAME access control system.
Netskope works differently from the other integrations. EDAMAME does not allow or block anything here — it applies a device tag in Netskope to every device that satisfies your policy, and removes that tag when a device falls out of compliance. Your own Netskope Real-time Policy, keyed on that tag, decides what the tag actually grants.
EDAMAME applies the device tag
   -> a Device Classification rule matches the tag
      -> a Real-time Policy references that classification
         -> allow / block
EDAMAME labels; Netskope enforces. That split means the integration is inert until you complete the Netskope-side chain in Step 3, and it also means you keep full control of the enforcement decision.
-
A Netskope tenant where you can create API tokens and device tags.
-
A REST API v2 token with read and write access to device tags. EDAMAME calls exactly two endpoints:
Purpose Endpoint Read a device's current tags POST /api/v2/devices/device/tags/gettagsWrite a device's tag set POST /api/v2/devices/device/tags/bulkreplace -
The tag already exists in your tenant. EDAMAME resolves the tag name to its internal id when you create the integration, so the tag must be created first. Creating the integration fails cleanly if the name does not match.
-
A device tag, not a device classification. Netskope has two separate systems with separate id spaces, and a tag with the same name can exist in both. EDAMAME writes a device tag. Create it in the device-tag catalog, not under Device Classification. Getting this wrong is the most common setup mistake, because the names look identical in the console.
-
Fewer than five tags on your devices. Netskope caps a device at five tags. EDAMAME's tag needs one of those slots.
This integration matches devices by their Netskope device identity, which EDAMAME reads from the Netskope Client running on the device. Every device you expect to be tagged must satisfy all of the following:
-
The Netskope Client is installed and enrolled, so it has both a user key and a provisioning device UID. EDAMAME reads them from:
Platform User key and hostname Device UID macOS /Library/Application Support/Netskope/STAgent/nsconfig.json/Library/Preferences/com.netskope.provisioning.plistWindows C:\ProgramData\netskopestagent\nsconfig.jsonHKLM\SOFTWARE\NetSkope\ProvisioningLinux /opt/netskope/stagent/nsconfig.json/opt/netskope/stagent/provisioning -
EDAMAME runs with elevated privileges. Every device-UID store above is root- or system-owned. In practice:
- On macOS and Windows, the EDAMAME helper must be installed and running alongside the EDAMAME Security app.
- On Linux and in CI,
edamame_posturemust be running as root (which is how the packaged service runs by default).
Linux requires a recent EDAMAME release. Support for reading the device UID on Linux was added after this integration first shipped. On an older agent, Linux devices report no device identity and are never tagged — under the allow-on-tag policy of Step 3 they are then denied. If your fleet includes Linux, confirm the agent version before enabling the policy.
A device that fails any of these requirements reports no Netskope identity, and there is no fallback to its IP or MAC address — the tag endpoints address a device by the user key and device UID above and by nothing else. Such a device is skipped, which looks exactly like a device that has no Netskope Client at all. It is never tagged, so under the allow-on-tag policy of Step 3 it is denied rather than accidentally allowed.
In the Netskope console, create a REST API v2 token with read and write access to the device-tag endpoints listed under Prerequisites. The exact location of the API token page varies between tenant versions; it sits with the other administration tools rather than with the policy configuration.
Copy the token and keep it secure — you will need it in Steps 2 and 4.
Netskope API tokens can be given an expiry. Note the expiry date: once the token lapses, EDAMAME can no longer update tags. Devices keep whichever tag state they had at that moment, so an expired token freezes enforcement rather than opening it. Plan to rotate the token in EDAMAME Hub before it expires.
Create the tag in the device-tag catalog (not under Device Classification) and note its exact name. You can do this from the Netskope console or from the API.
- In the Netskope console, go to Settings → Devices.
- Open any device.
- Open the Select tags control, then click Manage.
- In the Manage Tags dialog, click + Add, enter the tag name, and save.
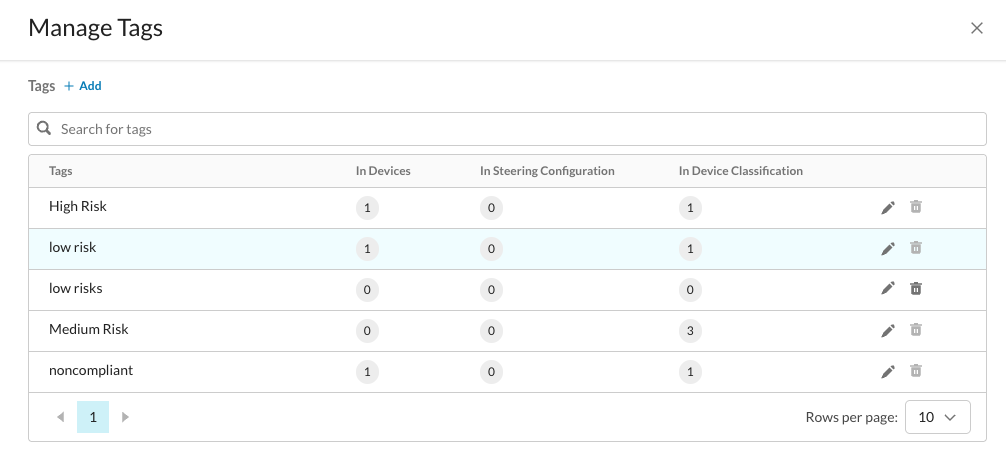
The dialog lists existing device tags and how many devices, steering configurations, and device classifications use each one. That is the catalog EDAMAME resolves against in Step 4.
Creating the tag through the API avoids any ambiguity with Device Classification:
curl -X POST "https://your-tenant.goskope.com/api/v2/devices/device/tags" \
  -H "Netskope-Api-Token: YOUR_TOKEN" \
  -H "User-Agent: EDAMAME-setup-1.0" \
  -H "Content-Type: application/json" \
  -d '{"name": "EDAMAME-Compliant"}'
Then confirm the tag is visible on the same catalog EDAMAME reads, which is what Step 4 validates against:
curl -X POST "https://your-tenant.goskope.com/api/v2/devices/device/tags/gettags" \
  -H "Netskope-Api-Token: YOUR_TOKEN" \
  -H "User-Agent: EDAMAME-setup-1.0" \
  -H "Content-Type: application/json" \
  -d '{}'
The response lists the tenant's device tags with their ids. If your tag appears here, Step 4 will resolve it. If it does not, it was most likely created as a device classification instead.
Both headers matter. Netskope's v2 API authenticates with
Netskope-Api-Tokenrather thanAuthorization: Bearer, and it rejects requests whoseUser-Agentis not inVendor-product-versionform — so the defaultcurl/8.xagent will not work. The catalog is paginated at ten entries by default; add{"limit": 100}to the body if your tenant has more tags than that.
Name the tag for what it means. EDAMAME applies this tag to devices that pass your policy, so the tag marks a compliant device. A name like EDAMAME-Compliant reads correctly in Step 3 and in your Netskope logs. Avoid risk-flavoured names such as High Risk: a later reader will assume the tag marks bad devices and may write a policy that blocks precisely your compliant fleet.
A tag on its own enforces nothing. To turn it into an access decision:
- Create a Device Classification rule that matches on your tag (a device-tag check).
- Create or edit a Real-time Policy that references that classification.
- Choose the polarity of the rule.
Use allow-on-tag. Because EDAMAME tags compliant devices, the natural rule is allow when the tag is present (equivalently, block when it is absent). Every failure mode then lands on the safe side: a device with no EDAMAME agent, a device whose Netskope Client is not enrolled, or an EDAMAME outage all leave the device untagged, and therefore blocked.
The inverse — treating the tag as a block signal — inverts the meaning of the tag and blocks exactly the devices that passed your policy. It also fails open: anything EDAMAME never reaches stays untagged and keeps its access.
Validate the chain with one device before rolling the policy out broadly.
- Visit EDAMAME Hub.
- Select your domain.
- Open Policies, then the Conditional access tab.
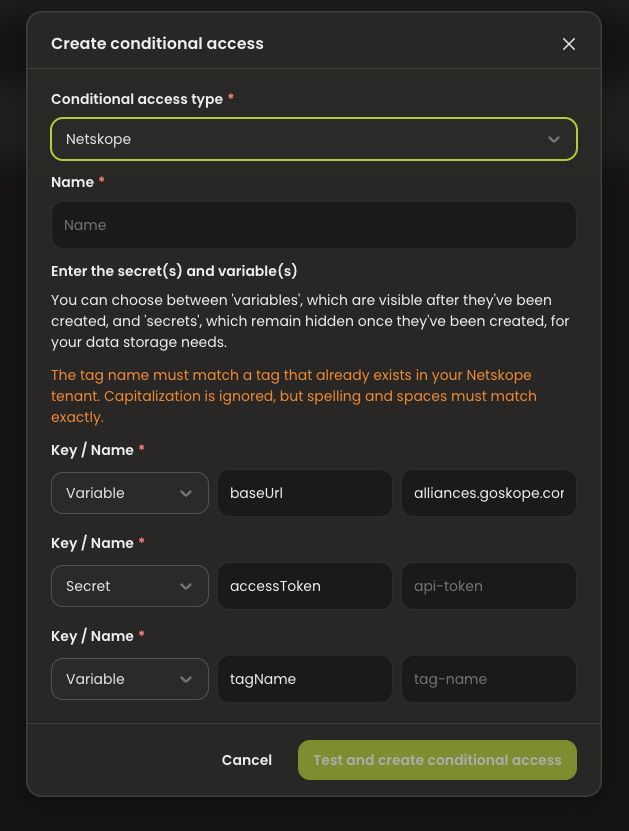
- Click Create conditional access and select Netskope.
-
Fill in the following details:
Field Type Value Name — A label for this integration in Hub baseUrl Variable Your tenant hostname, for example your-tenant.goskope.comaccessToken Secret The token from Step 1 tagName Variable The exact device-tag name from Step 2 -
Click Test and create conditional access.
Two details about baseUrl:
- Enter the hostname only, with no
https://prefix and no trailing path. EDAMAME adds the scheme and the API path itself, so a full URL produces a malformed request. - The field is pre-filled with a default that is not your tenant. Replace it with your own hostname.
The tag name is matched case-insensitively, but spelling and spaces must match exactly. Creation validates the token, the tenant hostname, and the tag name together, so a failure at this step means one of those three is wrong — the integration is not created in a half-configured state.
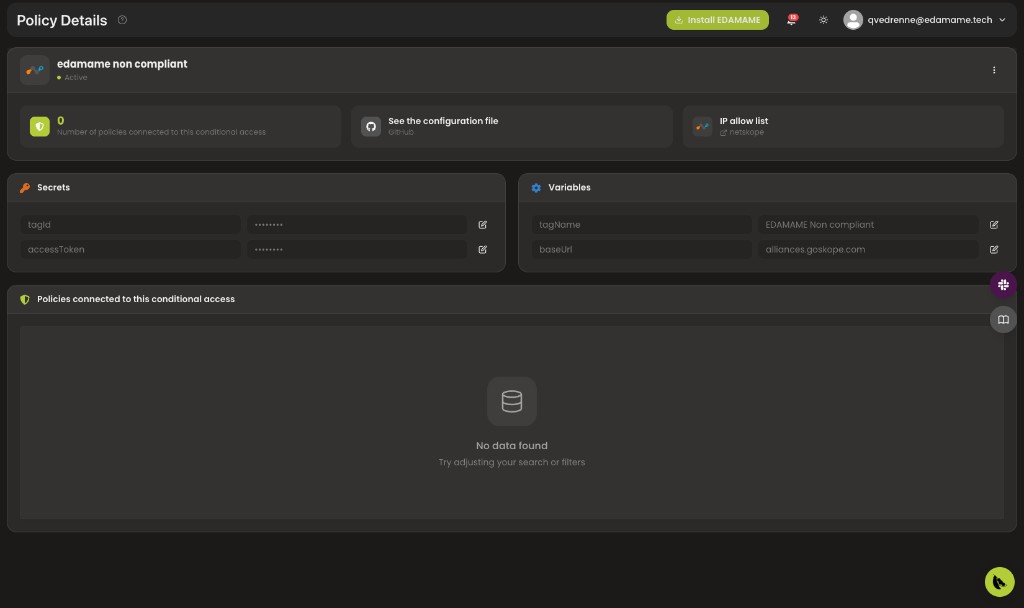
After creation, the conditional-access detail page shows the stored secrets (accessToken, and the resolved tagId) and variables (tagName, baseUrl):
- Still in Policies, open the Policies tab and click Create a policy (or edit an existing one).
- Configure the conditions devices must satisfy (for example a minimum score).
- Link the Netskope conditional access from Step 4 to that policy.
The Policies list then shows the policy with its linked Netskope conditional access:

Opening the policy shows compliance counts, the linked conditional access, and the conditions:
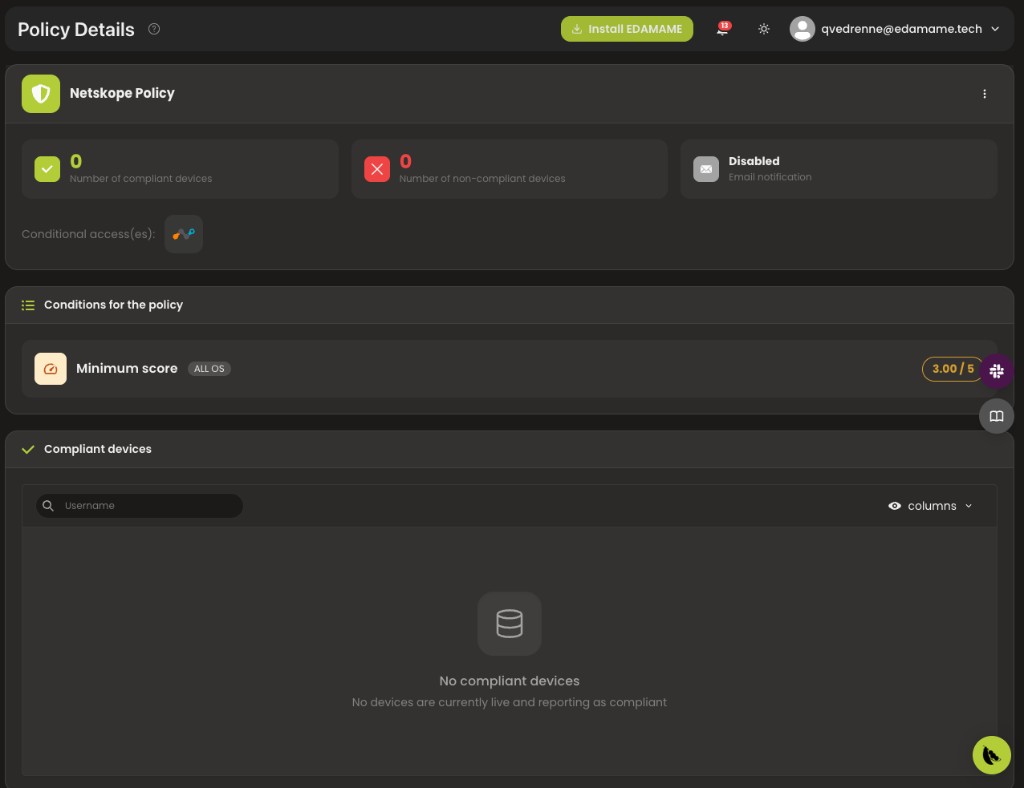
From this point on, devices that satisfy the policy receive the Netskope tag; devices that fall out of compliance lose it. Enforcement still depends on the Netskope-side chain from Step 3.
Once the integration exists, each compliance change triggers the following sequence:
- The EDAMAME agent on the device reads the user key and hostname from the Netskope Client configuration and the provisioning device UID from the platform store, combines them into the composite identifier Netskope uses, and reports it to EDAMAME Hub.
- When the device's compliance changes, EDAMAME reads that device's current tag set from Netskope.
- If the device is now compliant, EDAMAME adds your tag to the set. If it is no longer compliant, EDAMAME removes it.
- EDAMAME writes the resulting set back.
Two consequences worth knowing:
- Tags set by other tools are preserved. Because every update reads the current set first, tags applied by Netskope Cloud Exchange or any other integration survive. This is unlike EDAMAME's allow-list and group integrations, which replace the whole list on each update.
- Only the device whose compliance changed is touched. There is no fleet-wide reconciliation pass, so this integration never affects a device EDAMAME has not heard from. That is the opposite of the Tailscale integration, which acts across the whole tailnet.
Re-tagging is automatic: once a device returns to compliance, the next update restores its tag without any manual step in the Netskope console.
The integration will not create. The failure is in the token, the tenant hostname, or the tag name. Check that the tag exists as a device tag (not a device classification), that the spelling and spaces match, that the token carries device-tag read and write access, and that baseUrl is a bare hostname with no https://.
Devices are compliant in EDAMAME but never get tagged. The device is reporting no Netskope identity, and is being skipped silently. Work through the device-side checklist under Prerequisites: the Netskope Client installed and enrolled, and EDAMAME running elevated. If only the Linux devices are affected, check the agent version — see the note under Prerequisites.
The tag is applied but access does not change. The Netskope-side chain from Step 3 is incomplete. Confirm the Device Classification rule matches the tag, and that a Real-time Policy references that classification.
One device never receives the tag while others do. Check how many tags that device already carries. At the five-tag cap there is no slot left for EDAMAME's tag.
Compliant devices are being blocked after enabling the policy. Check the polarity of the Real-time Policy from Step 3. EDAMAME tags devices that pass your policy, so the tag must grant access, not deny it.