-
Notifications
You must be signed in to change notification settings - Fork 34
Command Line Aliases and Triggers
MUSHclient does not by default have a mechanism for creating aliases and triggers from the command line. This is likely because of a combination of the possible complexity of setting up any given alias or trigger and the fact that more and more people are moving towards using plugins for everything.
But the fact remains that sometimes a player wants to be able to set up simple aliases and triggers quickly and easily without dealing with the rather complicated interface and without having to write a full plugin.
It is possible to add this functionality to MUSHclient by adding two aliases (described down below):
#alias {*} {*}
for adding new simple aliases, and
#trigger {*} {*}
for adding new simple triggers.
If you are using the world file included in recent versions of the Aardwolf MUSHclient Package, then you may already have these aliases.
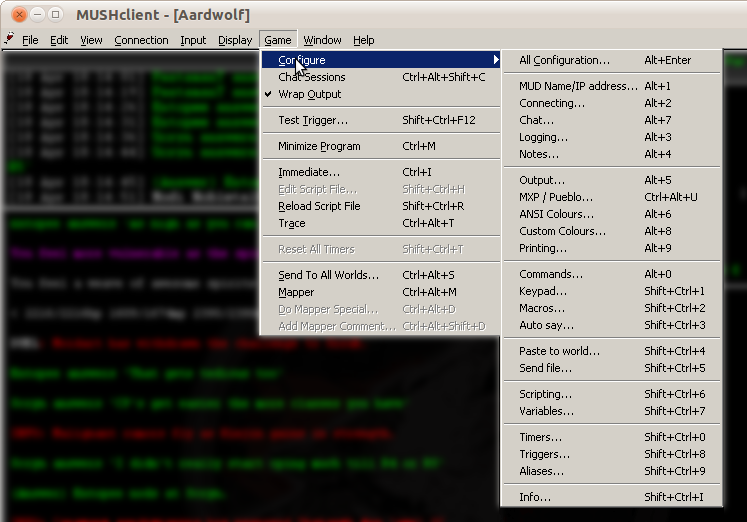
You can check by going to the Aliases configuration screen by pressing Shift+Ctrl+9 or by going to Game->Configure->Aliases... as shown here:

The process for adding these is as follows:
- Select all of the text in the box below and copy it. Typically this is done either with Ctrl+C or by right-clicking on the selected text and choosing "Copy".
<aliases>
<alias
match="#alias {*} {*}"
enabled="y"
group="special_convenience_aliases"
send_to="12"
sequence="100"
>
<send>
require "addxml"
addxml.alias {
match = "%1",
send = "%2",
sequence = 100,
enabled = true,
send_to = 10,
group = "command_line_aliases"
}
ColourNote ("white", "green", "Added alias to match on '%1', sending '%2'")
</send>
</alias>
<alias
match="#trigger {*} {*}"
enabled="y"
group="special_convenience_aliases"
send_to="12"
sequence="100"
>
<send>
require "addxml" -- addxml extension
addxml.trigger {
match = "%1",
send = "%2",
sequence = 100,
enabled = true,
send_to = 10,
group = "command_line_triggers"
}
ColourNote ("white", "green", "Added trigger to match on '%1', sending '%2'")
</send>
</alias>
</aliases>
-
Go back to MUSHclient and bring up the Aliases configuration screen by pressing Shift+Ctrl+9 or by going to Game->Configure->Aliases... as shown above.
-
On the Aliases configuration screen, find the Paste button and click it:


You should now have both aliases in place. Click OK to go back to the game.
Say you want to make an alias where the pattern is:
h *
and you want the result to be (where %1 is the target you want to heal):
cast 'heal' %1
You would now be able to type:
#alias {h *} {cast 'heal' %1}
And then you could, for example, do:
h self
which would result in sending:
cast 'heal' self
If you want to perform multiple commands with a single alias, you need to use two semicolons (;;) to separate the commands as in:
#alias {h *} {cast 'heal' %1;;say I just healed %1!}
For the reason why, read about semicolons in MUSHclient here.
Project Details
- Introduction
- Why Should I Use This?
- Installing and Upgrading
- Version Numbering
- Who makes this?
- Mac/Linux/BSD/etc
- License And Other Misc Project Info
Guide/FAQs
- FAQ
- Writing Aliases
- Writing Macros
- Writing Triggers
- Using Variables
- Using GMCP
- Command Line Aliases and Triggers
- Converting Scripts
- GMCP-only Channels
- Miniwindow Basics
- Changing the server address
Featured Components
- ASCII automap
- Text Substitution (sub and gag)
- GMCP driven world mapper
- Communication log window
- Copy with color codes
- Group monitor window
- Health bars
- Stats window
- Bigmap display
- Main output layout
- Automatic update checker
- Miniwindow Color Themes
- Easy DIY Miniwindows
Required Plugins (do not uninstall)
Useful Other Bits