Repository navigation
Mod Organizer 2
Source: 298b3e8f49b4. Check the source page for feature scope.
LostOdysseyRecomp has a Mod Organizer 2 (MO2) game plugin. MO2 maps the mods you enable onto the game's mods/ folder through its virtual file system, so nothing is copied into the game folder and disabling a mod removes it on the next launch. MO2 runs the Windows build only.
- MO2 2.5 or newer on Windows. It already includes the
basic_gamesplugin. - The game is set up: you started it once and finished the first-start setup that imports your discs.
- You know your LostOdysseyRecomp folder: the folder you start the game from, which holds
LostOdysseyRecomp.exe(the extracted Windows ZIP) and thegamefolder with your imported discs. In this guide it isC:\Games\LostOdysseyRecomp; yours can be anywhere. Use that folder, not a newly extracted copy: a new copy has no game data, and the game would ask you to import the discs again.
- Open your LostOdysseyRecomp folder and then its
mo2folder. It holdsgame_lostodysseyrecomp.pyandlostodysseyrecomp_export.py. - Copy
game_lostodysseyrecomp.pyinto<MO2 folder>\plugins\basic_games\games\. - Optional, for exporting the game's textures, movies and text: copy
lostodysseyrecomp_export.pyinto<MO2 folder>\plugins\. Not intoplugins\basic_games\. - Restart MO2 if it is running.
After you update the game, copy the two files again and replace the old ones; MO2 loads them when it starts.
No mo2 folder? Your game is older than v0.9.52, the first release to include it. Update the game, or download the files from GitHub (open a file, then press Download raw file).
-
Start MO2. If it does not open the instance window by itself, click the first toolbar button (Manage Instances) and press Create new instance.
-
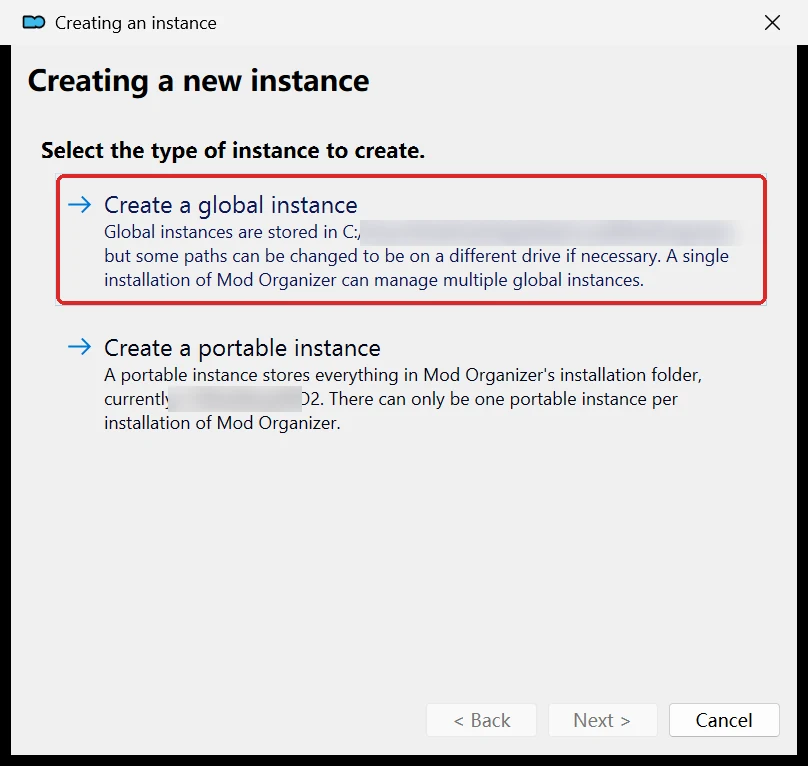
Choose Create a global instance. A portable instance, which keeps MO2's files in MO2's own folder (on another drive, for example), works the same way; the steps below do not change.
-
On Select the game to manage, tick Show all supported games and type
Lost Odysseyin the box next to it. Click Lost Odyssey Recomp. "No installation found" is normal: MO2 cannot find the game by itself.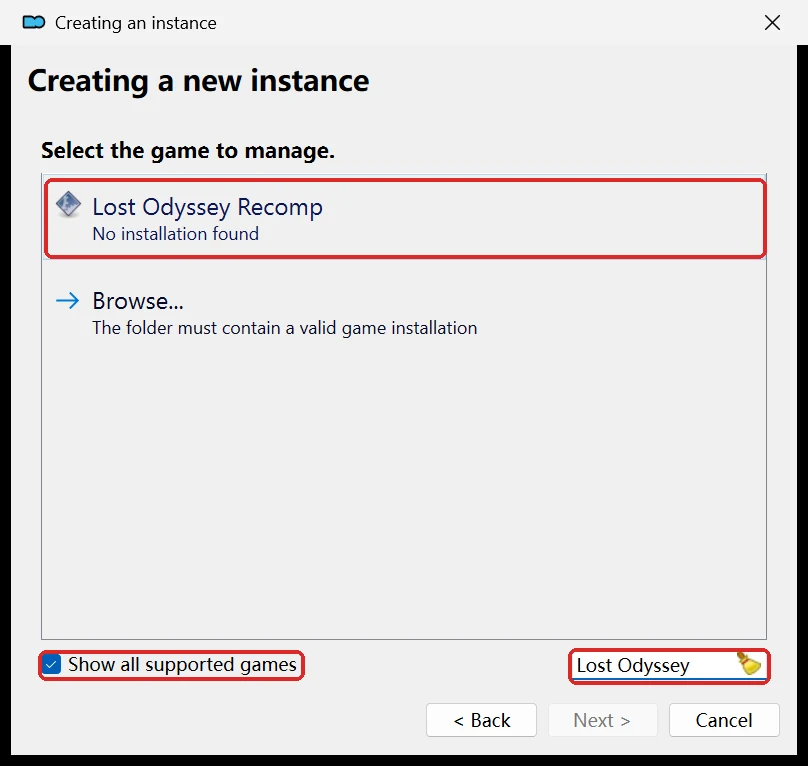
-
A folder window opens. Go to your LostOdysseyRecomp folder, the one with
LostOdysseyRecomp.exeand your importedgamefolder, and press Select Folder. Look at the folder before you press it: the window starts in the last folder you used, which may be someone else's example or an older install. -
Customize the name: keep it or type your own, then press Next. Press Next on the profile settings page too.
-
Select a folder where the data should be stored: keep the default and press Next. Never choose your game folder here: MO2 would keep its own
mods,downloadsandprofilesfolders in it, and itsmodswould be the same folder the game reads mods from. -
Press Next on the Nexus page (optional), check that the game location on the last page is your LostOdysseyRecomp folder, and press Finish.
-
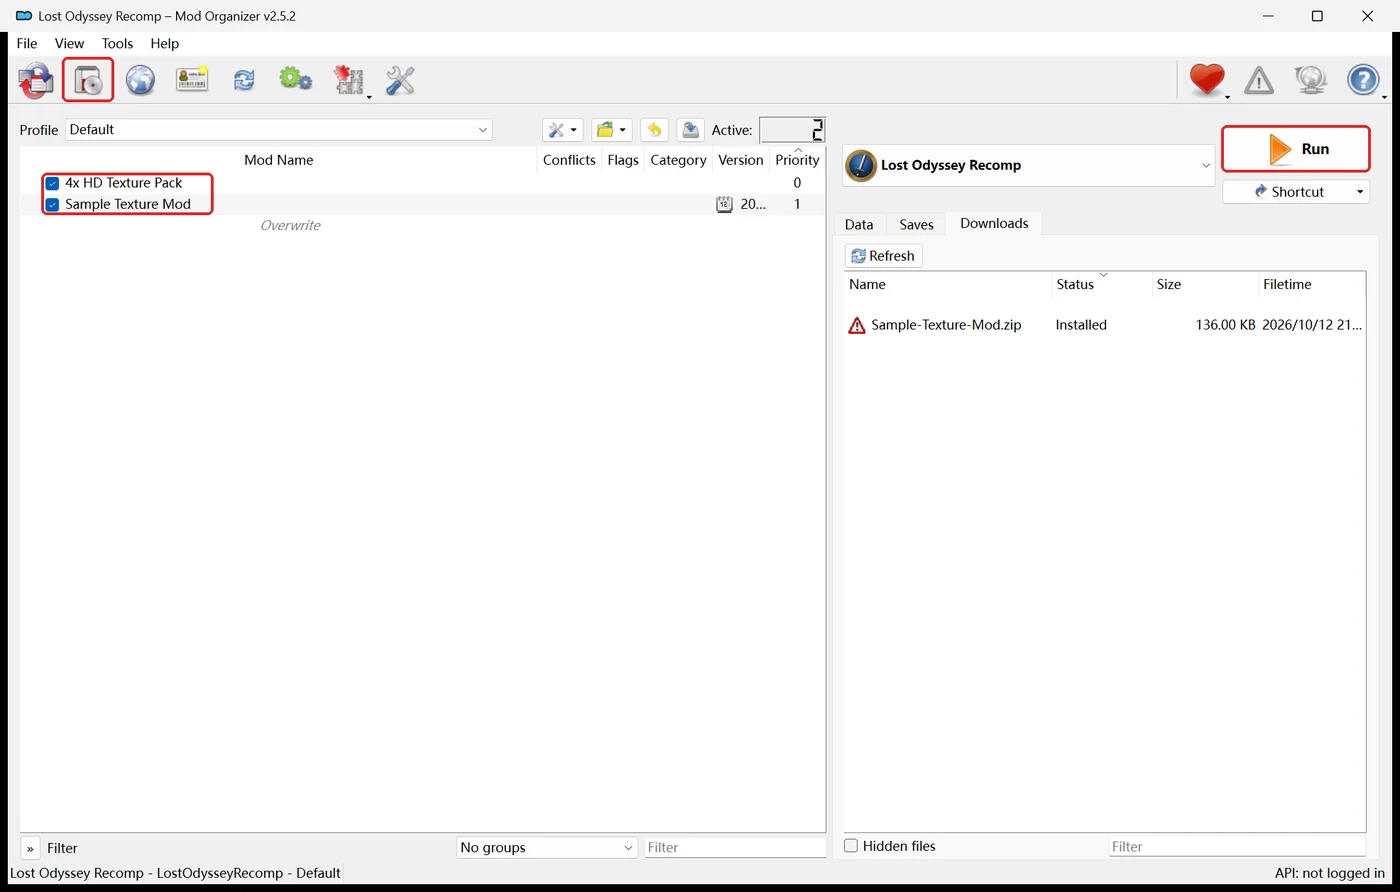
Click the second toolbar button (Install Mod) and choose the mod's archive (
.zip,.7zor.rar). You can also drag the archive onto MO2's window: it then appears on the Downloads tab, and double-clicking it there installs it.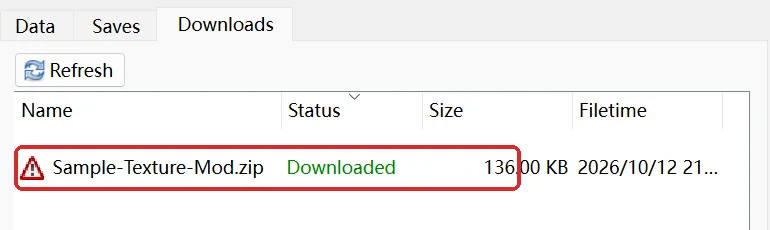
-
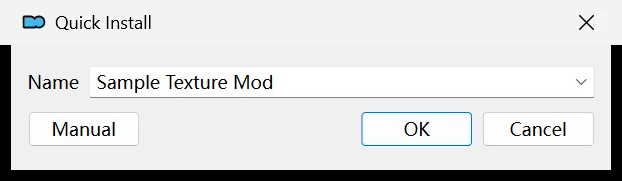
MO2 shows Quick Install with a name for the mod. Change the name if you like and press OK.
-
The mod appears in the left list. Tick its box to enable it.
What installs as is: mod folders (mods/<id>/mod.ini with mods/<id>/overlay/... or mods/<id>/overlay.loarc), older mod.ini packages, overlay packages (a top-level overlay/ folder) and language packs (a folder with a language.ini). The plugin removes the outer mods/ folder of those archives, so their contents land in the game's mods/. An archive whose top holds mod.ini or language.ini itself (the inside of such a folder) is marked as invalid: put it in a folder named after the mod in MO2's manual installer. Copy the game plugin again (step 1) if MO2 says a mod folder or language pack has no valid game data.
- Check that Lost Odyssey Recomp is selected in the list next to Run.
- Press Run. Always start the game this way; starting
LostOdysseyRecomp.exedirectly loads no MO2 mods. - After you enable, disable or reorder mods, close the game and press Run again.
MO2 keeps an instance's game folder in the instance's ModOrganizer.ini. The export tool warns about it (see Export the original assets), and the game does not see your MO2 mods. To point an existing instance at your LostOdysseyRecomp folder:
-
Close MO2.
-
Open the instance's
ModOrganizer.iniin a text editor. A global instance keeps it in%LOCALAPPDATA%\ModOrganizer\<instance name>\(paste that path into the File Explorer address bar, with your instance's name). A portable instance keeps it in the MO2 folder itself. -
Under
[General], change thegamePathline to your folder, writing every\twice. ForD:\Games\LostOdysseyRecomp:gamePath=@ByteArray(D:\\Games\\LostOdysseyRecomp) -
Save the file and start MO2.
Creating a new instance for the right folder (step 2) works too; install your mods into it again.
If the data folder of an instance is your game folder (step 2.6), create a new instance with the default data folder, then delete the downloads, overwrite, profiles and webcache folders MO2 made in your game folder. Keep the game's own mods folder.
Started from MO2, the game looks for your imported discs in MO2's game folder. If that folder has none, the importer opens, and its top line says it was started from Mod Organizer 2. This usually means MO2 points at another copy of the game, such as a newly extracted ZIP. Do not import again: that only adds a second copy of the discs.
- Close the importer.
- Point MO2 at the folder you imported the discs for, as in If MO2 points to the wrong folder.
Moved your game folder after importing? Older versions still look in the old place. Update the game, or delete game-path.txt beside LostOdysseyRecomp.exe if your discs are in its game folder.
The export tool copies the game's own textures, movies, text, 3D models and animations out of your game data. Use them as the starting point for a mod: textures to repaint or upscale, text to translate, character models and map pieces to edit. Animations are for reference only. It needs lostodysseyrecomp_export.py from step 1.
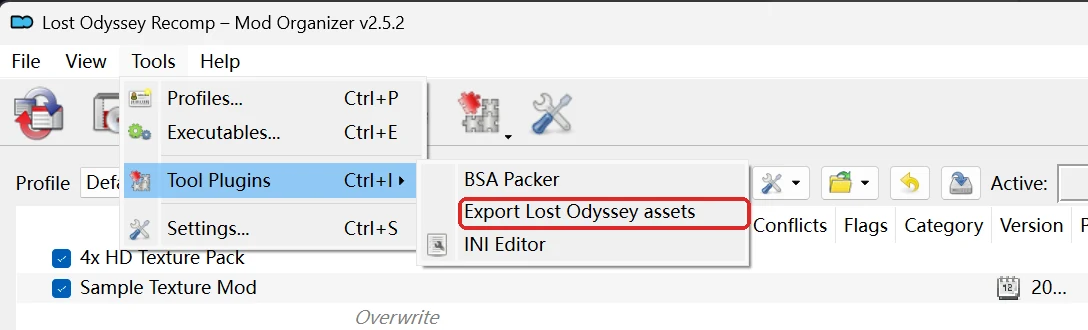
In the menu bar, choose Tools > Tool Plugins > Export Lost Odyssey assets.
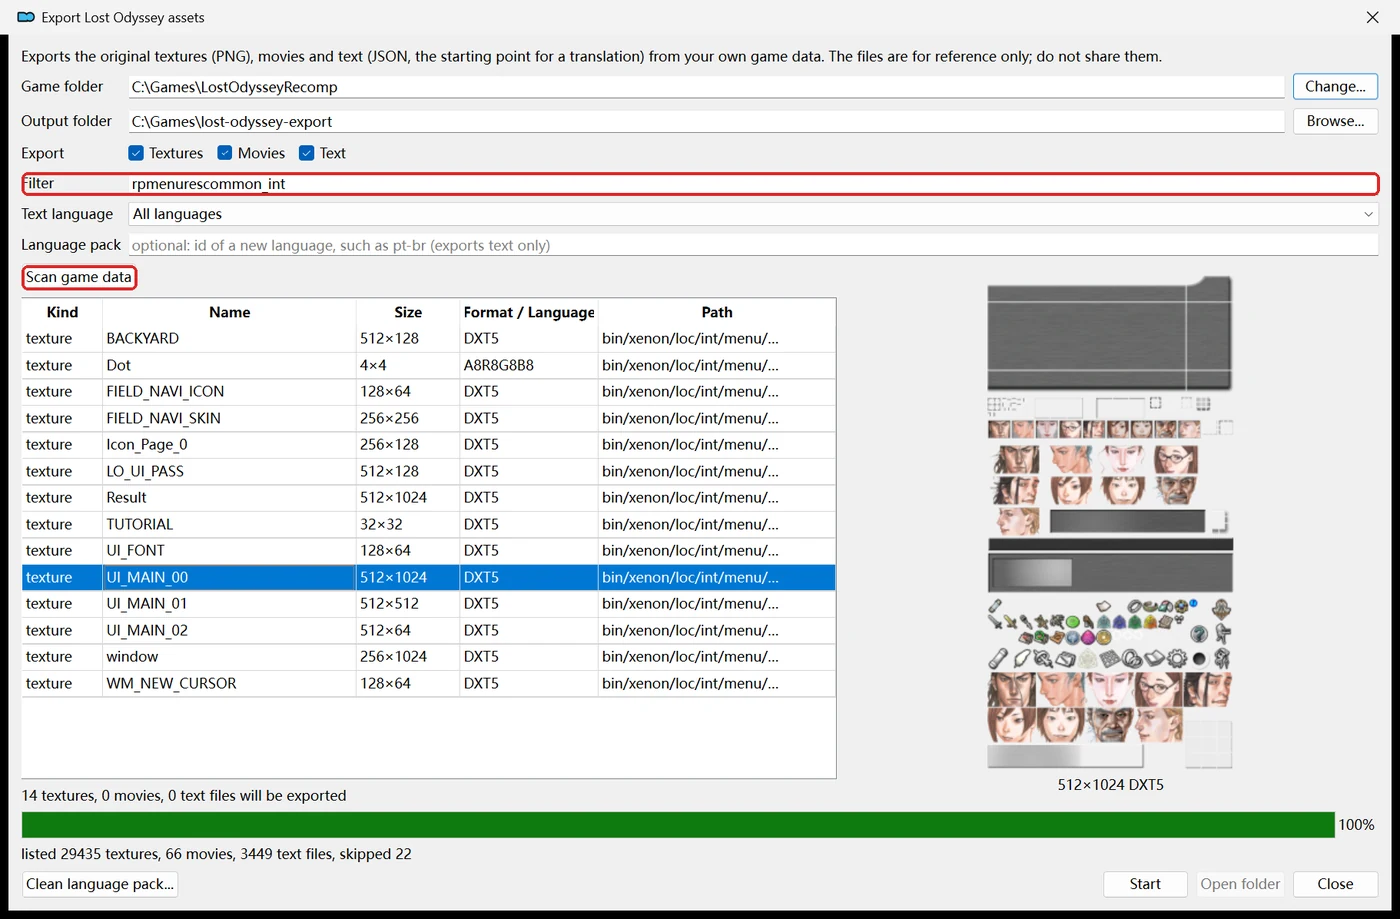
- Check the window:
-
Game folder: the folder the tool reads, normally MO2's game folder. If the window says it has no
LostOdysseyRecomp.exe, press Change... and choose the folder you start the game from. The tool remembers it. This changes only the export tool: to play with mods, fix MO2's folder as in If MO2 points to the wrong folder.
-
Output folder: where the files go. The default is a new
lost-odyssey-exportfolder in your MO2 instance folder. It must be a new or empty folder, outside the game folder. A full export needs about 7 GB of free space, and models and animations need about 6.5 GB more. -
Export: tick what you need.
- Textures: every texture as a PNG image (about 5.3 GB).
- Movies: the CG movies as the original WMV files (about 1.7 GB).
- Text: all game text as JSON files, for translations (about 33 MB).
-
Models: every 3D model as a glTF
.glbfile (about 4 GB). With textures, on by default, also links each material's colour texture to its model. -
Animations: each animation set with the character model it moves, as a glTF
.glbfile (about 2.5 GB). - Models and Animations are off by default because of their size.
-
Filter (optional): export only files whose path contains this text, for example
rpmenurescommon(the menu artwork). After Scan game data (see Preview what will be exported) it also matches the names in the table, such asKaimorUhra, and Start exports exactly the rows the table shows. Leave it empty to export everything. -
Text language: the language of the exported text. All languages exports every language on your discs.
-
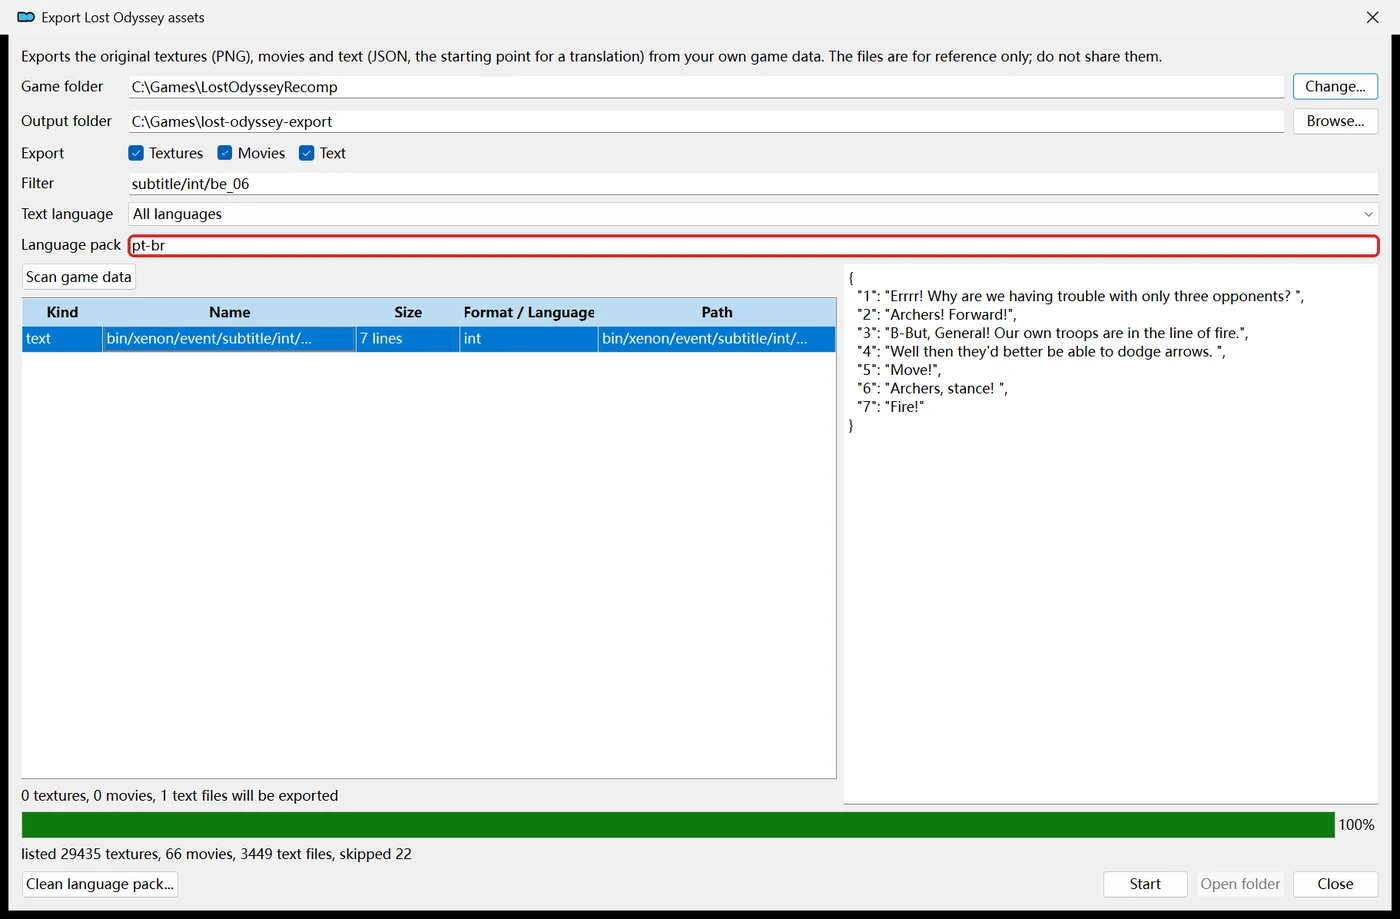
Language pack: leave it empty here. See Make a language pack.
-
- Press Start. The bar shows the progress. A full export takes about a minute on an SSD.
- When it is done, MO2 asks whether to open the folder. Press Yes.
If it fails, the window shows the reason:
| Message | What to do |
|---|---|
output folder ... is not empty |
Choose a new or empty folder. |
output folder ... is inside the game data |
Choose a folder outside the game folder. |
found no game data |
The game is not set up yet, or Game folder is not your game folder. Start the game once from that folder and finish the first-start setup that imports your discs, or press Change... and choose your LostOdysseyRecomp folder. |
has no LostOdysseyRecomp.exe or Could not start LostOdysseyRecomp.exe
|
Game folder is not the folder that has LostOdysseyRecomp.exe. Press Change..., and fix MO2's own folder as in If MO2 points to the wrong folder. |
cannot list assets; update the game |
Your LostOdysseyRecomp.exe is older than the tool. Update the game. |
cannot export models, animations or selections; update the game |
Your LostOdysseyRecomp.exe is older than the models, animations and Export selected options. Update the game. |
cannot draw previews; update the game |
Your LostOdysseyRecomp.exe is older than the model pictures. Update the game. |
The window can list the files an export would write before you start it.
- Press Scan game data. The game lists all its textures, movies, text, models and animations once. It takes about 15 seconds on an SSD. The list is saved, so the next time you open the window it shows at once. After a game update, press Scan game data again; the old list is not used for the new version.
- The table shows what the current settings would export. It changes as you tick Export boxes or change Filter, Show, Text language or Language pack. The line under it counts the files, for example
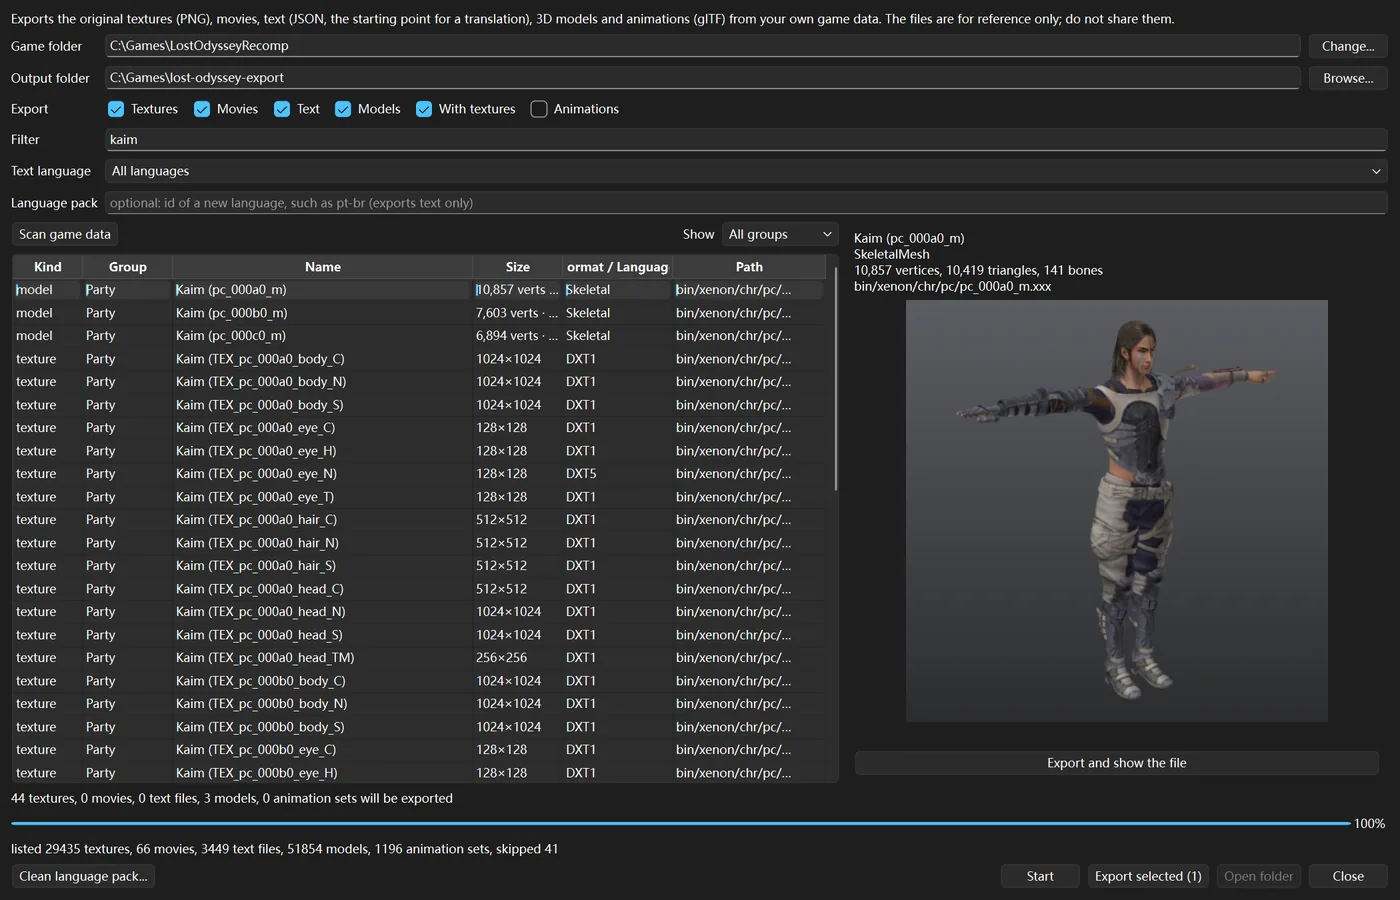
14 textures, 0 movies, 0 text files, 0 models, 0 animation sets will be exported.- Group sorts the rows by what they are: Party, NPCs, Animals, Monsters, Maps, Battle arenas, World map, Weapons, Objects, Effects, Cutscenes, Other, Movies and Text.
-
Name puts the game's own name in front of the file's code, for example
Kaim (pc_000a0_m),Flame Beast (en_043a0_m)orUhra - Main Street (u36_0) / StaticMesh_705(a piece of that map). The names come from your game's text, in the language picked in Text language; with All languages, or when the game has no name in that language, they are English. Rows the game gives no name keep their code, for example battle arenas, effects, weapons and most NPCs. -
Show (above the table, right) shows one group only, for example Monsters. Filter finds names and paths, for example
kaimormain street. With either of them set, Start exports exactly the rows in the table. - If models show only codes and the line under the table says
Update the game and scan again, yourLostOdysseyRecomp.exeis older than this tool. Update the game, then press Scan game data.
- Click a row to preview it on the right:
- Texture: the image, with its size and format.
- Movie: its name and size. Press Play to export that movie and open it in your video player.
- Text: the first 200 lines of the JSON file.
-
Model: a picture of the model with its colours, seen from the front at an angle, with its counts (vertices, triangles and bones). The window shows
Drawing a preview...for under a second first. - Animation: a picture of the character the animations move, standing still, with its counts (sequences, tracks and frames). To watch the animations, open the file in Blender.
-
Export and show the file (models and animations): exports only that row as a
.glbfile and opens Explorer with the file selected. Drag it into Blender: see Open models in Blender. The path is also shown under the button. The first preview of a texture, movie or text file takes a moment. Closing the window deletes those preview files. Model pictures are kept (the last 400) and Export and show the file copies for 14 days, in MO2'splugins\data\lostodysseyrecomp_exportfolder.
- Double-click a row to put its path into Filter. Start then exports only that package, movie or text file.
- Select several rows with Ctrl or Shift, then press Export selected (N) to export only those rows, where N is the number selected. The button is off while Language pack holds an id.
lost-odyssey-export/
  textures/            PNG images; index.csv lists each texture's mod key and fingerprint
  movies/              the CG movies (.wmv)
  text/                one .json file per game text file; index.csv lists them
  models/              3D models as glTF (.glb); index.csv lists them (with Models ticked)
  animations/          animation sets as glTF (.glb); index.csv lists them (with Animations ticked)
  export-summary.txt   how many files were exported and what was skipped
Next steps:
- Repaint or upscale textures: Make a texture pack.
- Translate text: Translate the game's text.
- Look at a model or play its animations: Open models in Blender.
- Edit a character model: Replace a model.
The tool reads the game folder directly, not through MO2, so it exports the original game files, not your installed mods. With the DLC installed, files the DLC changes come from the DLC.
The files come from your own copy of the game. Use them to make your mods, but do not share them or put them in a mod.
To translate the game into a new language:
- Open Tools > Tool Plugins > Export Lost Odyssey assets as above.
- In Language pack, type a short id for the language, for example
pt-br. Letters, digits,-,_and.only. The table then lists the text files the pack will hold; click one to read it. - Leave Text language on All languages to translate from English, or pick the language to start from.
- Press Start. Only text is exported (a few seconds), whatever Export says.
- The output folder now holds a
pt-brfolder (language.iniand the text intext/) and anoriginalfolder. Follow Make a language pack from step 2 to name, translate and try it. - To share it, open the tool again, press Clean language pack... and choose the
pt-brfolder. The lines you translated are copied toshare/pt-brin the output folder; zip that folder and share the ZIP. Clean needs theoriginalfolder besidept-br.
-
Mod folders (the default layout of
lo_mod.py): each mod has its own folder andmod.ini, so MO2 shows no conflict between them. The game's own mod order decides which one wins for the same file (Settings → System → Mods, saved inmod-list.ininext tosettings.ini, outside MO2's virtual folder), then thepriorityinmod.ini. Disabling a mod in MO2 removes its folder, so it stops loading and leaves the game's Mods page; it keeps its place in the game's order for when you enable it again. -
Overlay packages (
--layout overlay): two mods that replace the same asset ship the same file path. MO2 shows the conflict, and the mod lower in MO2's left pane wins. An overlay file beats every mod folder. - Language packs: MO2's order does not matter. Only the pack picked in Settings → System → Game language is used.
Both layouts load together, whatever --mods-mode the game is started with. An overlay file wins over a mod folder for the same asset, so MO2's order decides wherever overlay packages overlap; --mods-mode standalone makes mod folders win instead.
Only mods/ is virtual. Settings, the game's mod order (mod-list.ini), saves (profile/), logs, shader caches and the game files rebuilt for model mods (cache/mods) stay in the game folder, so MO2 profiles do not separate them.
Every run writes logs/runtime-*.log in the game folder. Its mods: line shows the mods folder, the mode, the mod folders it loaded (highest priority first) and whether an overlay folder was visible; warnings about broken mod.ini or mod-list.ini files follow it. If an MO2 mod is missing there, make sure the game was started from MO2.
Managers that deploy with hard links or symbolic links (Vortex, or a script on Linux and Steam Deck) work too: put the files under the game's mods/ folder while the game is closed. Symlinked mod folders are followed.