Repository navigation
03. Setting up Equipment
Overview. Every control on this screen has detailed built-in help: hover it, press F1, or click the ? beside the title. See Built-in Help.
The Equipment section is where you connect, configure and save every device attached to a Pier. It has one screen per device category; all screens follow the same pattern.
- How equipment screens work
- Camera
- Mount
- Filter Wheel
- Focuser
- Rotator
- Optics
- Switches
- Flat Panel
- Weather and Safety Monitor
- Dome
- Control Panel
- Auto-connect
Every device screen has the same three-field connection row at the top:
| Field | Meaning |
|---|---|
| Driver | Alpaca (ASCOM network protocol) or INDI (Linux/macOS/Pi server) |
| Server | Host name or IP address of the machine running the device or indiserver. If it is the same machine, enter that computer's own name or LAN address: localhost and 127.0.0.1 are refused, because a saved address has to mean the same computer on every Galileo node (a profile saved earlier with one is marked in red). .local mDNS names work, including on Windows. |
| Port | Default is 32323 for Alpaca (the common Seestar / ASCOM Remote default) or 7624 for INDI. Change this to match whatever your device documents. |
Workflow:
- Fill in Driver, Server and Port.
- Click Scan. Galileo queries the server and lists found devices in the log pane at the bottom and in each device's Device drop-down.
- Pick your device from the Device drop-down.
- Click Save to store the settings under the selected Pier.
Settings are stored per Pier — except the Safety page, whose weather station and safety monitor belong to the Observatory and are shared by all its Piers. Make sure the correct Pier is selected in the top bar before saving.
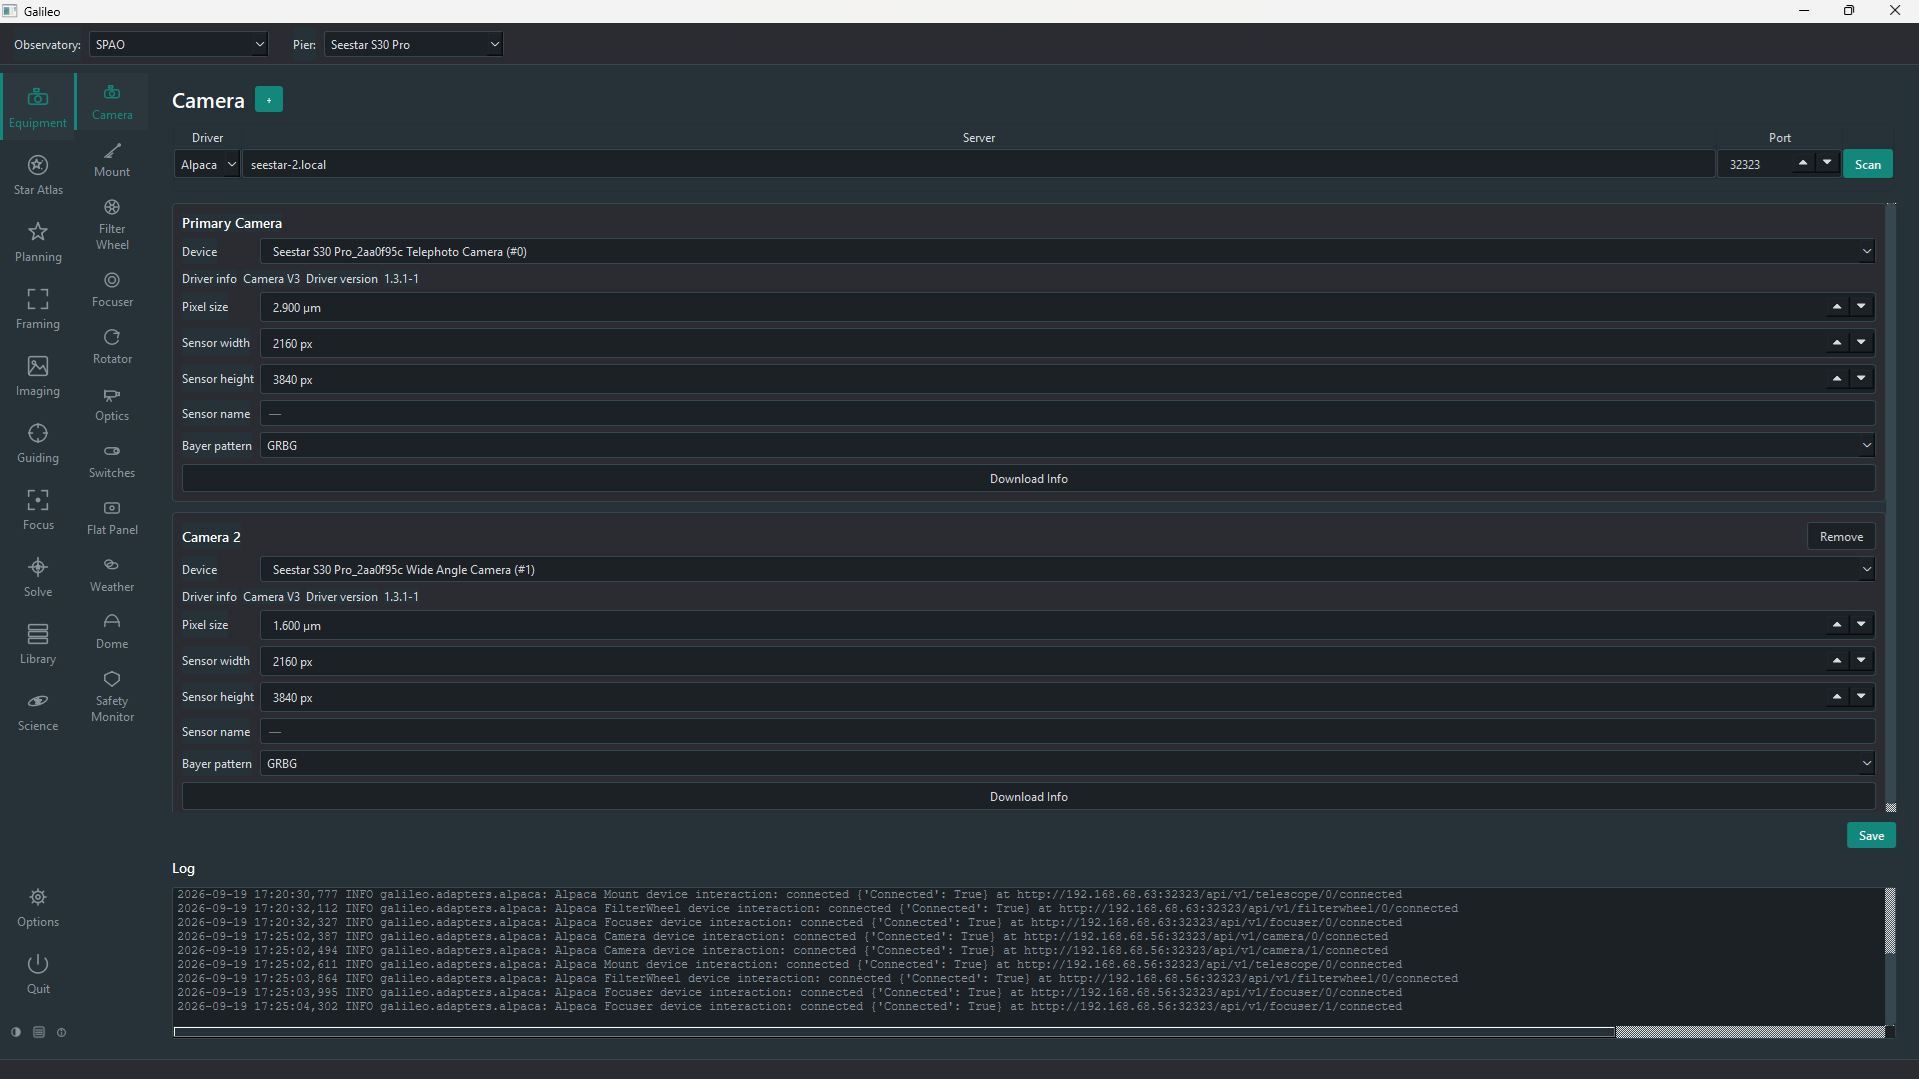
After scanning and picking your camera from the Device drop-down:
| Setting | Meaning |
|---|---|
| Download Info | Reads pixel size and sensor dimensions from the camera over the protocol and fills them in automatically. |
| Pixel size (µm) | Sensor pixel size; used for plate-solve pixel-scale calculations and FOV overlays in Star Atlas. |
| Sensor width / height (px) | Used for FOV calculations. |
| Bayer pattern | For one-shot-colour (OSC) cameras: RGGB, BGGR, GRBG, GBRG. Recorded in saved frames (BAYERPAT). Previews are debayered automatically from what the camera itself reports. |
| Sensor name | The sensor model, if the driver reports it. |
| Max well depth (e-) | The sensor's full-well capacity, from its datasheet; the Flats Assistant uses it to work out flat exposures. |
| Default gain / offset | Your preferred gain and offset for this camera. The Imaging screen starts with these whenever you select the camera or switch Pier. |
| + button | Add a second camera on the same connection (for Piers with multiple cameras on one Pier). Extra cameras share the Driver/Server/Port row but are separate devices. |
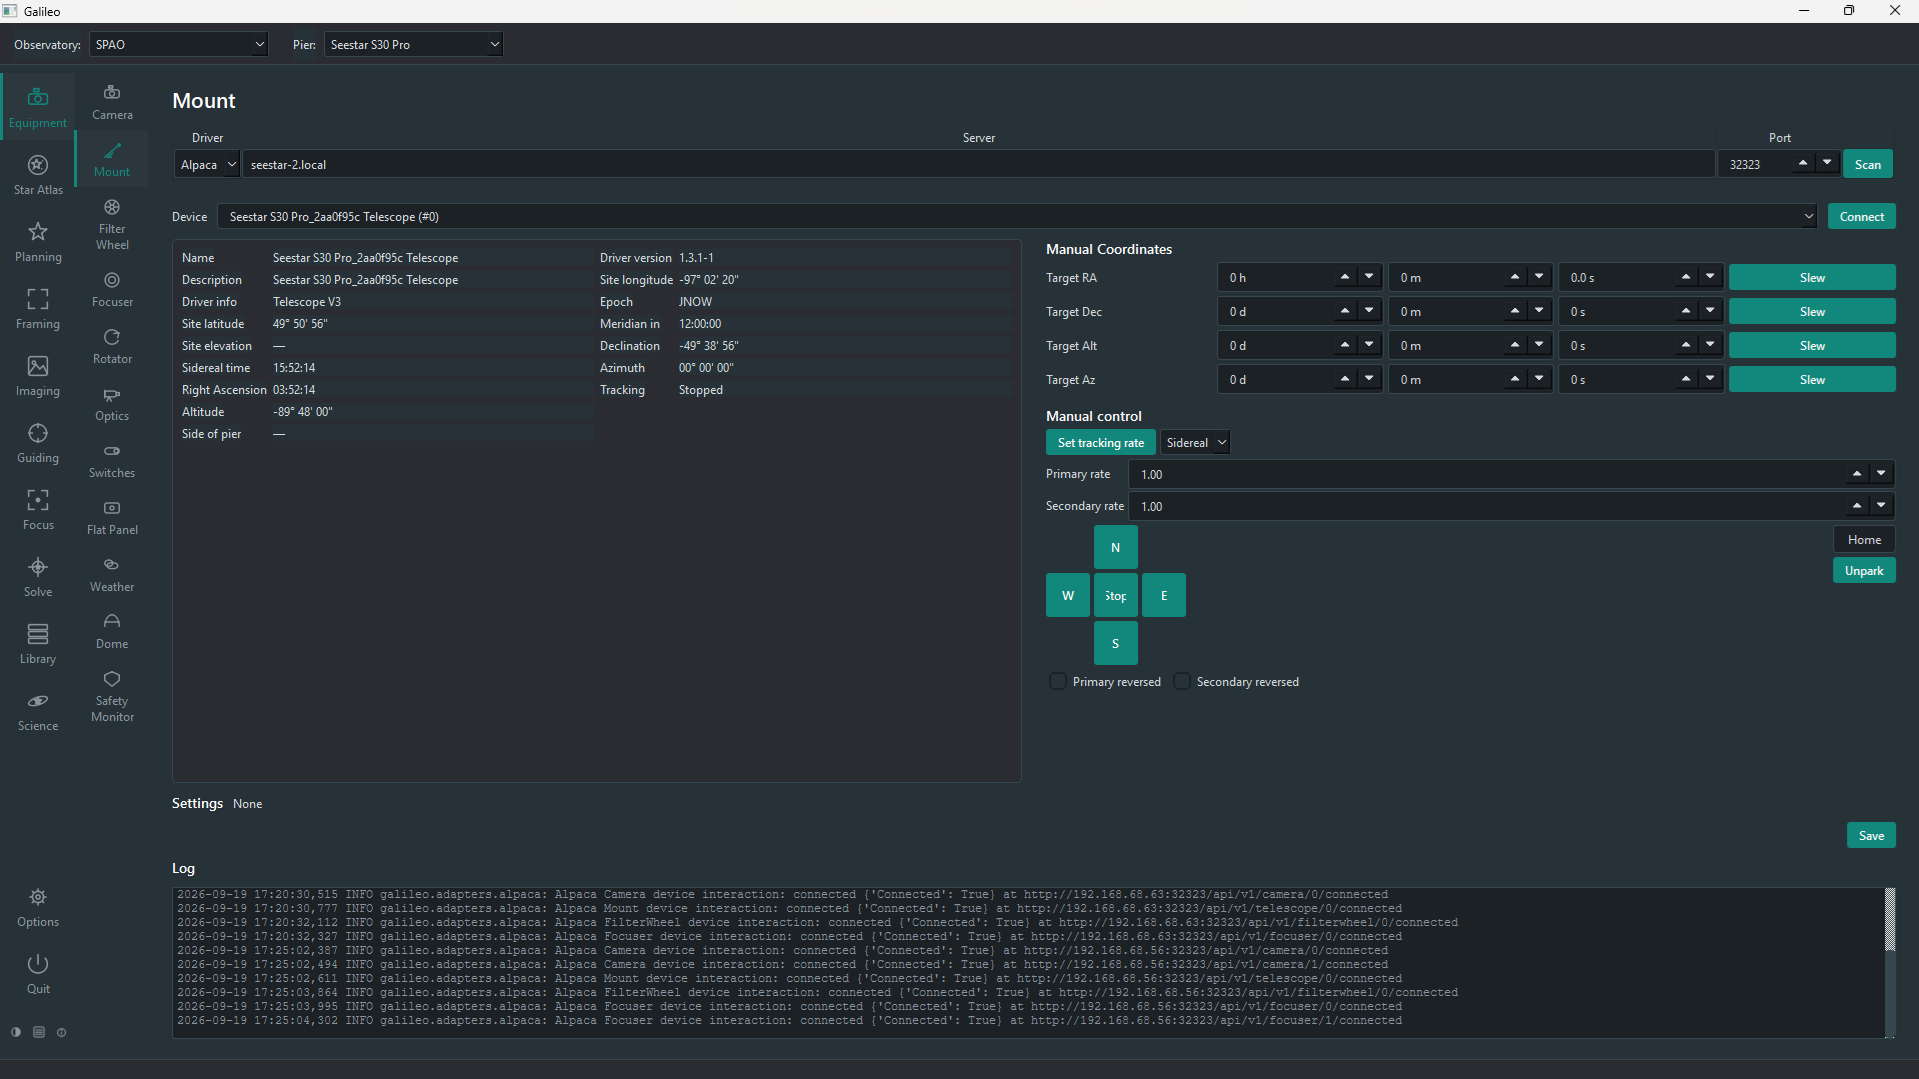
After connecting, the Mount page shows live status and manual controls:
| Status field | Meaning |
|---|---|
| RA / Dec | Current pointing position in J2000 equatorial coordinates |
| Altitude / Azimuth | Current pointing in horizontal coordinates |
| Sidereal time | Local sidereal time |
| Time to meridian | How long until the target crosses the meridian (positive = not yet, negative = past) |
| Pier side | East or West |
| Tracking | Whether tracking is on; the tracking rate (sidereal, lunar, solar) |
| Parked | Whether the mount is currently parked |
Manual controls:
| Control | Effect |
|---|---|
| Slew to RA/Dec or Alt/Az | Type coordinates and press Slew; tracking starts when the slew ends |
| Tracking On / Off, tracking rate | Start or stop tracking, and choose Sidereal, Lunar, Solar or King rate |
| N / S / E / W pad and Rate | Hold to jog at the chosen level (1 slowest to 9 fastest), release to stop; Primary/Secondary reversed flip the directions |
| Park / Unpark / Home | Park the mount, release it, or send it home |
| Stop | Halt any slew or jog immediately |
Meridian flip and limits. The page also holds the mount's safety settings, saved per Pier. Flip if HA > makes Galileo flip a tracking mount to the other side of the pier once it is a set number of degrees past the meridian. Limits stop the mount, and refuse slews, outside a minimum/maximum altitude or beyond a maximum hour angle. They apply wherever the slew was asked for, including sequences.
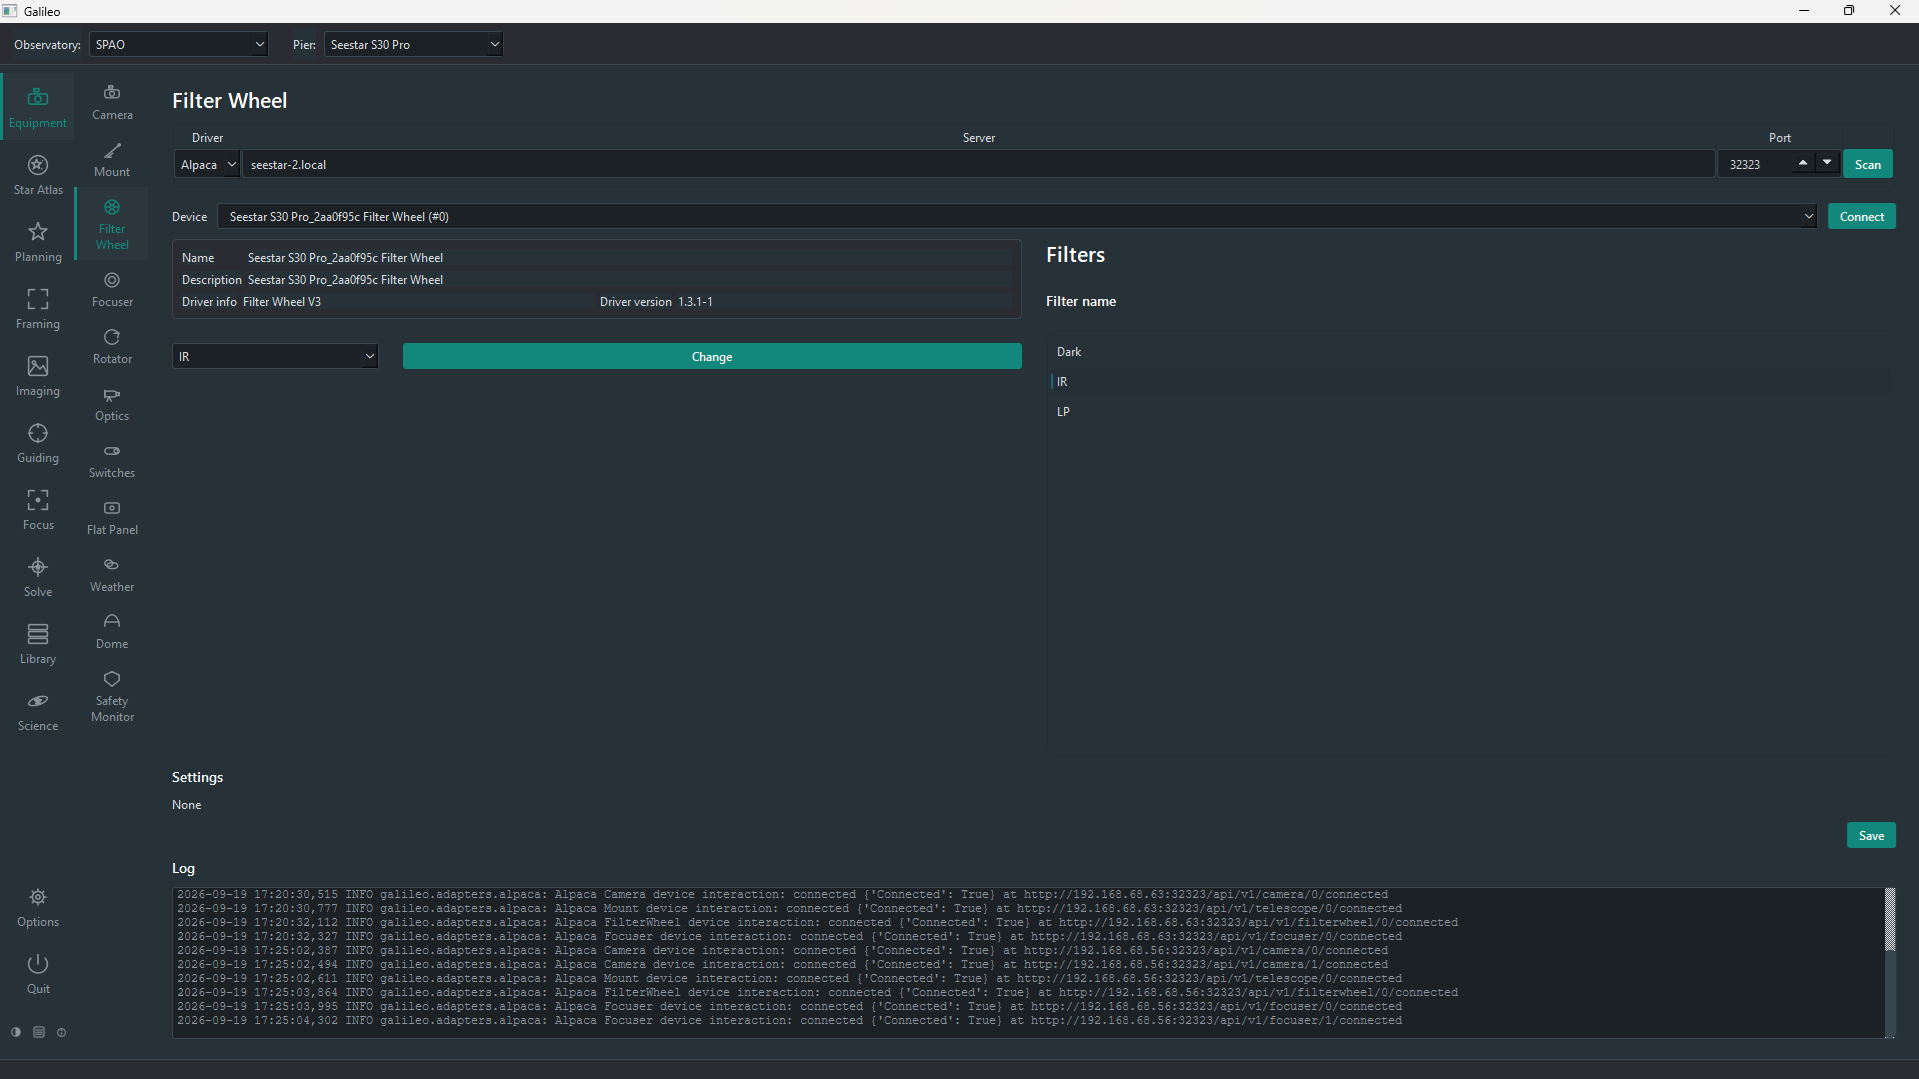
After connecting, the Filter Wheel page shows the wheel's name and description, the filter currently in place, and the list of filter names read from the wheel. Choose a filter in the box and press Change to move the wheel. Filter names come from the wheel's own configuration (the ASCOM driver or INDI properties); they appear in the Imaging screen's Filter drop-down, in session blocks and in Library metadata. Focus offsets per filter are measured on the Focus screen.
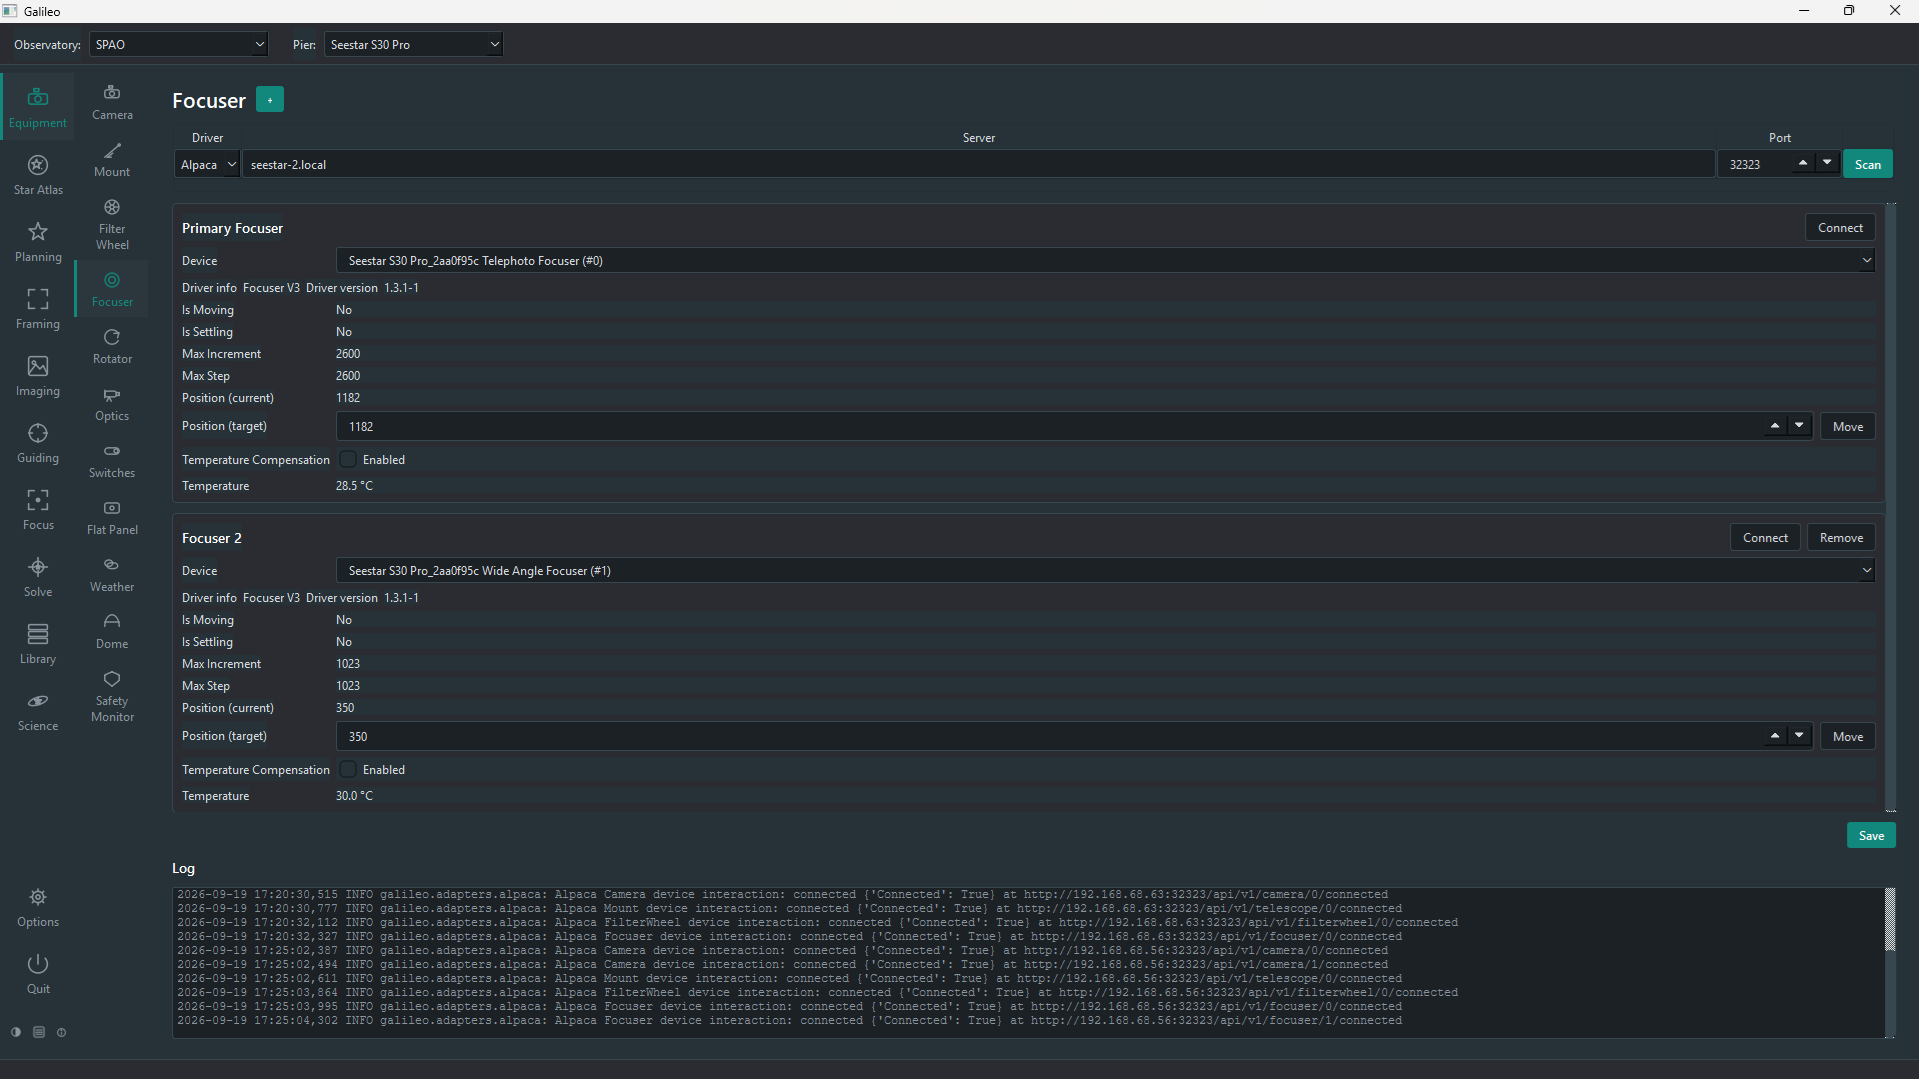
After connecting, the Focuser page shows live status — whether it is moving or settling, its current position, its range (Max Step, Max Increment) and its temperature. Type a Position (target) and press Move. Temperature Compensation turns the focuser's own compensation on or off, if the device has it. A telescope with more than one focuser gets extra panels with +.
Mode. Most focusers are Absolute — the driver reports and accepts positions. A simple focuser that can only be told to run its motor for a number of milliseconds is a Pulse focuser (INDI only): choose Pulse, move the focuser by hand to the middle of its travel, and press Reset to middle. Galileo then tracks the position itself and remembers it across restarts, so autofocus works as it does with any other focuser (step sizes are milliseconds).
Travel limits. In either mode, move the focuser to each safe end of its travel and press Set Min and Set Max; Galileo will not command moves beyond them, protecting against the physical stops. Press Save to keep the settings with the focuser. Every control has built-in help. Autofocus itself is on the Focus screen.
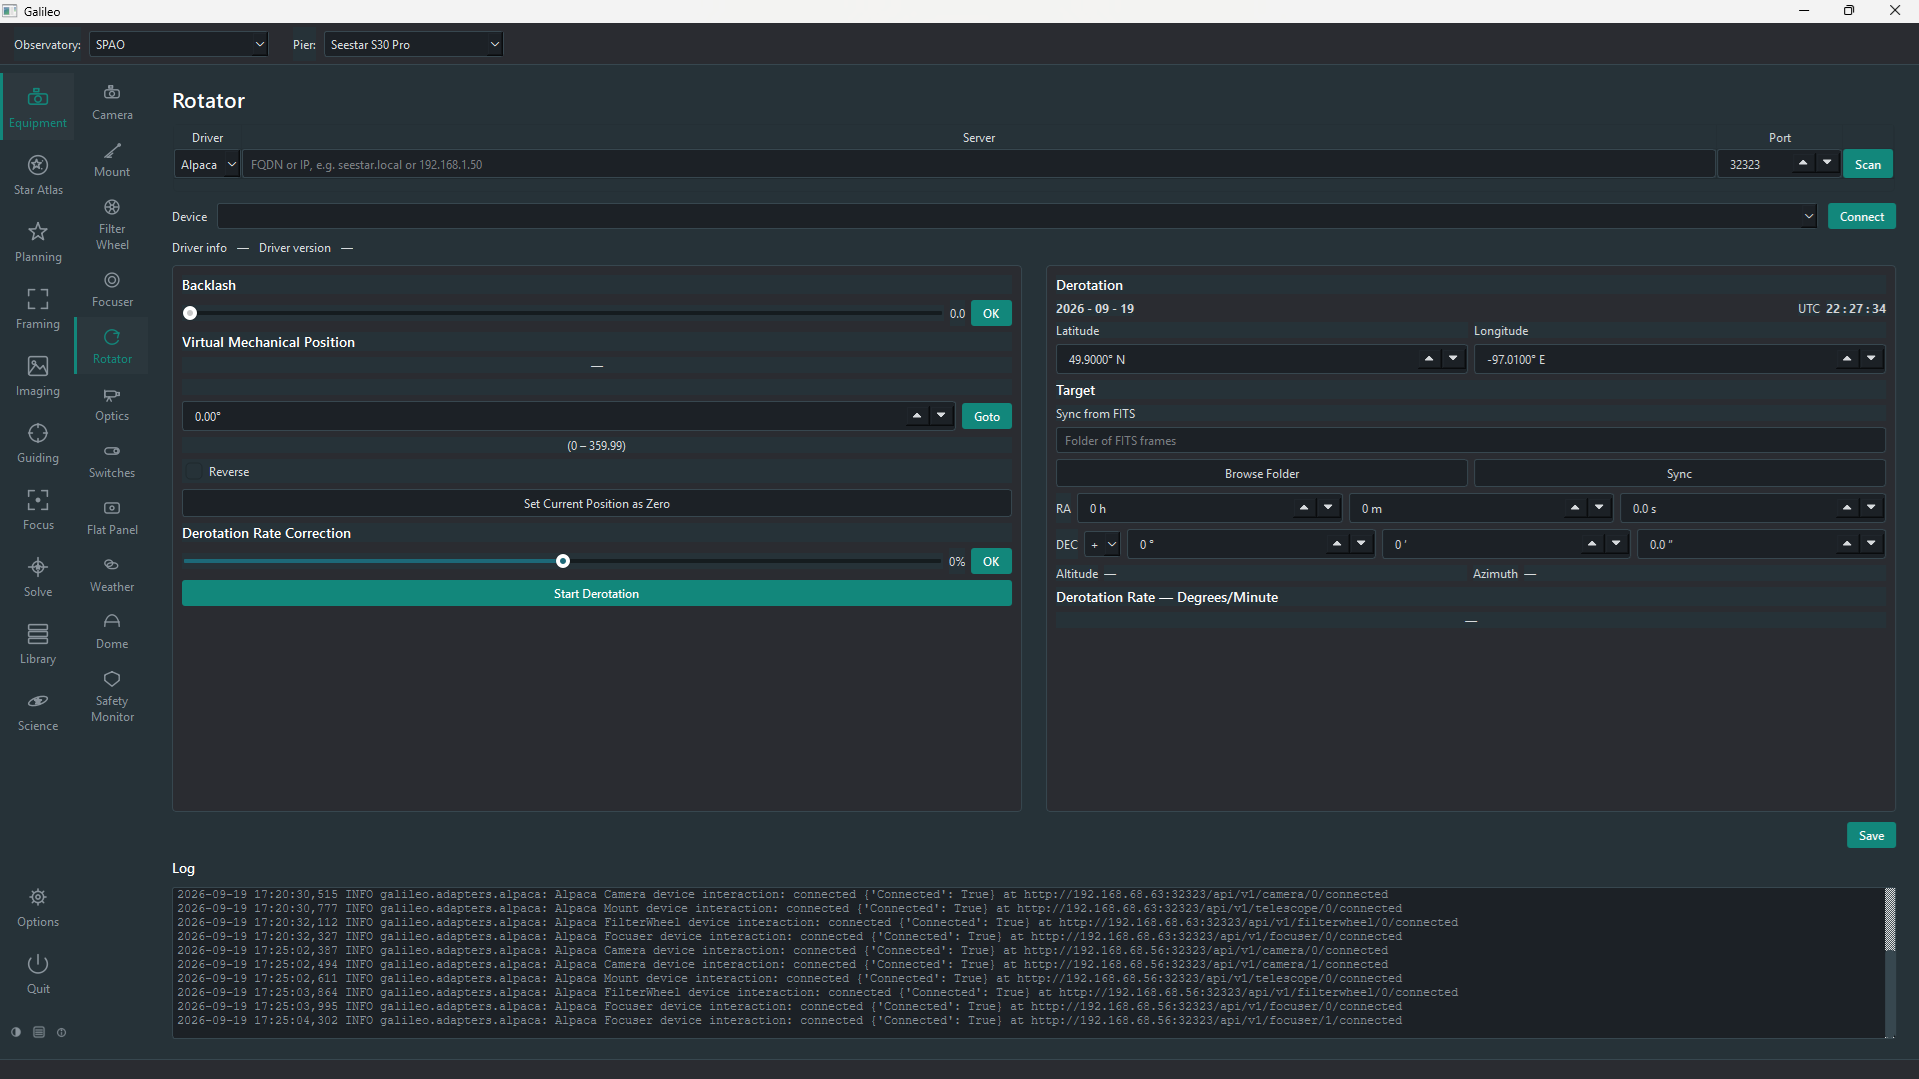
The Rotator page shows the current position and lets you turn the camera: type an angle and press Goto, set the current position as zero, reverse the direction, and set backlash. It can also derotate continuously: on an alt-azimuth mount the sky field rotates as the target moves, and the rotator cancels that turn, using the site's latitude/longitude and the target's coordinates (typed in or synced from a FITS file). A trim of ±100% fine-tunes the rate.
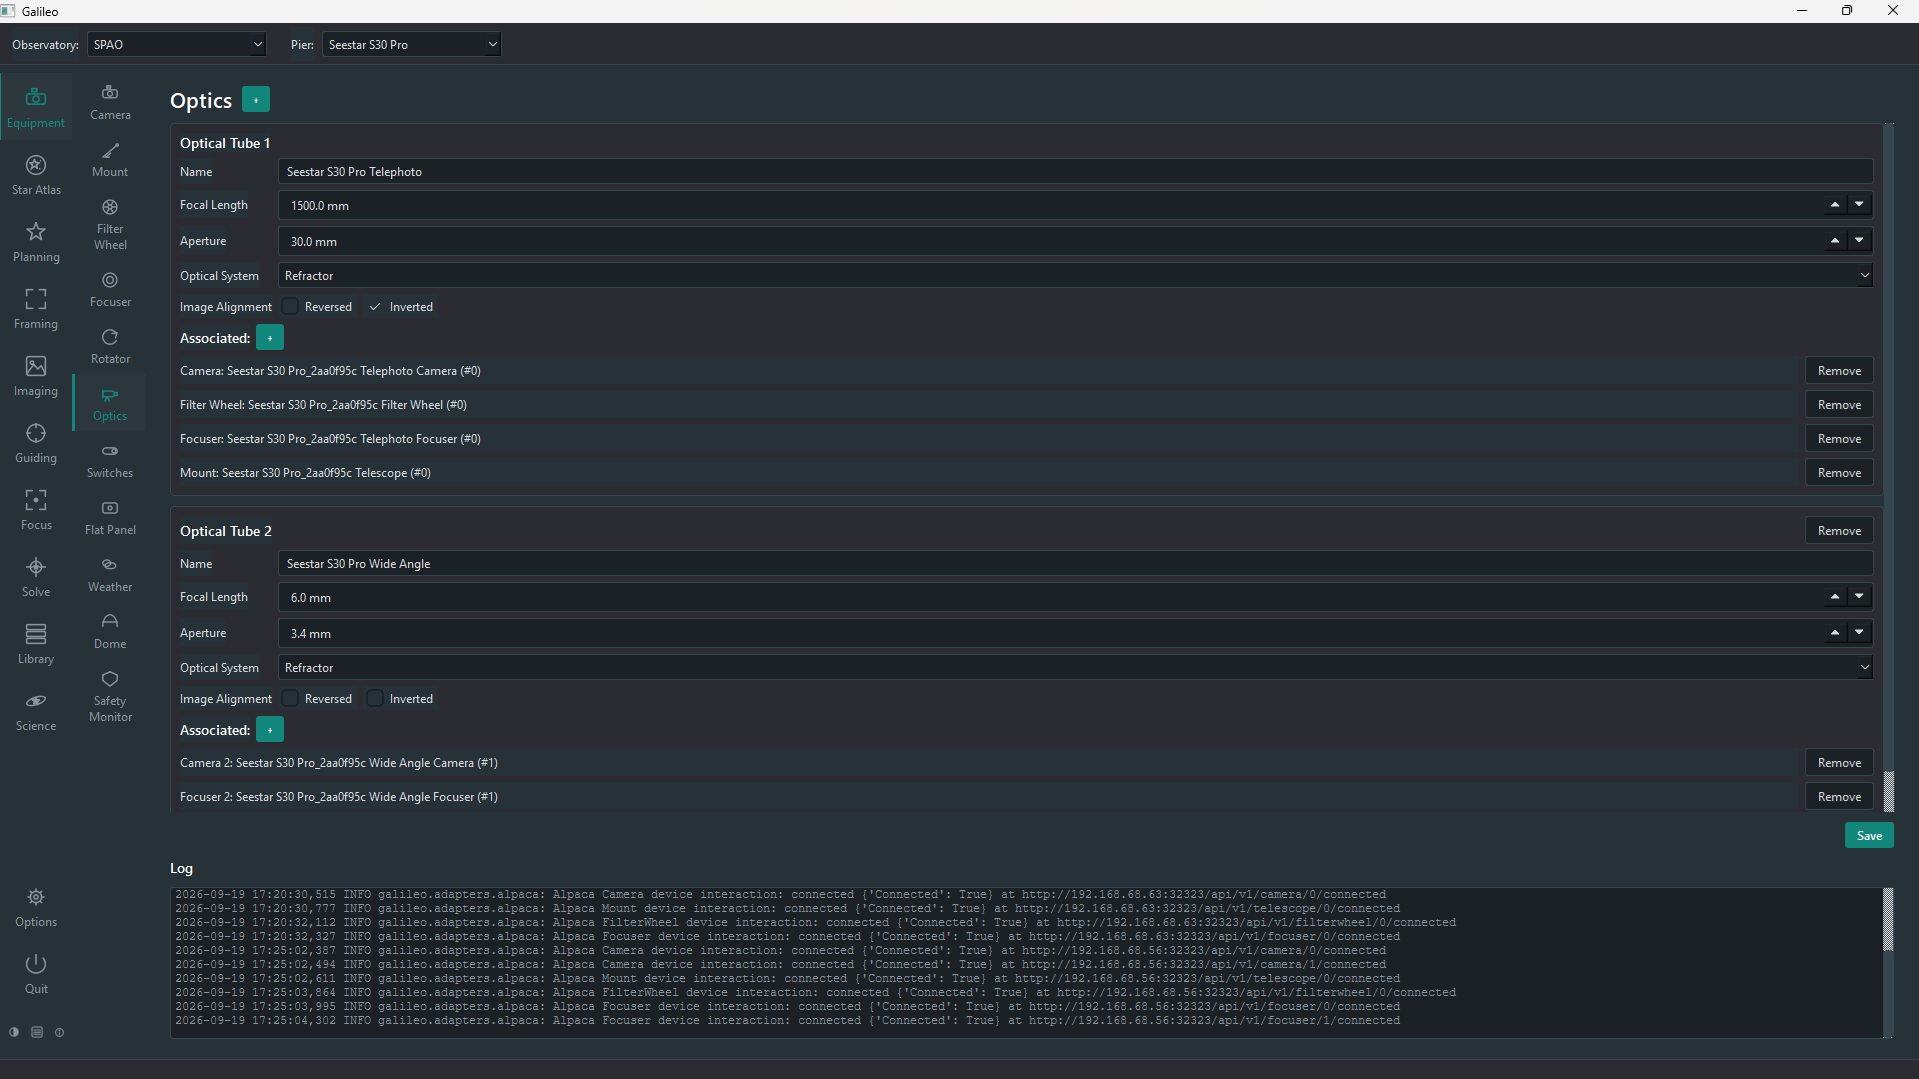
The Optics page ties devices together into optical tubes — each tube is one telescope. A Pier can have more than one optical tube (e.g. a main scope and a guide scope on the same mount).
- Click + next to "Optical Tubes" to add a new tube.
- Fill in the tube's details:
| Field | Meaning |
|---|---|
| Name | A friendly label, e.g. "Esprit 150" or "Main scope". Appears in the top bar's Optics selector. |
| Focal length (mm) | Used for FOV overlays, plate-solve pixel-scale checking, and the top bar label. |
| Aperture (mm) | Used to compute the focal ratio for the top bar label. |
| Optical design | Refractor, Newtonian, Schmidt-Cassegrain, etc. Informational only. |
-
Click + next to Associated to attach devices to this tube. Only devices already saved on their own Equipment pages appear in the list. Associate a camera, filter wheel, focuser and/or rotator.
-
Click Save.
The Imaging, Focus and Solve screens use the optics selected in the top bar's Optics selector to know which camera, filter wheel and focuser to talk to.
The Switches page controls power boxes and relay boards over INDI or Alpaca, so you can power a camera, mount or heater on and off, set a dew heater, and watch the supply voltage without leaving Galileo.
Typical use: choose the Driver and Server, press Scan, pick the device, press Connect, then Save so it connects again when this Pier is opened. Tick Show on imaging beside a port, a dew heater or an adjustable output to put it in the More menu on the Imaging screen, on the desktop, web and mobile, so you can switch it or set a dew heater's percentage while you image. The page then shows the device grouped by port type — DC, USB, dew heaters, adjustable outputs — with an On / Off button for each switchable port, a percentage and Set for each dew heater, a voltage and Set for an adjustable output, and a Readings box for voltage, current and temperatures. A port the hardware can't switch is shown as not switchable. Anything else the device's driver offers (mode selectors, calibration and so on) is under Other, so nothing is hidden. Switching a port off while a session is running on this Pier asks you to confirm first. Every control has built-in help.
Which devices work:
| Device | How |
|---|---|
| INDI power boxes that follow INDI's standard power interface — Pegasus Pocket Powerbox Micro and Advanced, Ultimate Powerbox V3, Terrans PowerBoxGo V2 and PowerBoxPro V2, and others | Nothing extra to install |
| Wanderer Astro WandererBox Pro V3, Plus V3 and Dew Terminator | Install the WandererBox plugin (Options > Plugins). The WandererBox Lite V3 has no control interface, so it can't be used |
| An ASCOM Alpaca Switch device | Nothing extra; shown as one list of switches, with any numeric channel shown with exactly the range the device declares and no unit |
| Any other INDI driver | Listed under Other exactly as the driver defines it, and also available on the Control Panel page |
Note: support for the Pegasus, Terrans and Wanderer boxes was built from their drivers' published source and tested against a simulated INDI server; it has not yet been tried on real hardware. If something looks wrong on your box, the log pane on this page and the Other section show what the driver actually offers.
If the Kasa Switch plugin is installed (Options > Plugins), the page also shows a Scan for KASA switches button. It finds TP-Link Kasa plugs and power strips on your network and lists each one with On and Off buttons for every outlet. Add by IP… covers a device on another subnet.
Note — Third-Party Compatibility: newer Kasa firmware ships with local control switched off, so the strip answers in the Kasa app but refuses Galileo. In the Kasa app open the device's settings and turn on Third-Party Compatibility (HS300: Device Settings), then scan again.
If the SwitchBot plugin is installed, the page also has a Scan for SwitchBots button for SwitchBot Bot devices over Bluetooth. A Bot stuck over a Seestar's power button lets you switch the telescope on and off from Galileo. Each Bot has On, Off and Press buttons and shows its battery level. The plugin needs the bleak Python package (pip install bleak) and a Bluetooth adapter in range of the Bot; every control has built-in help.
The Flat Panel page controls a light panel for flat frames: a motorised dust cover with a built-in light (a Flip-Flat), or a fixed observatory panel. It shows the cover and light state, Park/Unpark for the cover, Light On/Off and a Brightness setting. The Flats Assistant and session Flat Capture blocks use it automatically when the Flat Panel method is chosen.
The Safety page connects the devices that tell Galileo whether it is safe to image: a weather station (temperature, humidity, wind, cloud, rain…) and/or a safety monitor that simply reports safe or unsafe. Several can be added, each on its own tab. They belong to the Observatory, not to a Pier: one weather station watches the sky over every Pier under the roof, so you set it up once, selecting another Pier does not disconnect it, and the top-bar Connect/Disconnect for a Pier leaves it alone (use the tab's own Connect/Disconnect). For each measure you choose whether it counts and the value at which it becomes unsafe; a banner shows SAFE or UNSAFE with the reasons. When conditions are unsafe, sessions stop imaging and close up, and the dome will not be opened.
The Dome page controls a dome or roll-off roof: Open and Close the shutter, Park, and Abort, with the shutter state and azimuth shown. An Observatory Status box summarises the dome and the weather and says whether the observatory is Ready.
The Control Panel page is Galileo's counterpart of the INDI Control Panel in EKOS. Enter the INDI server and port and press Connect: every device the server reports becomes a tab, and each device tab has a sub-tab per property group (Main Control, Options, Image Settings and so on) holding the driver's own switches, numbers and text fields. Nothing is connected for you — switch a device on from its Connection property, just as in EKOS. A log tail sits at the bottom of the page, and Save makes the Pier reconnect to the same server at start-up.
It is the place for anything that has no page of its own — dew heaters, power boxes, lens covers — and for checking exactly what a driver offers. The page is INDI-only — Alpaca Switch devices are driven from the Switches page. Every control has built-in help.
Saved cameras and focusers connect automatically when a Pier is selected in the top bar, and again when Galileo starts up. Switching Pier shows the same progress splash as start-up — the step being worked on and each device's connection result — so a slow switch is never a blank wait. Other devices (mount, filter wheel, rotator, etc.) have a manual Connect button because some setups prefer to connect them only when needed. If auto-connect fails, the log pane on the device's page shows the reason.
By default each Equipment screen connects and keeps its own devices. Options > Equipment > Hold devices in the device service makes Connect go through the same device service the headless engine uses, so other parts of Galileo (the safety guard, remote control) find the devices a screen connected. While it is on, Galileo also runs the engine inside the window (from the next start), so a second Galileo or Galileo --engine on the same computer is refused instead of fighting over the equipment. Nothing looks different on the screens. It is off by default, applies to devices connected from then on, and can be turned off again if a device will not connect. Every control has built-in help.