Repository navigation
05. Planning Functions
Overview. Every control on this screen has detailed built-in help: hover it, press F1, or click the ? beside the title. See Built-in Help.
The Planning section is where you decide what to observe. It has four sub-sections accessible from its secondary sidebar:
| Sub-section | What it does |
|---|---|
| What's Up Tonight | A ranked list of the best targets for tonight from your observatory |
| Search | Searchable deep-sky catalog — criteria-driven filtering and manual lookup |
| Targets | Your saved targets, kept between sessions |
| Sessions | Build a sequence of observation blocks and schedule them |
| Schedule | A multi-night calendar view of all scheduled sessions |
| History | Review how past and running sessions went, frame by frame |
Click Planning in the left sidebar to reveal these choices in the secondary panel.
- What's Up Tonight
- Search
- Targets
- Sessions
- Schedule
- Planning options
- History
- Watching several Piers: the Dashboard
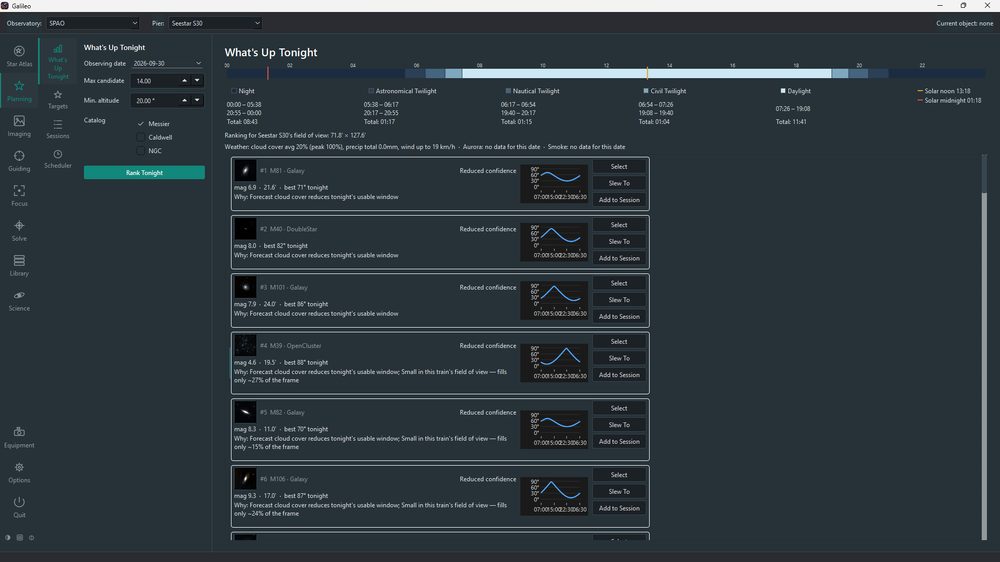
What's Up Tonight (WUT) ranks objects from the catalog for tonight at your Observatory and shows the top 50. It is a recommendation layer on top of the Search catalog, not a separate catalog.
| Control | Effect |
|---|---|
| Observing date | Defaults to today. Change it to plan ahead for a future night. |
| Min altitude | Ignore objects that don't rise above this threshold tonight. |
| Object types | Tick the types to include: galaxies, nebulae, clusters, etc. |
| Max magnitude | Exclude objects fainter than this value. |
| Run | Re-computes the ranked list with the current criteria. |
Each result tile shows:
- Object name, type, magnitude and angular size
- A thumbnail image, shown only if already cached on your computer (What's Up Tonight never downloads images; a note above the results says how many were loaded — load them with Download Catalog Images in Options > Planning)
- The reason this object was ranked here (e.g. "High altitude all night", "No prior integrations in your Library")
- A mini altitude-over-the-night chart
- Rise, transit and set times for tonight
- A confidence badge when the ranking score was computed with incomplete data
| Button | What it does |
|---|---|
| Select | Makes this the Pier's current object (shown in the top bar) |
| Slew To | Slews the connected mount to this object |
| Goto and Centre | Slews to this object, then plate-solves and re-centres on it |
| Add to Session | Appends a Light Frame block for this object to the open session in Planning > Sessions |
When the date is set to today, WUT fetches a brief advisory line (weather, aurora index, smoke) at the top of the results. This is a live network fetch and may be absent in offline use.
If you have an Astrospheric Professional membership, enter your API key in Options > Planning and rows (Cloud, Seeing, Transparency, Temperature, Dew point, Wind) of hourly Astrospheric forecast, plus NOAA Aurora Kp and Smoke AQI rows that need no key, appear directly under the day/night bar, each hour lined up with the bar (North America, Greenland, Iceland, Ireland and the UK). If it can't be fetched, a line says why. It is informational and does not change the ranking; leave the key empty to turn it off.
Search is the full searchable deep-sky catalog — all Messier, Caldwell, NGC and IC objects bundled with Galileo.
Filter the catalog with any combination of:
| Criterion | Notes |
|---|---|
| Name / ID | Partial match on any identifier (M31, NGC 224, Andromeda…) |
| Object type | Galaxy, nebula, cluster, etc. |
| Constellation | Three-letter IAU abbreviation or full name |
| Magnitude | Maximum (faintest) to show |
| Minimum size | Minimum angular size in arcminutes |
| Min altitude tonight | Only objects that rise above this threshold |
| Catalog | Messier only, NGC only, etc. |
Click Search to run the query. Results are capped at 200; narrow the criteria if more objects match.
Each tile shows the same information as What's Up Tonight tiles (name, type, thumbnail, altitude chart with your Star Atlas horizon shaded in, rise/transit/set) and the same action buttons (Select, Slew To, Goto and Centre, Add to Session).
Press Save on a tile to keep that object on the Targets screen. The same Save button is on What's Up Tonight tiles.
Targets is your own list of saved objects. Add to it with the Save button on a tile on Search or What's Up Tonight; the list is kept between sessions and shows newest first. Its tiles are the same as Search's — thumbnail, altitude chart, rise/transit/set and the Select, Slew To, Goto and Centre and Add to Session buttons — and Remove (where Save was) takes an object off the list. The list is shared with your other Galileo nodes (Master and Remotes) and appears as a Targets screen in the Galileo mobile apps, where you can slew to or centre on a saved target. Every control has built-in help.
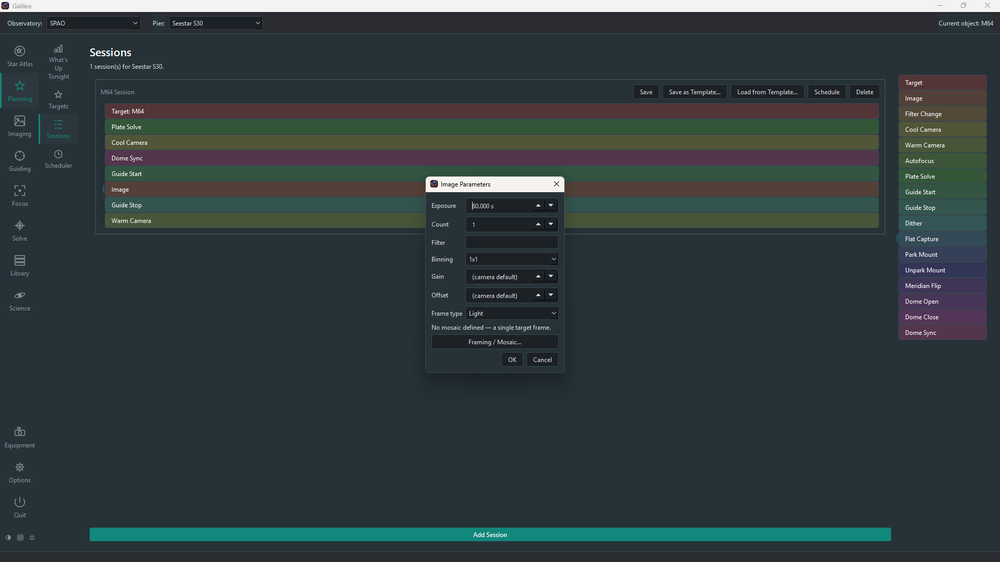
Sessions is the session authoring screen. Each session belongs to one camera, chosen on its card (new sessions start on the camera selected in the top bar). Every action of the session uses that camera. A session is an ordered list of blocks — each block is one step of the night's plan (capture lights, take flats, autofocus, solve, send a notification, etc.).
- Open Planning > Sessions.
- Click Add Session — or use Add to Session on an object in the Star Atlas, Search, Targets or What's Up Tonight, which creates a session that already starts with a Slew To block.
- Drag blocks from the palette on the right into the session. Drag within the session to reorder. Right-click a block to change its settings.
| Block | What happens at run time |
|---|---|
| Slew To | Slew to the target and start tracking |
| Image | Capture frames: exposure, count, filter, binning, gain, offset, frame type; can carry a mosaic (via its Framing / Mosaic dialog) |
| Filter Change | Move the filter wheel (applying any saved focus offset for that filter) |
| Cool Camera / Warm Camera | Cool the sensor to a set temperature, or warm it back up |
| Autofocus | Run an autofocus sweep, optionally on a named filter |
| Plate Solve | Solve and centre on the target (needs a Slew To block before it) |
| Guide Start / Guide Stop | Start (optionally calibrating first) or stop PHD2 guiding |
| Flat Capture / Dark Capture | Take flats or darks the way the Flats and Darks assistants do; Dark Capture can also close a connected dust cover / flip-flat panel for the darks |
| Park Mount / Unpark Mount | Park or unpark the mount |
| Dome Open / Dome Close / Dome Sync | Open or close the shutter, or line the slit up with the telescope |
| FOR Filter / FOR Object | Repeat the blocks indented beneath it once per filter, or once per object |
| Notification | Send a message to your notification channels |
Every block, and each setting in its dialog, has detailed built-in help.
FOR Filter and FOR Object repeat everything indented beneath them. Only indented blocks are inside the loop. When building a session, drag each block that belongs in the loop to the right so it is indented under the loop tile, and drag a block to the left to take it out of the loop — an unindented block runs once, after the loop finishes. A loop moves together with its body. For an object loop, right-click and search the catalog to build the list.
- A Plate Solve block needs a Slew To block somewhere before it.
- A scheduled session is locked: it is outlined in red and cannot be edited until it is descheduled.
Save as Template… stores a session's blocks under a name; Load from Template… fills a session from one. A template keeps the target of the session it was made from, so it is valid as it stands. Load from Template… puts your own session's target in its place, so a session must already start with a real Slew To block to load one. Add Session from Template (bottom of the screen) skips that: pick a saved template and it creates a whole new session from it, with the template's target, for you to change if you want.
A session you Save or Schedule stays on the Sessions screen, with later edits, across restarts until it completes or you delete it, and a scheduled one still runs after a restart. A session you never saved is not kept.
Run executes the session now, without adding it to the Schedule (if a scheduled session is already running on that Pier, Run stops it and takes over): Galileo first checks that the equipment each block needs is connected and lists any problems instead of starting. While it runs the card shows the block and frame in progress, and has Pause/Resume and Stop. A bad frame is logged and skipped; a failed slew, solve, park or dome-open ends the session so the equipment is not left unsafe. If the safety monitor reports unsafe, only shutdown blocks (park, dome close, guide stop, warm) still run.
Schedule places the session on the Schedule calendar, where it can be given a start time and will run by itself when the time arrives, on whichever Pier it belongs to, while Galileo is running and that Pier's equipment is connected.
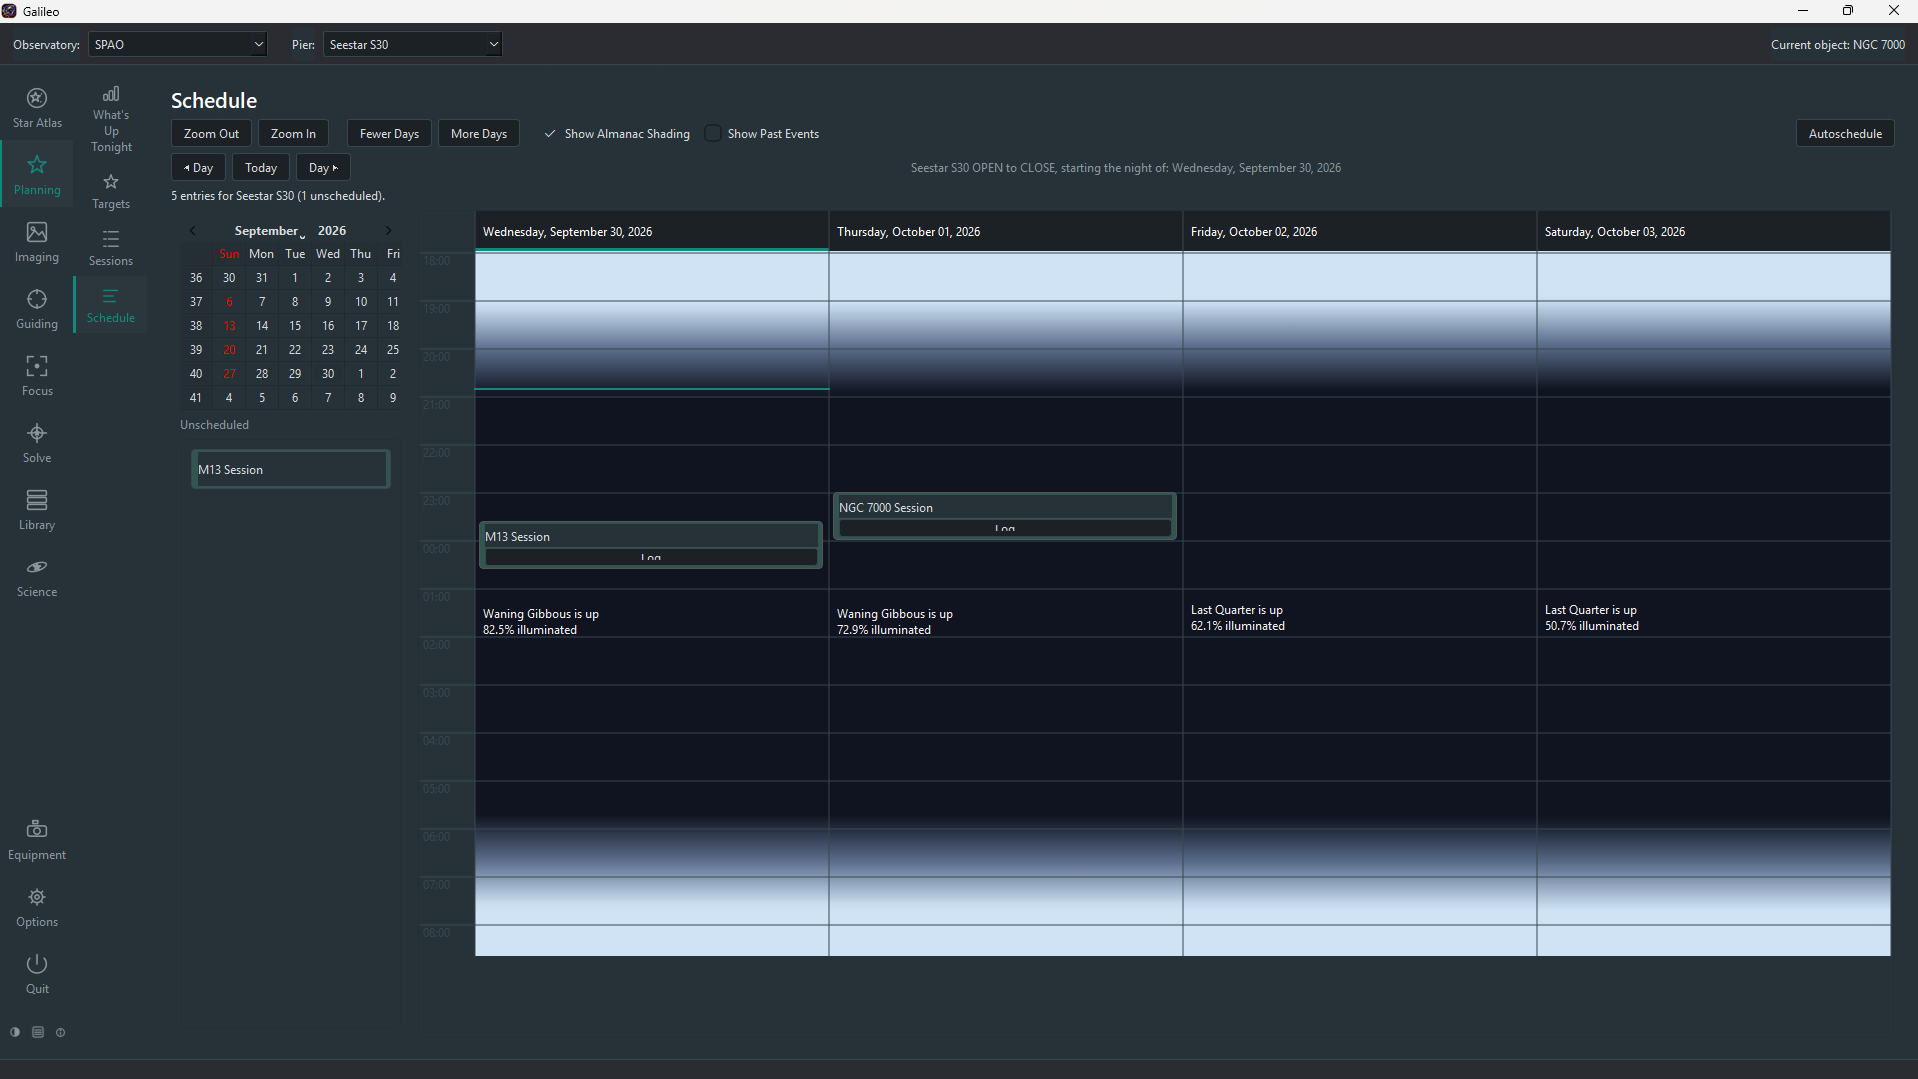
The Schedule is a multi-night calendar view of all sessions and pier operations queued for this Pier.
-
One column per observing night (a night runs from dusk to dawn, centred on midnight — the column is not split at midnight the way a plain calendar would be).
-
A shared hour axis on the left, running from dusk at the top to dawn at the bottom.
-
Each column is shaded by twilight depth (civil, nautical, astronomical) for that night's actual times at your Observatory.
-
The Moon phase icon appears at the top of each night's column.
-
Scheduled jobs appear as coloured blocks positioned by start time and sized by duration.
-
Right-click a session block to set its time, Edit… its priority, constraints, start/completion conditions and frames required, or Show Trajectory… to chart the target's altitude over the night. Every control has built-in help.
-
The Upcoming Sessions list under the calendar shows each scheduled entry still to run, soonest first, with its start time and a one-line summary of what it will do, starting with the target.
- In Planning > Sessions, click Schedule on the session you want. The session appears at the bottom of the Schedule grid as an Unscheduled block.
- Drag the block from the Unscheduled area onto the calendar column for the night you want.
- Drop it at the start time you want. The block snaps to 15-minute increments.
- To move a placed block, drag it to its new position.
If a connected Safety Monitor, or a Weather Station reading you marked safety-related, goes unsafe, the status line above the grid shows BLOCKED with the reason. Nothing new starts and a running scheduled session pauses; both carry on by themselves once conditions are safe again. A session you started with Run is not paused.
Click Autoschedule to have Galileo place every unscheduled session on the night shown. It works through the sessions in priority order and gives each the earliest free slot where the target is high enough, clear of your horizon, far enough from the Moon and in sufficient darkness, without overlapping anything else on the Pier. You get a preview to confirm; anything that cannot fit is listed with the reason. Entries you have already placed are never moved. Every control has built-in help.
When several Piers share one roof or dome, a Pier will not close the roof or slew the dome while another Pier is imaging: that Dome Close or Dome Sync step is skipped and noted in the session log, and the session carries on. Opening the roof is never blocked, and a close caused by unsafe weather always goes ahead.
Right-click any empty area on the calendar and choose Add Pier Operation. Options include:
| Operation | Effect |
|---|---|
| Open Dome | Commands the dome controller to open |
| Close Dome | Commands the dome controller to close |
| Park Scope | Parks the mount at its home position |
| Unpark Scope | Unparks the mount |
| Dome Sync | Synchronises dome azimuth with the mount |
A job's block changes colour based on its run state:
| Colour | Meaning |
|---|---|
| Grey | Scheduled, not yet run |
| Green | Completed successfully |
| Red | Completed with errors |
| Yellow | Currently running |
Click a block to see its run log (if execution has been attempted).
Note: Automated execution of scheduled sessions is planned but not yet implemented. The calendar tracks what should happen; actual automated execution requires future work.
Open Options > Planning to set two things. These apply to all of Galileo, not to one Pier.
- Do not slew where obstructed — refuses any slew into the horizon you described in the Star Atlas options, whether it comes from a screen or from a session.
- Download Catalog Images — fetches one ZIP of sky-survey thumbnails for the whole catalog from galileo-imaging.com and unpacks it, so What's Up Tonight, Search and Targets show pictures. It is a single download and can be cancelled; run it again after an update to add new images. It includes the larger click-to-enlarge images, so enlarging a thumbnail works offline.
History is where you review how a session went. Every light frame a session takes is measured and logged: its HFR (star sharpness — smaller is better), star count (a drop usually means cloud or dew) and, when PHD2 is connected, the guide RMS. Choose a session from the drop-down to see its summary, a chart of HFR and star count against frame number, and a table of every frame. A running session updates the page every few seconds.
The history is saved when a session ends and kept across restarts. Export CSV… writes a session's frames to a spreadsheet-friendly file, and Delete Session removes its record (never the images). Every control has built-in help.
The Dashboard (its own button in the left sidebar, below Solve) is a one-screen picture of what every Pier of the Observatory is doing: a very compact timeline per Pier, with lanes for the session, mount, meridian flip, guiding, plate solving, focusing and capture (one box per frame), the guide error over time and as a dot plot, and clock times along the bottom. Time runs left to right and the right-hand edge is now, so a glance shows whether a Pier is exposing, refocusing or has lost its guide star, and when it last did. Galileo records the timelines in the background (the last twelve hours, kept until Galileo restarts), so they are already filled in when you open the screen. There is nothing to choose: every Pier of the selected Observatory is shown, and double-clicking a timeline makes that Pier the working one.
The Dashboard ends in a single node health line for the computer Galileo runs on: CPU and memory use, free disk space, CPU temperature where the computer reports one, and uptime, with a ⚠ or ⛔ when a figure is tight. Restart and Shut down buttons beside it ask before acting and are refused while a session is running. The MobileConnect phone app shows the same figures on its Overview screen.
Plugins can add their own view above the timelines, for example the AllSkyCam animation. Tick Publish on Dashboard on the plugin's page under Options and it appears in a strip that takes whatever height the timelines leave free. Every control has built-in help.
Each Pier keeps its own device connections when you select another one, so you can connect every Pier's equipment (select it, press Connect) and then leave them all working. Scheduled sessions start on every Pier whose equipment is connected, not only the one you are looking at, and every Pier is held by the Observatory's one weather station and safety monitor (set up once on the Safety page): unsafe weather pauses all of them together. A Pier with nothing connected simply waits until you connect it. A session you start with Run still runs on the Pier shown in the top bar. Pointing and guiding stay per Pier (one PHD2 instance each), and a shared roof or dome is arbitrated between Piers as described above.