Проект по приведению качества фотографий снятых на мобильные устройства к уровню зеркальных камер с помощью глубоких сверточных нейросетей.
В этом репозитории представлены файлы как оригинального проекта на TensorFlow, так и переписанную нами версию на PyTorch. Помимо переписанного скрипта для обучения здесь также есть скрипты для обработки сырого датасета, которых не было в оригинальном проекте, и небольшие утилиты для удобного запуска модели.
Мы предлагаем 3 способа запустить модель: через скрипт run_patch.py, через run_tiled.py, а так же через веб-приложение gradio_app.py.
run_patch.py: Консольное приложение для обработки изображений.run_tiled.py: Похоже на приложение выше, однако данный скрипт запускает модель, предварительно порезав фотографию на части. Позволяет запускать модели с батч нормализацией без потери качества на GPU с малым объемом видеопамяти.gradio_app.py: Графическое веб-приложение с простым интерфейсом.
Требуемый объем видеопамяти зависит от конкретного размера фотографий. Для обработки фотографий в полном размере, снятых на планшет KVADRA_T, потребуется как минимум 11 Гб видеопамяти.
-
Установите пакетный менеджер pixi: https://pixi.sh/latest/installation/
-
Скачайте этот репозиторий.
$ git clone https://github.com/i44p/DPED-pytorch && cd DPED-pytorch
- Скачайте модели. Наши модели опубликованы здесь: https://huggingface.co/i44p/dped-pytorch-models, их можно скачать через git lfs:
$ git clone https://huggingface.co/i44p/dped-pytorch-models
- Запустите любое из перечисленных приложений с помощью pixi:
$ pixi run python <приложение>
Например,
$ pixi run python gradio_app.py dped-pytorch-models/ dped-pytorch-models/
Чтобы узнать подробнее о том, как запускать конкретное приложение, воспользуйтесь флагом --help:
$ pixi run python gradio_app.py --help
Чтобы обработать все фотографии в какой-то папке, можно воспользоваться командой:
$ pixi run python run_patch.py <путь к модели> <путь к конфигу модели> <путь к фотографии или директории> <путь к обработанным изображениям>
Мы запускали обучение на видеокартах с 8 ГБ видеопамяти. Вполне возможно, что удастся запустить обучение и на GPU с меньшим объемом (4 или 6 Гб).
-
Возьмите любой конфигурационный файл, представленный либо в нашей галерее https://huggingface.co/i44p/dped-pytorch-models либо из
configs/test.yaml, и отредактируйте как вам нужно. -
Запустите:
pixi run python train.py <путь к конфиг к файлу>
Чтобы обучить модель на своих парах изображений, нужно сначала их подготовить, затем совместить, затем извлечь патчи. Можно их извлекать сразу во время обучения, с помощью data.h5.H5Dataset, но это будет не очень быстро.
- Сначала совместим пары изображений и сохраним их в .h5 файл.
$ pixi run python -m tools.prepare_h5_dataset <плохие изображения> <качественные изображения> <выходной h5 файл>
- Извлечем патчи.
$ pixi run python -m tools.prepare_h5_dataset <путь к h5 файлу> <путь, куда сохранять патчи>
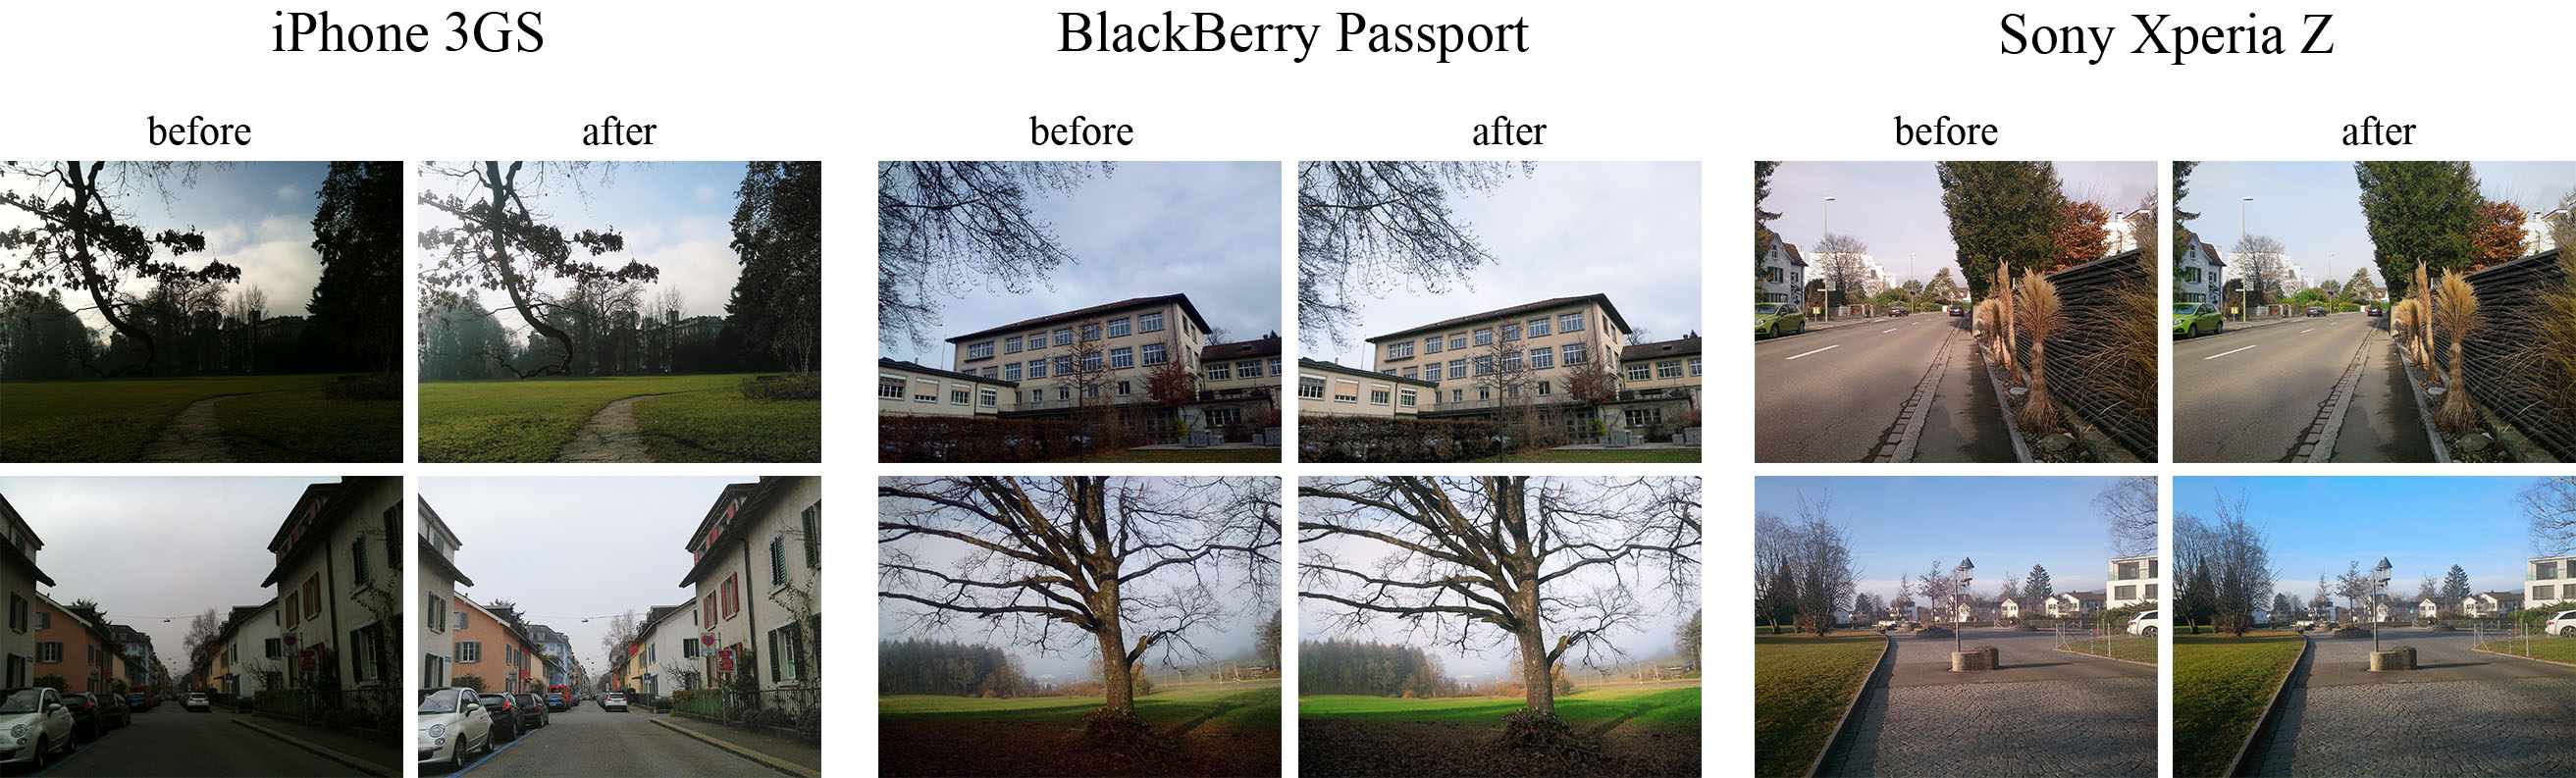
The provided code implements the paper that presents an end-to-end deep learning approach for translating ordinary photos from smartphones into DSLR-quality images. The learned model can be applied to photos of arbitrary resolution, while the methodology itself is generalized to any type of digital camera. More visual results can be found here.
- Python + Pillow, scipy, numpy, imageio packages
- TensorFlow 1.x / 2.x + CUDA CuDNN
- Nvidia GPU
- Download the pre-trained VGG-19 model Mirror and put it into
vgg_pretrained/folder - Download DPED dataset (patches for CNN training) and extract it into
dped/folder.
This folder should contain three subolders:sony/,iphone/andblackberry/
python train_model.py model=<model>Obligatory parameters:
model:iphone,blackberryorsony
Optional parameters and their default values:
batch_size:50- batch size [smaller values can lead to unstable training]
train_size:30000- the number of training patches randomly loaded eacheval_stepiterations
eval_step:1000- eacheval_stepiterations the model is saved and the training data is reloaded
num_train_iters:20000- the number of training iterations
learning_rate:5e-4- learning rate
w_content:10- the weight of the content loss
w_color:0.5- the weight of the color loss
w_texture:1- the weight of the texture [adversarial] loss
w_tv:2000- the weight of the total variation loss
dped_dir:dped/- path to the folder with DPED dataset
vgg_dir:vgg_pretrained/imagenet-vgg-verydeep-19.mat- path to the pre-trained VGG-19 network
Example:
python train_model.py model=iphone batch_size=50 dped_dir=dped/ w_color=0.7python test_model.py model=<model>Obligatory parameters:
model:iphone_orig,blackberry_origorsony_orig
Optional parameters:
test_subset:full,small- all 29 or only 5 test images will be processed
resolution:orig,high,medium,small,tiny- the resolution of the test images [origmeans original resolution]
use_gpu:true,false- run models on GPU or CPU
dped_dir:dped/- path to the folder with DPED dataset
Example:
python test_model.py model=iphone_orig test_subset=full resolution=orig use_gpu=truepython test_model.py model=<model>Obligatory parameters:
model:iphone,blackberryorsony
Optional parameters:
test_subset:full,small- all 29 or only 5 test images will be processed
iteration:allor<number>- get visual results for all iterations or for the specific iteration,
<number>must be a multiple ofeval_step
resolution:orig,high,medium,small,tiny- the resolution of the test images [origmeans original resolution]
use_gpu:true,false- run models on GPU or CPU
dped_dir:dped/- path to the folder with DPED dataset
Example:
python test_model.py model=iphone iteration=13000 test_subset=full resolution=orig use_gpu=true
dped/- the folder with the DPED dataset
models/- logs and models that are saved during the training process
models_orig/- the provided pre-trained models foriphone,sonyandblackberry
results/- visual results for small image patches that are saved while training
vgg-pretrained/- the folder with the pre-trained VGG-19 network
visual_results/- processed [enhanced] test images
load_dataset.py- python script that loads training data
models.py- architecture of the image enhancement [resnet] and adversarial networks
ssim.py- implementation of the ssim score
train_model.py- implementation of the training procedure
test_model.py- applying the pre-trained models to test images
utils.py- auxiliary functions
vgg.py- loading the pre-trained vgg-19 network
What if I get an error: "OOM when allocating tensor with shape [...]"?
Your GPU does not have enough memory. If this happens during the training process:
- Decrease the size of the training batch [
batch_size]. Note however that smaller values can lead to unstable training.
If this happens while testing the models:
- Run the model on CPU (set the parameter
use_gputofalse). Note that this can take up to 5 minutes per image. - Use cropped images, set the parameter
resolutionto:
high- center crop of size1680x1260pixels
medium- center crop of size1366x1024pixels
small- center crop of size1024x768pixels
tiny- center crop of size800x600pixels
The less resolution is - the smaller part of the image will be processed
@inproceedings{ignatov2017dslr,
  title={DSLR-Quality Photos on Mobile Devices with Deep Convolutional Networks},
  author={Ignatov, Andrey and Kobyshev, Nikolay and Timofte, Radu and Vanhoey, Kenneth and Van Gool, Luc},
  booktitle={Proceedings of the IEEE International Conference on Computer Vision},
  pages={3277--3285},
  year={2017}
}
Please contact Andrey Ignatov (andrey.ignatoff@gmail.com) for more information