A plugin to help play and record musical chords with one hand using external MIDI devices
In order to use the Akai Mini Mpk keyboard the Akai Mpk Mini Editor must be downloaded from the Akai website under the tab downloads. In the home directory there is a file "akai_batchords.mk2". Instructions on using the Akai editor to load this preset onto the Akai, the program must be selected on the Akai keyboard after loading. Before loading the preset all programs that take MIDI input (which includes Chrome) should be closed, otherwise they will interfere with the Mpk Mini editor.
To use the Infinity USB foot pedal the proper software must be downloaded for your operating system.
- Windows: Pedable foot pedal software
- MacOS: ControllerMate
The left foot pedal should be configured to map to the left arrow key, the right foot pedal should be configured to map the right arrow key, and the middle pedal should be mapped to the space bar. This will allow for navigation within the embedded editor and easy playback and pause.
credit: These instructions are from Andrew DeOrio's EECS 485 Project 3 Setup tutorial. We are using the same environment.This document will guide you through setting up your computer for local development on OSX or Linux, or through setting up a virtual machine if using Windows or another operating system.
For local development, clone or download the repo git clone https://github.com/jmzuid/BatChords. Throughout this document, we’ll refer to this root project directory as $PROJECT_ROOT.
This tutorial will walk you through
- Restarting this tutorial
- Install toolchain
- Create a Python virtual environment
- Install back end
- REST API
- Install front end
- Understanding the front end code
- Developer Tools
If you made a mistake with these Python instructions, here’s how to start over. First, close your shell and reopen it to ensure that environment variables are reset. Then, delete the virtual environment.
$ cd $PROJECT_ROOT
$ rm -rf env
After you’ve deleted your virtual environment, you can create it again. Resume the instructions with Create a Python virtual environment.
Install the tools based on your operating system.
If you run OSX, install the Homebrew package manager. Then, use Homebrew to install a few packages like Python3.
$ /usr/bin/ruby -e "$(curl -fsSL https://raw.githubusercontent.com/Homebrew/install/master/install)"
$ brew install python3 git tree wget
These instructions work for Debian-based systems like Ubuntu.
$ sudo apt-get update
$ sudo apt-get install python3-venv python3-wheel python3-setuptools git tree
$ sudo apt-get install default-jre
To develop locally on Windows, you’ll need Windows 10 installed. We’ll use it’s Linux Subsystem, which lets us install Linux programs on top of Windows. Background on the Windows Subsystem from Microsoft.
A free Windows 10 upgrade is available to UM students (direct link, UM computer showcase link).
Enable the Linux Subsystem (link to Microsoft). Alternative link to howtogeek.
Start a Bash shell (not a Windows PowerShell). You can now use Ubuntu Linux tools, including the apt-get package manager.
$ sudo apt-get update
$ sudo apt-get install python3-venv python3-wheel python3-setuptools git tree
$ sudo apt-get install default-jre
WARNING Be sure that your root project directory has no spaces anywhere in the filename. Remember that the root project directory is something like p1-insta485-static, and we’re referring to it as $PROJECT_ROOT in this document. You can check it like this:
$ cd $PROJECT_ROOT
$ pwd
/mnt/c/something/with/no/spaces/p1-insta485-static/
If you are developing locally, you can skip this subsection and move on to Create a Python virtual environment.
First, install Git Bash, Vagrant and VirtualBox. When we use the command line later in this section, we’re assuming that you are using Git Bash, not the Windows command prompt.
Vagrant lets us describe an entire virtual computer using a configuration file. Usually, the configuration lives inside your project’s root directory. Create a sample configuration file for an Ubuntu 16.04 virtual machine:
$ cd $PROJECT_ROOT/
$ vagrant init bento/ubuntu-16.04
A `Vagrantfile` has been placed in this directory. You are now
ready to `vagrant up` your first virtual environment! Please read
the comments in the Vagrantfile as well as documentation on
`vagrantup.com` for more information on using Vagrant.
$ ls Vagrantfile
Vagrantfile
Now, edit the Vagrantfile to forward a port for your development webserver. This lets you access a webserver running inside your guest virtual machine using a web browser running on your host operating system. Find this line, uncomment it, and change the port numbers.
config.vm.network "forwarded_port", guest: 8000, host: 8000
Before starting your virtual machine, make sure you don’t have any stale virtual machines for this project laying around. You can also use the VirtualBox graphical user interface (GUI) for this.
$ vboxmanage list vms
Start your virtual machine. This is an entire second operating system running like it’s a program.
$ vagrant up
Bringing machine 'default' up with 'virtualbox' provider...
Check if VM is running:
$ vagrant status
Current machine states:
default                   running (virtualbox)
Log in to your virtual machine using SSH
$ vagrant ssh
Welcome to Ubuntu 16.04.2 LTS (GNU/Linux 4.4.0-75-generic x86_64)
vagrant@vagrant:~$
All commands for the remainder of this tutorial are executed inside your virtual machine. By default, there is a shared directory between the guest and host operating systems. Inside the VM, it’s located at /vagrant.
$ cd /vagrant/
$ ls
Vagrantfile
You can install programs with apt-get. Let’s install a few tools that this tutorial will use later.
$ apt-get update
$ apt-get install python3-venv python3-wheel python3-setuptools git tree
$ sudo apt-get install default-jre
Let’s fire up a development web server inside our VM. This is a static file server. It listens for requests, and responds to a request with a copy of a file from the server’s file system.
$ cd /vagrant
$ python3 -m http.server 8000
Serving HTTP on 0.0.0.0 port 8000 ...
After starting the server, navigate to http://localhost:8000 using a web browser on your host OS. You should see something like this:
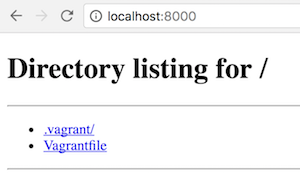
After you’re done with a coding session, log out of your SSH session, and shut down the VM.
vagrant@vagrant $ exit
$ vagrant halt
==> default: Attempting graceful shutdown of VM...
WARNING This project uses npm to install JavaScript libraries, shared directories won’t work. Use a $PROJECT_ROOT that is inside the VM and not shared. A good choice is /home/vagrant.
$ vagrant ssh
$ cd /home/vagrant/
$ git clone https://github.com/jmzuid/BatChords
$ cd BatChords
$ pwd
/home/vagrant/BatChords  # this is your $PROJECT_ROOT
This section will help you install the Python tools and libraries locally, which won’t affect Python tools and libraries installed elsewhere on your computer.
After finishing this section, you’ll have a folder called env/ that contains all the Python libraries you need for this project. Those libraries won’t interfere with other Python projects on your computer.
We’re starting in the root of our project directory. If you’re using a VM, don’t forget to vagrant ssh.
$ cd $PROJECT_ROOT
Set up a virtual environment. (More on venv and the creation of virtual environments)
$ python3 -m venv env
NOTE If you’re on OSX and have previously installed Anaconda, be sure to use the full path to the Python executable.
$ which python
/Users/awdeorio/anaconda/bin/python
$ rm -rf env  # Remove environment from previous step and start over
$ /usr/local/bin/python3 -m venv env
NOTE If the PYTHONPATH environment variable is set, then this can cause problems. Check this when you first start a new shell.
$ echo $PYTHONPATH  # Output isn't blank, problem!
/Users/awdeorio/anaconda/lib/
$ rm -rf env  # Remove environment from previous step and start over
$ unset PYTHONPATH
$ python3 -m venv env
Activate virtual environment. You’ll need to do this every time you start a new shell.
$ source env/bin/activate
We now have a complete local environment for Python. Everything lives in one directory. Environment variables point to this virtual environment.
$ echo $VIRTUAL_ENV
/Users/carolinesaab/Documents/eecs/eecs498/BatChords/env
We have a Python interpreter installed inside the virtual environment. which python tells you exactly which python executable file will be used when you type python. Because we’re in a virtual environment, there’s more than one option!
$ which python
/Users/carolinesaab/Documents/eecs/eecs498/BatChords/env/bin/python
$ which -a python  # Show all available python executables
/Users/carolinesaab/Documents/eecs/eecs498/BatChords/env/bin/python
/usr/bin/python
There’s a package manager for Python installed in the virtual environment. That will help us install Python libraries later.
$ which pip
/Users/carolinesaab/Documents/eecs/eecs498/BatChords/env/bin/pip
$ pip --version
pip 9.0.1 from /Users/carolinesaab/Documents/eecs/eecs498/BatChords/env/lib/python3.6/site-packages (python 3.6)  # Your version may be different
Python packages live in the virtual environment. We can see that Python’s own tools are already installed (pip and setuptools).
$ ls env/lib/python3.6/site-packages/
pip
setuptools
...
Upgrade the Python tools in your virtual environment
$ pip install --upgrade pip setuptools wheel
For developers: install HTML5 Validator to check style
$ pip install html5validator
$ html5validator --version
html5validator 0.2.6         # Your version may be different
Next, we’ll install the back end app in developer mode. Make sure that you still see (env) in the terminal, meaning your virtual environment is activated. Otherwise run env/bin/activate to reactivate it.
$ pip install -e .
We need to install a tool chain for our front end.
We’re working in the BatChords root directory, with the Python virtual environment activated.
$ cd batchords/
$ source env/bin/activate
We want to install our front end tool chain into our existing virtual environment. nodeenv is a Python tool for merging a Python virtual environment with a JavaScript virtual environment.
$ pip install nodeenv # You may need to use pip3 if this command doesn't work
$ nodeenv --python-virtualenv
$ source env/bin/activate  # Yes, do this again after nodeenv
Next, we’ll create a JavaScript package for our front end source code, which lives in batchords/js/.
Our front end JavaScript package will use the react library, which in turn relies on several dependencies of its own. We’ll use npm to install these dependencies. At this point, you should be within the BatChords directory.
$ npm install .
The source code for module dependencies is stored in ./node_modules/ and their exact versions are listed in package-lock.json. This is what the root BatChords directory should look like now.
$ ls
README.md    batchords.egg-info  env     package-lock.json setup.py
batchords   bin     node_modules    package.json    webpack.config.js
Now finally, run the front end build process.
$  ./node_modules/.bin/webpack
[BABEL] Note: The code generator has deoptimised the styling of "/Users/carolinesaab/Documents/eecs/eecs498/BatChords/node_modules/react-dom/cjs/react-dom.development.js" as it exceeds the max of "500KB".
Hash: bb352a7038ce1b616a01
Version: webpack 3.6.0
Time: 17159ms
    Asset    Size  Chunks                    Chunk Names
bundle.js  799 kB       0  [emitted]  [big]  main
  [16] ./batchords/js/main.jsx 482 bytes {0} [built]
  [32] ./batchords/js/bcapp.jsx 2.47 kB {0} [built]
  [33] ./batchords/js/pad.jsx 2.89 kB {0} [built]
    + 31 hidden modules
$ ./node_modules/.bin/webpack --watch  # optional, for auto rebuild during development
bundle.js is the output of our front end build process, a single JavaScript file that is completely self-contained with no dependencies, batchords/static/js/bundle.js.
Fire up your web server.
$ ./bin/run_batchords
Finally, browse to http://localhost:8000/, where you’ll see the BatChords web app.
The piano sound fonts originated from the University of Iowa electronic music project: