Repository navigation
Releases: michaeldale/smartclock-oss
Release list
SmartClock-OSS 1.3.2

SmartClock-OSS 1.3.2 says more about why the clock cannot join your WiFi: a failed join now comes with the code the router or WiFi chip reported, and the settings page explains it.
Download
SDPro_SmartClockOSS_v1.3.2.bin: one file for both the stock update page and our own. Keep the file name: the stock page only accepts names starting with SDP. It contains no WiFi details.
SHA-256: see SHA256SUMS.txt attached to the release.
Upgrading
- From 1.3.1, 1.3.0, 1.2.0 or 0.1.2: install it from the Firmware update card. Your settings and photos stay.
- From 0.1.1 or earlier: the settings page and setup network now ask for the clock's password. On the sign-in page, press Show the password on the clock (see the 0.1.2 notes).
New
-
WiFi disconnect codes (#2). When the clock cannot join, the setup screen adds the code, for example "Can't join: no answer (15)". The settings page explains it, for example:
- 15 or 204: the password handshake timed out; check the password.
- 202: authentication failed; check the password.
- 201: the network was not found.
- 20: unsupported security mode; use WPA2 rather than WPA3-only.
- 203: the router refused the connection.
If your clock still will not join, please open an issue with the code it shows and your router's WiFi settings (band, security mode, channel).
Known limitations
- The disconnect codes have been built and tested on the PC but not yet confirmed on a clock.
- Only the GeekMagic SD Pro is supported. Other models, such as the SmallTV Ultra, use different boards.
- MQTT has still not been tested against a real broker and Home Assistant.
Licensed under GPL-3.0. Full history: CHANGELOG.md.
SmartClock-OSS 1.3.1
SmartClock-OSS 1.3.1 fixes WiFi setup: Connect & restart now works on phones, where it could do nothing at all.
Download
SDPro_SmartClockOSS_v1.3.1.bin: one file for both the stock update page and our own. Keep the file name: the stock page only accepts names starting with SDP. It contains no WiFi details.
SHA-256: see SHA256SUMS.txt attached to the release.
Upgrading
- From 1.3.0, 1.2.0 or 0.1.2: install it from the Firmware update card. Your settings and photos stay.
- From 0.1.1 or earlier: the settings page and setup network now ask for the clock's password. On the sign-in page, press Show the password on the clock (see the 0.1.2 notes).
Fixed
- Connect & restart did nothing on phones. After you join the clock's setup network, a phone usually opens the setup page in its sign-in window, and those windows block confirmation dialogs. The button asked for confirmation first, so nothing happened and the clock stayed on the setup screen. It now saves your network and restarts straight away. If you could not get your clock onto WiFi before (#2), please try again with this version.
- Clocks built from source keep their WiFi. A clock that only joined through the network in
secrets.ininow saves it the first time it joins, so installing a release image later does not leave it on the setup screen.
Known limitations
- The photo-time switch and the WiFi failure reasons from 1.3.0 have not yet been tried on a clock.
- MQTT has still not been tested against a real broker and Home Assistant.
Licensed under GPL-3.0. Full history: CHANGELOG.md.
SmartClock-OSS 1.3.0
SmartClock-OSS 1.3.0 lets you hide the time on photos, so it no longer covers Home Assistant dashboards, and says why the clock cannot join your WiFi instead of only showing the setup screen again.
Download
SDPro_SmartClockOSS_v1.3.0.bin: one file for both the stock update page and our own. Keep the file name: the stock page only accepts names starting with SDP. It contains no WiFi details.
SHA-256: see SHA256SUMS.txt attached to the release.
Upgrading
- From 1.2.0 or 0.1.2: install it from the Firmware update card. Your settings and photos stay.
- From 0.1.1 or earlier: the settings page and setup network now ask for the clock's password. On the sign-in page, press Show the password on the clock (see the 0.1.2 notes).
New
- Show the time on photos (#1). A switch on the Photos card, on by default. Turn it off when geekmagic-hacs pushes dashboards, so the time does not cover them. Scripts can set it with
/api/set?key=photoclock&value=0while signed in. - Why WiFi will not connect (#2). When a 30 s attempt to join the saved network fails, the setup screen and the settings page show the reason: network not found, wrong password, connection refused, or no answer. The clock tries again every 5 minutes, so give it a few minutes after saving. It joins 2.4 GHz networks only.
Known limitations
- Both changes have been built and tested on the PC but not yet on a clock. Please report what you find.
- MQTT has still not been tested against a real broker and Home Assistant.
Licensed under GPL-3.0. Full history: CHANGELOG.md.
SmartClock-OSS 1.2.0
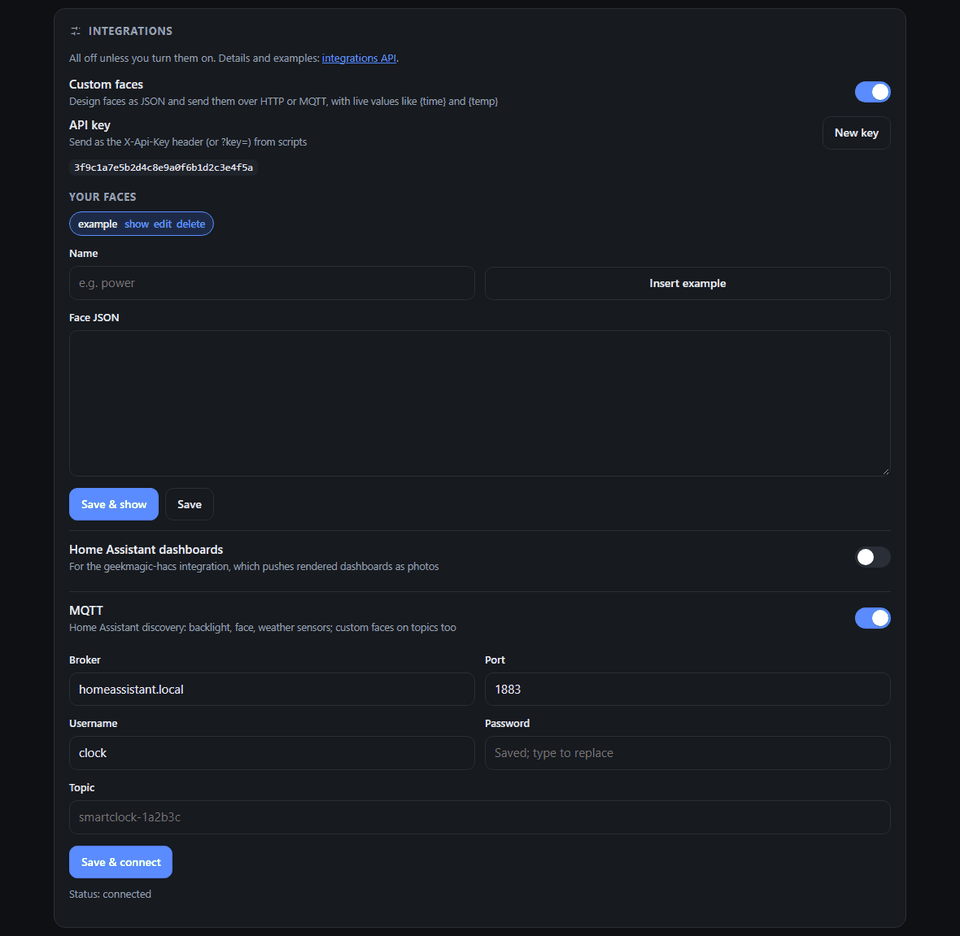
SmartClock-OSS 1.2.0 adds integrations: design your own clock faces with live values, show Home Assistant dashboards via geekmagic-hacs, and connect to Home Assistant over MQTT. All three are off until you turn them on. The version jumps from 0.1.2 to 1.2.0.
Download
SDPro_SmartClockOSS_v1.2.0.bin: one file for both the stock update page and our own. Keep the file name: the stock page only accepts names starting with SDP. It contains no WiFi details.
SHA-256: bb611565bd931096fd0b7958c2d8ff41445d2917c3b45d3751dc1c068f2aedc3
Upgrading
- From 0.1.2: install it from the Firmware update card. Nothing else changes until you turn an integration on.
- From 0.1.1 or earlier: the settings page and setup network now ask for the clock's password. On the sign-in page, press Show the password on the clock (see the 0.1.2 notes).
New: integrations (settings page → Integrations)
- Custom faces. Describe a face as JSON (text, rectangles, circles, lines, progress rings and bars, weather icons, your photos) and send it over HTTP or MQTT. Placeholders such as
{time},{temp},{hum}and{sunset}stay live on the clock, and you can push your own values (for example{solar}) without resending the face. Faces join the rotation. Use your signed-in browser or the generated API key. The page has an editor with a ready-made example. - Home Assistant dashboards. The stock SD Pro photo API, so geekmagic-hacs recognises the clock and pushes rendered dashboards. Tested on a clock with that integration's exact request sequence. That integration cannot sign in, so while this is on, anyone on your network can manage photos, the face and brightness without the password. WiFi, the password and firmware stay protected.
- MQTT with Home Assistant discovery: the backlight as a dimmable light, the face as a select, temperature, humidity, weather and WiFi signal as sensors, and an update-weather button. Custom faces and values can arrive on MQTT topics too.
Full API reference: integrations-api.md.
Also new
- Photos: an "in slideshow" switch on each photo, and how many seconds each one shows.
- A single photo is no longer redrawn at every interval, and full-screen photos draw without a black flash.
- The System card links to this project.
- The README now shows the settings page.
Known limitations
- MQTT has not yet been tested against a real broker and Home Assistant. Please report what you find.
- The image is now 97% of the over-the-air update limit, so future features will need to make room.
Licensed under GPL-3.0. Full history: CHANGELOG.md.
SmartClock-OSS 0.1.2
SmartClock-OSS 0.1.2 adds a password, an update check, night mode that follows the sun, and settings backup. It also frees 34 KB of flash for future features.
⚠ Upgrading from 0.1.1: the clock now has a password
After this update, the settings page and the Smart Weather Clock setup network both ask for the clock's password. The clock creates the password itself the first time it starts this version.
- Install the update from the Firmware update card as usual.
- Open the settings page and press Show the password on the clock. Read it off the clock and sign in. The clock hides it again as soon as you are signed in.
- Optional: choose your own password under System → Password.
Anyone who can see the clock can show its password this way. Recovery mode (power on for under 10 s twice, then leave it on) is open and shows the password too, so you cannot lock yourself out.
Download
SDPro_SmartClockOSS_v0.1.2.bin: one file for both the stock update page and our own. Keep the file name: the stock page only accepts names starting with SDP. It contains no WiFi details.
SHA-256: 7d5bfcd1fcca457b3a60b71713e49b803c1382ed108a77e1406fb05c457a131b
New
- Password protection. One password, generated on the clock, protects the settings page and the setup network (WPA2). Every change, including firmware uploads, needs you to be signed in. Five wrong attempts lock sign-in for a minute.
- Update check. The settings page tells you when a newer release is on GitHub. Your browser does the checking, so the clock needs no internet access for it.
- Night mode from sunset to sunrise. Dim the screen when it gets dark where you are, instead of at fixed hours.
- Backup and restore your settings as a file, plus Forget WiFi and Reset all settings. Backups contain no WiFi details or password.
- Build ID on the System card, so you can tell exactly which build is installed.
Improved
- 34 KB of flash freed without removing anything. The image is now 92% of the update limit, down from 96%.
- Brightness changes respect night dimming straight away.
- Photo names with spaces display correctly.
- The first weather update after the clock connects to WiFi is more reliable.
Install over the stock firmware
New to SmartClock-OSS? See the README. The steps are unchanged, except that the setup network now uses the password shown on the clock's screen.
Licensed under GPL-3.0. Full history: CHANGELOG.md.
SmartClock-OSS 0.1.1
First public release of SmartClock-OSS, open replacement firmware for the "Smart Weather Clock" SD Pro (ESP8266, 240×240 IPS). Install it from the clock's own update page; no cables needed.
Download
SDPro_SmartClockOSS_v0.1.1.bin: the one file you need, for both the stock update page and later updates. Keep the file name: the stock page only accepts names starting with SDP.
SHA-256: 1e801f1d3a56d295f00abd6603c6ec464345b573076d243132d61900cbee6c42
Install over the stock firmware
- Open the clock's web page, find Firmware Update (OTA), choose the file and press Start Update.
- Wait for "Update Success". The clock restarts by itself within about 30 seconds. Keep it powered.
- Join the WiFi network Smart Weather Clock and open http://192.168.4.1/.
- Set up your WiFi in the WiFi card. The clock shows its new address when it connects.
Your clock's update page should say "Please use the firmware of SD PRO". Tested over stock V1.0.6. Other GeekMagic models are not supported.
There is no way back to the stock firmware over WiFi; that needs a USB-serial adapter.
What's in it
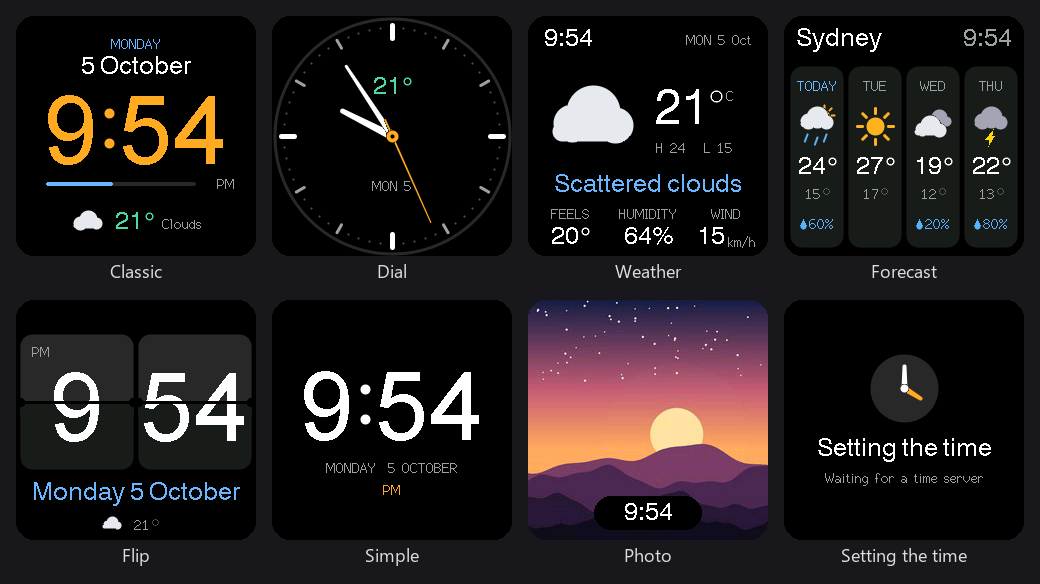
- Seven faces: Classic, Dial, Weather, Forecast, Flip, Simple and Photo, with optional rotation.
- Weather and a 4-day forecast from Open-Meteo. No API key needed.
- Time zones with daylight saving.
- Photo upload, resized to 240×240 in your browser.
- A modern settings page that works on phones, in dark mode, and offline on the setup network.
- Validated firmware updates, an always-on setup network, and power-cycle recovery mode.
- WiFi passwords are not exposed by the web API, unlike the stock firmware.
Known limitations
- The setup network and settings page have no password yet: anyone in WiFi range can change settings or install firmware.
- Animated GIFs are not played.
Licensed under GPL-3.0. Full history: CHANGELOG.md.