Dive Into Fennec Fox_v0.90.0
Fennec Fox is a system framework that provides mechanisms to run multiple, heterogeneous processes on a single Wireless Sensor Network. This framework is programmed with Swift Fox programming language. Swift Fox programs are used to model the execution of multiple processes across a network of low-power devices as a Finite State Machine. Thus, the whole network has a notion of state. Each state executes one or more processes. Transitions among the network states schedule the execution of different processes on the network motes. This resembles a typical model of an operating system, which switches execution of multiple processes on a single machine.
In Fennec Fox the same set of processes executes on all the motes. These processes require communication services supporting information exchange among the motes. Processes may have different and sometimes conflicting communication requirements. For example, one process may require a duty-cycled many-to-one data collection, and another process may need a high-throughput one-to-one data streaming. To perform their duties, these two processes use different network and MAC protocols and sometimes different radio configurations. Because these two processes use different communication protocols, they cannot execute on the same network simultaneously. Fennec Fox solves this problem by running these processes asynchronously and reconfiguring the whole network protocol stack.
Each Fennec Fox process is scheduled to execute on a dedicated four-layer protocol stack. The top layer of the protocol stack, called Application, runs the process code. For instance, a process code might periodically sample a sensor, compute the average of the last few samples, and send it across the network. The Network layer runs the network protocol (e.g. CTP for data collection or Trickle for data dissemination) that provides the communication service required by the Application layer code. The MAC layer executes one of the available MAC protocols, such as CSMA, TDMA, and their duty-cycled version. The Radio layer provides the driver code controlling a particular radio chip.
Fennec Fox processes are defined in a Swift Fox program. In the program, each process must specify the application code and list the network, MAC, and radio mechanisms that support the application's execution. The compiled program is installed on the WSN motes. At run-time, as Fennec Fox schedules the execution of a process across the network, it also schedules the execution of the network and MAC protocols together with the radio driver.
So let's review basic terminology:
- network process - is an application computation logic executing across the network, together with the communication logic defining how the network motes should communicate while executing a given application
- network state - is a set of network processes that are executing at a given time
The following figure shows the visualization of the wireless sensor network run-time execution.
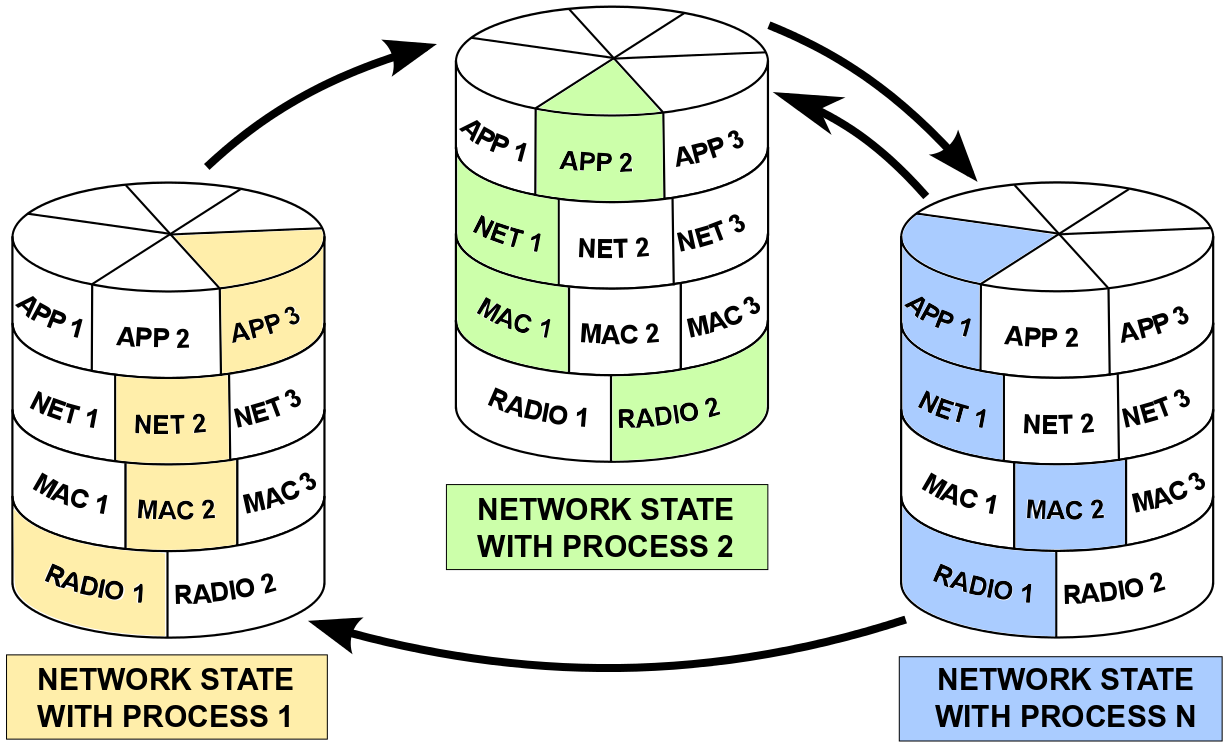
The figure above shows a Wireless Sensor Network that has 3 states. In each state, the WSN runs only one network process. Starting from the left, in one state, the WSN runs with a process computing application APP3. This application's execution is supported with the NET2 network protocol, MAC2 Medium Access Control (MAC) protocol, and it uses the RADIO1 radio driver. All Fennec Fox modules that are running at this process are highlighted on yellow. Other modules that are not running at this state are white.
At some time, as a result of some event, which for simplicity we do not specify yet, the WSN context switches from running the network process with APP3, to the state with another network process that executes APP2, supported with NET1, MAC1, and RADIO2 (all green color). Later on the WSN, can execute again a context switch to run a network process composed of APP1, NET1, MAC2 and RADIO1 Fennec Fox modules. From this blue state, with APP1, the WSN can change back to the state with the network process running with APP2 (green) or switch to the first state running one network process with APP3 (yellow). The network state transitions follows the black arrows on the figure; therefore the first (yellow) network state can only switch to the second (green) state and that state cannot switch back to the first state.
Next, we will go more into details of programming Fennec Fox. First, we will use a simple example of a Wireless Sensor Network consisting of one state, running with one network process. At this moment, please make sure that you have installed:
TelosB is one of the most popular Wireless Sensor Network platforms. This platform has 3 sensors: humidity, temperature and light. Bellow is an example of a Swift Fox program to create a firmware that collects sensor samples, sends them to another destination mote, and the destination mote sends the measurements over UART.
process sensor { telosSens(1, 1024)
	nullNet()
	nullAM()
}

state test { sensor }

start test
The code above defines one network process called sensor. This process consists of telosSens application module and empty modules running on the network, MAC, and radio layers. The telosSens module takes two parameters: the first one is the address of the mote to which the measurements should be sent to (here it is 1), and the second one is the sensors' sampling frequency (here it is 1024ms). The sensor network process runs in the test state, which is the initial WSN state, in which the network should start right after booting up.
More information about Swift Fox programs (syntax and semantics) can be found here.
If we compile this Swift Fox program and then compile it to the Telosb platform with mote address 1, then the mote will start reporting sensor measurements over the serial interface. In the teslosSens documentation we read that this application sends sensor measurements first to the network, not do the serial interface. But because it runs on the nullNet network module, this very simple/primitive network layer recognizes that the destination address where the sensor measurements should be sent to is 1 (this mote), instead of sending packet to MAC, it signals back to the application layer the receive event.
Assuming that the above code is saved in a file called simple_telos.sfp, then the following steps will make one TelosB mote to send sensor measurements over the serial:
user@linux $ sfc simple_telosb.sfp
will compile the simple_telos.sfp Swift Fox program. Then, after attaching TelosB mote to PC through a USB port, the following will compile the code into telosB platform and install it on the hardware:
user@linux $ fennec telosb install,1
where the number after install sets the currently programmed mote address. In this example, the mote is set with the ID = 1, and in the code, all references to TOS_NODE_ID variable will return 1.
After this step, we should be able to print the sensors' measurements packet on the Linux shell. Assuming that the TelosB mote is attached to USB at /dev/ttyUSB0, we can either use the TelosbSensors application python script to read messages from the serial interface and parse them:
user@linux $ cd src/apps/tests/TelosbSensors
user@linux $ ./TelosbSerial.py serial@/dev/ttyUSB0:115200
which will print messages looking like this:
1393261400.57 1 0 377 7062 206
Message <TelosbMsg>
  [seq=0x0]
  [src=0x1]
  [hum=0x17a]
  [temp=0x1b9b]
  [light=0xcd]

1393261401.57 1 0 378 7067 205
Message <TelosbMsg>
  [seq=0x0]
  [src=0x1]
  [hum=0x17a]
  [temp=0x1b96]
  [light=0xce]

1393261402.57 1 0 378 7062 206
Message <TelosbMsg>
  [seq=0x0]
  [src=0x1]
  [hum=0x17a]
  [temp=0x1b9a]
  [light=0xcd]
or we can use TinyOS' Java tools to print raw serial messages:
user@linux $ java net.tinyos.tools.Listen -comm serial@/dev/ttyUSB0:115200
which will print raw bytes of the packets sent from a mote to PC over USB, looking like this:
00 FF FF 00 00 0C 00 64 00 00 00 00 00 01 01 7C 1B 98 01 06
00 FF FF 00 00 0C 00 64 00 00 00 00 00 01 01 82 1B 9A 00 CC
00 FF FF 00 00 0C 00 64 00 00 00 00 00 01 01 88 1B 9A 00 CB
00 FF FF 00 00 0C 00 64 00 00 00 00 00 01 01 8A 1B 96 00 CC
00 FF FF 00 00 0C 00 64 00 00 00 00 00 01 01 90 1B 96 00 CE
Sensor Data Collection
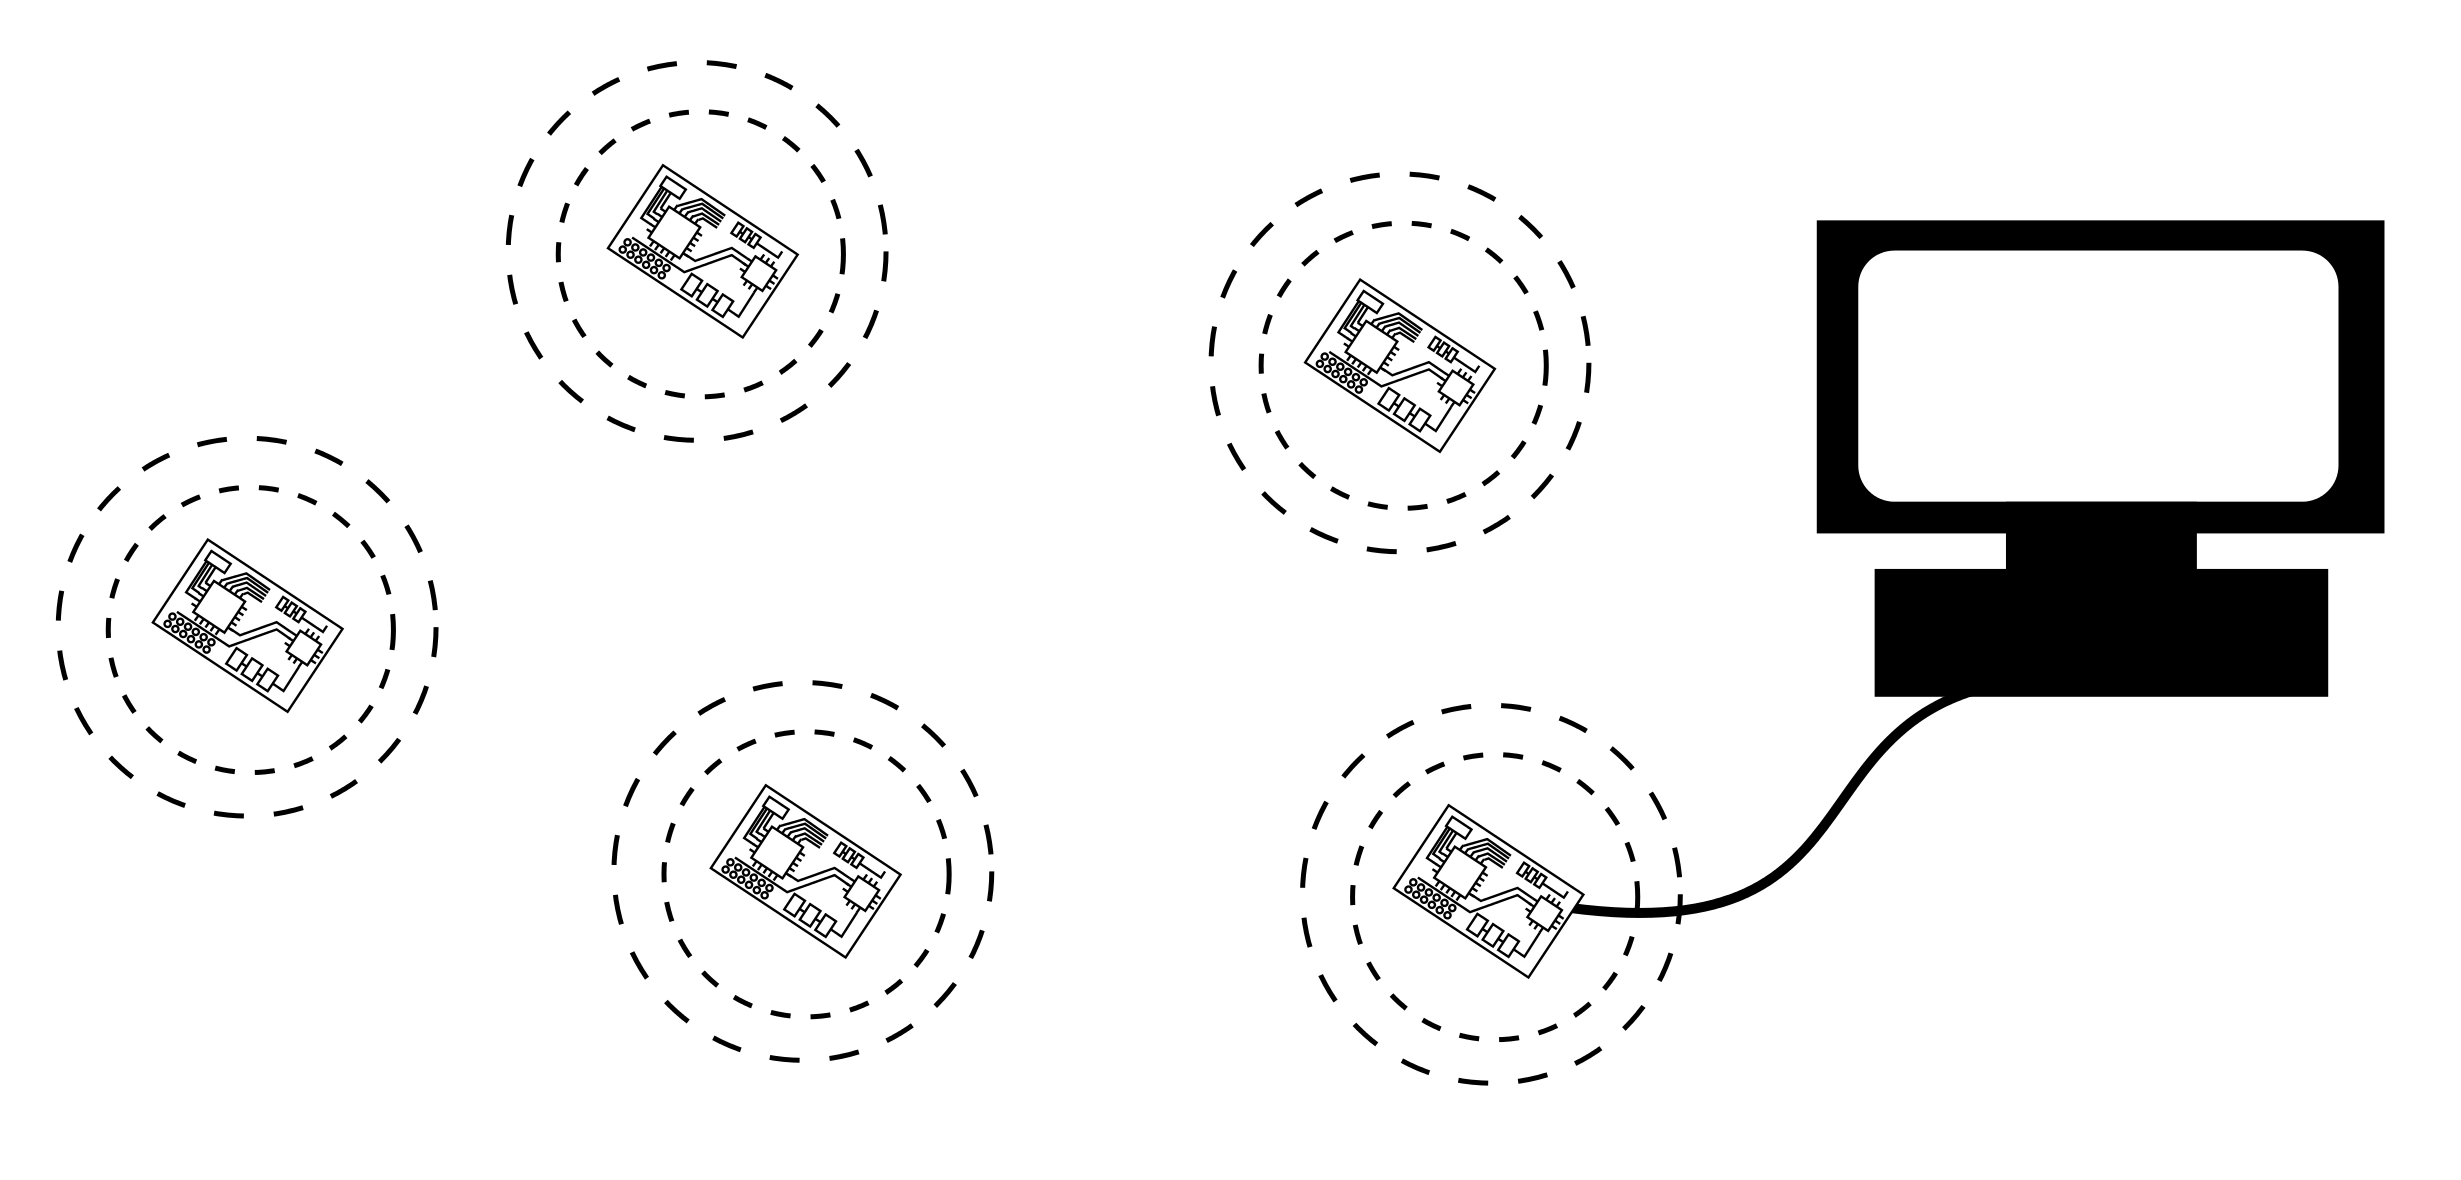
In the following example, let's advance the previous Swift Fox program, by adding real network communication to the telosSens application execution. This time, when the application will send a packet with a sensor measurements to some destination mote, the destination mote will receive that packet. One example of such system is shown on the figure below. There are 5 TelosB motes sending sensor measurements over the radio. By programming the right most mote, which is attached to PC over USB, with ID 75, the PC will receive sensor measurements from all the other motes in the network. Make sure that the other motes have different IDs; e.g 71, 72, 73, and 74.
Now, we can write a Swift Fox program with telosSens application, collecting sensor measurements at mote 75.
# this is a comment
# and below are global variables that can be passed to the
# Fennec Fox modules

uint8_t radio_tx_power = 31     # in    [31, 27, 23, 19, 15, 11, 7, 3]
                                # for   [0, -1, -3, -5, -7, -10, -15, -25] dBm
uint8_t radio_channel = 26      # in    [11-26]

uint16_t dest_node = 75
uint16_t freq = 3000

process sense { telosSens(dest_node, freq)
       ctp(dest_node)
       cc2420(radio_channel, radio_tx_power, 200, 20, 1)
       # channel, power, sleepInterval, sleepDelay, autoAck
}

state test { sense }

start test
The code above programs a Wireless Sensor Network with Telosb motes. In this example, every mote samples sensors every 3000ms and sends sensor reports to the mote with the address 75. The network process consists of the telosSens application, running on top of the Collection Tree Protocol (CTP), implemented as ctp Fennec Fox module taking one parameter: the address of the destination mote, which should receive the application's sensor measurements. The ctp modules uses csmaca MAC module services. This MAC takes 6 parameters, with description commented in the code. The csmaca sends packet through cc2420 radio driver module. The radio module takes parameters specifying radio's channel, radio signal strength, and flags for using auto acknowledgement and cyclic-redundancy check.
In the presented examples we have seen two different Swift Fox programs. In those programs we were changing the system run-time execution logic by using different Fennec Fox modules running on the layers of the Fennec Fox protocol stack, and by changing the parameters that are passed to those modules. With these examples, we can now distinguish two system development spaces:
- Network level programming - using Swift Fox program define the processes that are executing on the network
- Mote level programming - using nesC program new application, network, MAC and radio modules that are running on every mote of the network and which are used in Swift Fox programs to build network processes
We have seen one example of an application module: telosSens. The nesC implementation of this application module can be found here. We have seen two examples of network modules: nullNet and ctp. Similarly, we can browse Fennec Fox source code to find other application, network, MAC, and radio modules that are part of the Fennec Fox standard library.
More information about modules and how to program them can be found here.
Data Dissemination
In another example we look how to disseminate data from one mote in the network to the rest of the motes in the network. We will use the following Fennec Fox modules: at the application layer we run counter application, which periodically sends a message with a number that is increased after each message transmission; at the network layer we run trickle, a network protocol that is direct implementation of the Trickle algorithm; and on the MAC and Radio layers we will use the same modules as in the previous example: csmaca and cc2420.
The following Swift Fox implements a single process that disseminates messages from one mote (here it is the src_node set to ID 3) to all the motes in the network.
uint16_t src_node = 3

process disseminate { counter(20, 1024, src_node, src_node)
       trickle(1, 1024, 1, 6)
       cc2420(radio_channel, radio_tx_power, 200, 20, 1)
       # channel, power, sleepInterval, sleepDelay, autoAck
}

state test { disseminate }

start test