How To: Export AirTags
Getting your AirTags out of Apple's Find My and into a .zip the OpenTagViewer Android app can
import.
You no longer need a Mac. The exporter used to read files that only exist on macOS, which is
why this project shipped a VM guide. From 1.1.0 it reads the same records out of iCloud, so
it runs on Windows and Linux too — and where a Mac can still read them locally, it does, because
that route asks for less.
Three ways, in the order most people should try them:
- The Export Wizard (⭐ recommended) — a window, on any of the three platforms
- The command-line exporter — the same thing without a window
- By hand — deprecated, and rarely needed now
Import steps for inside the Android App are here.
Important
Only the "Owner" Apple Account of an AirTag can export it — the account that was used to register the tag from an iOS device. (See issue #6.) A tag that was shared with you through Apple's own sharing cannot be exported: those records carry no key material.
ℹ️ A note on why this is needed
Locating an AirTag means querying Apple's Find My network with keys derived from that tag's private key. Apple publishes no API for any of this, so the key has to come out of somewhere it already exists — the Find My cache on a Mac, or the iCloud account those files sync from.
What changed in 1.1.0 is only where the records are read from. The zip it produces is the
same, and the app imports it the same way.
| An Apple Account | The one that owns the tags, with 2FA by SMS or trusted device |
| The screen-lock passcode of one of your Apple devices | An iPhone's PIN, or a Mac's login password. Not your Apple ID password |
| Any computer | Windows, Linux, or a Mac. No Apple hardware needed |
Note
On macOS 14 (Sonoma) or older, you need neither of the first two. That Mac already keeps the records on disk, so the exporter reads those instead and never signs in — see flow A below. macOS 15 tightened keychain access so the key can no longer be read, which is why every newer machine uses iCloud.
Download it from the releases page.
1. 📁 Download the zip for your operating system
Releases are named OpenTagViewer-Exporter-<version>-<os>-<arch>.zip. Since 1.1.0 there is one
for each platform, not just macOS:
| Your machine | Download |
|---|---|
| Mac, Apple Silicon (M1/M2/M3/…) | …-macos-arm64.zip |
| Mac, Intel | …-macos-x64.zip |
| Windows | …-windows-x64.zip |
| Linux | …-linux-x64.tar.gz |
If you are unsure which Mac you have, download both — you will be told which one is compatible when you try to open it.
2. 📁 Unzip it and run it
macOS — unzip and double-click OpenTagViewer.app.
Windows — unzip the folder and run OpenTagViewer.exe from inside it. The other files in
that folder are the interpreter and libraries it needs; moving the .exe out on its own will not
work.
Linux — untar and run ./OpenTagViewer/OpenTagViewer, same caveat.
3. ⚠️ Get past your operating system's warning
The app is not signed by Apple or Microsoft, so both will object the first time.
macOS — you will get a warning about an "unknown developer". Follow Apple's guide to add an exception; it asks for your password, then confirms in a second box.
Windows — SmartScreen shows "Windows protected your PC". Choose More info → Run anyway.
Linux — you may need chmod +x OpenTagViewer/OpenTagViewer.
4. ⏳ Wait for it to start, and see which route it took
Give it a moment. The window takes a few seconds to appear the first time, and on a Mac that first launch also has to get past the security check above. Nothing is wrong.
When it opens it tells you, in grey under the heading, which of the two routes it is using and why — this is the difference between being asked for an Apple ID and not:
The short flow. No Apple ID, no password, no verification code, and nothing added to your Apple account.
macOS asks for your login password — twice, in its own dialog, not the app's — so it can read the key that decrypts its Find My cache. Then you are straight at choosing what to export.

Note
This is not an offline route, though it looks like one. Those files are on your Mac because macOS signed into iCloud, joined your keychain's trust circle as a device and synced them down. It needs a signed-in Mac, and it leaves more on your account than flow B does. What it genuinely saves you is typing your Apple ID password into this program.
1. 🪪 Read what signing in adds to your account
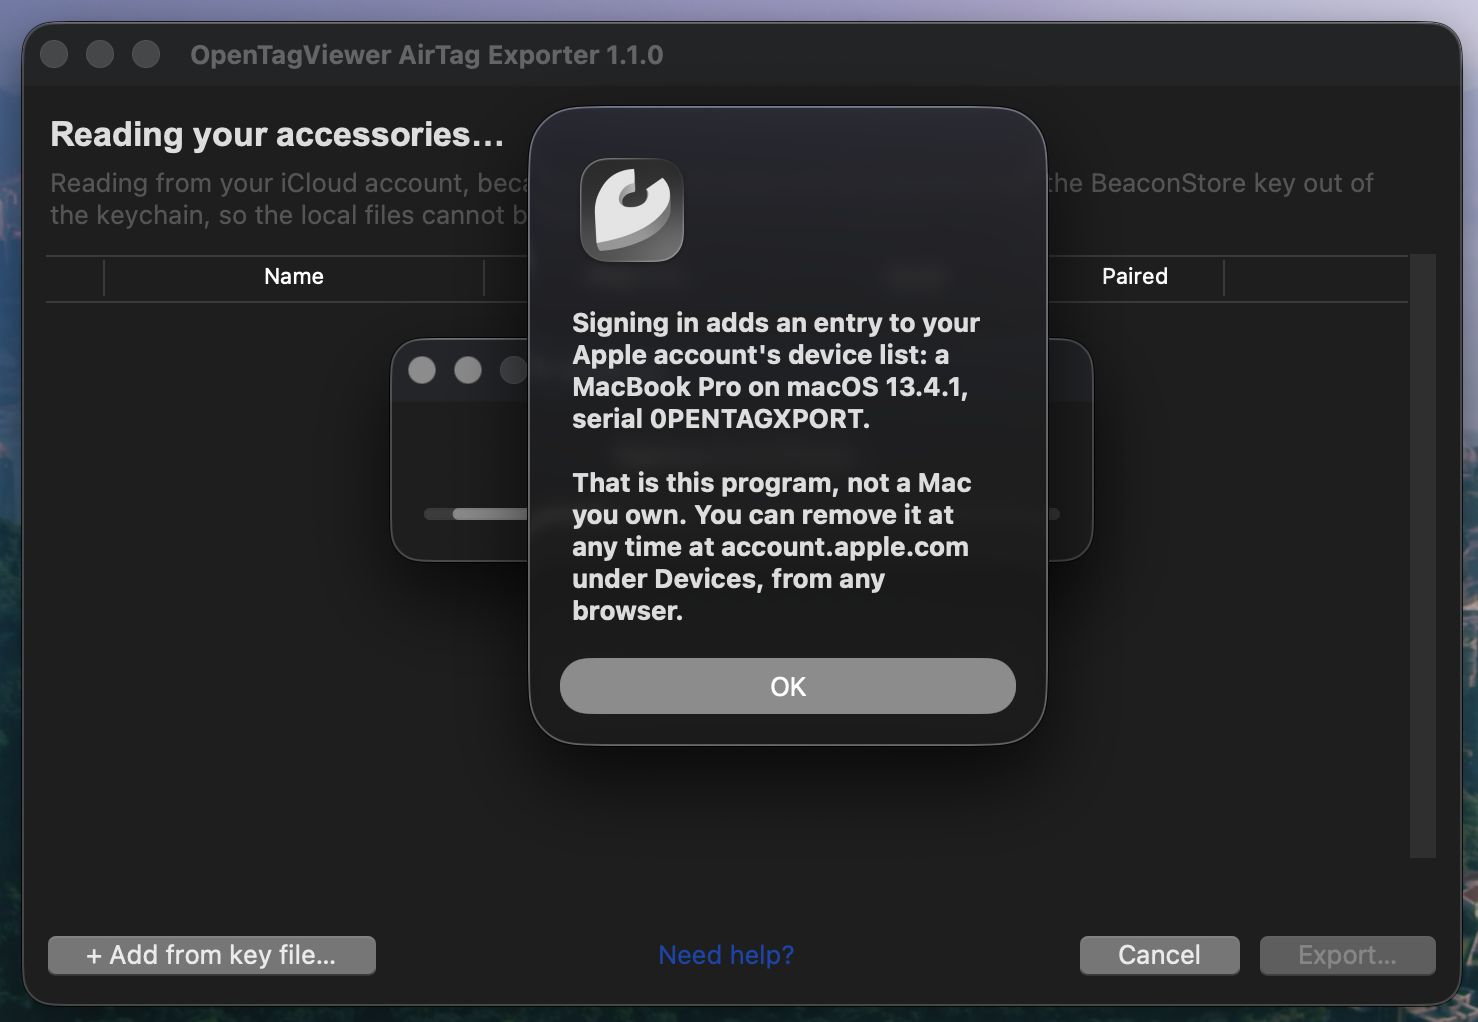
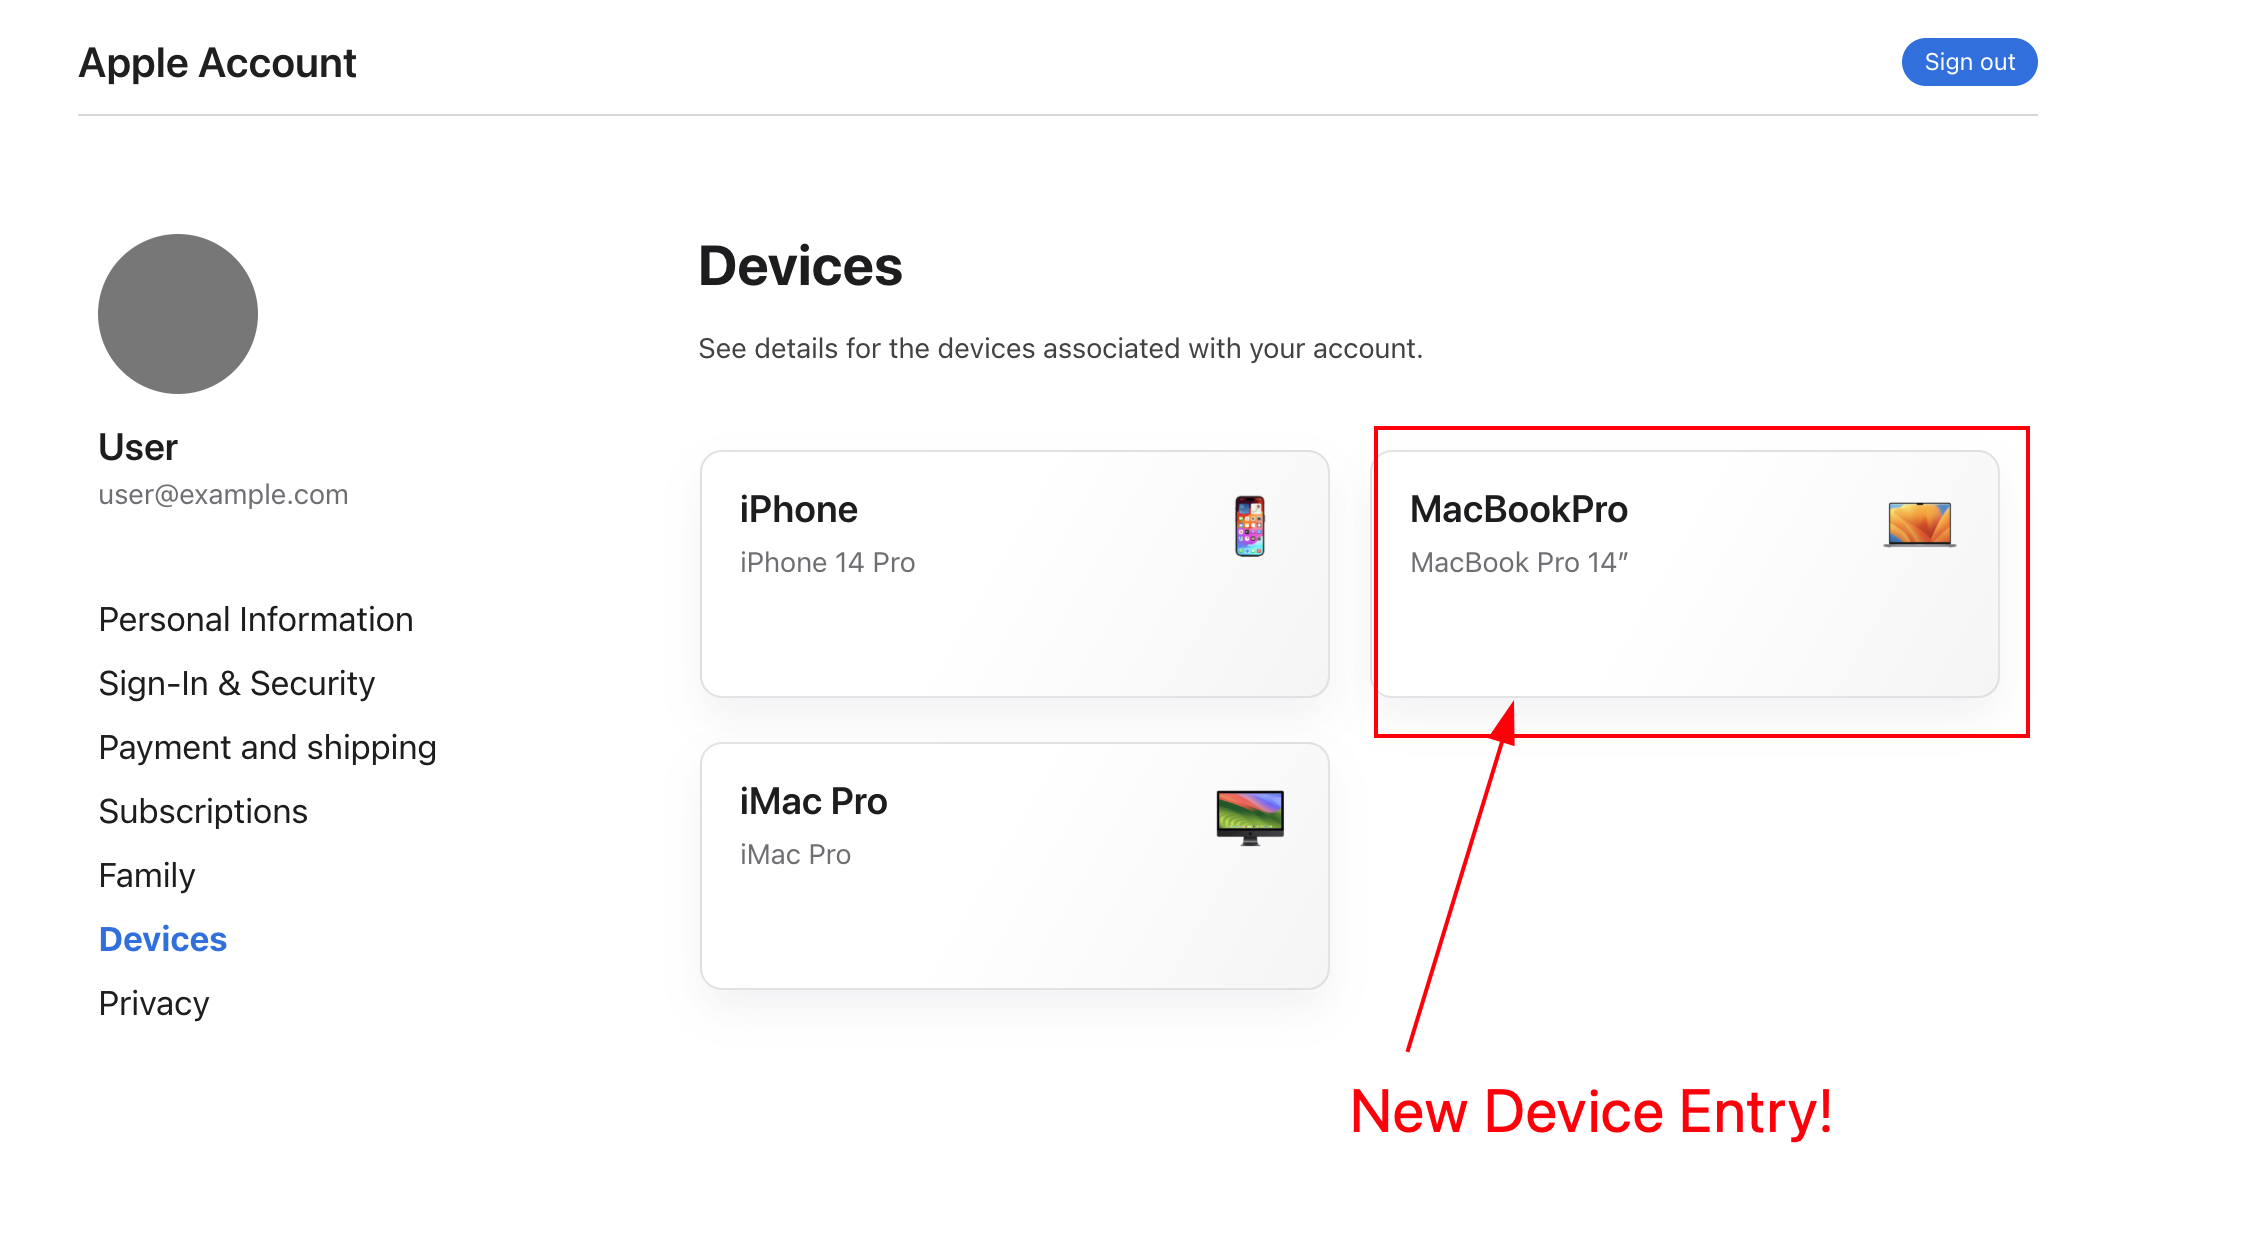
Signing in registers a device on your Apple account. It appears in your device list as a
MacBook Pro on macOS 13.4.1, serial 0PENTAGXPORT — that is this program, not a Mac you own.
It is one entry however many times you export, and you can remove it whenever you like at account.apple.com → Devices → Remove from Account, from any browser and with no Apple device.
2. 🔑 Sign in with your Apple ID
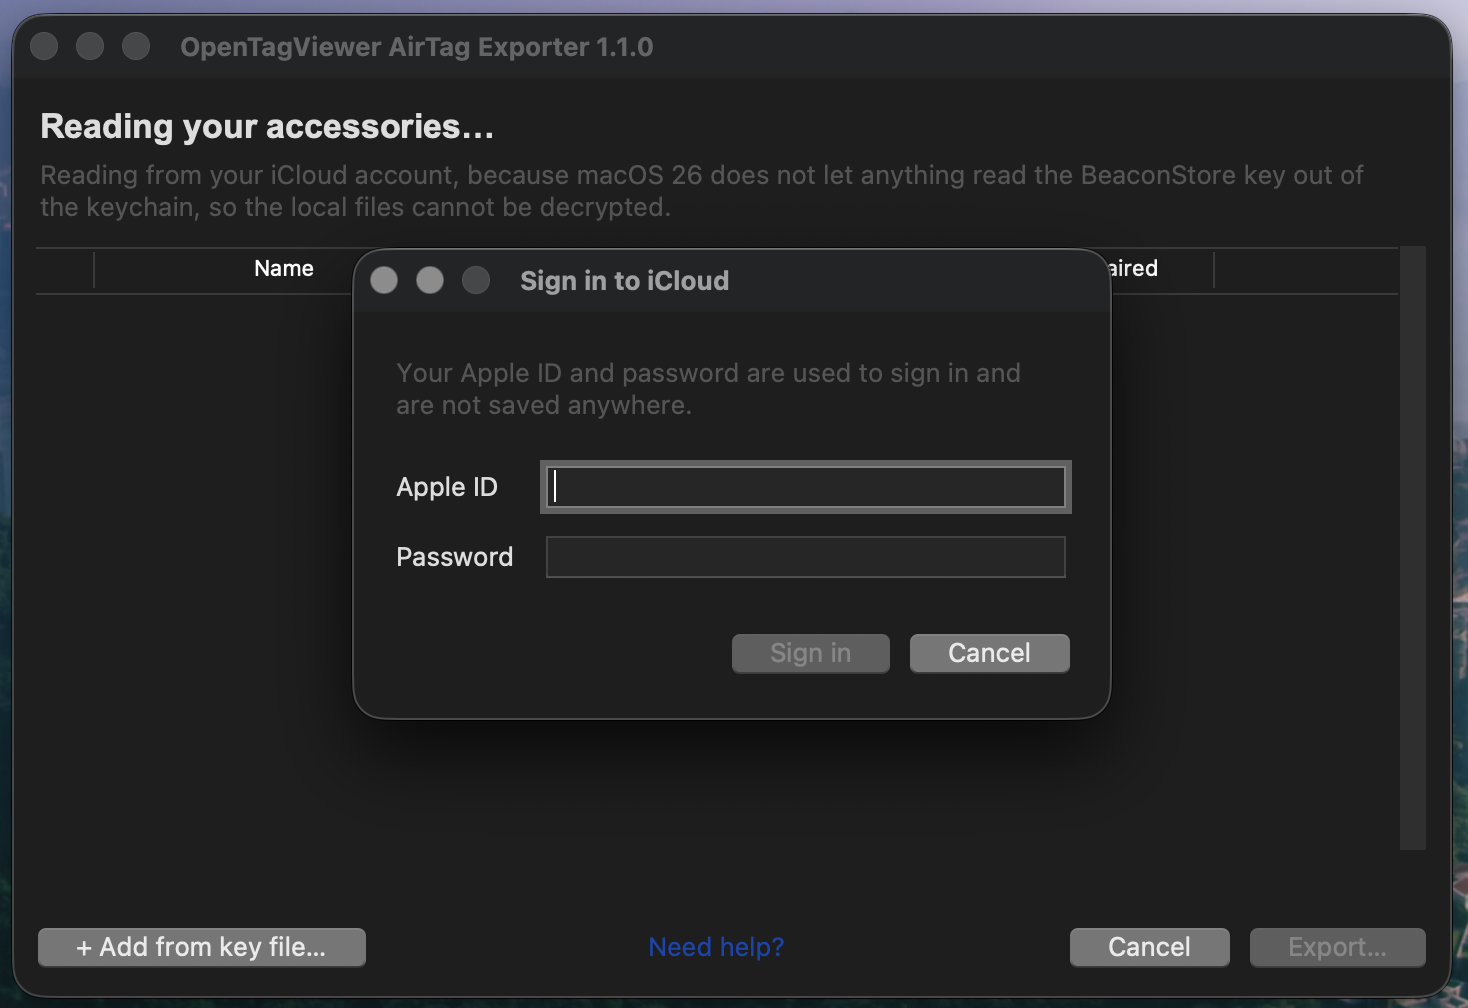
Your Apple ID and password are used to sign in and are not saved anywhere — no account file is written, and a later export asks again.
3. 📱 Choose how Apple sends your verification code, and enter it
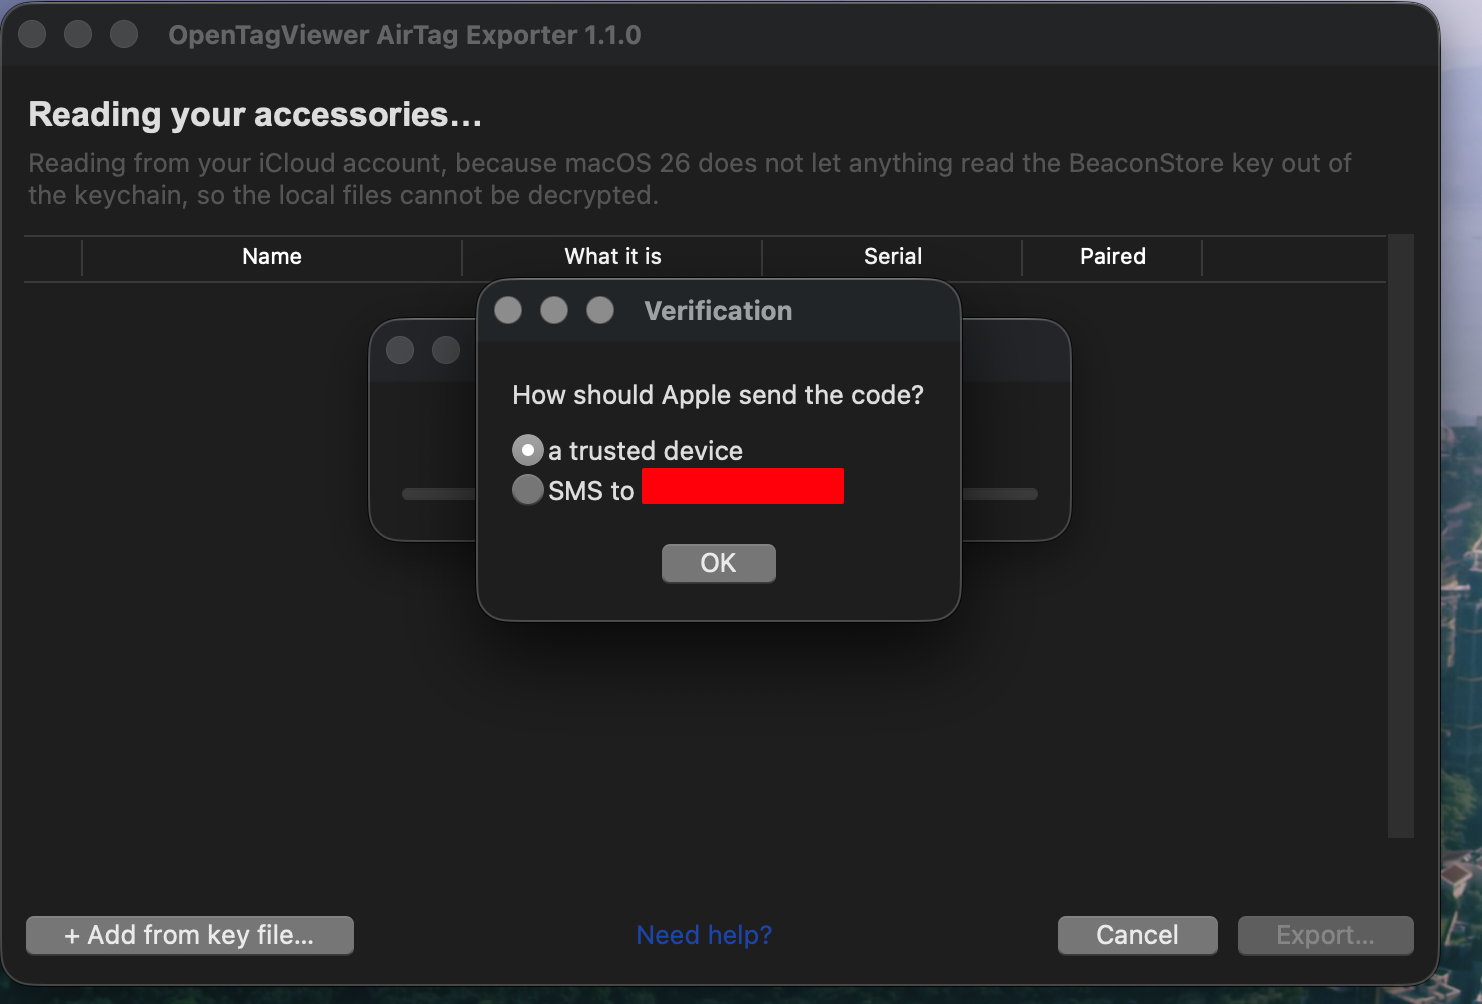
A trusted device, or an SMS. Only these two are supported.
4. 🔓 Unlock your keychain with a device passcode
Your tags' keys are in an encrypted iCloud keychain, and getting them out means recovering from one of your Apple devices. Pick one you know the passcode of:
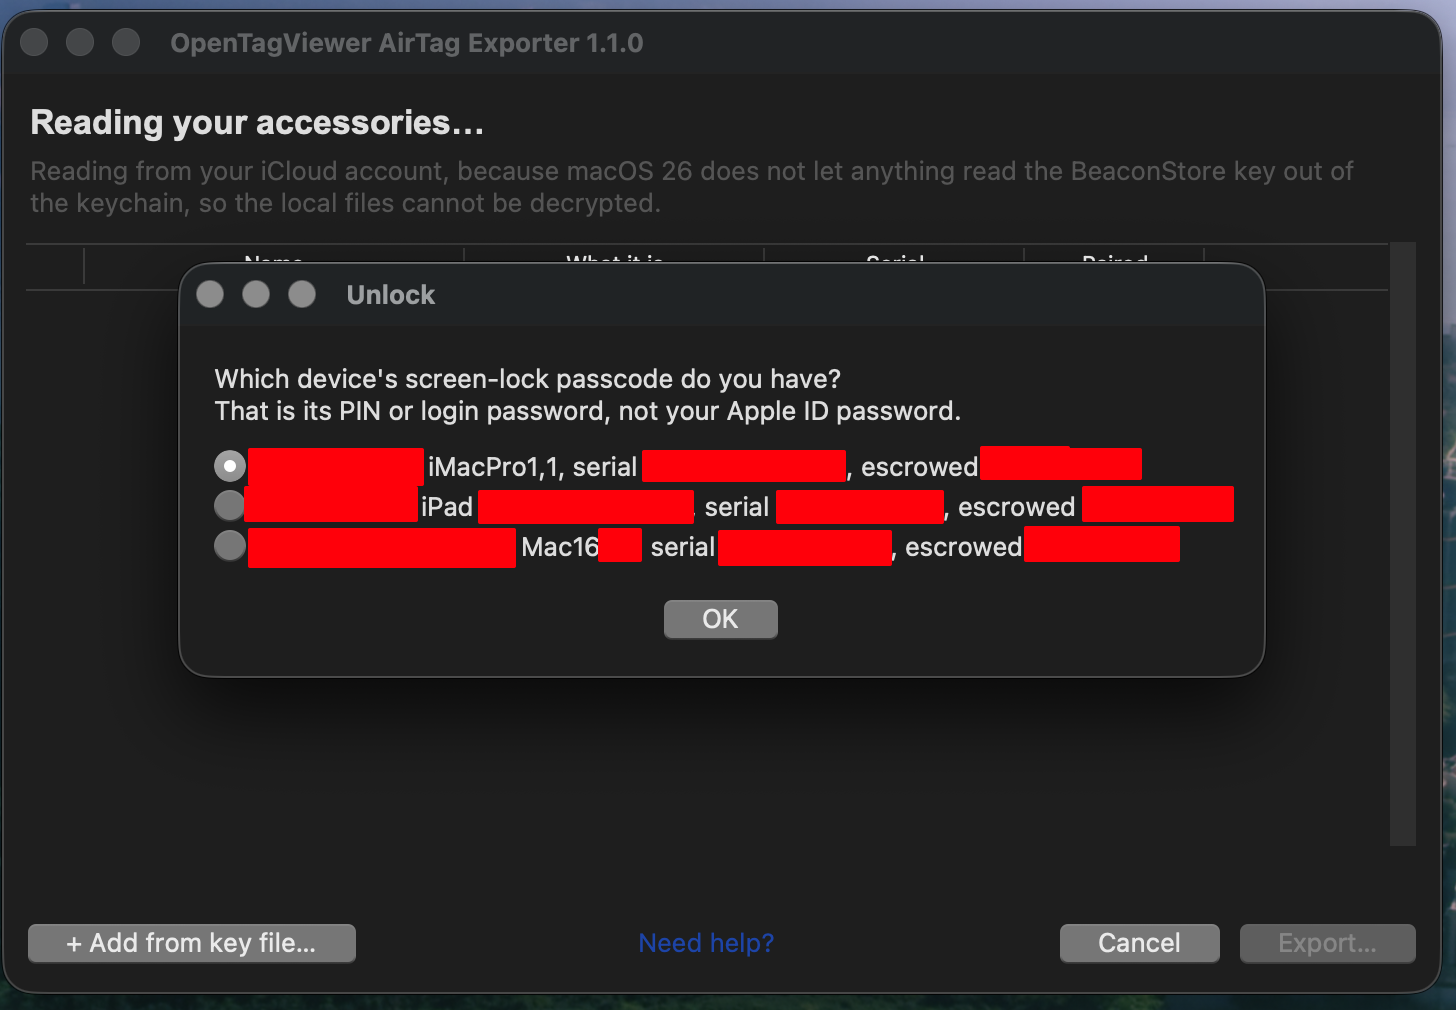
Then enter that device's screen-lock passcode — its unlock PIN, or a Mac's login password:
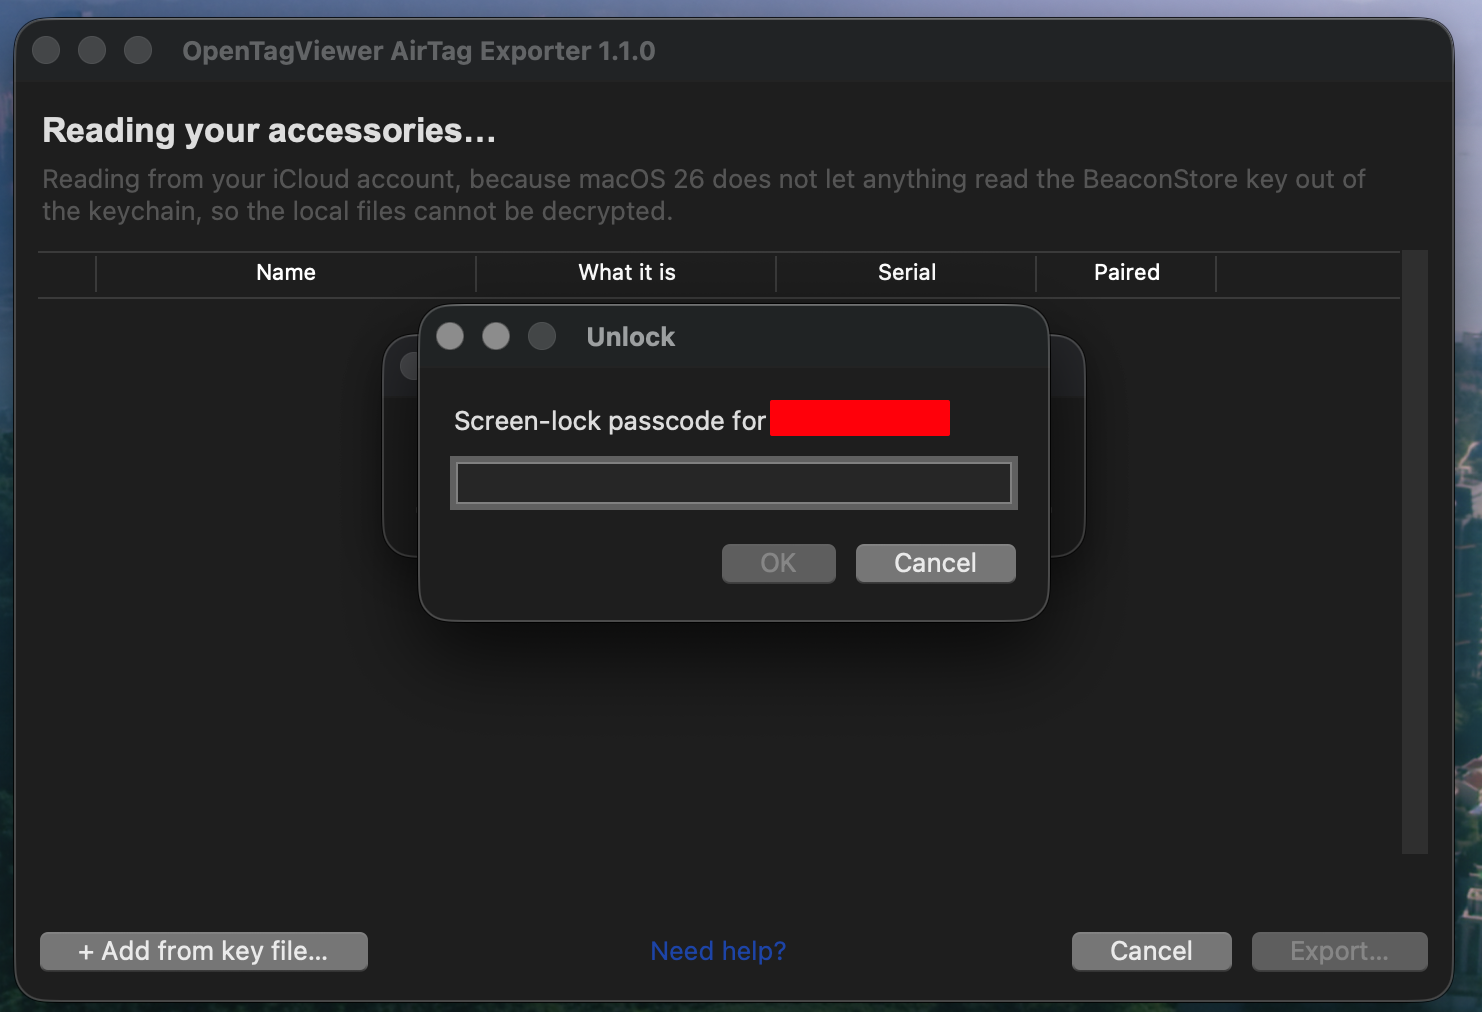
[!IMPORTANT] This is not your Apple ID password, and it is the step people most often get wrong. If it is refused, try a different device from the list before assuming something is broken.
Nothing is written to your account by this. Recovering the keys is a read.
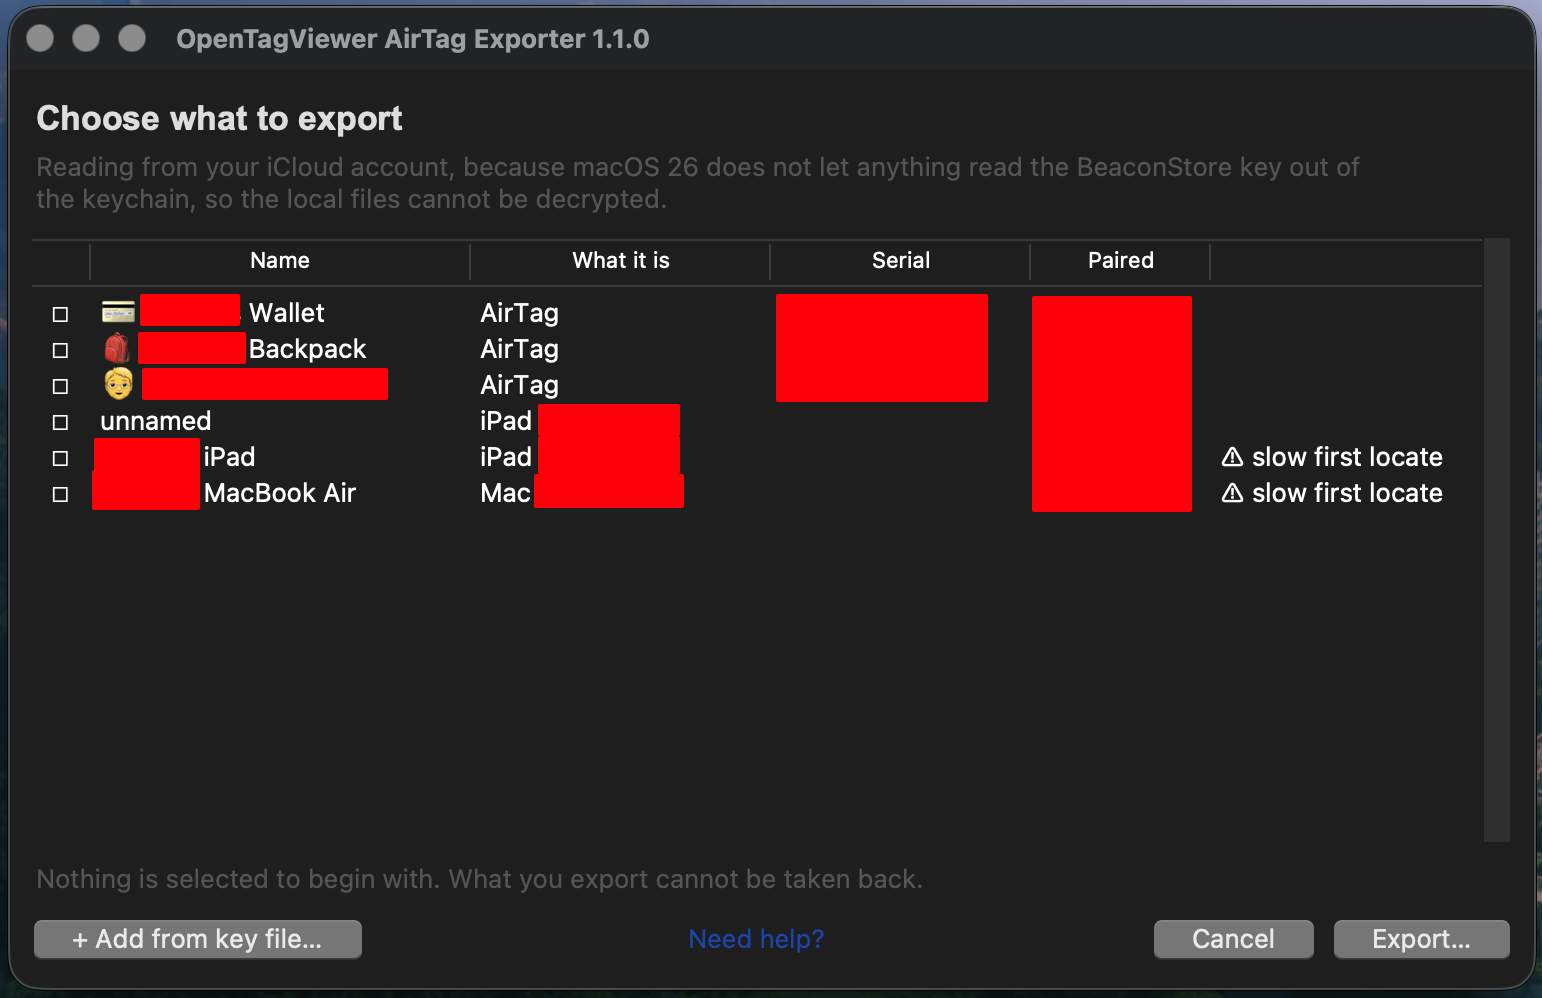
Every accessory on the account, with what it is, its serial number and when it was paired — so an accessory you never named is still recognisable. Tick the ones you want.
Two things you may see:
- ⚠ slow first locate — that tag has no key-alignment record, so whoever imports it searches its whole key history the first time. Minutes rather than seconds. Not an error, and nothing to be done about it.
- Your own iPhones, iPads and Macs in the list. They are findable devices and live in the same place as your tags. You can export them; if you tick one the app asks again first, because a bundle holding your MacBook lets whoever receives it locate you, not a wallet.
Warning
Exporting a tag cannot be undone. The zip holds that tag's keys, and the only way to revoke them is to unpair the AirTag itself. Anyone who ends up with the file can locate it from any Apple account for as long as it stays paired. Apple's own sharing is revocable; this is not that. Nothing is ticked to begin with, deliberately.
➕ Optional: add a tag that was never in an Apple account
DIY tags — OpenHaystack, Macless Haystack — are not in iCloud, so they come from a file instead. + Add from key file…, then pick it:
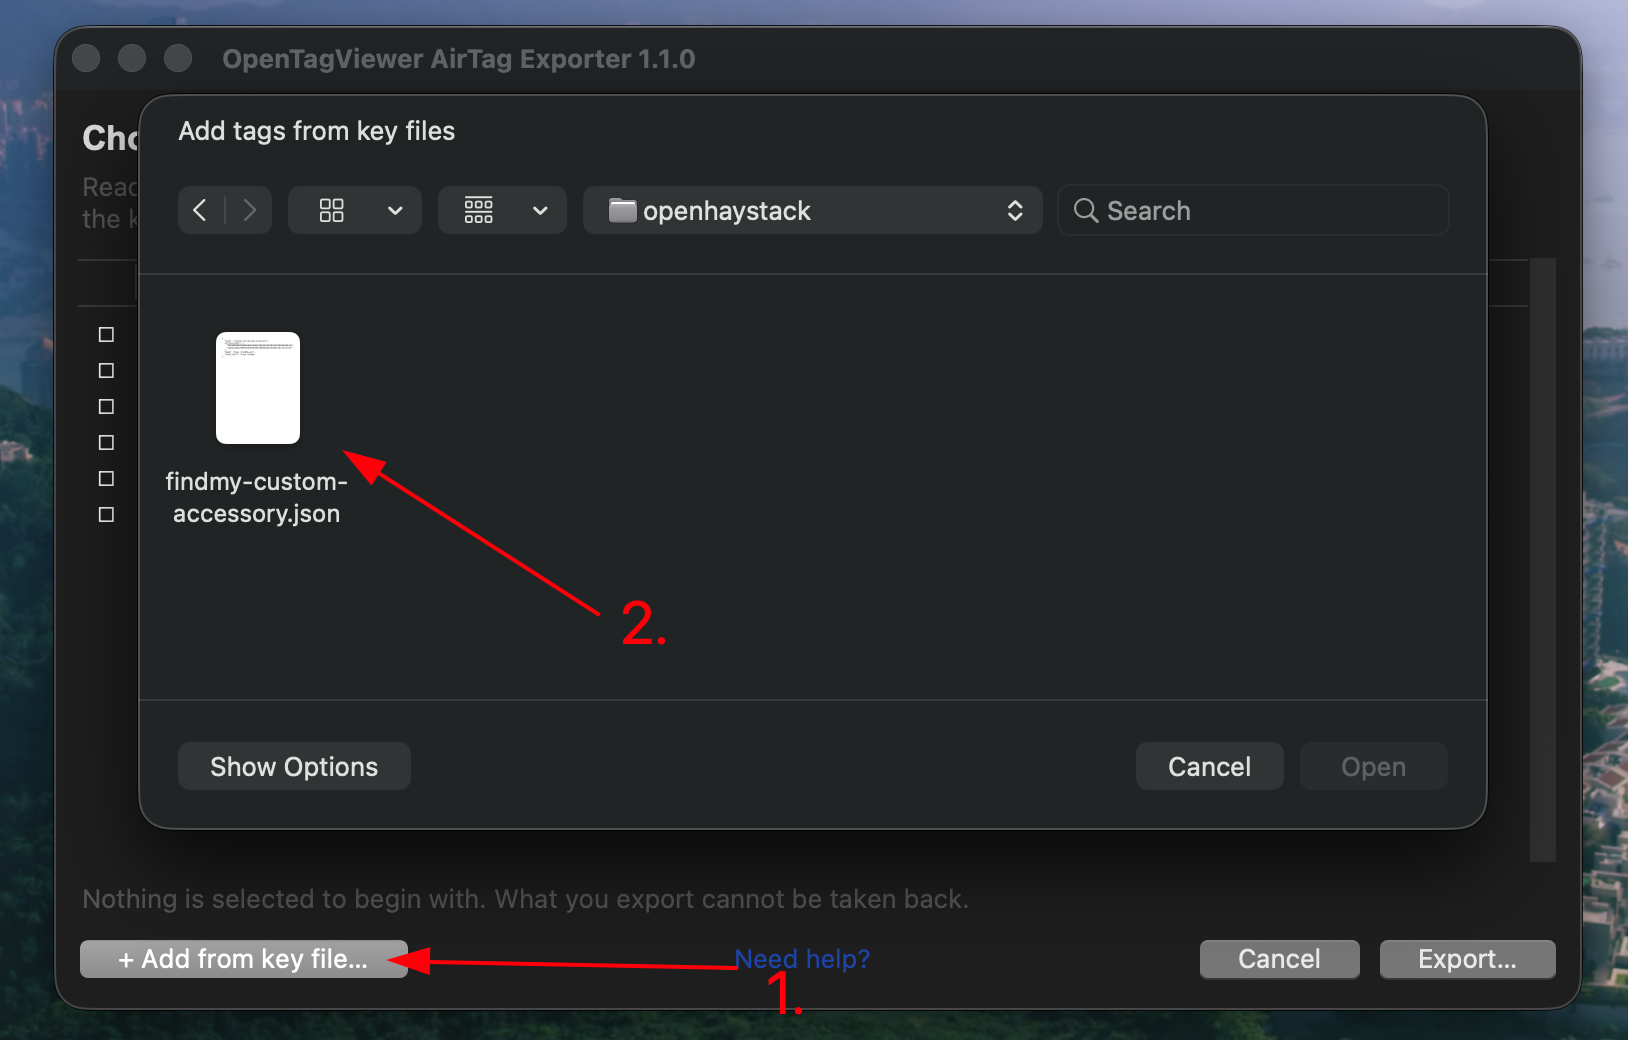
Four formats are read:
| Format | From |
|---|---|
devices.json |
Macless Haystack |
An accessory JSON (custom_rolling_key_accessory) |
FindMy.py |
.keys files |
OpenHaystack |
| A plain list of keys, one per line | anywhere — base64 or hex, # comments allowed |
You are asked to name each one.
It then appears in the list as a self-generated tag, alongside everything else:
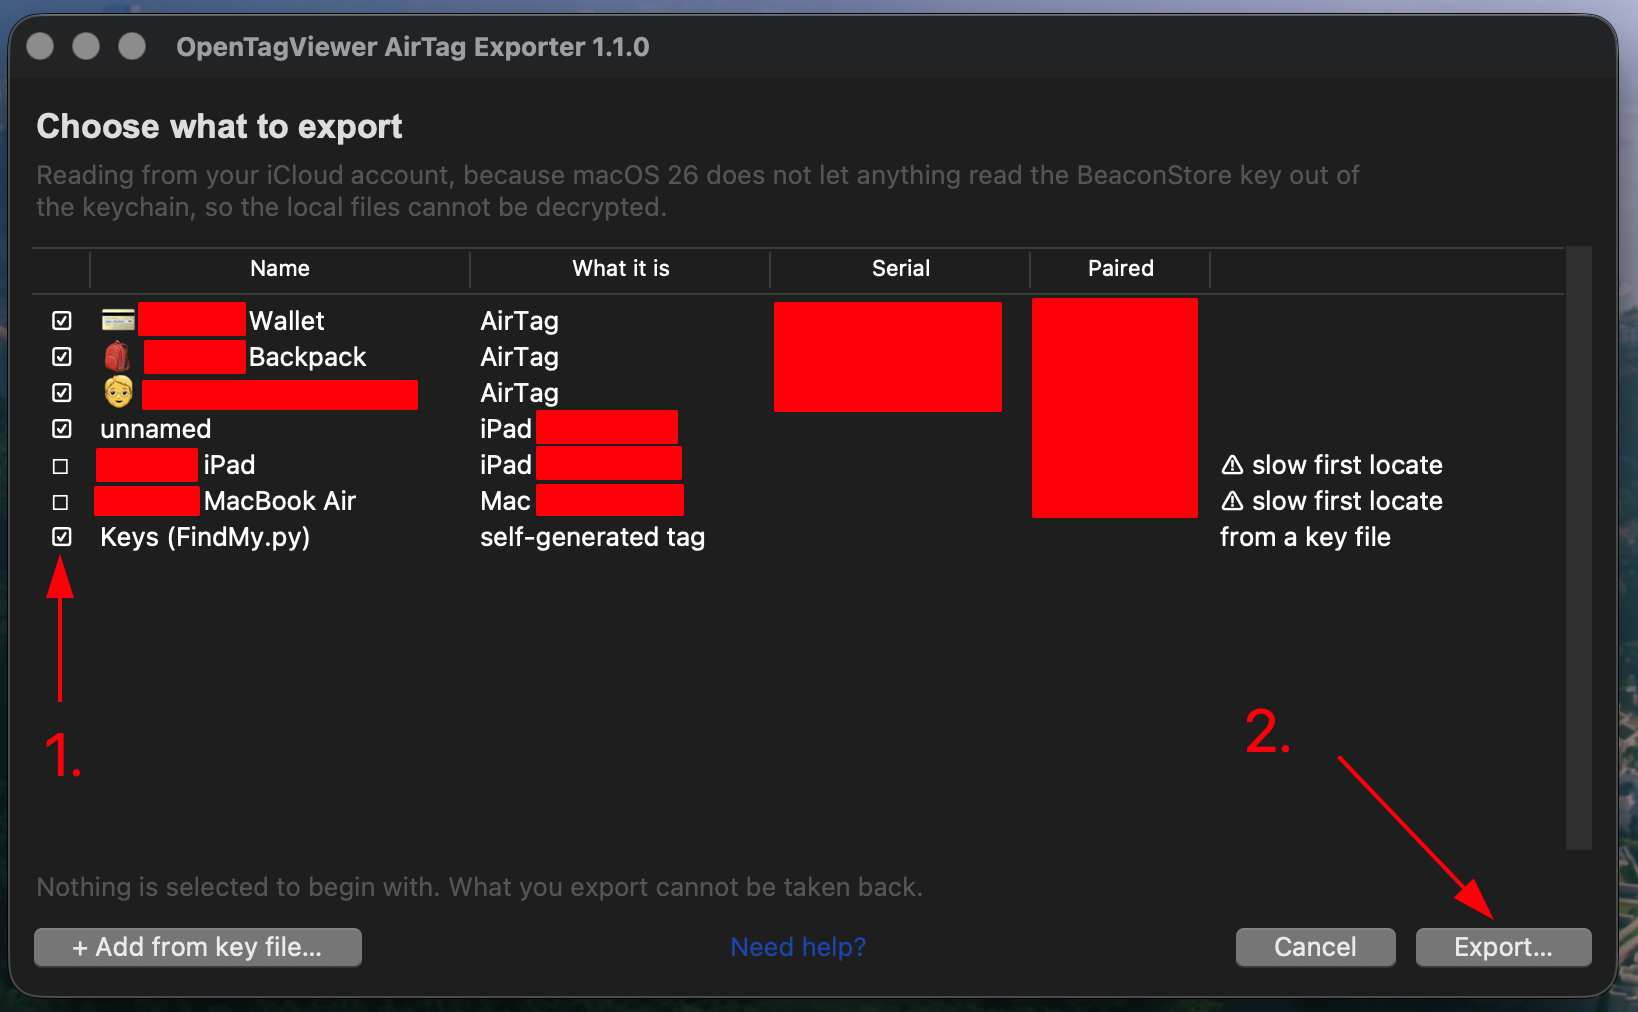
[!NOTE] The app cannot import these yet. They go into the bundle in a new format (
0.0.3) that the current importer skips. The tags from your Apple account in the same bundle import normally.
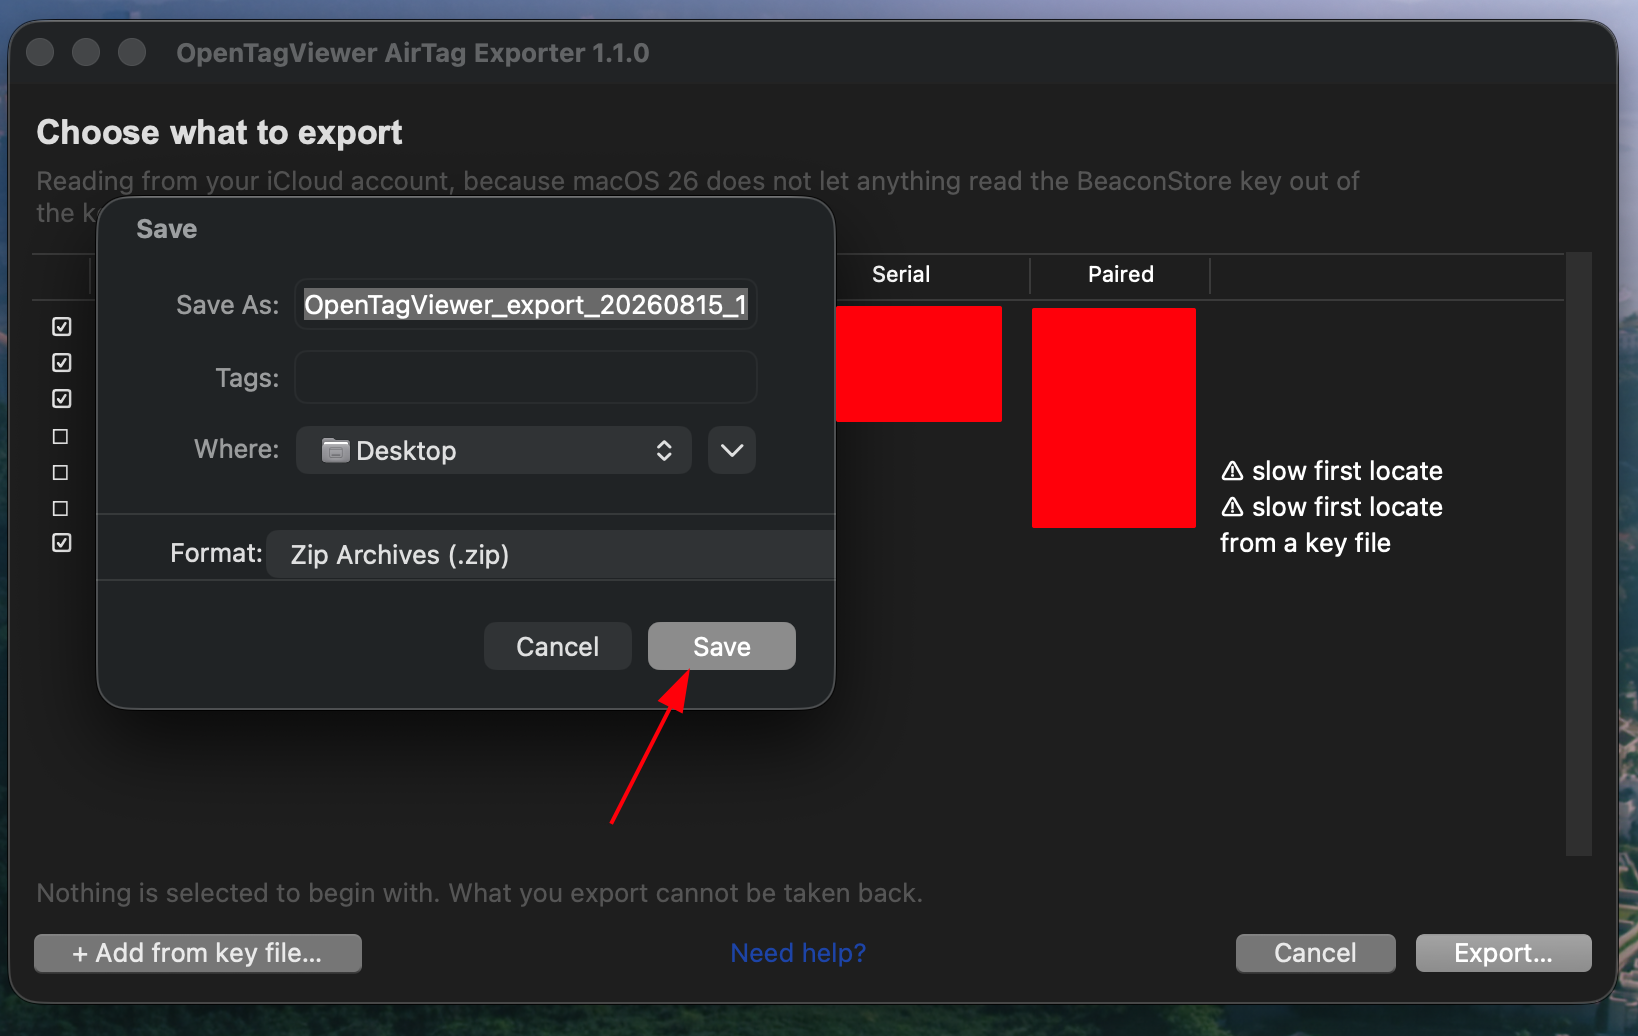
Put it somewhere you can get at from your phone — a cloud drive works well.
Done. To import it, see 📖 this page.
Important
To share your AirTags with someone else using OpenTagViewer, send them this same .zip. They
will see every device you chose to export.
Only share it with people you trust: it contains everything needed to track those tags permanently, unless you reset them.
Nothing, if you used flow A — that route never signs in.
Otherwise, one entry in your device list, because signing in registers a device. It looks like this:
You do not own that MacBook Pro. Open it and you can see what it actually is:
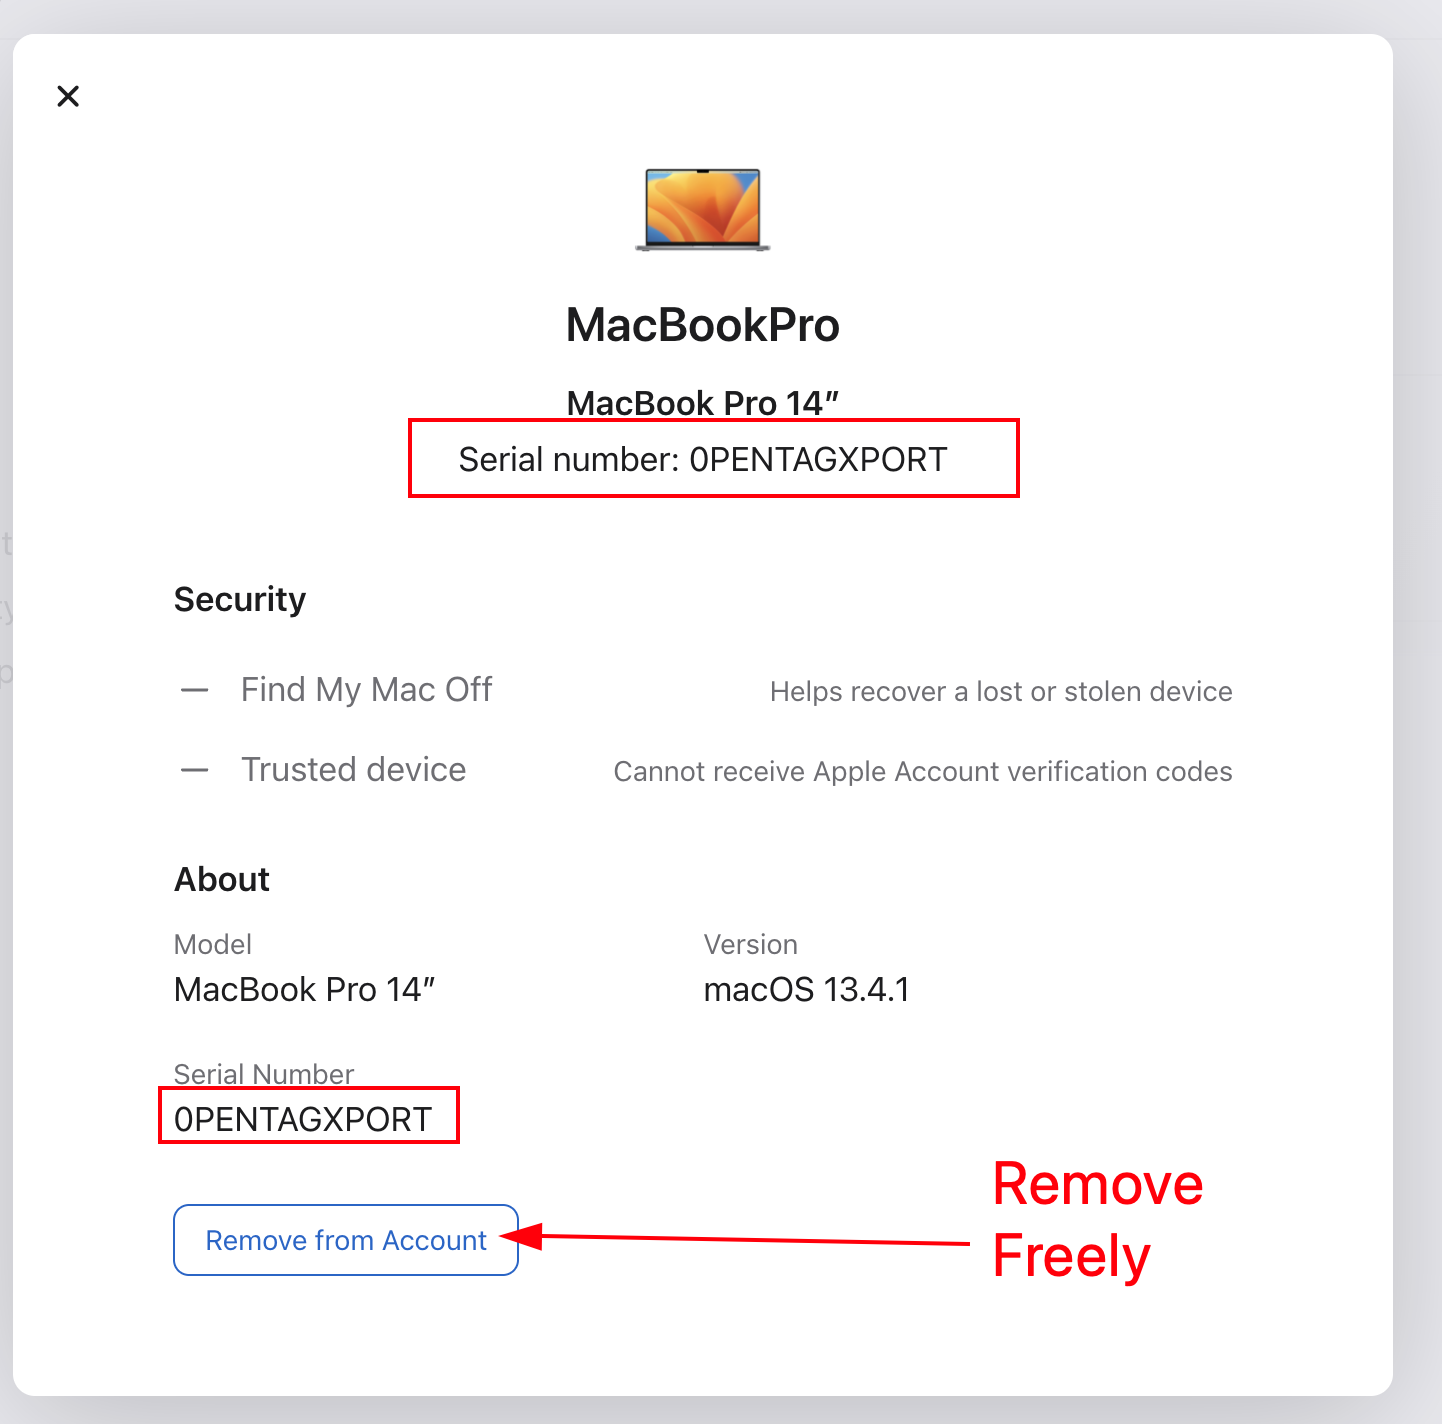
| Model | MacBook Pro 14" |
| Version | macOS 13.4.1 |
| Serial Number | 0PENTAGXPORT |
The model and version come from the library the exporter uses, which has always presented itself
as a MacBook Pro and authenticates fine that way. The serial is the part that identifies it —
0PENTAGXPORT is this exporter, and it is deliberately not shaped like real hardware so you can
tell it apart from a Mac you own. (If you also use the Android app, that registers separately as
0PENTAGVIEWR.)
It is one entry no matter how many times you export, because the identity is stable.
Remove it freely. Press Remove from Account on that page — at account.apple.com → Devices, in any browser, with no Apple device needed.
Nothing depends on it:
- It is not a trusted device and cannot receive verification codes, as the page itself says — removing it cannot lock you out of your own account.
- Find My Mac is off for it, so it is not being located.
- Your exported
.zipkeeps working. The bundle holds the tags' keys and has nothing to do with this session. - A later export simply signs in again, and the entry comes back.
The same exporter without a window, for a machine with no screen, a server, or anyone who would rather script it:
python -m exporter.cli --no-password --output my-tags.zipIt asks the same questions in the same order and produces the same zip. Full instructions, including the flags and what each step means: 📖 How To: Export AirTags With The CLI
There is a manual route:
decrypt the plists with a script, then assemble the .zip yourself. It still works and the app
still imports what it produces — but it is no longer the answer to any question, and it is kept
for people who already depend on it.
Why it is deprecated:
- It existed because macOS 15+ could not use the wizard. That was its whole reason, and the wizard runs on macOS 15+ now — through iCloud, along with Windows and Linux.
- It needs a Mac. Every decryption script for the local files does. The wizard and the CLI need any computer at all.
-
Assembling the zip by hand is easy to get subtly wrong, and the mistakes are quiet ones: a
directory named
KeyAlignmentRecordinstead ofKeyAlignmentRecords, a.recordextension left where.plistbelongs, a binary plist where XML is expected. Each produces a zip that imports and is missing something, rather than one that fails. -
The key-alignment record is yours to remember. The manual guide correctly calls it optional
and recommends it, and
airtag_decryptor.pydecrypts it along with everything else — but "optional" is a step people skip, and skipping it means every tag searches its entire key history on its first locate. The wizard and the CLI include it without being asked.
If you are on macOS 15 or newer and looking for the manual route because the old wizard would not run, you want the wizard instead.