Z Offset
The primary bed calibration mechanism is the "paper test". It involves placing a regular piece of "copy machine paper" between the printer's bed and nozzle, and then commanding the nozzle to different Z heights until one feels a small amount of friction when pushing the paper back and forth.
It is important to understand the "paper test" even if one has an "automatic Z probe". The probe itself often needs to be calibrated to get good results. That probe calibration is done using this "paper test".
In order to perform the paper test, cut a small rectangular piece of paper using a pair of scissors (eg, 5x3 cm). The paper generally has a thickness of around 100 microns (0.100mm). (The exact thickness of the paper isn't crucial.)
The first step of the paper test is to remove the bed leveling sensor from the print head and inspect the printer's nozzle and bed. Make sure there is no plastic (or other debris) on the nozzle or bed.
If one always prints on a particular tape or printing surface then one may perform the paper test with that tape/surface in place. However, note that tape itself has a thickness and different tapes (or any other printing surface) will impact Z measurements. Be sure to rerun the paper test to measure each type of surface that is in use.
If there is plastic on the nozzle then heat up the extruder and use a metal tweezers to remove that plastic. Wait for the extruder to fully cool to room temperature before continuing with the paper test. While the nozzle is cooling, use the metal tweezers to remove any plastic that may ooze out.
When the nozzle is heated, its position (relative to the bed) changes due to thermal expansion. This thermal expansion is typically around a 100 microns, which is about the same thickness as a typical piece of printer paper. The exact amount of thermal expansion isn't crucial, just as the exact thickness of the paper isn't crucial. Start with the assumption that the two are equal (see below for a method of determining the difference between the two distances).
It may seem odd to calibrate the distance at room temperature when the goal is to have a consistent distance when heated. However, if one calibrates when the nozzle is heated, it tends to impart small amounts of molten plastic on to the paper, which changes the amount of friction felt. That makes it harder to get a good calibration. Calibrating while the bed/nozzle is hot also greatly increases the risk of burning oneself. The amount of thermal expansion is stable, so it is easily accounted for later in the calibration process.
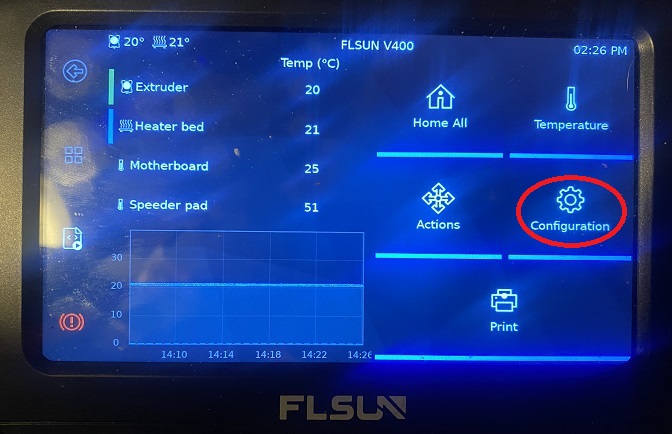
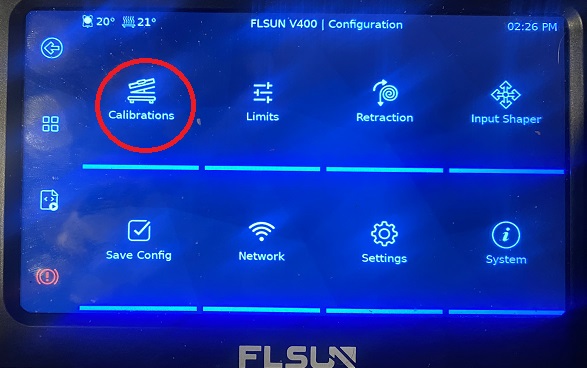
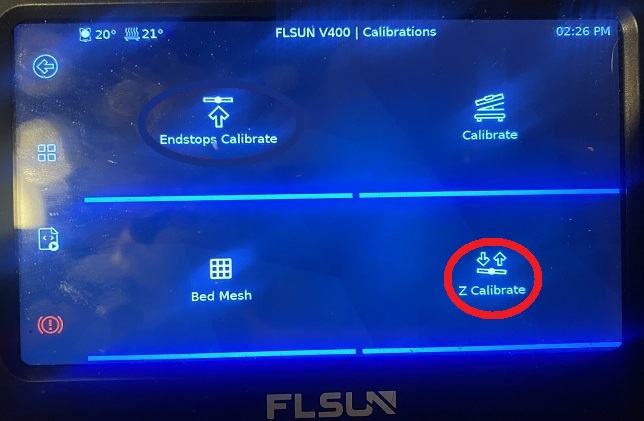
- From the home screen press "Configuration-> Calibrations-> Z Calibrate"
- Place the paper between the nozzle and bed. It can be useful to fold a corner of the paper so that it is easier to grab. (Try not to push down on the bed when moving the paper back and forth.)
- Press "move to Z0" the head will home and then proceed to drop to the plate and remain 2-3 mm above the plate.
- Use the Z- command to request the nozzle to move closer to the paper.
The Z- command will move the nozzle a relative distance from the nozzle's current position. (there are distance values you can choose from to command the nozzle to move that amount when the Z-/+ command is pressed. IE 0.01, 0.05, 0.5, and 1 )
- After the nozzle stops moving, push the paper back and forth to check if the nozzle is in contact with the paper and to feel the amount of friction.
Continue issuing z- commands until one feels a small amount of friction when testing with the paper. If too much friction is found then one can use Z+ to move the nozzle up
- After finding a small amount of friction your all set to return to the home screen. The Z-offset will be saved to your variables.cfg as seen below
[Variables]
gcode_offsets = {'x': None, 'y': None, 'z': -2.420000000000001}
Continue to E Steps calibration.
If you like my work, don't hesitate to support me by buying me a 🍺 or a ☕. Thank you 🙂