django
Django is a high-level Python web framework that lets you build powerful and scalable web applications quickly. It follows the Model-View-Template (MVT) architecture and includes built-in tools for authentication, database management, and security.
To install Django, ensure Python and pip are installed.
Open a terminal and type:
python --version
pip --version
✔ If Python 3.x is installed, you're ready to proceed.
Run:
pip install django✔ This installs the latest Django version.
django-admin --version✔ If you see a version number, Django is installed successfully! 🎉
A Django project is a collection of settings and configurations for a web application.
django-admin startproject myproject✔ This creates a myproject folder with Django settings.
cd myprojectpython manage.py runserver✔ Open http://127.0.0.1:8000/ in your browser.
✔ If you see "Congratulations! It worked!", Django is running! 🎯
After running startproject, Django creates these files:
myproject/
│── manage.py         # Command-line tool for Django
│── myproject/        # Main project directory
│   │── settings.py   # Configuration file
│   │── urls.py       # URL routing
│   │── wsgi.py       # Web server gateway
│   │── asgi.py       # ASGI server file
A Django app is a modular component of a project.
python manage.py startapp myapp✔ This creates a folder myapp/ for the app.
Open settings.py and add "myapp" inside INSTALLED_APPS:
INSTALLED_APPS = [
    'django.contrib.admin',
    'django.contrib.auth',
    'myapp',  # Add your app here
]A view handles requests and returns a response.
Open myapp/views.py and add:
from django.http import HttpResponse

def home(request):
return HttpResponse("Hello, Django!")Open myapp/urls.py and add:
from django.urls import path
from .views import home

urlpatterns = [
    path('', home),
]
✔ If urls.py doesn’t exist in myapp/, create it manually.
Open myproject/urls.py and modify:
from django.contrib import admin
from django.urls import path, include

urlpatterns = [
    path('admin/', admin.site.urls),
    path('', include('myapp.urls')),  # Include myapp URLs
]python manage.py runserver✔ Open http://127.0.0.1:8000/ → You should see "Hello, Django!"
Django uses templates to separate logic from presentation.
Inside myapp/, create a folder:
myapp/
│── templates/
│   │── home.html  # HTML file
<!DOCTYPE html>
<html>
<head>
    <title>My Django Page</title>
</head>
<body>
    <h1>Welcome to Django!</h1>
</body>
</html>from django.shortcuts import render
def home(request):
return render(request, "home.html")✔ Refresh http://127.0.0.1:8000/ → You should see the HTML page! 🎯
Django models define database structure.
from django.db import models

class Product(models.Model):
    name = models.CharField(max_length=255)
price = models.DecimalField(max_digits=10, decimal_places=2)python manage.py makemigrations
python manage.py migrate✔ This creates a database table for Product.
Django provides a built-in admin panel.
python manage.py createsuperuser✔ Enter username, email, and password.
from django.contrib import admin
from .models import Product

admin.site.register(Product)python manage.py runserver✔ Go to http://127.0.0.1:8000/admin/
✔ Log in and manage database entries!
Django has forms to handle user input.
from django import forms
from .models import Product

class ProductForm(forms.ModelForm):
    class Meta:
        model = Product
fields = ['name', 'price']from django.shortcuts import render
from .forms import ProductForm
def add_product(request):
if request.method == "POST":
form = ProductForm(request.POST)
if form.is_valid():
form.save()
else:
form = ProductForm()
return render(request, "add_product.html", {"form": form})<form method="POST">
{% csrf_token %}
{{ form.as_p }}
<button type="submit">Add Product</button>
</form>✔ Now, users can submit a product form!
To build REST APIs, install Django REST Framework:
pip install djangorestframeworkINSTALLED_APPS = [
'rest_framework',
'myapp',
]from rest_framework.response import Response
from rest_framework.decorators import api_view
@api_view(['GET'])
def api_home(request):
return Response({"message": "Hello, API!"})from django.urls import path
from .views import api_home
urlpatterns = [
path('api/', api_home),
]✔ Visit http://127.0.0.1:8000/api/ → You’ll see {"message": "Hello, API!"}
Tip: to enlarge your pyCharm editor
In the Settings/Preferences dialog ( Ctrl+Alt+S ),
go to Editor | General (Mouse Control section).
Select the Change font size with Ctrl+Mouse Wheel in option.
Return to the editor, press and hold Ctrl ,
and using the mouse wheel, adjust the font size.
https://www.codingforentrepreneurs.com/guides/install-python-on-windows/
| ■ Installing django | pip install django==2.1.5 |
| ■ Create Virtual environment | python -m venv myenvname |
| ■ Create django project |
django-admin startproject yourProjectName . where the period tell that your project was in current folder |
| ■ Run project |
python manage.py runserver where manage.py is the module to manage django project |
■ Create app in your project
|
use multiple apps to control your project |
| ■ Create your View | |
| ■ URL Mapping | |
| ■ Model | |
| ■ Migrations | you can reset the database by deleting all the files in the migration and the |
| ■ Admin | register your app model in the admin.py |
| ■ Python Shell | Use python shell to register product |
| ■ Templates |
{% block content%}{% endblock %} https://docs.djangoproject.com/en/4.0/ref/templates/builtins/
|
| ■ Form Create |
Product.objects.get(id=1) Create DB data |
| ■ Raw HTML Form | create your own input field without {{ form.as_p }}
|
| ■ Better way to insert data | create a better insert data form |
| ■ Form Widgets | |
| ■ Form Validation | |
| ■ Class Based Views | ListView |
| ■ Connect with PostgreSQL | pip install psycopg2 |
- open your project terminal in the
pyCharmand typepip install django==2.1.5where 2.1 is the version number - If you are in Windows and the error mentions something like:
... Connection aborted.', PermissionError ...Make sure you open the CMD with "Run as Administrator"
- type
pwdto see your location\ - to create virtual env type
python -m venv potatoscript- potatoscript is your env name - to activate the virtual env type
.\potatoscript\Scripts\activate - Deactivate and reactivate To deactivate, just type:
(potatoscript) deactivateTo reactivate type:.\potatoscript\Scripts\activate
- each
appis actually the python'spackage - type
python manage.py startapp appname - python will create a package folder called
appnamefor you and you can reuse it in your project or you can public it in thepip apifor other people to use it - your will have a file called
admin.pyit is your login logout panel administrator CRUD -
apps.pyis your project configuration file
- open our
views.pymodule - create a function with the
http request parameteras belowfrom django.http import HttpResponse from django.shortcuts import render def index(request): return HttpResponse('Hello World')
- to tell dJango that when user call /products -> index we need to Map the URL(Uniform Resource Locator -> Address)
- go to our project app and create a python file called
urlsyou must name iturlsas requested by djangofrom django.urls import path from . import views # '' mean the root path urlpatterns = [ path('', views.index) ]
- Next we need to tell django where is our app
  - go to our project folder and select `urls.py` and type the following
  - we need to add `include` in the `from django.urls import path`
from django.contrib import admin
from django.urls import path, include

urlpatterns = [
    path('admin/', admin.site.urls),
    path('products/', include('products.urls'))
]- to navigate to
newpathproducts\newcreate a new function in the views and add its path in the app'surls
def new(request):
    return HttpResponse('New Page')
urlpatterns = [
path('', views.index),
path('new', views.new)
]- another way of mapping the url is just using one urls.py file as below
from django.contrib import admin
from django.urls import path
from products.views import index, new, about

urlpatterns = [
    path('admin/', admin.site.urls),
    path('', index, name = 'index'),
    path('new/', new),
    path('about/', about),
]- the following is not a good practice
from django.contrib import admin
from django.urls import path

from pages import views

urlpatterns = [
    path('', views.home_view, name='home'),
    path('admin/', admin.site.urls),
]- you should change the above to the following
from django.contrib import admin
from django.urls import path

from pages.views import home_views, contact_view

urlpatterns = [
    path('', home_view, name='home'),
    path('contact/', contact_view, name='contact'),
    path('admin/', admin.site.urls),
]- in the app models.py create a new class called
Product - we need to inherit all the models module into the class
- this models.Model contain all the behavior we want to CRUD it to database
from django.db import models

class Product(models.Model):
    name = models.CharField(max_length=255) #to prevent hacker to input something strange
    price = models.FloatField()
    stock = models.IntegerField()
    image = models.CharField(max_length=2083) #2083 is the max standard length in the input field

class Product2(models.Model):
    title       = models.CharField(max_length=120)
    description = models.TextField(blank=True, null=True)
    price       = models.DecimalField(decimal_places=2, max_degits=10000)
    summary     = models.TextField(default='this is cool') #summary     = models.TextField(blank=True, null=False)
featured = models.BooleanField() # null=True, default= True- after you add some data into the database without the
featuredfield and you try to run themakemigrationsit will give you error
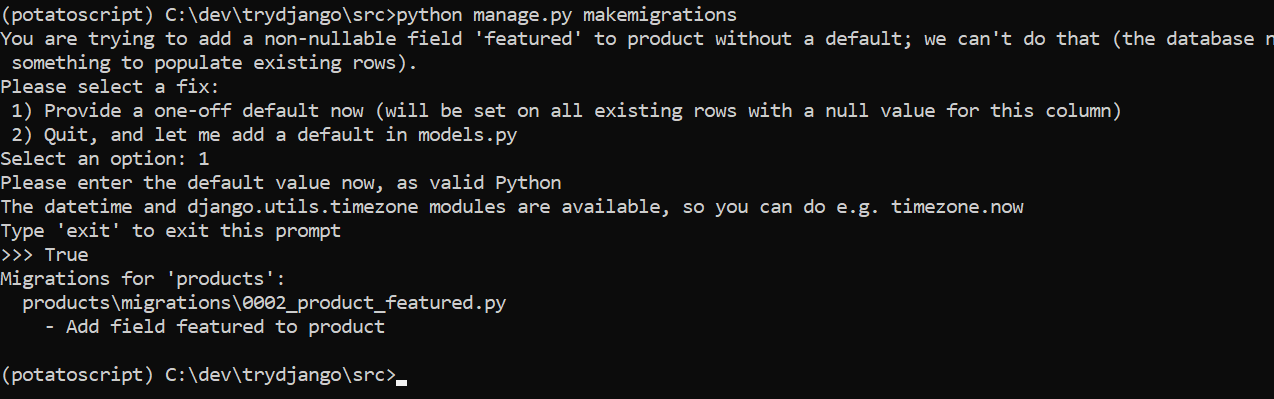 select 1 and then type True
- Use the models to create database table to storing product
- go to browser and search for
db browser for sqlitehttps://sqlitebrowser.org/ install the sqlite into our machine - and drag and drop our database file
db.sqlite3from our pyCharm - next go to our project folder and open
setting.pyand look forINSTALLED_APPSand include ourProductsCongfigpath into it. To let django know where is our app
INSTALLED_APPS = [
    'django.contrib.admin',
    'django.contrib.auth',
    'django.contrib.contenttypes',
    'django.contrib.sessions',
    'django.contrib.messages',
    'django.contrib.staticfiles',
    'products.apps.ProductsConfig'
]- to auto create the table with the column fields as in our model type the following in the terminal
python manage.py makemigrations - to generate our db table run the following in the terminal
django will look for the pending migration
python manage.py migrate
- django by default come with the administration panel
- let create a super user -> in the terminal
python manage.py createsuperuser - it can let you manage your user just one line code as above and it also can let you manage your products
- open the admin.py and type the following -> it tell django to register our Product into the admin
from django.contrib import admin
from .models import Product

admin.site.register(Product)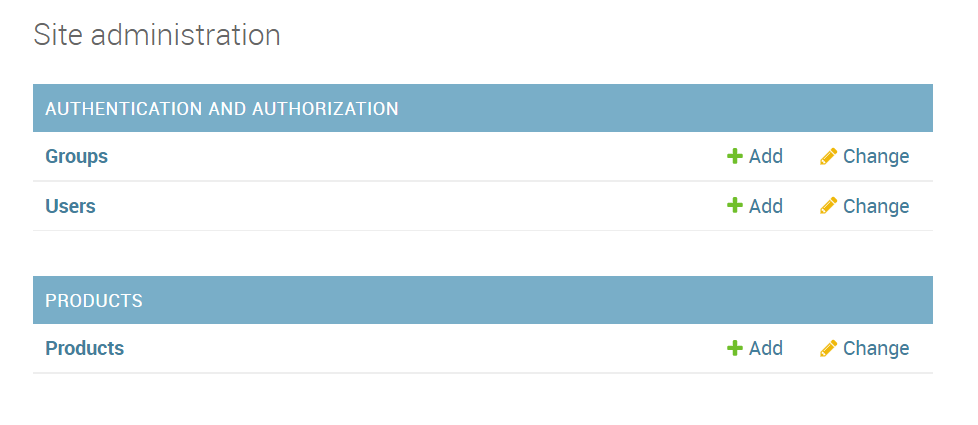
- at the root of your project type
python manage.py shell - at the shell type
>>>from products.models import Product -
>>>Product.objects.all()to list out the queryset which is default in the django command - to create new item in the products type
>>>Product.objects.create(title='New product 2', description='anotther one', price='200', summary='anything you like ')
- Create a folder called
Templatesand register it in theSettings.py
TEMPLATES = [
    {
        'BACKEND': 'django.template.backends.django.DjangoTemplates',
        'DIRS': [os.path.join(BASE_DIR, "templates")],
        ...
    },
]- Create a
base.htmlas Templates inheritance
...
    <body>
        {% block content %}
        share content
        {% endblock%}
        <p style="color:blue;font-size:12px">copyright by LIM 2022</p>
    </body>
...- Create the views page like
home.html,contact.html,about.htmland extend them tobase.html
{% extends 'base.html' %}
{% block content %}
<h1>This is homepage</h1>
{% endblock %}- setting in the
urls.py
from django.contrib import admin
from django.urls import path

from pages.views import home_view, contact_view, about_view

urlpatterns = [
    path('', home_view, name='home_view'),
    path('contact/', contact_view),
    path('about/', about_view),
    path('admin/', admin.site.urls),
]- Next we can include other template into our current template by using
{% include 'navbar.html' %}
    <body>
        {% include 'navbar.html' %}
        {% block content %}
        share content
        {% endblock%}
        <p style="color:blue;font-size:12px">copyright by LIM 2022</p>
</body>- for loop in the template tag
{% extends 'base.html' %}

{% block content %}
<h1>This is Contact</h1>
<p>
    {{ my_text }}, my number is {{ my_number }}
</p>
<ul>
    {% for item in my_list %}
      {% if item == 321 %}
        <li>{{ forloop.counter }} - {{ item|add:1000 }}</li>
      {% elif item == "abc" %}
        <li>This is not a network</li>
      {% else %}
        <li>{{ forloop.counter }} - {{ item }}</li>
      {% endif %}
    {% endfor %}
</ul>
{% endblock %}- views.py in products
from django.shortcuts import render
from .models import Product

def product_detail_view(request):
    obj = Product.objects.get(id=1)
    #context = {
    #    "title": obj.title,
    #    "description": obj.description
    #}
    context = {
        'obj': obj
    }
return render(request, "product/detail.html", context)- Form Create DB Step 1: create
form.py
from django import forms

from .models import Product

class ProductForm(forms.ModelForm):
    class Meta:
        model = Product
        fields = [
            'title',
            'description',
            'price'
]- Form Create DB Step 2: create view by adding the following in the views.py
from django.shortcuts import render

from .forms import ProductForm

from .models import Product


def product_create_view(request):
    form = ProductForm(request.POST or None)
    if form.is_valid():
        form.save()
        form = ProductForm() # this is to clear the input fields value after save
    context = {
        'form': form
    }
return render(request, "products/product_create.html", context)- Form Create DB Step 3: create
product_create.htmlinside the in app templates
{% extends "base.html" %}

{% block content %}
<form method="POST"> {% csrf_token %} # the csrf_token was for security of POST
    {{ form.as_p }} # this will generate the input fields base on the model for you automatically
    <input type='submit' value="Save" />
</form>
{% endblock %}- Form Create DB Step 4: add to
urls.py
from products.views import product_detail_view, product_create_view

urlpatterns = [
    path('', home_view, name='home_view'),
    path('contact/', contact_view),
    path('about/', about_view),
    path('create/', product_create_view),
    path('product/', product_detail_view),
    path('admin/', admin.site.urls),
]- product_create.html
{% extends "base.html" %}

{% block content %}
<form action='.' method="POST"> {% csrf_token %}
    <!--{{ form.as_p }}-->
    <input type="text" name="title" placeholder="your title" />
    <input type='submit' value="Save" />
</form>
{% endblock %}- views.py
def product_create_view(request):
    #print(request.GET)
    #print(request.POST)
    if request.method == "POST":
        my_new_title = request.POST.get('title')
        print(my_new_title)
        # Product.objects.create(title=my_new_title)
    context = {}
return render(request, "products/product_create.html", context)- views.py
def product_create_view(request):
    form = RawProductForm() # to initial the form look like
    if request.method == "POST":
        form = RawProductForm(request.POST) # use request.POST to do some action
        if form.is_valid():
            #now the data is good
            #print(form.cleaned_data) #cleaned_data is the data come from the form after you submit it
            Product.objects.create(**form.cleaned_data) #we need to use ** to pass the data as argument
            form = RawProductForm()
        else:
            print(form.errors)
    context = {
        "form" : form
    }
return render(request, "products/product_create.html", context)- product_create.html
{% extends "base.html" %}

{% block content %}
<form action='.' method="POST"> {% csrf_token %}
    <!--{{ form.as_p }}-->
    <!--<input type="text" name="title" placeholder="your title" />-->
    {{ form.as_p }} <!--you can change the display style to as_ul or as_p or ...-->
    <input type='submit' value="Save" />
</form>
{% endblock %}- use the form widget you can overwrite the thing in the form
class RawProductForm(forms.Form):
    title       = forms.CharField(label='', widget=forms.TextInput(attrs={"placeholder":"my title"}))
    description = forms.CharField(
                        required=False,
                        widget=forms.Textarea(
                            attrs={
                                "class": "new-class-name two",
                                "rows": 20,
                                "cols": 90,
                                "id": "my_textarea_id"
                            }
                        ))
price = forms.DecimalField(initial=200)class ProductForm(forms.ModelForm):
title = forms.CharField(label='', widget=forms.TextInput(attrs={"placeholder":"my title"}))
email = forms.EmailField()
description = forms.CharField(
required=False,
widget=forms.Textarea(
attrs={
"placeholder": "Your description",
"class": "new-class-name two",
"rows": 20,
"cols": 90,
"id": "my_textarea_id"
}
))
price = forms.DecimalField(initial=200)
class Meta:
model = Product
fields = [
'title',
'description',
'price'
]
def clean_title(self, *args, **kwargs):
title = self.cleaned_data.get("title")
if not "CFE" in title:
raise forms.ValidationError("This is not a valid title")
if not "news" in title:
raise forms.ValidationError("This is not a valid title")
else:
return title
def clean_email(self, *args, **kwargs):
email = self.cleaned_data.get("email")
if not email.endswith("edu"):
raise forms.ValidationError("This is not a valid email")
else:
return email - views.py
from django.shortcuts import render

from django.views.generic import(
    CreateView,
    DetailView,
    ListView,
    UpdateView,
    DeleteView
)

from .models import Article

class ArticleListView(ListView):
    template_name = 'articles/article_list.html'
queryset = Article.objects.all() # <blog>/<modelname>_list.html- in app url.py
from django.urls import path
from .views import(
    ArticleListView
)

app_name = 'articles'
urlpatterns = [
    path('', ArticleListView.as_view(), name='article-list')
]- install djangorestframework
pip install djangorestframework - install psycopg2
pip install psycopg2