Installation
I'm using Ubuntu (server) 24.04.4 LTS on a ~10 year old machine with 32GB 800MHz DDR3, Intel i7-4790K CPU @ 4.00GHz, SSD for the OS + models. The GPU is a NVIDIA GeForce GTX 1060 with 6GB VRAM, so I appear to be limited to LLMs of 8 billion parameters (or less). This information is provided to get a sense of timing, and to show that experimenting with LLMs can be achieved on older hardware.
The LLMs are running on Ollama.
curl -fsSL https://ollama.com/install.sh | sh
Note: For security, this is not how it will be installed for in-production environments.
Ollama is a wrapper for llama.cpp by Georgi Gerganov. It abstracts away the configuration required to run llama.cpp via scripts which detect likely good choices and exposes OpenAI model compliant LLMs through a local API endpoint or chat interface directly on the terminal. Ollama also hosts LLMs and allows you to effortlessly pick and choose a (tagged) model that suits your needs. In my case 6GB VRAM is a bottleneck. Replicating the flow presented by mmajurski/NIST requires a model that implements "thinking" (reasoning tokens).
For me, that means nemotron-3-nano:4b. Here is a screenshot of the Ollama site, "Models" section:

^^Underlined in red is the "thinking" tag we're after (reasoning tokens)

^^Underlined in red is the default context length, which effectively represents how much memory running the model will require
Note: Ollama will happily run a model that uses more memory than can be provided by your physical VRAM. It does this by 1. Swapping to disk in the event you are constrained by mainboard memory (RAM) or 2. Using a combination of mainboard memory and GPU memory. By adjusting the model context size via the OLLAMA_CONTEXT_LENGTH environment variable, you can fine tune Ollama so that it makes most efficient use of your fastest components.
The command ollama ps will show you how resources are being used, as in the following example output of the same:
| NAME | ID | SIZE | PROCESSOR | CONTEXT |
|---|---|---|---|---|
| nemotron-3-nano:4b | 6cc467f05439 | 5.0 GB | 100% GPU | 167936 |
In order to get the highest memory use entirely on GPU, I came to use the value (164 x 1024) = 167936 through trial and error. The number 167936 is tokens, not MB, and the length (size in bytes) of a token can vary from model to model.
More information on getting started with Ollama can be found here.
Note: Before installing Ollama, install the NVIDIA drivers recommended for your graphics card. The rule of thumb seems to be that "if nvidia-smi returns results (rather than an error), you should be good to use your GPU/VRAM with Ollama".
In my case, I installed Ollama before installing the NVIDIA drivers, assuming that they were detected by the Ubuntu installation process, since I selected "use third-party drivers" (enabling the restricted, multiverse apt package repositories), but this proved to be incorrect and Ollama threw an error explicitly identifying which drivers to install for my graphics card (580x), which is curious because ubuntu-drivers devices recommends the 535x "non-free" (NVIDIA). I have yet to benchmark performance on the 535x vs. the 580x (if they even work), because at this point I'm only looking for a working proof of concept.
uv is a fast Python package manager, written in Rust. Installation instructions in detail are available here. It enables you to fetch dependencies (libraries) from their official distribution sources faster than when using pip alone.
curl -LsSf https://astral.sh/uv/install.sh | sh
Note: For security, this is not how it will be installed for in-production environments.
mkdir airflow
uv venv --python=3.12
source .venv/bin/activate
uv pip install "apache-airflow[celery]==3.2.2" --constraint "https://raw.githubusercontent.com/apache/airflow/constraints-3.2.2/constraints-3.12.txt"
Note: For security, this is not how it will be installed for in-production environments.
uv pip install apache-airflow-providers-openai
uv pip install apache-airflow-providers-common-ai
airflow standalone
Note: On first run, the admin password will be echoed to terminal. After the first run, you can find it in the file simple_auth_manager_passwords.json.generated in the directory
Create a connection to your OpenAI model compliant LLM via the Apache Airflow UI at http://localhost:8080 (do not use "standalone" for production), using the following:
- Connection Type: Pydantic AI
- Connection ID: openai_default
- Description: [optional]
- Host: http://127.0.0.1:11434/v1
- API Key: [not required but apparently cannot be left blank]
- Extra JSON:
{ "extra": { "model": "openai:nemotron-3-nano:4b" } }
Screenshots:

^^Defining a Pydantic AI connection to your locally running LLM in Apache Airflow via the web UI

^^Standard fields

^^Extra fields JSON
Note: "model" in extra JSON must be prefixed with "openai:", but you can use whatever model is desired, as long as it supports "thinking"
Copy the provided example to your dags path
Note: The default path for directed acyclic graphs (DAG) is "./dags/".
Apache Airflow will scan the configurable DAGs path on a schedule:
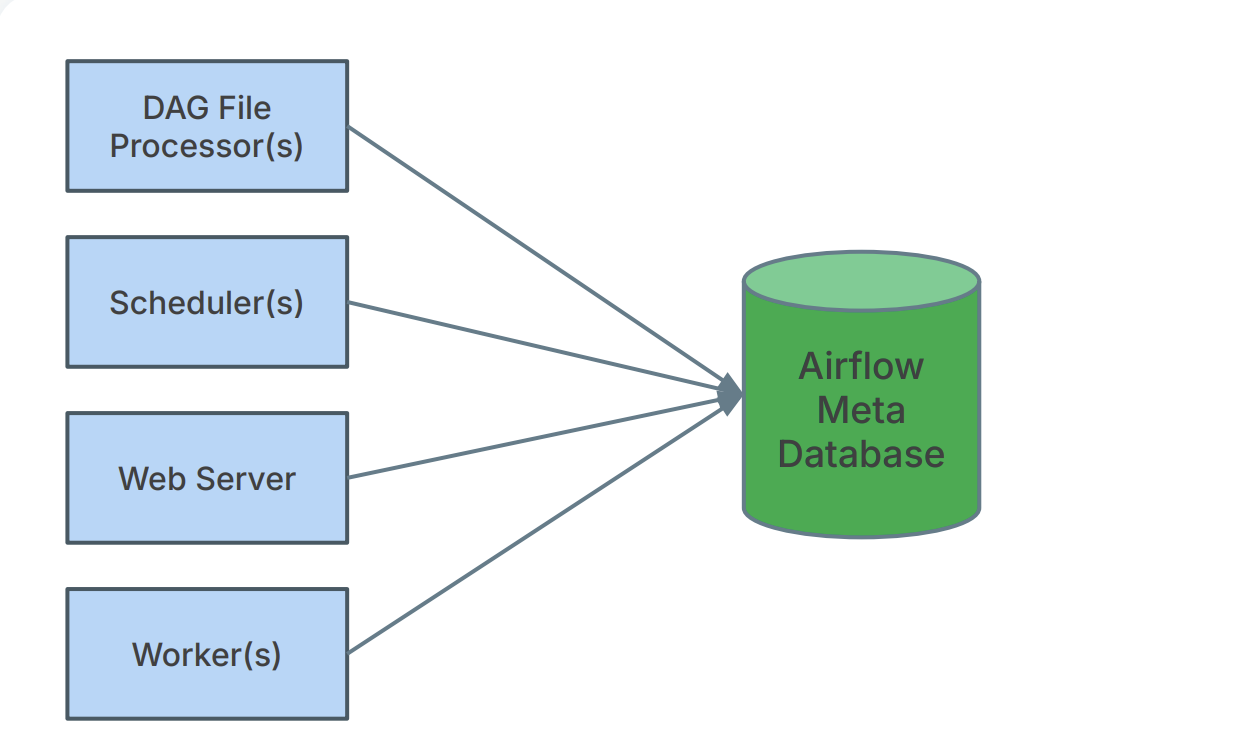
Note: See Airflow 2x Architecture from the source for more information.
..and import newly added files in to its internal database (sqlite):
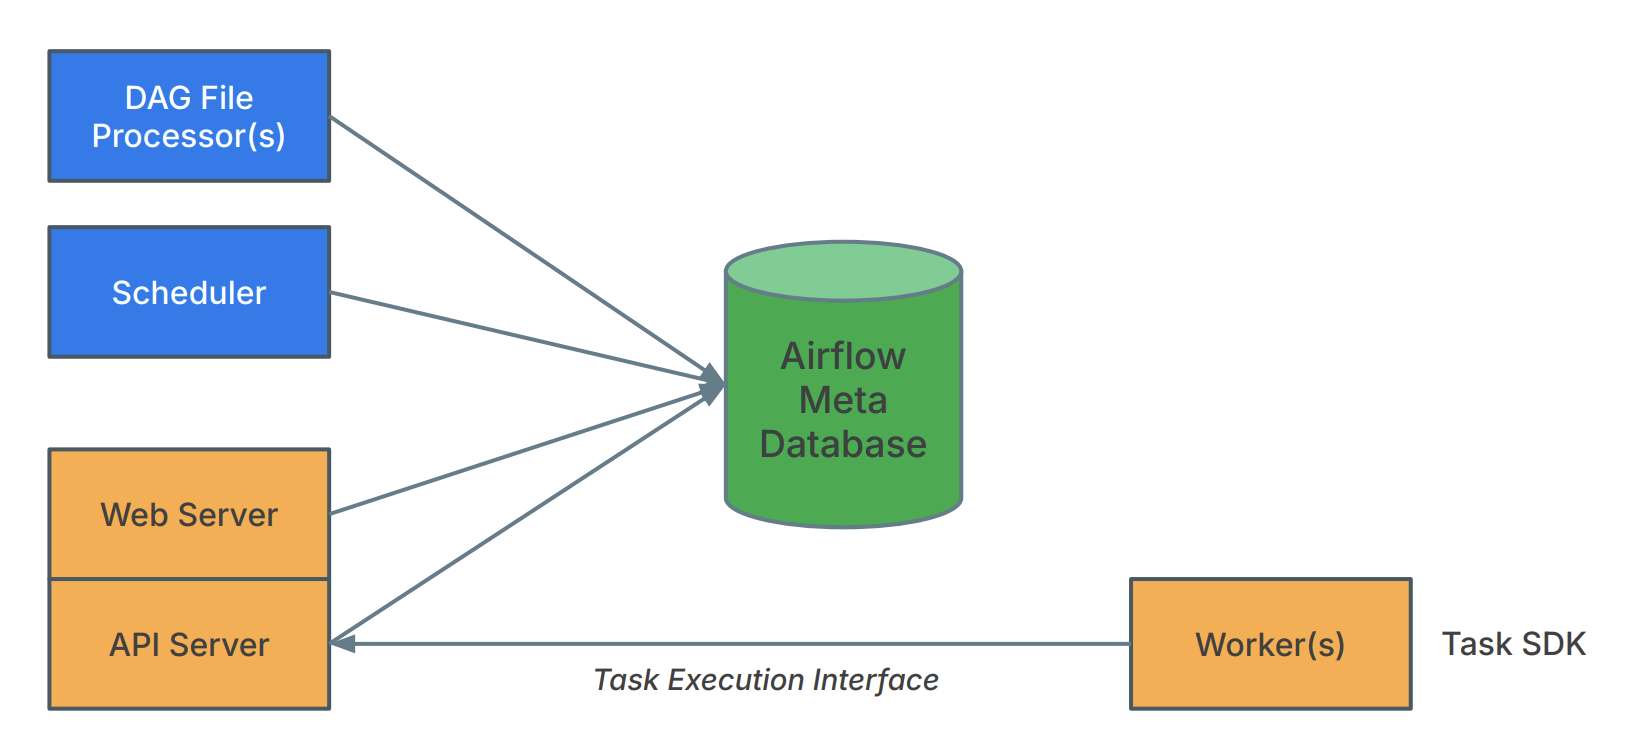
After a few moments, your DAG should have been imported into Airflow's internal database. The airflow standalone command provides a number of example DAGs), click on Dags in the left hand menu, and search for it by name (dag_id), "llm_test":

Note: The DAG version and a convenient button to rescan (reparse) the file for changes:

Hit the Trigger button to manually trigger the task:

Options can be specified once you expand the example, if desired. Click trigger to launch the task:

There are two subtasks defined in our DAG: run_analyst_agent and format_report, see the first task is running:

Then, once completed, click on the instance of the finished format_report task:

The LLM response, formatted in JSON, for machine-readability:

The DAG script that generated the response:

Note: Ollama will automatically import the requested model in to memory and purge it if there are no requests after a delay which is configurable with the OLLAMA_KEEP_ALIVE environment variable, which you can set in the systemd unit file for the ollama service, or by passing it directly on launch. The duration of my manually triggered test run was a cold started 00:00:21.157, so ~21 seconds for a simple response from a prompted agent.
You can monitor your GPU resource usage using nvtop (for NVIDIA graphics cards), available from Ubuntu apt packages repository (top) and other system resources via htop directly at the terminal (bottom), multiplex the terminal windows using screen "split" for a quick dashboard, as shown in the following video:
 ^^The spike in the graph shows the Airflow DAG run