Stop overpaying for AI. Let the router cook.
A microkernel AI agent for your CLI, Web UI, and chat channels.


AgentOS is an AI agent. It saves tokens, so it costs less to run. It has a small core (this is called "microkernel"). A local model router picks the cheapest model that can do each job. AgentOS also has memory that stays after you close it, a safe sandbox with many layers, built-in web search, and on-device embeddings.
You can use AgentOS from the Web UI, the CLI, or chat apps. All of them use the same core loop. This means tool calls, retries, and logs work the same way everywhere. AgentOS can talk to many AI providers. By default it uses OpenRouter. It can also use the Bankr LLM Gateway, OpenAI, Anthropic, Ollama, DeepSeek, Gemini, Qwen/DashScope, and 20+ other providers. You do not need to change your code or config to switch providers.
AgentOS 2026.7.14.post1 is the current release. The project website is useagentos.dev. Follow @useAgentOS on X for updates.
For step-by-step guides, start with the
AgentOS Product Guide or the
documentation index. You can find past releases in
CHANGELOG.md and RELEASES.md.
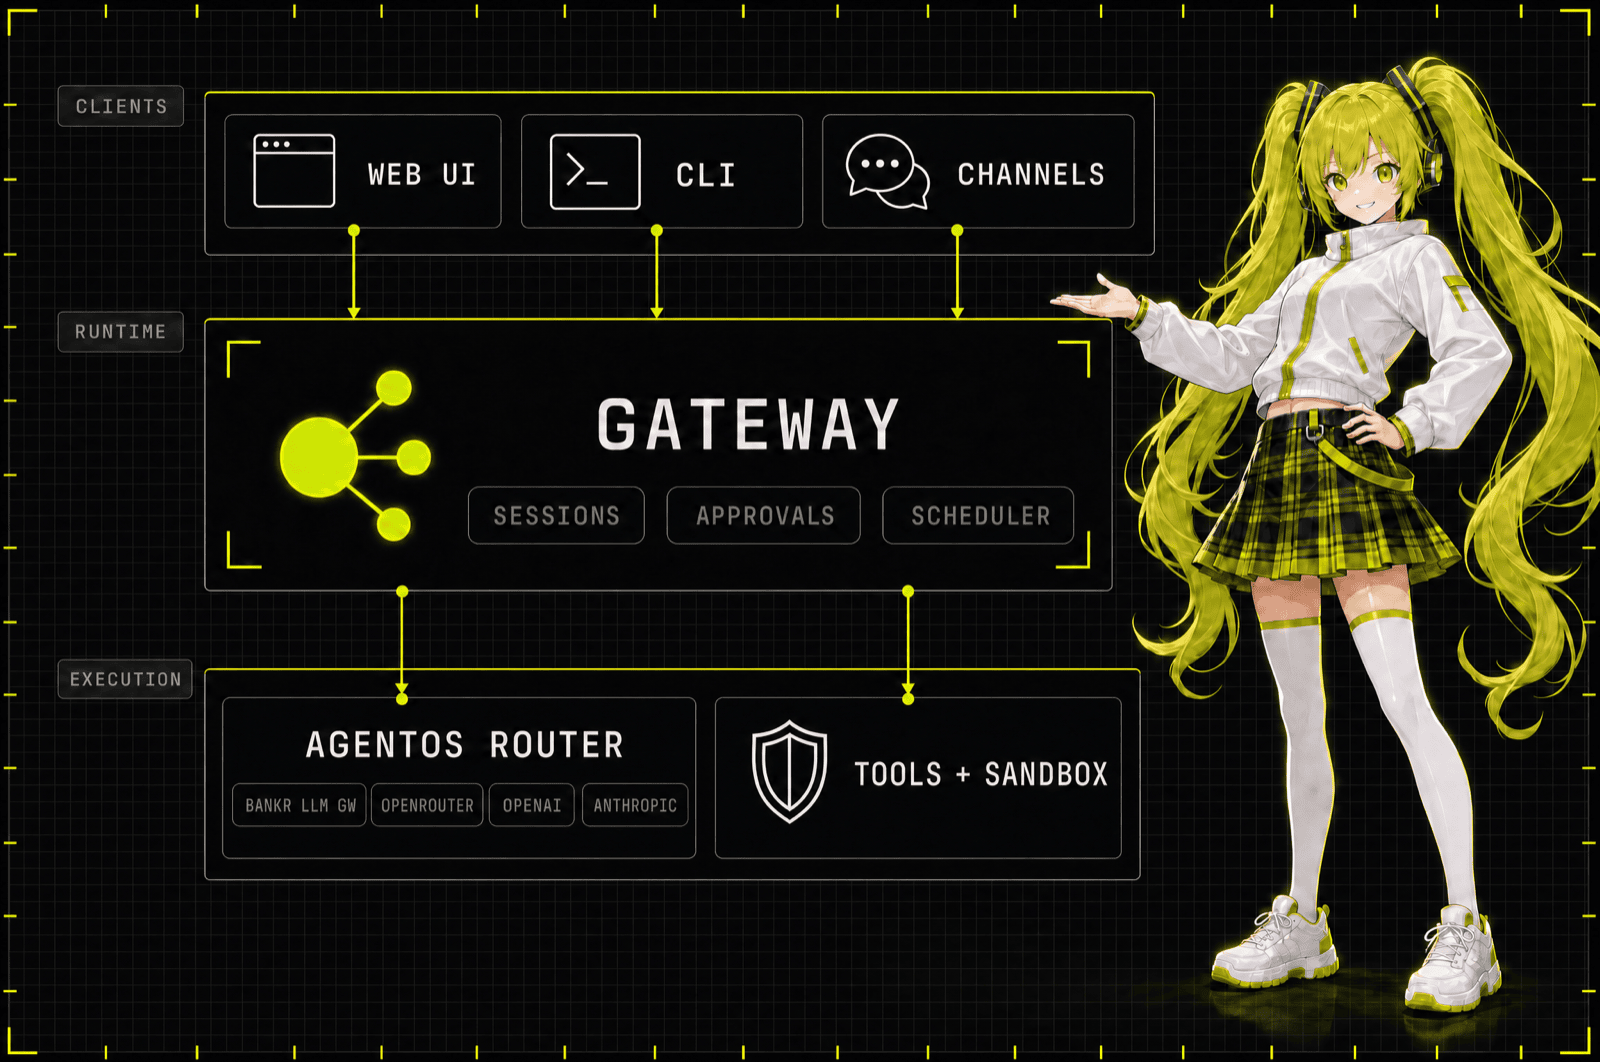
Every client — the Web UI, the CLI, and the chat channels — talks to one local gateway. This gateway handles sessions, approvals, and scheduling. It sends each turn to the AgentOS Router, which picks the model. Then it runs tool calls inside the safe sandbox.
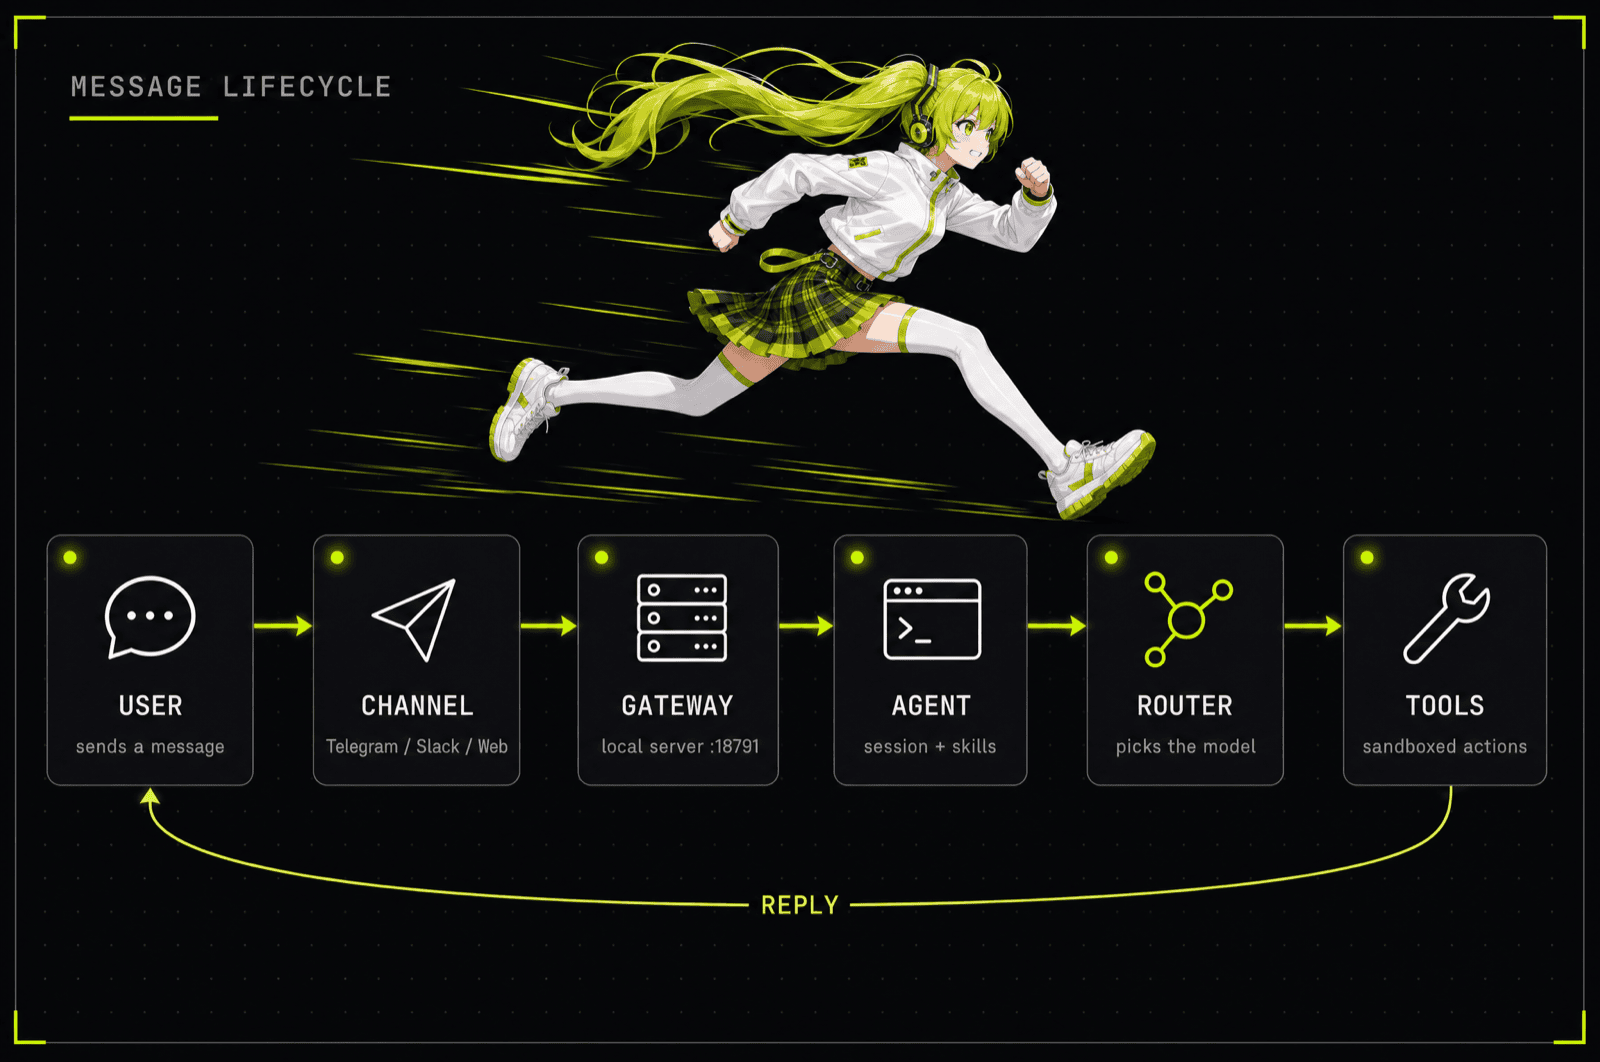
Here is what happens to one message: it comes in through a channel, goes through the gateway into the shared turn loop, gets sent to the cheapest model that can handle it, runs any tools in the sandbox, and the reply goes back the same way:
AgentOS works on Windows, macOS, and Linux. Pick the option that fits what you need.
Windows portable and Quick terminal install give you a ready-made
release. You do not need Git for these. The other two — Install
from source and Develop from source — need a Git checkout
(git clone + Git LFS).
Release installs use files from GitHub releases. The Windows
portable zip also has a short link at /releases/latest/download/
for the newest release. Python wheel installs use file names with
version numbers, because the installer checks the version in the
file name.
| Path | Audience | When to use |
|---|---|---|
| Windows portable | Windows users | No Python needed; just unzip and run |
| Quick terminal install (recommended) | End users on any OS | Install a release from a terminal |
| Install from source | Users who want the latest main code |
Run from a Git checkout, but don't edit it |
| Develop from source | Contributors | Edit, test, or debug the code |
| Requirement | Windows portable | Quick terminal install | Install from source | Develop from source |
|---|---|---|---|---|
| Python 3.12+ | bundled | via uv |
via uv or system |
via uv |
| Git + Git LFS | — | — | required | required |
uv |
— | installed if missing | recommended | required |
The default recommended profile installs AgentOS Router — AgentOS's
own on-device model router (strategy v4_phase3) — along with the Python
dependencies it needs (ONNX Runtime, LightGBM, scikit-learn). Its ~75MB
model bundle is not distributed with the repo or the wheel yet, and the
installers do not fetch it. When the bundle is absent, the router degrades
gracefully at boot: it logs a warning and pins every turn to the default
tier (c1) instead of crashing. To get per-turn routing today, either restore
the bundle into src/agentos/agentos_router/models/v4.2_phase3_inference/
or switch to the llm_judge strategy, which needs no local model files —
pick it during onboarding or set agentos_router.strategy = "llm_judge".
Set AGENTOS_INSTALL_PROFILE=core to skip the router dependencies, or use
the --router disabled flag during first-time setup to keep them installed
but turn the router off.
On Windows, AgentOS Router needs the Visual C++ runtime too (it comes
with the ONNX engine inside AgentOS Router). The Windows portable
launcher and the from-source PowerShell installer install this
runtime for you, using winget. The Quick terminal install
(uv tool install) does not do this step. If you see a
DLL load failed error in the logs, install it by hand (see
Troubleshooting). AgentOS still works without
it — it just routes every turn to one single model instead.
Install links: Git · Git LFS · uv.
This is the fastest way to start on Windows. The zip file has its own copy of Python inside, so you don't need to install Python yourself.
- Download the current portable zip: https://github.com/use-agent-os/agent-os/releases/latest/download/AgentOS-windows-x64-portable.zip
- Unzip it into a folder you can write to, like Downloads or
Documents. Then right-click
Start AgentOS.cmdand choose Run as administrator. - Finish the first-time setup. Then open http://127.0.0.1:18791/control/ in your browser.
Note
Preview builds are not signed, so you need to run them as administrator. If Windows SmartScreen shows a warning, click More info, then Run anyway. If your device blocks unsigned apps completely, use Quick terminal install instead.
Advanced portable usage
You can set an OpenRouter key before the first start:
$env:OPENROUTER_API_KEY="sk-..."
Set-ExecutionPolicy -Scope Process Bypass
.\start.ps1
If OPENROUTER_API_KEY is set and there is no config file yet, the
launcher writes a config that points to this key. Then it starts the
gateway right away, with no questions asked. If the key is not set,
the setup wizard asks you to pick a provider.
The portable zip does not add a global agentos command to your
system. If you want a terminal where agentos … works, run
AgentOS Shell.cmd. Or call the launcher directly, like this:
.\agentos.cmd onboard --provider openrouter --api-key-env OPENROUTER_API_KEYThis is the best path for Windows, macOS, and Linux. uv installs
AgentOS in its own space and manages its own Python. You do not need
Python on your system already. This path only installs official
releases. If you want main, other branches, or a local checkout,
use Install from source instead.
1. Install uv. Skip this if uv --version already works for
you.
Linux / macOS:
curl -LsSf https://astral.sh/uv/install.sh | sh
. "$HOME/.local/bin/env"
Windows PowerShell:
powershell -c "irm https://astral.sh/uv/install.ps1 | iex"
$env:Path = "$env:USERPROFILE\.local\bin;" + $env:Path
2. Install AgentOS. This command is the same on every system.
uv tool install --python 3.12 "use-agent-os[recommended]"This installs the latest AgentOS release from PyPI. Then uv
downloads whatever else that install needs. The default
recommended extra brings in local memory embedding's tools, like ONNX
Runtime, NumPy, and tokenizers. So the first install needs internet
access, unless these files are already saved on your computer.
3. Set up and run.
agentos onboard
agentos gateway run
Note
If agentos is not found right after installing with uv, open a
new terminal window. Or run the PATH command from step 1 again.
For an install pinned to one exact version, add ==<version> — for
example uv tool install --python 3.12 "use-agent-os[recommended]==2026.7.14.post1" —
or use the GitHub release wheel link directly:
https://github.com/use-agent-os/agent-os/releases/download/v2026.7.14.post1/use_agent_os-2026.7.14.post1-py3-none-any.whl.
Note
Release install commands use published GitHub release assets.
Python wheel installs use versioned wheel filenames — for example
use_agent_os-2026.7.14.post1-py3-none-any.whl — because the installers validate the
version segment inside the wheel filename, so there is no latest
wheel alias. Only the Windows portable zip has a version-independent
releases/latest/download/ alias.
Use this path to run AgentOS from a Git checkout, without changing
the code. The checkout is just the source the installer reads from.
After install, use the agentos command — do not use uv run. If
you plan to change the code, use
Develop from source instead.
-
Clone the code, with the large files too
git lfs install
git clone https://github.com/use-agent-os/agent-os.git
cd agent-os
git lfs pull --include="src/agentos/memory/models/**"
-
Run the installer
macOS / Linux
bash scripts/install_source.sh
Windows PowerShell
powershell -ExecutionPolicy Bypass -File ./scripts/install_source.ps1
This script installs
.[recommended](AgentOS Router + memory + local models). It usesuv tool install, in its own environment. Ifuvis not there, it falls back topython -m pip install --user. Ifagentosis not found after install, open a new terminal. -
(optional) Install extra features. Most chat channels — Telegram, DingTalk, QQ, WeCom, Slack, and Discord — already work with the base install. These are the extra, opt-in ones:
matrix— Matrix chat channel (addsmatrix-nio)matrix-e2e— Matrix chat channel with end-to-end encryption (needs libolm)document-extras— makes PDFs, using WeasyPrint
AGENTOS_INSTALL_EXTRAS=matrix bash scripts/install_source.sh # macOS / Linuxpowershell -ExecutionPolicy Bypass -File ./scripts/install_source.ps1 -Extras matrix # Windows
-
Set up and run — see Configuration.
Install from source — terminal prerequisites and installer options
Install Git, Git LFS, and uv from a terminal
Windows PowerShell:
winget install --id Git.Git -e
winget install --id GitHub.GitLFS -e
powershell -ExecutionPolicy Bypass -c "irm https://astral.sh/uv/install.ps1 | iex"
git lfs install
macOS (Homebrew):
brew install git git-lfs uv
git lfs install
Debian / Ubuntu:
sudo apt update && sudo apt install -y git git-lfs
curl -LsSf https://astral.sh/uv/install.sh | sh
git lfs install
On Fedora, use sudo dnf install -y git git-lfs. On Arch, use
sudo pacman -S --needed git git-lfs. Then install uv with the
curl command above. After running these installers, PATH changes
only apply in new terminal windows.
Installer environment variables and PATH checks
AGENTOS_INSTALL_PROFILE=core   bash scripts/install_source.sh   # small install, no AgentOS Router
AGENTOS_INSTALL_DRY_RUN=1      bash scripts/install_source.sh   # just show the plan, don't install
To check which agentos your shell is using, run command -v agentos (macOS/Linux) or where.exe agentos (Windows). If it is
not on your PATH, run uv tool update-shell. If you reinstall from
a local checkout, restart the gateway so it uses the new files.
Use this path when you want to change AgentOS's code: writing
changes, running tests, or checking behavior in this checkout. This
is not the normal way to install AgentOS. Unlike
Install from source, this path needs uv:
uv sync builds a .venv folder inside the repo, and uv run runs
commands using the files in this checkout.
uv sync --extra recommended --extra dev
uv run agentos --help
The recommended extra also brings AgentOS Router here. The dev extra
adds the test, lint, and type-check tools. To add more extras to
this same setup:
uv sync --extra recommended --extra dev --extra matrix
uv run agentos channels status matrix --json
In this mode, add uv run before every agentos command shown in
Configuration. Do not test a development checkout
through a normal, user-installed agentos command — that command
uses a different Python setup.
agentos onboard is the wizard you run the first time. It writes
your config file. It keeps provider secret keys as environment
variables, if you pass --api-key-env. The router is set to
recommended by default (this means AgentOS Router, on the providers it
supports). Pass --router disabled if you want one single model
with no routing.
agentos onboard                # full interactive wizard
agentos onboard --if-needed    # safe to run again; does nothing if already set up
agentos onboard --minimal      # only sets the provider; skips channels and search
agentos onboard status         # shows every setup section, but changes nothing
If you are using SSH, CI, or any place without a normal terminal screen, use the non-interactive form. Keep the secret key as an environment variable, and pass its name — not the key itself:
Linux / macOS
export OPENROUTER_API_KEY="sk-..."
agentos onboard --provider openrouter --api-key-env OPENROUTER_API_KEY
Windows PowerShell
$env:OPENROUTER_API_KEY="sk-..."
agentos onboard --provider openrouter --api-key-env OPENROUTER_API_KEY
OpenRouter is just one example — you can use any supported provider and its own API key variable instead.
You can change one part of the setup later, without doing the whole wizard again. (These examples assume you already have the API key set as an environment variable.)
agentos configure provider --provider openai --model gpt-4o --api-key-env OPENAI_API_KEY
agentos configure router --router recommended
agentos configure search   --search-provider brave --api-key-env BRAVE_SEARCH_API_KEY
agentos configure channels
Sections: provider, router, channels, search,
image-generation, memory-embedding. The Web UI shows the same
options at /control/setup. Provider and Router are the two main
ones to set up first. Channels, Search, Image generation, and Memory
embedding are in the Capability Center — you can set these up later.
If you leave channels empty, that's fine — it just means you chose
not to use them.
Config file order: AgentOS checks these one after another, and
uses the first one it finds: AGENTOS_GATEWAY_CONFIG_PATH →
./agentos.toml → ~/.agentos/config.toml → its own
built-in defaults. But secret values set as environment variables
always win over anything in a file.
If you already have data in ~/.openclaw or ~/.hermes, run a dry
run first. This shows you a report without changing anything. Then
run it again to actually apply the changes:
agentos migrate openclaw --json
agentos migrate openclaw --apply

agentos migrate hermes --json
agentos migrate hermes --apply
Use agentos migrate --source openclaw,hermes --apply to bring in
data from both at once. Only add --migrate-secrets after you have
checked the dry-run report. See MIGRATION.md for
custom paths and how conflicts are handled.
agentos gateway run                # runs in this terminal, at 127.0.0.1:18791
agentos gateway start --json       # runs in the background, waits until healthy
agentos chat                       # opens an interactive chat in your terminal
agentos agent -m "your prompt"     # runs one task and stops; good for scripts
Open the Web UI at http://127.0.0.1:18791/control/. The Health page shows if AgentOS is ready, what is not ready yet, and what to do next. From the CLI, you can run:
agentos doctor
agentos doctor --json
agentos doctor --config ./agentos.toml --json
/health and /healthz are simple checks — they just say if the
process is alive. agentos doctor and the Web UI Health page check
much more: your provider setup, memory, logs, search, channels,
sandbox safety, router, image generation, and how to fix problems.
Press Ctrl+C to stop a gateway that is running in your terminal.
Other command groups include sessions, skills, memory,
migrate, cron, channels, providers, models, and cost. Run
agentos --help or agentos <group> --help to see more.
Advanced configuration — verify a channel, public network binding, Docker
Connect and check a messaging channel
Saving a channel's settings does not mean it is actually connected and working. After you change channel settings, restart the gateway. Then check the real, live status:
agentos gateway restart
agentos channels status <name> --json
Only treat a channel as connected when the status shows
enabled=true, configured=true, and connected=true. Discord
uses websocket mode by default, Telegram uses polling, and Slack can
use Socket Mode — none of these need a public URL. Telegram webhook
mode, Slack webhook mode, and WeCom do need a public URL that the
provider can reach.
Public network binding
To open the Web UI from another computer, bind the gateway to all network interfaces, and use this computer's public IP address:
agentos gateway run --listen 0.0.0.0 --port 18791To let other computers in, you also need to open this port in your
firewall or cloud security settings. Do not run the gateway with
[auth] mode = "none" while doing this — set up token login first,
before you bind to 0.0.0.0.
Docker
The Docker Compose setup runs an agentos:local image that you
build yourself. Build it from a source checkout, after pulling the
Git LFS embedding-model files (see Install from source
for the clone and git lfs pull steps):
docker build -t agentos:local ../start.sh (or start.ps1 on Windows) then runs docker compose up -d and shows the gateway logs. Docker means you don't need
Python installed on your computer — but you still need to build the
image locally first.
Provider tiers, sandbox settings, image generation, and concurrency
settings are all in agentos.toml.example.
| Capability | What it does |
|---|---|
| Token-efficient routing | AgentOS Router defaults to v4_phase3, a small local AI model (BGE embeddings + LightGBM; the recommended extra installs its runtime dependencies) that looks at each message — its length, language, code, keywords, and meaning — and picks one of four levels (c0–c3), then routes it to the cheapest model that can still do the job well. This check runs on your own device, so your message never has to leave your computer just to make this choice. The ~75MB model bundle is not distributed yet; without it the router falls back to a single tier, so pick the llm_judge strategy instead (a small LLM call, optionally a local Ollama/LM Studio endpoint) for per-turn routing with no local model files. Choose either in onboarding. |
| Adaptive reasoning and prompts | AgentOS only asks for deep, extended thinking when the router sees the message is hard. The system instructions also grow to match: short and simple for easy messages, full and detailed for hard ones. |
| 20+ LLM providers | AgentOS can talk to 20+ AI providers — OpenRouter (used by default), the Bankr LLM Gateway, OpenAI, Anthropic, Ollama, DeepSeek, Gemini, DashScope/Qwen, Moonshot, Mistral, Groq, Zhipu, SiliconFlow, vLLM, LM Studio, and more. It picks a main provider first, with backups ready if needed. The first-time setup shows you the providers that are fully tested. |
| On-demand skills and MCP | AgentOS comes with 37 built-in skills (coding, GitHub, cron jobs, pptx/docx/xlsx/pdf files, summaries, tmux, weather, and more). Each skill only loads when a task actually needs it. AgentOS can use other MCP tools, and can also act as an MCP tool for others — agentos mcp-server run needs the mcp extra (install with use-agent-os[recommended,mcp]). You can write, install, and share your own skills from the CLI. |
| Persistent local memory | AgentOS remembers things between sessions, using a main MEMORY.md file plus dated notes in Markdown. You can search this memory two ways: by keyword (SQLite full-text search) or by meaning (sqlite-vec). The meaning search runs on your device using a built-in ONNX model, or you can switch to OpenAI or Ollama instead. There are optional extra features too: old memories can slowly fade, and a "dream" mode can clean up and merge memories (you must turn this on yourself). |
| Layered security sandbox | There are three safety levels: Standard, Strict, and Locked. Each one controls what tools are allowed to do. On Linux, Bubblewrap keeps code running in its own safe space. On macOS, this job is done by sandbox-exec (Apple's Seatbelt). Windows does not have this sandbox yet. If AgentOS is denied the same action too many times in a row, it pauses itself automatically and does not keep trying. Any blocked output is deleted right away. Skill details and tool results are also cleaned (escaped) so they can't trick the AI into doing something unsafe. |
| Built-in tools | AgentOS can read, write, and edit files; run shell commands and background tasks; use git; search the web (with Brave or DuckDuckGo) and fetch pages safely (blocking unsafe internal network requests); create spreadsheets, PPTX, and PDF files; generate images; and turn text into speech. |
| Unified gateway | One local web server (built with Starlette) runs at 127.0.0.1:18791. It uses WebSockets and has a built-in control page at /control/. The Web UI, the CLI, and every chat channel — Terminal, WebSocket, Slack, Telegram, Discord, DingTalk, WeCom, Matrix, and QQ — all share one single TurnRunner engine underneath. |
| Durable sessions, subagents, and scheduling | Sessions, chat history, and replay data are all saved in SQLite, and each agent gets its own workspace folder. An agent can start smaller "subagent" helpers, up to a limited depth. A SchedulerEngine, with its own built-in cron reader, runs jobs on a schedule through agentos cron. |
| Operator controls | A person can review and approve risky tool calls before they run. You can see how many tokens and how much cost each turn and each session used, with agentos cost. More diagnostic tools are available from both the CLI and the Web UI. |
Windows: DLL load failed / Visual C++ runtime
If the startup log shows DLL load failed while importing onnxruntime_pybind11_state, AgentOS still works — but the built-in
local memory embedding (the on-device ONNX model) stays off and
memory falls back to keyword search until you install the Visual C++
Redistributable for Visual Studio 2015–2022 (x64).
The Windows portable launcher and the from-source PowerShell
installer both try to install this for you, using winget. If you
used Quick terminal install, or if winget is not available on your
computer, install it yourself and then restart PowerShell:
https://aka.ms/vs/17/release/vc_redist.x64.exe.
After that, restart the gateway:
agentos gateway restartAgentOS took ideas from
OpenClaw. Other tools and
code used inside AgentOS are credited in
THIRD_PARTY_NOTICES.md.
We welcome all kinds of help — bug reports, new ideas, better docs,
new provider or channel support, new skills, and core code work. See
CONTRIBUTING.md, then open an issue or pull
request on
GitHub.
Code of Conduct · Security · Support · License (MIT)