Software Setup
Software and firmware setup after you have the parts. For physical build steps, see Hardware Assembly.

Watch on YouTube — Flashing Raspberry Pi OS & Setup Guide
- Download Raspberry Pi OS (64-bit) with desktop from raspberrypi.com/software.
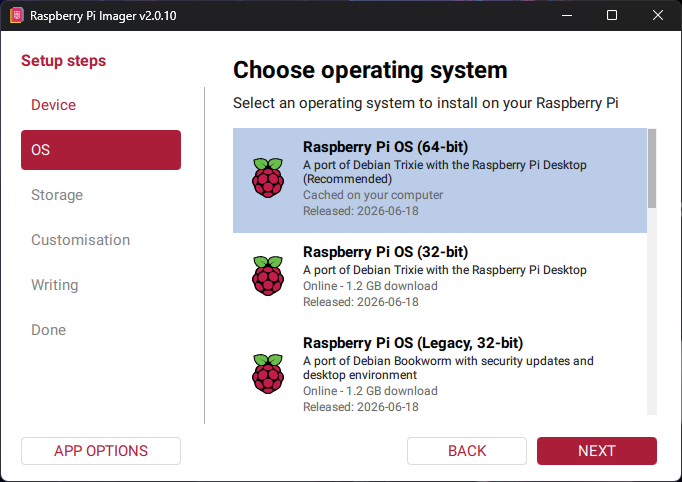
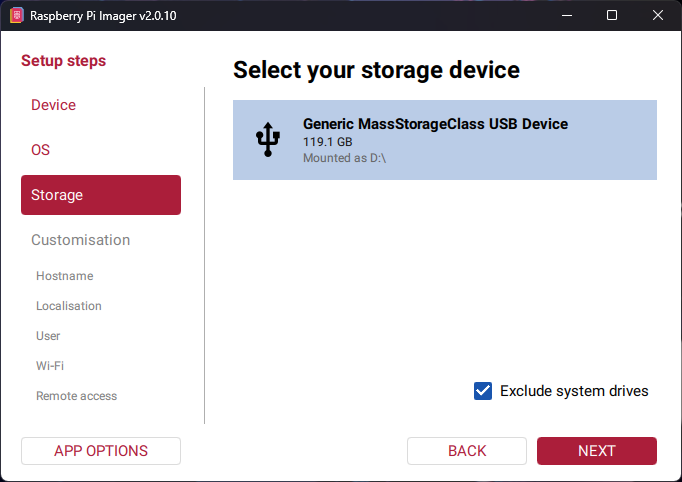
- Flash to the microSD card with Raspberry Pi Imager.
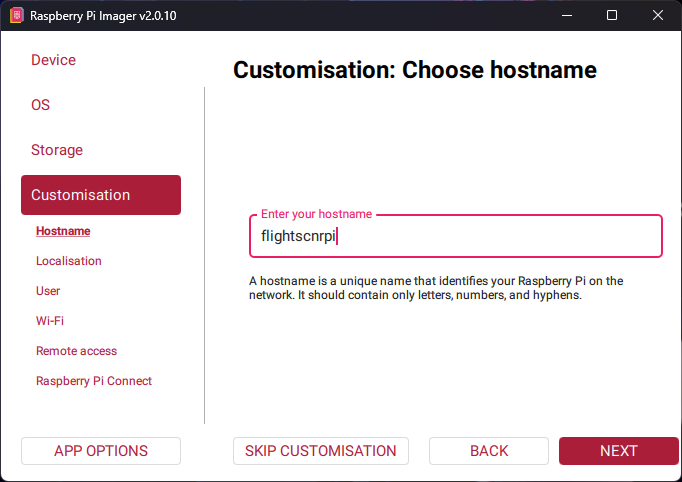
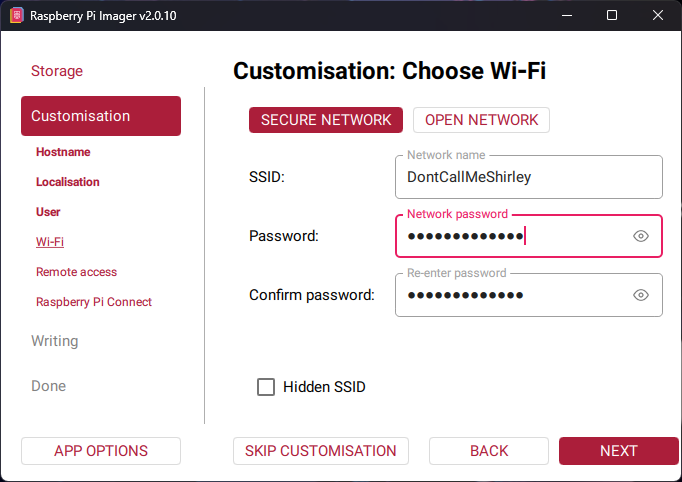
- In Imager OS customisation (recommended for first install): set hostname, enable SSH, set locale/time zone, and optionally configure Wi‑Fi so the Pi can download packages during install. You can also use Ethernet for the install step.
- Insert the card and boot. Confirm you can reach the Pi (SSH or desktop) before mounting the display.
Step-by-step: flashing with Raspberry Pi Imager (screenshots)





- Power off the Pi and disconnect USB-C power.
- Secure the display to the Pi with the included standoffs and screws.
- Connect the DSI ribbon cable between the round display board and the Pi’s DSI port (on Pi 4, the DSI connector above the micro SD card).
- If your board has an I2C address DIP switch, leave it in the factory position.
Full enclosure steps will live on Hardware Assembly.
On the Pi, edit the boot config.txt (not in the FlightScnr repo):
| Raspberry Pi OS | Path |
|---|---|
| Older releases | /boot/config.txt |
| Bookworm+ | typically /boot/firmware/config.txt
|
Add these lines:
dtoverlay=vc4-kms-v3d
#DSI1 Use
dtoverlay=vc4-kms-dsi-waveshare-panel,4_0_inchC
#DSI0 Use
#dtoverlay=vc4-kms-dsi-waveshare-panel,4_0_inchC,dsi0
On Pi 4, use the DSI1 line as shown. On Pi 5 / Compute Module, if the screen stays blank, comment out the DSI1 overlay and uncomment the DSI0 line instead.
Reboot and confirm the desktop fills the round panel and touch works:
sudo rebootgit clone https://github.com/yashmulgaonkar/FlightScnr_Pi.git ~/FlightScnr_Pi
cd ~/FlightScnr_Pi
sudo bash install-pi.shThis installs system packages, creates flightscnr-venv/, downloads UI assets (fonts, weather icons, aircraft icons), extracts airline logos from logo.zip, creates config.h from config.h.example, creates /var/lib/flightscnr/, writes /etc/flightscnr.env, and registers the flightscnr systemd service.
What the installer also does (current builds):
- Forces the desktop to X11 (LightDM Pi X11 session) so pinch-to-zoom can receive multi-touch; reboots automatically when that switch is pending
- Hides Openbox title / menu chrome for an edge-to-edge round kiosk UI
- Forces the Waveshare panel to 720×720
- Enables the enclosure cooling fan via the kernel
gpio-fanoverlay (GPIO 14, on at 60°C) - Disables Wi‑Fi IEEE 802.11 power save on NetworkManager profiles (wall-powered kiosk / hotspot reliability)
- Enables Bluetooth (
rfkillunblock +bluetooth.service) for speaker pairing - Leaves local dump1090 disabled by default (
DUMP1090_ENABLED=False) until you turn it on in the portal - Works for non-
piusernames on install / OTA
For optional ATC audio / Bluetooth speakers it also pulls in packages such as mpv, bluez, libspa-0.2-bluetooth, and pulseaudio-utils when available. The service is configured to use the desktop user’s pipewire-pulse session even though FlightScnr runs as root.
The installer also suppresses Raspberry Pi OS Bluetooth popups that can steal fullscreen focus. On Wayland it explicitly removes the wf-panel-pi Bluetooth widget and disables panel notifications; on older desktops it removes the lxpanel Bluetooth plugin. An unwritable legacy panel config now produces a warning instead of aborting installation. You can install the audio packages manually with:
sudo apt install mpv bluez libspa-0.2-bluetooth pulseaudio-utilsUpgrading from older builds: one portal Update Now is usually enough. If an OTA pulled a newer installer but did not finish, use Finish install (or let auto-resync run after reboot). If stuck on 2026.8.5.x, see Updates and Troubleshooting.
FlightScnr can bring up its own setup hotspot when the Pi has no Ethernet and no usable client Wi‑Fi (no saved profiles, or a saved SSID that never connects - e.g. you moved the Pi to a new network). The round display shows a FlightScnr Pi QR screen.
- On the display, scan the QR code with your phone (or join the
FlightScnr-Setup-XXXXnetwork and enter the on-screen password). - Your phone should open the captive portal automatically; if not, go to
http://10.42.0.1/wifi(NetworkManager’s default hotspot gateway). - Pick your home Wi‑Fi, enter the password, and tap Connect.
- The setup hotspot turns off and the display leaves the QR screen for the normal radar UI.
Notes
- Installing FlightScnr the first time still needs network access (apt / pip / git) - use Imager Wi‑Fi or Ethernet for
install-pi.sh, then use the QR flow later if you change networks. - To force the QR screen for testing: add
FLIGHTSCNR_FORCE_WIFI_SETUP=1to/etc/flightscnr.envand restart (sudo systemctl restart flightscnr). Remove that line when finished. - To skip setup entirely:
FLIGHTSCNR_SKIP_WIFI_SETUP=1.
| Check | How |
|---|---|
| Radar fills the circle | Display should show the radar UI on boot |
| Touch | Tap an aircraft → flight detail; swipe down → clock |
| Pinch zoom | Two-finger pinch on radar changes range |
| Web portal | Open http://raspberrypi.local from another device on the LAN |
| Wi‑Fi setup (optional) | With no client Wi‑Fi, display shows QR; phone joins and configures home network |
| Logs | sudo journalctl -u flightscnr -f |
If touch or pinch-zoom misbehaves, see Troubleshooting.
Easiest: open the web portal → API Keys → enter FR24_API_KEY and TOMORROW_API_KEY → Save & restart.
Or edit config.h in the project folder:
nano ~/FlightScnr_Pi/config.h
sudo systemctl restart flightscnr
Without FR24_API_KEY, the app still runs using adsb.fi only (radar positions and basic tags - no routes or rich detail screens). Set ADSB_ENABLED=True and your home location. See config.h.example and .env.example for all options.
Optional next steps in the web portal:
- Favorite Locations - save common radar centers (swipe left on radar to cycle)
- ATC Audio / Bluetooth Speaker - LiveATC to USB or BT
- Display & screens - radar clock HUD, chime, and optional earthquake voice
- Radar - map style (incl. Dark Flat), wildfires, earthquakes, tag leaders
- Route Sources / Position Sources - enrichment and Follow / Live fallbacks
- System → Download settings - backup preferences (includes API keys)
API and feed details: Data Sources.
