Release Testing Instructions WooCommerce 5.1
WooCommerce 5.1 includes:
-
WooCommerce Admin Updates:
- Correct the Klarna slug #6440
- Refactor panel with withFocusOutside #6233
- Add the Mollie payment provider setup task
- Fix: allow for more terms to be shown for product attributes in the Analytics orders report
- Add: new inbox message - Getting started in Ecommerce - watch this webinar
- Update: store deprecation welcome modal support doc link
- Enhancement: Allowing users to create products by selecting a template
- Update: Homescreen layout, moving Inbox panel for better interaction
- Enhancement: Use the new Paypal payments plugin for onboarding
- WooCommerce Product Blocks Updates:
-
WooCommerce Core Updates:
- Use tax location from order while computing tax in discount
- Adjust spacing and font sizes for Twenty Twenty-One
- Flush term cache when saving product and settings closes
- Fix price filtering when there are variations
- Defer nonce creation until displayed by WC Admin
- Test WooCommerce Core critical flows with WooCommerce Admin functionality disabled
2.0.2:
Please download WooCommerce Admin plugin v 2.0.2 in order to test this use case. If you are testing on the brand new site, upon activating WooCommerce, skip the onboarding, install and activate the WooCommerce Admin plugin and proceed with testing instructions below.
- Set up a new store with a UK address so that Klarna available as a payment processor
- Go to the "Choose payment methods" task item
- Set up Klarna. The plugin will install.
- Click Continue. It should take you back to the payment methods page - previously it wasn't doing anything but a console error was displayed.
Please download WooCommerce Admin plugin v 2.0.2 in order to test this use case. If you are testing on the brand new site, upon activating WooCommerce, skip the onboarding, install and activate the WooCommerce Admin plugin and proceed with testing instructions below.
- Go to WooCommerce home page
- Click on Display and Help button back and forth, check that the popover and the panel close as expected.
- Check that the setup store tab continues to work.
2.0.1:
- You'll need a site that has the setup task list visible. Complete the OBW and make sure you're in a Mollie supported country (Such as United Kingdom).
- Go to the setup payments task
- Mollie should be listed as an option
- Click "Set up" button on the Mollie task
- It should install and activate the mollie payments plugin
- The connect step should provide links to create an account or go straight to Mollie settings. (test both links work)
- Click "continue"
- You should arrive back at the payment provider list
- Create a product attribute
- Give the attribute more than 10 terms
- Go to Analytics -> Orders
- Add an attribute filter to the list, choose your attribute.
- Go to the second input field and click on it, a result set of all your terms should appear
- First you'll need to make sure you meet the criteria for the note:
- Onboarding (Setup Wizard) is done
- revenue is between 0-2500
- do not check "setting up for client" during onboarding
- store should have no products
- Next you need to install and activate WP Crontrol plugin, go to its list of cron events and click "run now" on "wc_admin_daily"
- Confirm the new note is displayed and that the content matches that specified below:
- Title: Getting Started in eCommerce - webinar
- Copy: We want to make eCommerce and this process of getting started as easy as possible for you. Watch this webinar to get tips on how to have our store up and running in a breeze.
- CTA leads to: https://youtu.be/V_2XtCOyZ7o
- CTA label: Watch the webinar
- Starting with a fresh store (or by deleting the woocommerce_task_list_welcome_modal_dismissed option), visit /wp-admin/admin.php?page=wc-admin. You should see the standard welcome modal.
- Add &from-calypso to the URL. You should see the Calypso welcome modal.
- Notice "Learn more" links to https://wordpress.com/support/new-woocommerce-experience-on-wordpress-dot-com/
- Load new store and finish the Wizard
- Go to the
Add my productstask - Click the
Start with a templateoption, and select either a physical, digital, variable product - Once you click
Go, it should redirect you to an edit page of the new post, with the data from the sample-data.csv (mentioned in the original ticket). Only the title is missing, as it is saved as auto-draft. - You should be able to save the new product as draft or publish it.
- You should be able to exit without making any changes, and not having the product show up as draft in your product list.
- Create new product from template
- Wait until redirected
- Without saving go to the Products > all products page, the new product should not be displayed.
- Create a new woo store, and finish the onboarding wizard.
- Go to the home screen, and make sure the panels follow this order:
- Two column:
- Left column: store setup and/or management tasks + inbox panel
- Right column: stats overview + store management shortcuts (only shows when setup tasks is hidden)
- Single column:
- store setup tasks, inbox panel, stats overview, store management links (only visible when setup tasks is hidden).
- Hide the setup tasks list, and see if the store management links show up in the right place.
Please note that the testing instructions below work only if you have access to LIVE PayPal credentials. If you don't, feel free to skip it.
- Create new woo store, and finish the onboarding wizard
- Go to the home screen, and click the Set up payments task. Paypal Payments option should be listed as an option, with a Set up button.
- Click Set up on the Paypal plugin.
- It should automatically start the Install step, and install and enable the Paypal Payments plugin.
- For Paypal Payments version greater then
1.1.0, this might not be released yet at time of testing, here is the zip with the dependent changes- For the second step it should show a
Connectbutton - Click on Connect and a window should popup for Paypal, follow this until finished. The last button is - Go back to Woocommerce Developers
- Once done, the page should reload, and briefly show the setup screen again, it should then finish and go back to the payment list.
- Once on the payment list, the
Set upbutton should be gone, and instead show a toggle, that is set to enabled.- The enable/disable button should be correctly reflected in the Woocommerce payment settings screen as well.
- For the second step it should show a
- For Paypal Payments version
1.1.0and below- For the second step it will show the manual fields (merchant email, merchant id, client id, client secret).
- Check if the help links work below, they should help with finding the above credentials.
- If you have a business account set up, you can find the credentials in these two places
- Get live app credentials
- Merchant id
- Fill in the credentials and click Proceed, this should succeed and redirect you to the Payment options list
- The Set up button should be replaced by a toggle, that is set to enabled.
- The enable/disable button should be correctly reflected in the Woocommerce payment settings screen as well.
Once everything is configured and enabled do a client test
- Make sure you have added a product and store homescreen (Finish the Personalize my store task)
- Navigate to one of the products and add it to the cart
- Click go to checkout
- Paypal should be one of the options to pay
- Filling in your billing/shipping info then click pay with Paypal
- The paypal pay window should pop up correctly without errors.
When using the testing instructions below, test only those cases presented in the section called "Feature plugin and package inclusion in WooCommerce core". There is no need to test cases in the "Feature plugin only" section since they are not a part of WooCommerce Core.
Feel free to skip the following cases in the testing instructions below: Set correct text color in BlockErrorBoundry notices. #3738.
Feel free to skip the following cases in the testing instructions below: add fallback screen reader styles, Hide elements that use 'hidden' attribute and Fix select inputs when dark mode is enabled in Twenty Twenty-One.
Use tax location from order while computing tax in discount (26983)
- Set price inclusive of taxes and any rate for a specific country other than your shop base address.
- For example: the shop's base address could be set to the US, and then enter a tax rate for another country, such as
25%for India, making sure that there is no other tax applied like so:
- Add a coupon for
10%and add a product for a price of242. (This could be any price -- if it's different then modify numbers in next step accordingly). - Complete an order for this product as a guest user in an incognito window or different browser. Make sure to use an address for the other country (such as India from the example in step 1 above).
- Open the order in the
WooCommerce > Ordersview, and set the order status to Pending Payment and click "Update". - Add the coupon. Note that previously, before this fix, the discount will be calculated on the final amount instead of the pre-tax amount (so the discount will be more than it should be). With this fix, the discount will be calculated before taxes are applied.
- In above case, with this fix, the discount should be 19.36 (193.6 at 10%), whereas before this change, the discount would have been 24.20 (242.2 at 10%).
Adjust spacing and font sizes for Twenty Twenty-One (28827)
- Set the default theme for the store to Twenty Twenty-One under
Appearance > Themes - Make sure the Shop, Cart, Checkout, and My Account default WooCommerce pages have been created
- Create another (non-default WooCommerce page)
- Add products to the store
- Open the link to the store and navigate through the product pages, viewing product details and making sure everything looks okay
- Open the My Account page and navigate through the various sections, making sure the pages look okay
- Open the page created in step 3 and verify that the page looks okay
- Add a product to the cart, and verify the shopping cart looks okay
- Continue the checkout flow, and make sure the checked out page (address fields and payment options, for example) all look okay
Flush term cache when saving product and settings closes (28974)
Testing instructions below require the use of WooCommerce widgets. If you need a refresher on what they are, please refer to Widgets included with WooCommerce.
- Add the Product Categories widget to your site. Enable show counts option.
- Make sure to have a hand full of products that belong to a category that is listed in that widget.
- For couple of the products, set the stock level to out of stock and save the product.
- Go back to the frontend shop page and ensure the widget shows the product count correctly.
- Go to your
WooCommerce > Settings > Products > Inventoryand setHide out of stock items from the catalogto enabled. - Go back to the frontend shop page and ensure the widget shows the product count correctly. Should show less than in step 5 as now it suppose to hide the product from catalog if it is out of stock.
- Disable
Hide out of stock items from the catalogsetting and save. - Go back to the frontend shop page and ensure the widget shows the product count correctly.
Fix price filtering when there are variations (29043)
Testing instructions below require the use of WooCommerce widgets. If you need a refresher on what they are, please refer to Widgets included with WooCommerce.
- Create a Variable Product having two variations, with prices
1000and1200. - Install the Price Filtering widget
- Try filtering on the following combinations of minimum and maximum price:
| Minimum | Maximum |
|---|---|
| 0 | 950 |
| 0 | 1000 |
| 0 | 1050 |
| 1000 | 1100 |
| 1050 | 1100 |
| 1050 | 1300 |
| 1200 | 1300 |
| 1250 | 1300 |
- The product should not be listed when filtering on
0, 950and on1200, 1300. In all the other cases it should be listed.
- Note: if you don't have products with a price higher than 1220 you won't be able to test the for the last three combinations.
Defer nonce creation until displayed by WC Admin (28500)
- Install WooCommerce 4.4.0 (the 4.4.0 version of
woocommerce.zipcan be downloaded from https://github.com/woocommerce/woocommerce/releases/tag/4.4.0) - Using the WooCommerce Beta Tester plugin, upgrade WooCommerce to version 5.1
- Ensure you're able to click on the
Update WooCommerce databasebutton without errors and you're able to see the process started to run. - After it is done, you should see another banner/notice
WooCommerce database update done. When you see this open another browser or incognito mode and login as the same admin user so you have two concurrent sessions going. - For the second user navigate to
WooCommerce > Home. Ensure you also see the same banner/notice WooCommerce database update done. - Go back to your first user session and now click on the
Thanks!dismissal button. - Ensure the banner goes away after clicking. If it doesn't work the first time, try one more time after refresh and it should now go away. You shouldn't have to reload the page more than twice for it to go away.
- Navigate to other WooCommerce pages and ensure that banner/notice does not reappear anywhere in either sessions
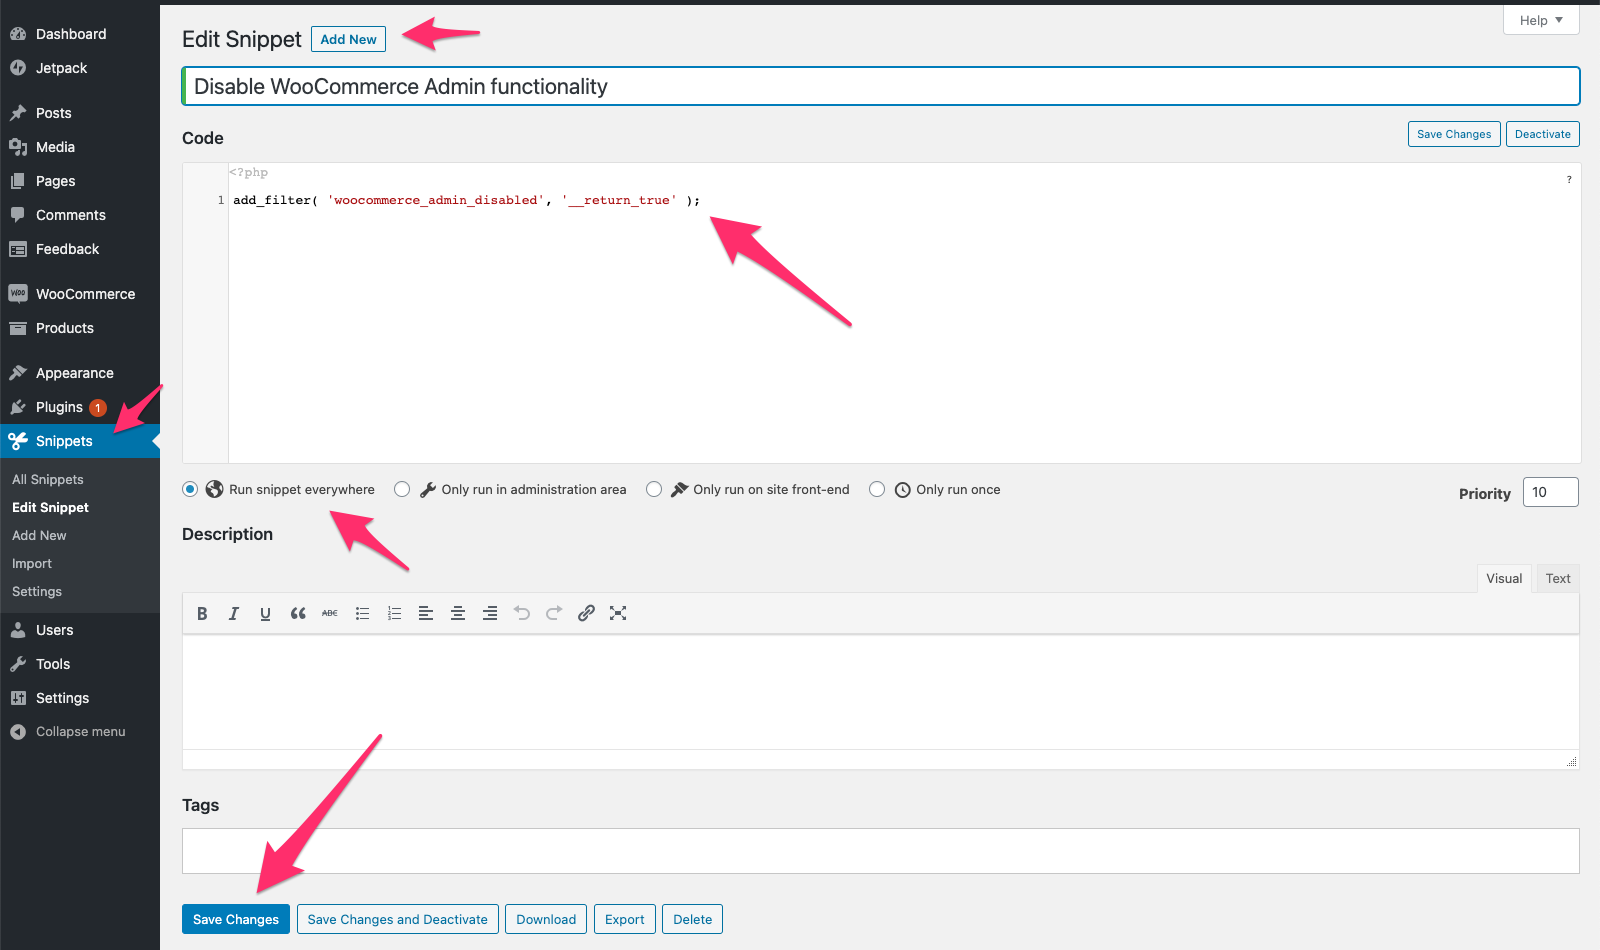
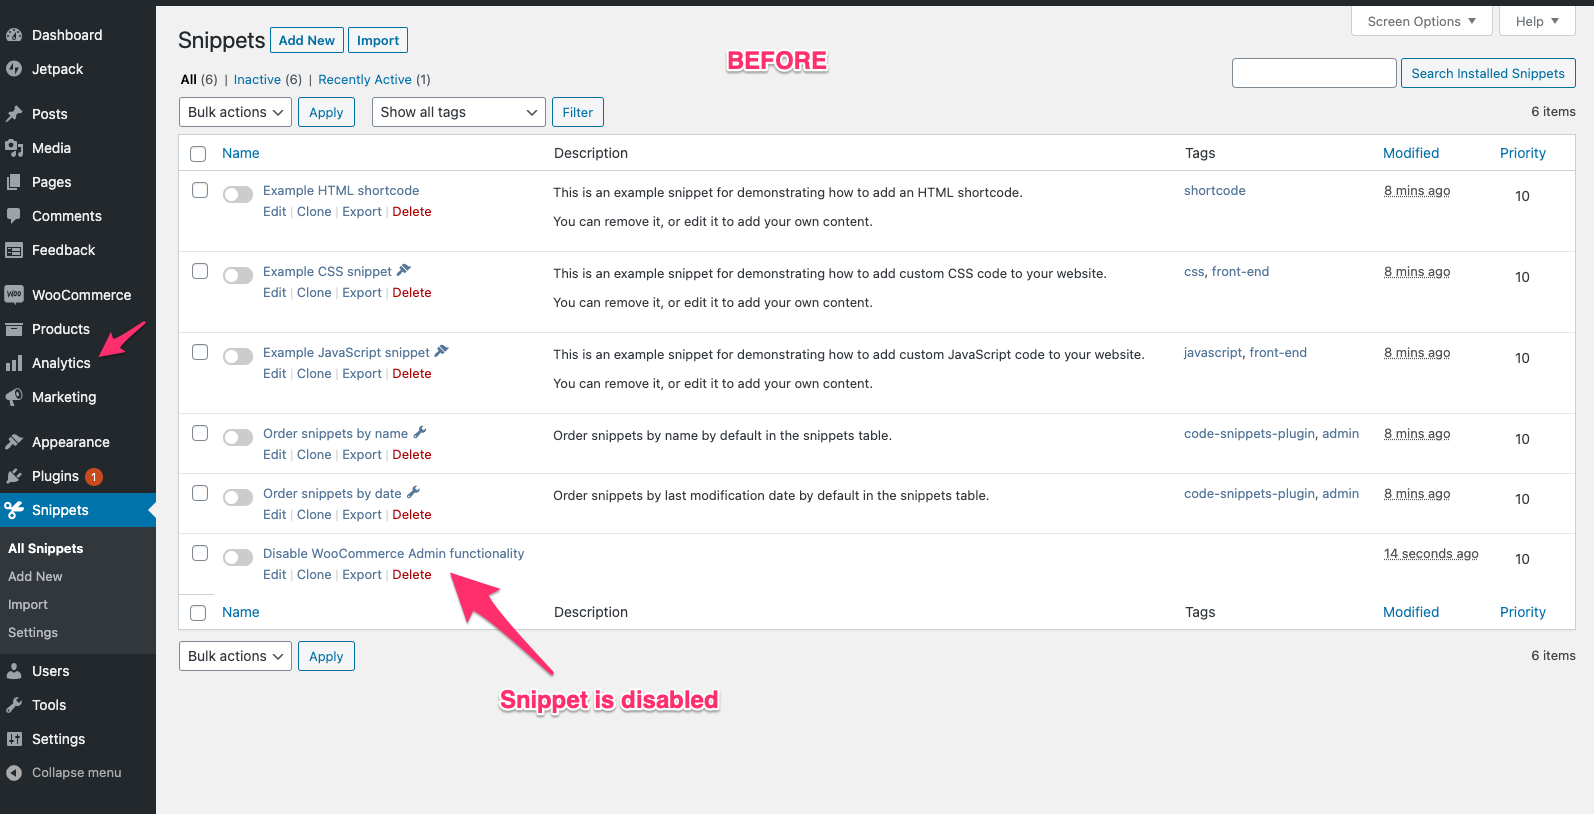
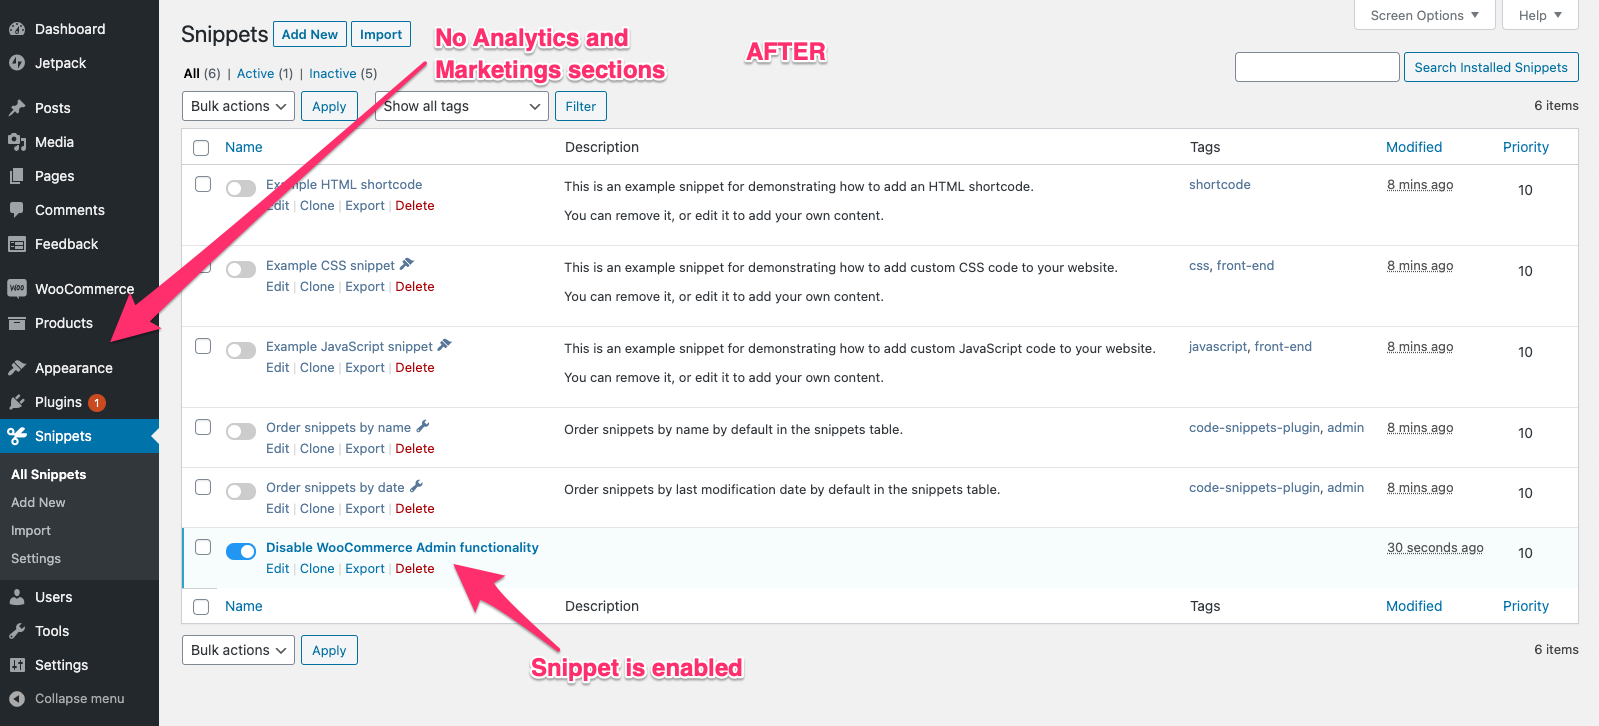
- Install and activate Code Snippets plugin.
- Add a new snippet with the following line of code:
add_filter( 'woocommerce_admin_disabled', '__return_true' );:
- Confirm that you no longer see the
AnalyticsandMarketingsections:
- Test WooCommerce Critical Flows to ensure that the basic functionality is still working.