Release Testing Instructions WooCommerce 7.0
WooCommerce 7.0 includes:
WooCommerce Blocks Updates #34654
Slack Workflow: WooCommerce Product Blocks
Blocks 8.4.0 Testing instructions
Blocks 8.5.0 Testing instructions
Slack Workflow: WooCommerce Core
- Make sure your site is on a timezone other than UTC +0.
- Go to the new order screen, and click on create to publish a new order (no need to add any details).
- Order created date will stay the same.
Slack Workflow: WooCommerce Marketplace
- Go to WooCommerce Settings > Advanced > Features page. You should see the new Marketing option checkbox, which should be disabled by default.

- Open another tab and go to the Marketing page: /wp-admin/admin.php?page=wc-admin&path=%2Fmarketing. You should see the normal marketing page.
- Check the new Marketing option checkbox and save, and then reload the Marketing page. You should see the new beta marketing page.
Slack Workflow: WooCommerce Marketplace
📹 Demo video : https://user-images.githubusercontent.com/417342/181312100-54783465-b740-4546-b4e4-ba437c7c288b.mov
- Enable the new Marketing experience in
/wp-admin/admin.php?page=wc-settings&tab=advanced§ion=features. - Go to the Marketing > Overview page in
/wp-admin/admin.php?page=wc-admin&path=%2Fmarketing. You should see the "Installed extensions" card. - The card should be expanded by default. You should be able to collapse / expand the card by clicking on the toggle button in the top right corner of the card.
- Each plugin should have a button:
- Plugins that are installed but not yet activated should have an "Activate" button. Clicking on it will activate the plugin.
- Plugins that are activated but not yet configured should have a "Finish setup" button. Clicking on it will bring you to the settings URL.
- Plugins that are activated and configured should have a "Manage" button. Clicking on it will bring you to the plugin dashboard URL or settings URL.
"Learn about marketing a store" card
- The "Learn about marketing a store" card should be collapsed by default.
- Expand the card.
- When blog posts is loading, there should be a loading indicator.
- When there is an error in retrieving the blog posts, there should be an error message.
- When there are no blog posts, there should be a message indicating "No posts yet".
- When blog posts are loaded successfully, they should be displayed in the card, with two posts in one page. You should be able to page through them by clicking on the pagination component in the card footer.

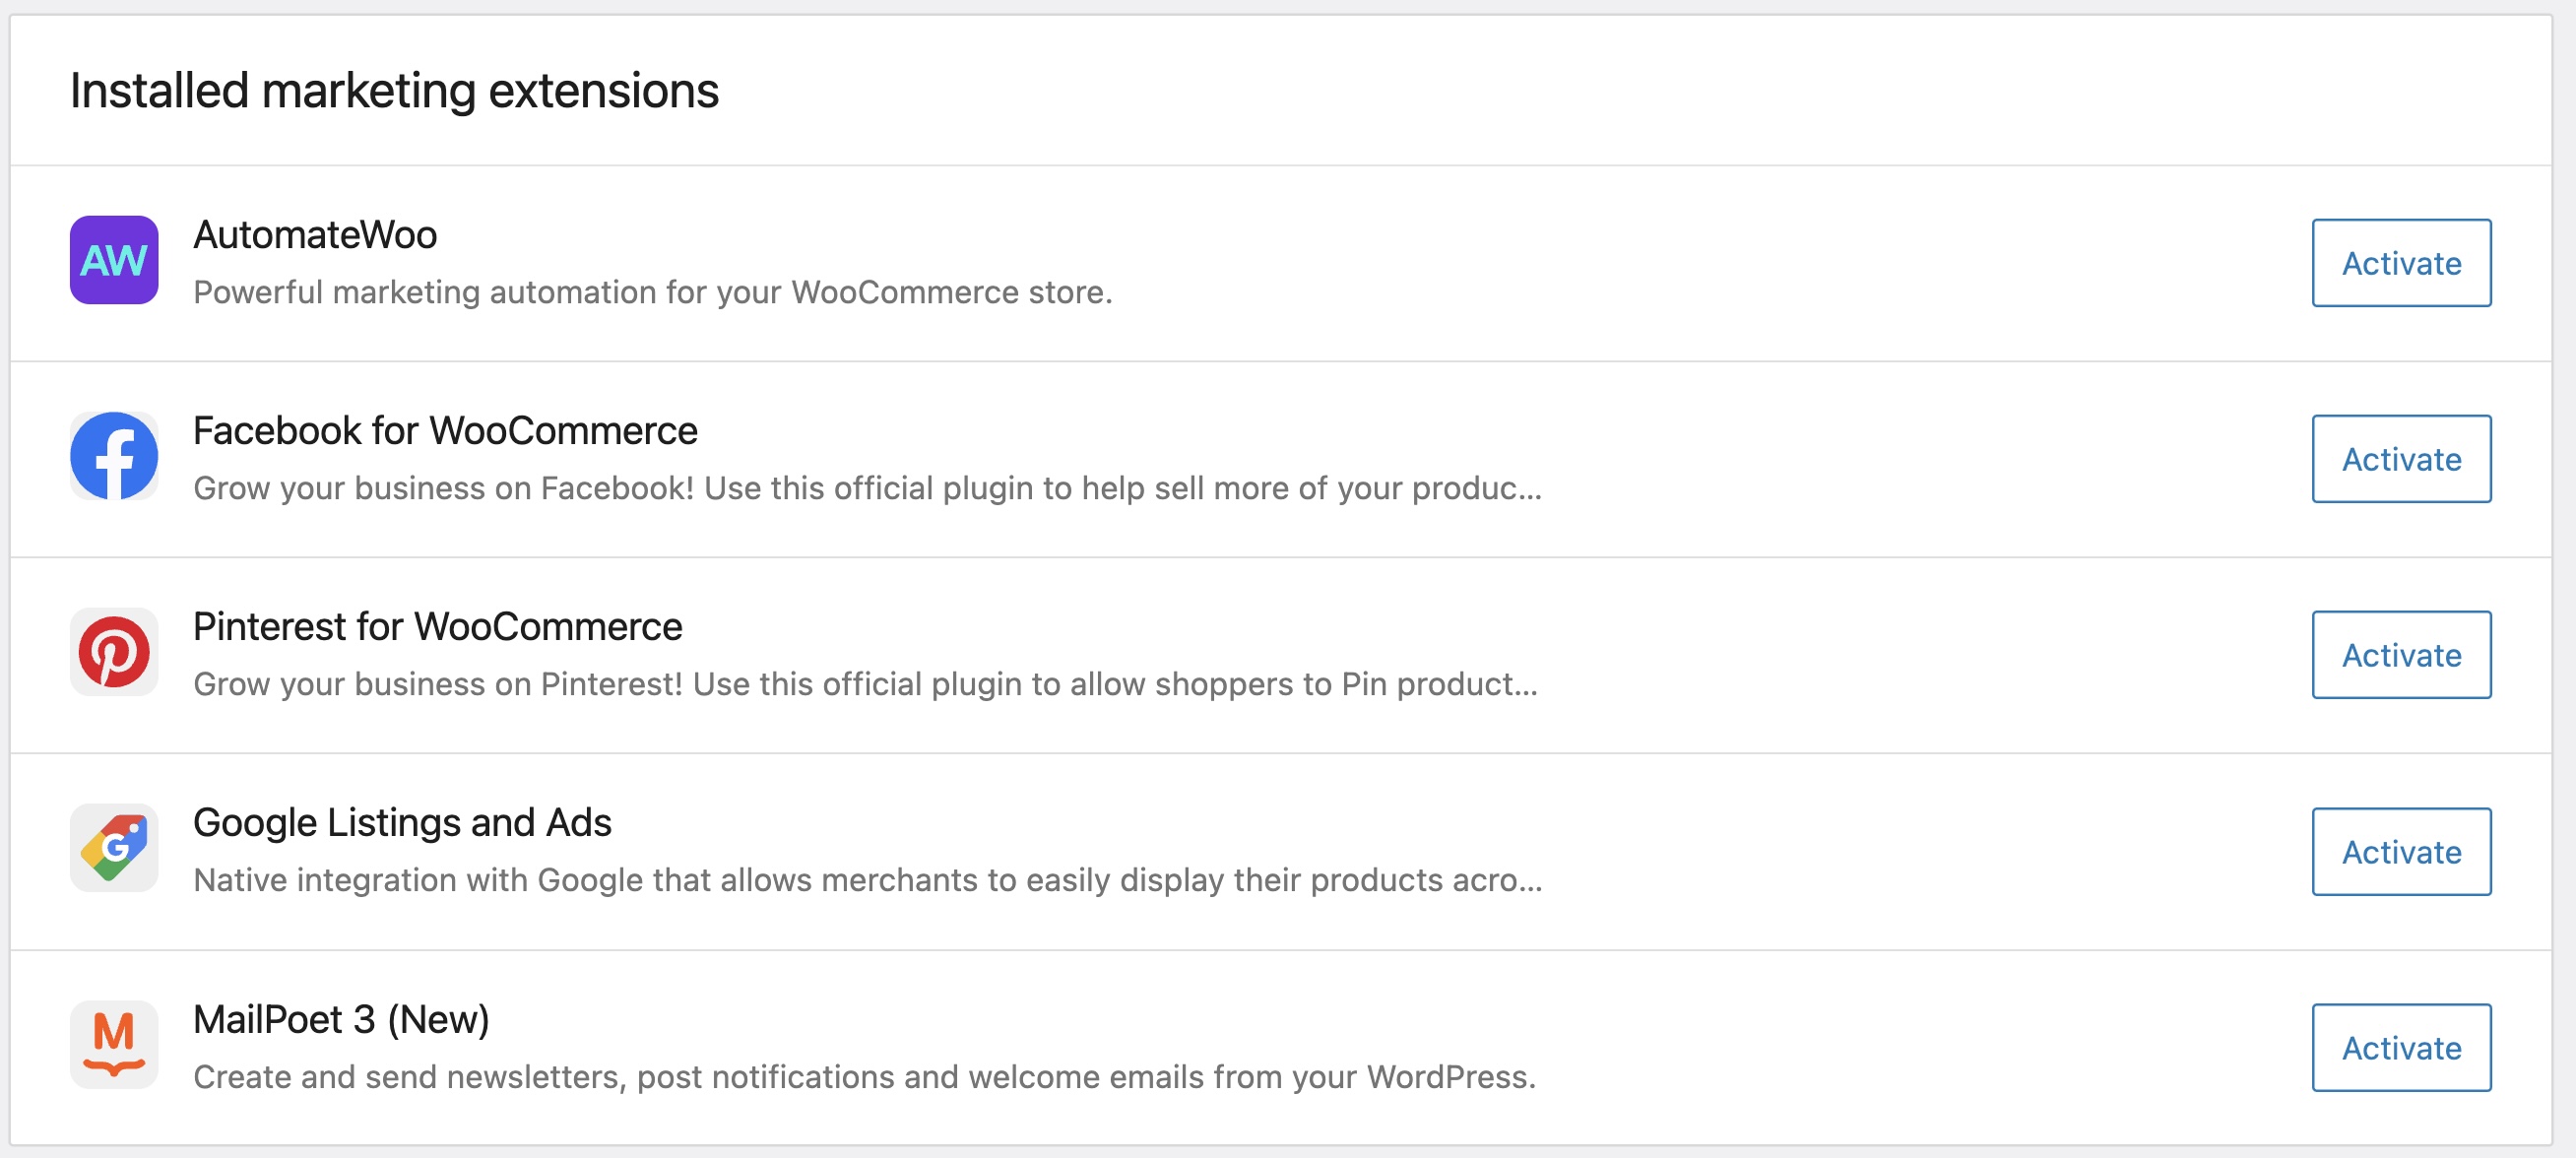
"Discover more marketing tools" card
- Go to WooCommerce Settings > Advanced > Features and turn off the multichannel marketing feature.
- Go to the Marketing page:
/wp-admin/admin.php?page=wc-admin&path=%2Fmarketing. You should see the normal view. All the extensions should have icons. (See screenshot.)
- Click on the extensions. It should bring you to the product page on woocommerce.com.
- Go to WooCommerce Settings > Advanced > Features and turn on the multichannel marketing feature.
- Go to the Marketing page:
/wp-admin/admin.php?page=wc-admin&path=%2Fmarketing. You should see the multichannel beta view. The "Discover more marketing tools" card should be collapsed by default. - All the extensions should have icons. (See screenshot.)

- Clicking on the "Get started" button should bring you to the extension product page.
- Install all the extensions under a specific tab, e.g. "Email". You can do this using the WordPress Plugins page without going through woocoommerce.com. Go back to the Marketing page. The tab should not show up anymore.
- Install all the recommended extensions, and go back to the Marketing page. There should be no tabs. There should be an "empty" message.
Slack Workflow: WooCommerce Core Setup List
- Start with a WooCommerce install that does not have Jetpack installed, and do not include it if you complete the onboarding profiler. Completing the onboarding profiler is optional and should not affect the flow.
- Find and click on the "Get WooCommerce mobile app" task in the next things tasklist

- You should see the modal appear, and it should allow you to install and connect jetpack
- The Jetpack installation flow should bring you out of the site to connect your WordPress.com account, and then return you back to the modal when it is complete.
- When you have returned to the homescreen you should be on step 2 with the correct email address shown
- It should allow you to click on the 'Send magic link' button, and you should receive a magic link login in your email inbox
- Clicking on the 'send another link' button should bring you back to the previous screen with the stepper.
NVIDIA_Share_lIDHVbIGE0.mp4
- Start with a WooCommerce install that already has Jetpack installed, or complete the onboarding profiler and install it as part of the flow. Alternatively use the same setup as the previous flow, as it already has Jetpack installed and connected
- Find and click on the "Get WooCommerce mobile app" task in the next things tasklist
- You should see the modal appear, and it should allow you to click on the 'Send magic link' button.
- You should receive a magic link login in your email inbox
- Clicking on the 'send another link' button should bring you back to the previous screen without the stepper
firefox_FDTrGTjUeQ.mp4
Slack Workflow: WooCommerce Admin Start Manage
- Visit the
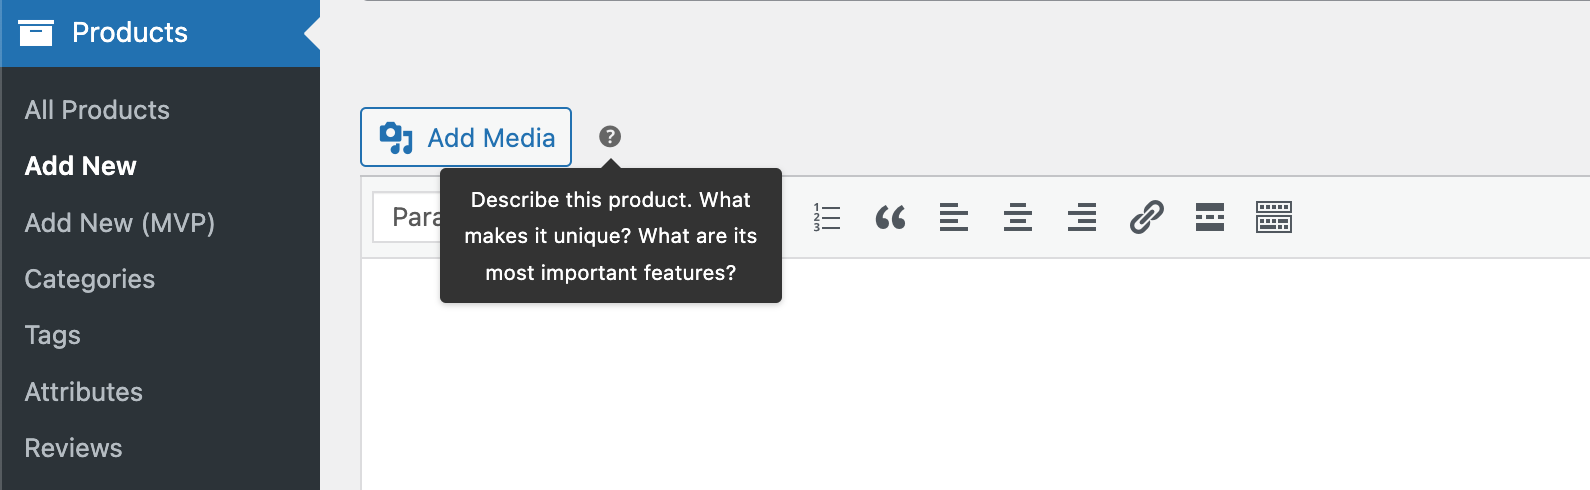
Add newproduct page - When hover the ? icon next to
Add mediabutton a tooltip should show like below:
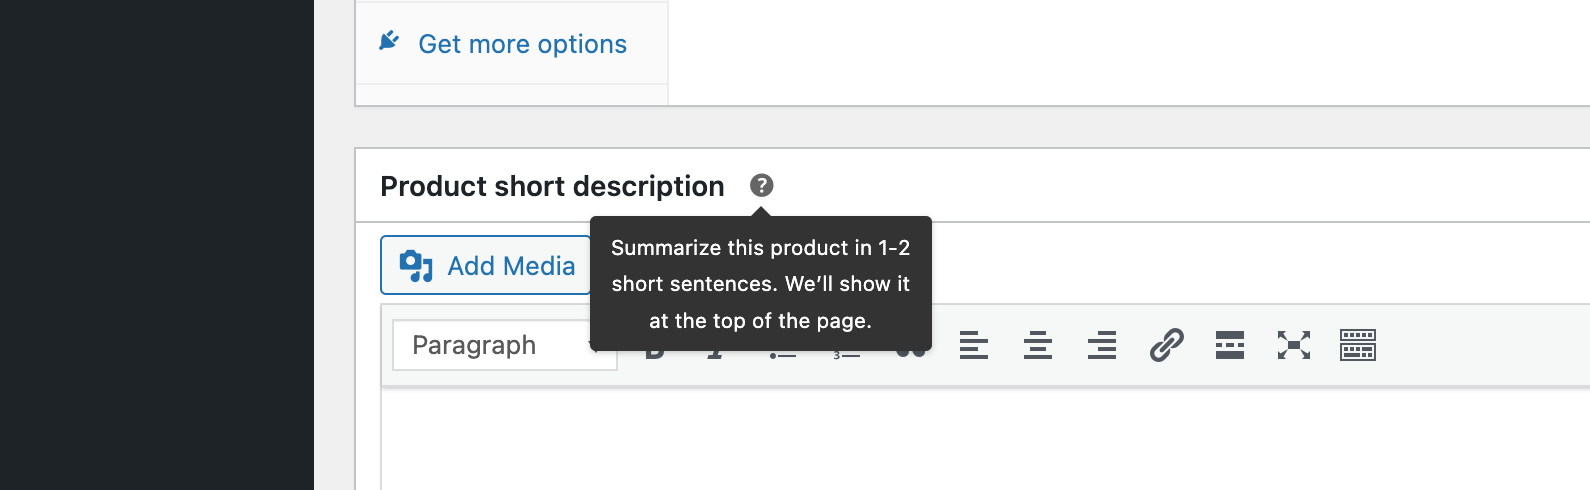
 3. When hover the ? icon next to panel with title `Product short description` a tooltip should show like below:
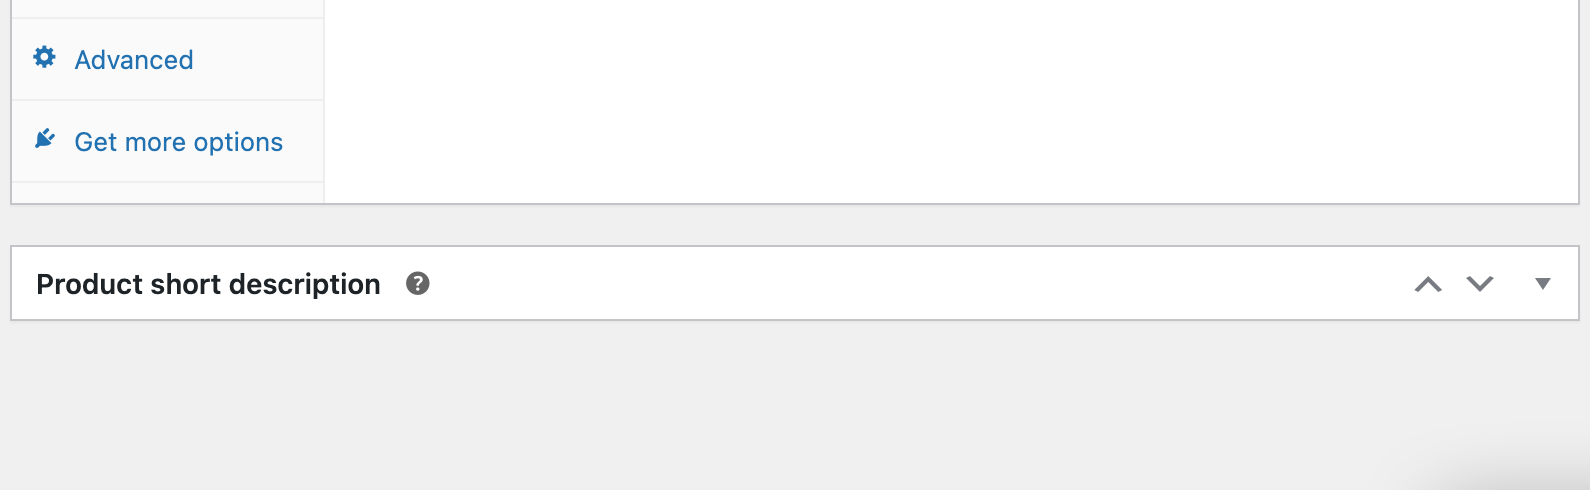
 4. Every time the page is visited or refreshed the `Product short description` panel should remain collapsed by default.
Slack Workflow: WooCommerce Core Setup List
- Go to OBW
- Select a "Country", but NOT fill the "Address"
- Complete the rest of OBW with "physical products" and any other required details
- Upon completing the OBW you should notice that there is a item to "Review Shipping Details" and clicking on it should bring you to the shipping settings page which should have a free shipping default filled in.
Slack Workflow: WooCommerce Core
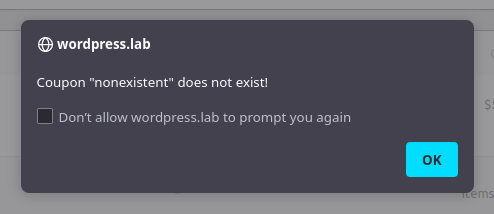
- Manually create or edit an order.
- Try to apply a non-existent coupon code.
- You should see an error informing you the coupon code does not exist:
Slack Workflow: WooCommerce Core Setup Wizard
- Start with a fresh site.
- Start OBW.
- On the
Business Detailsstep, chooseYes, on another latformforCurrently selling elsewhere?. - Confirm
WishandWalmartare listed underWhich platform is the store using?
Update form-login.php #34537
Slack Workflow: WooCommerce Core
- Enable the checkout login option in WooCommerce>Settings>Account & Privacy
- Add any product to the cart without logging in and go to the checkout.
- Click on the "Returning customer? Click here to login" link at the top of the page.
- You'll see the password visibility icon is displayed in the password field.
Slack Workflow: WooCommerce Core Setup Wizard
- Go to OBW
- Select a "Country", but NOT fill the "Address"
- Click
Continueand go to the next step - Click on
(1) Store Detailsin the header - Observe that the Country field is filled
Slack Workflow: WooCommerce Core Setup Wizard
- Use a fresh site
- Go to
Settings > General - Change site language to
Español - Go to OBW
- Go to Product types step
- Click on an info icon
(i) - Observe that tooltip shows translated contents.
Slack Workflow: WooCommerce Core Setup List
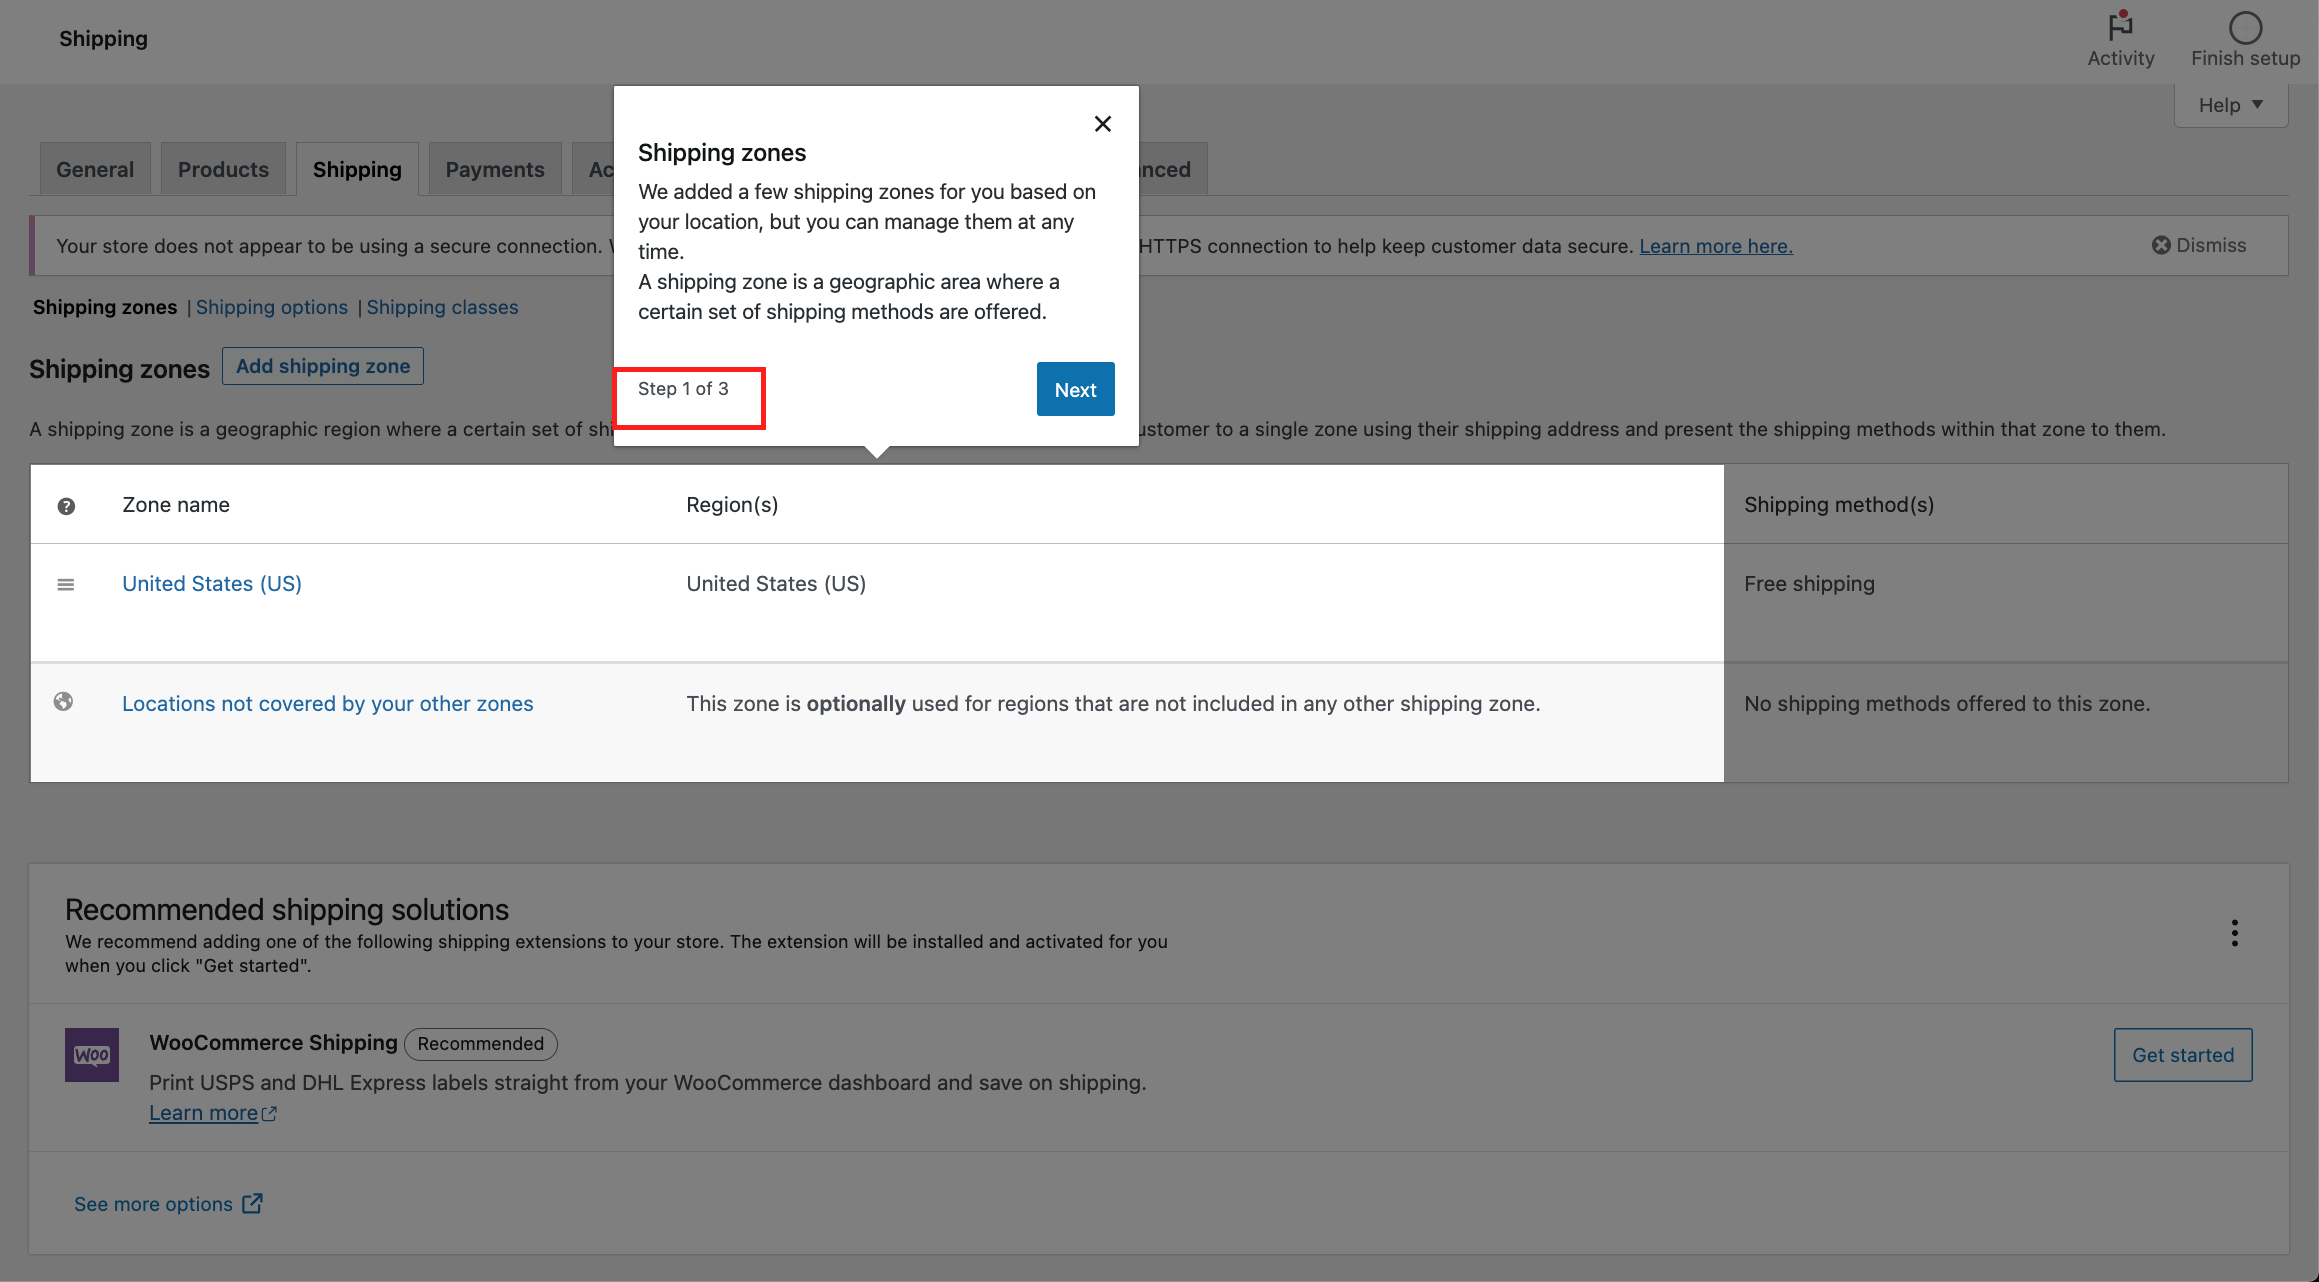
Case 1: The store sells physical products and is located in the US, but JP and WCS are not installed.
- Start OBW and choose United States as store country
- Choose "Physical products"
- Complete the OBW without installing anything from the Business Details tab.
- Navigate to WooCommerce -> Settings -> Shipping
- "United States (US)" zone should be created with Free shipping method
- Observe that the 3 step tour is displayed, with step one showing "Step 1 of 3"
- There should be 3 steps in the tour, covering shipping zones, shipping methods and recommended shipping options
- The tour should not appear again upon revisit or refresh of the page, if you complete the tour
Case 2: The store sells physical products, has JP and WCS installed and connected, and is located in the US.
- Start OBW and choose United States as store country
- Choose "Physical products"
- Install Jetpack and WooCommerce Shipping from the Business Details tab.
- Complete the OBW
- Connect and approve Jetpack when prompted.
- Navigate to WooCommerce -> Settings -> Shipping
- "United States (US)" zone should be created with Free shipping method
- Observe that the 3 step tour is displayed, with step one showing "Step 1 of 3"
- There should be 3 steps in the tour, with the third one highlighting the WooCommerce Shipping section
- The tour should not appear again upon revisit or refresh of the page, if you complete the tour
Slack Workflow: WooCommerce Core Setup List
- Make sure the task list has not been completed or use a fresh installation
- Go to
WooCommerce > Settings > Help > Setup Wizard - Click
DisableunderTask List - Go to
WooCommerce > Orders - Observe that
Finish Setupbutton is not shown on the right of the header bar
Slack Workflow: WooCommerce Marketplace
- navigate the Marketing in your WooCommerce site - example.site/wp-admin/admin.php?page=wc-admin&path=%2Fmarketing
Confirm that FB is listed in the "Installed marketing extensions" section of the marketing page.
Slack Workflow: WooCommerce Core
- Create a new coupon without any restrictions.
- As a customer, add a product to the cart and try applying the coupon (should work).
- Now trash the coupon.
- Continuing with the same shopping session as earlier, try to checkout and buy: you should find you are directed to return to the cart and the coupon is ultimately removed.
- Now as a new customer, try buying something and apply the same coupon. It should be rejected right away:

- As merchant, restore the coupon from the trash.
- Continuing with the second shopping session, try applying the coupon once more. It should now work:

Slack Workflow: WooCommerce Core
- Create a downloadable/virtual product with a PDF file.
- From Woocommerce Settings > Products > Downloadable Products select Inline File Delivery
- Create a test purchase of the downloadable product
- Test download delivery to be delivered inline so they would open directly in the browser.
Slack Workflow: WooCommerce Admin Start Manage

- Install WC on a connected Jetpack site.
- To be able to see a testing JITM, you'll need to add
&test_jitm=/1/at the end of a WooCommerce URL. It will work on every WooCommerce page except for:Products > Categories,Products > Tags,Products > Attributes, andProducts > Reviews. - Verify that the JITMs look good using the new navigation.
- They should look good also with different browser widths.
- Verify that they are not being shown in the Onboarding wizard.
For the PRs below to enable "Products > Add New (MVP)" Do the following steps
- Install WooCommerce Admin Test Helper from https://github.com/woocommerce/woocommerce-admin-test-helper/releases/download/v0.7.6/woocommerce-admin-test-helper.zip
- In Tools > WCA Test Helper > Features toggle
new-product-management-experienceto True
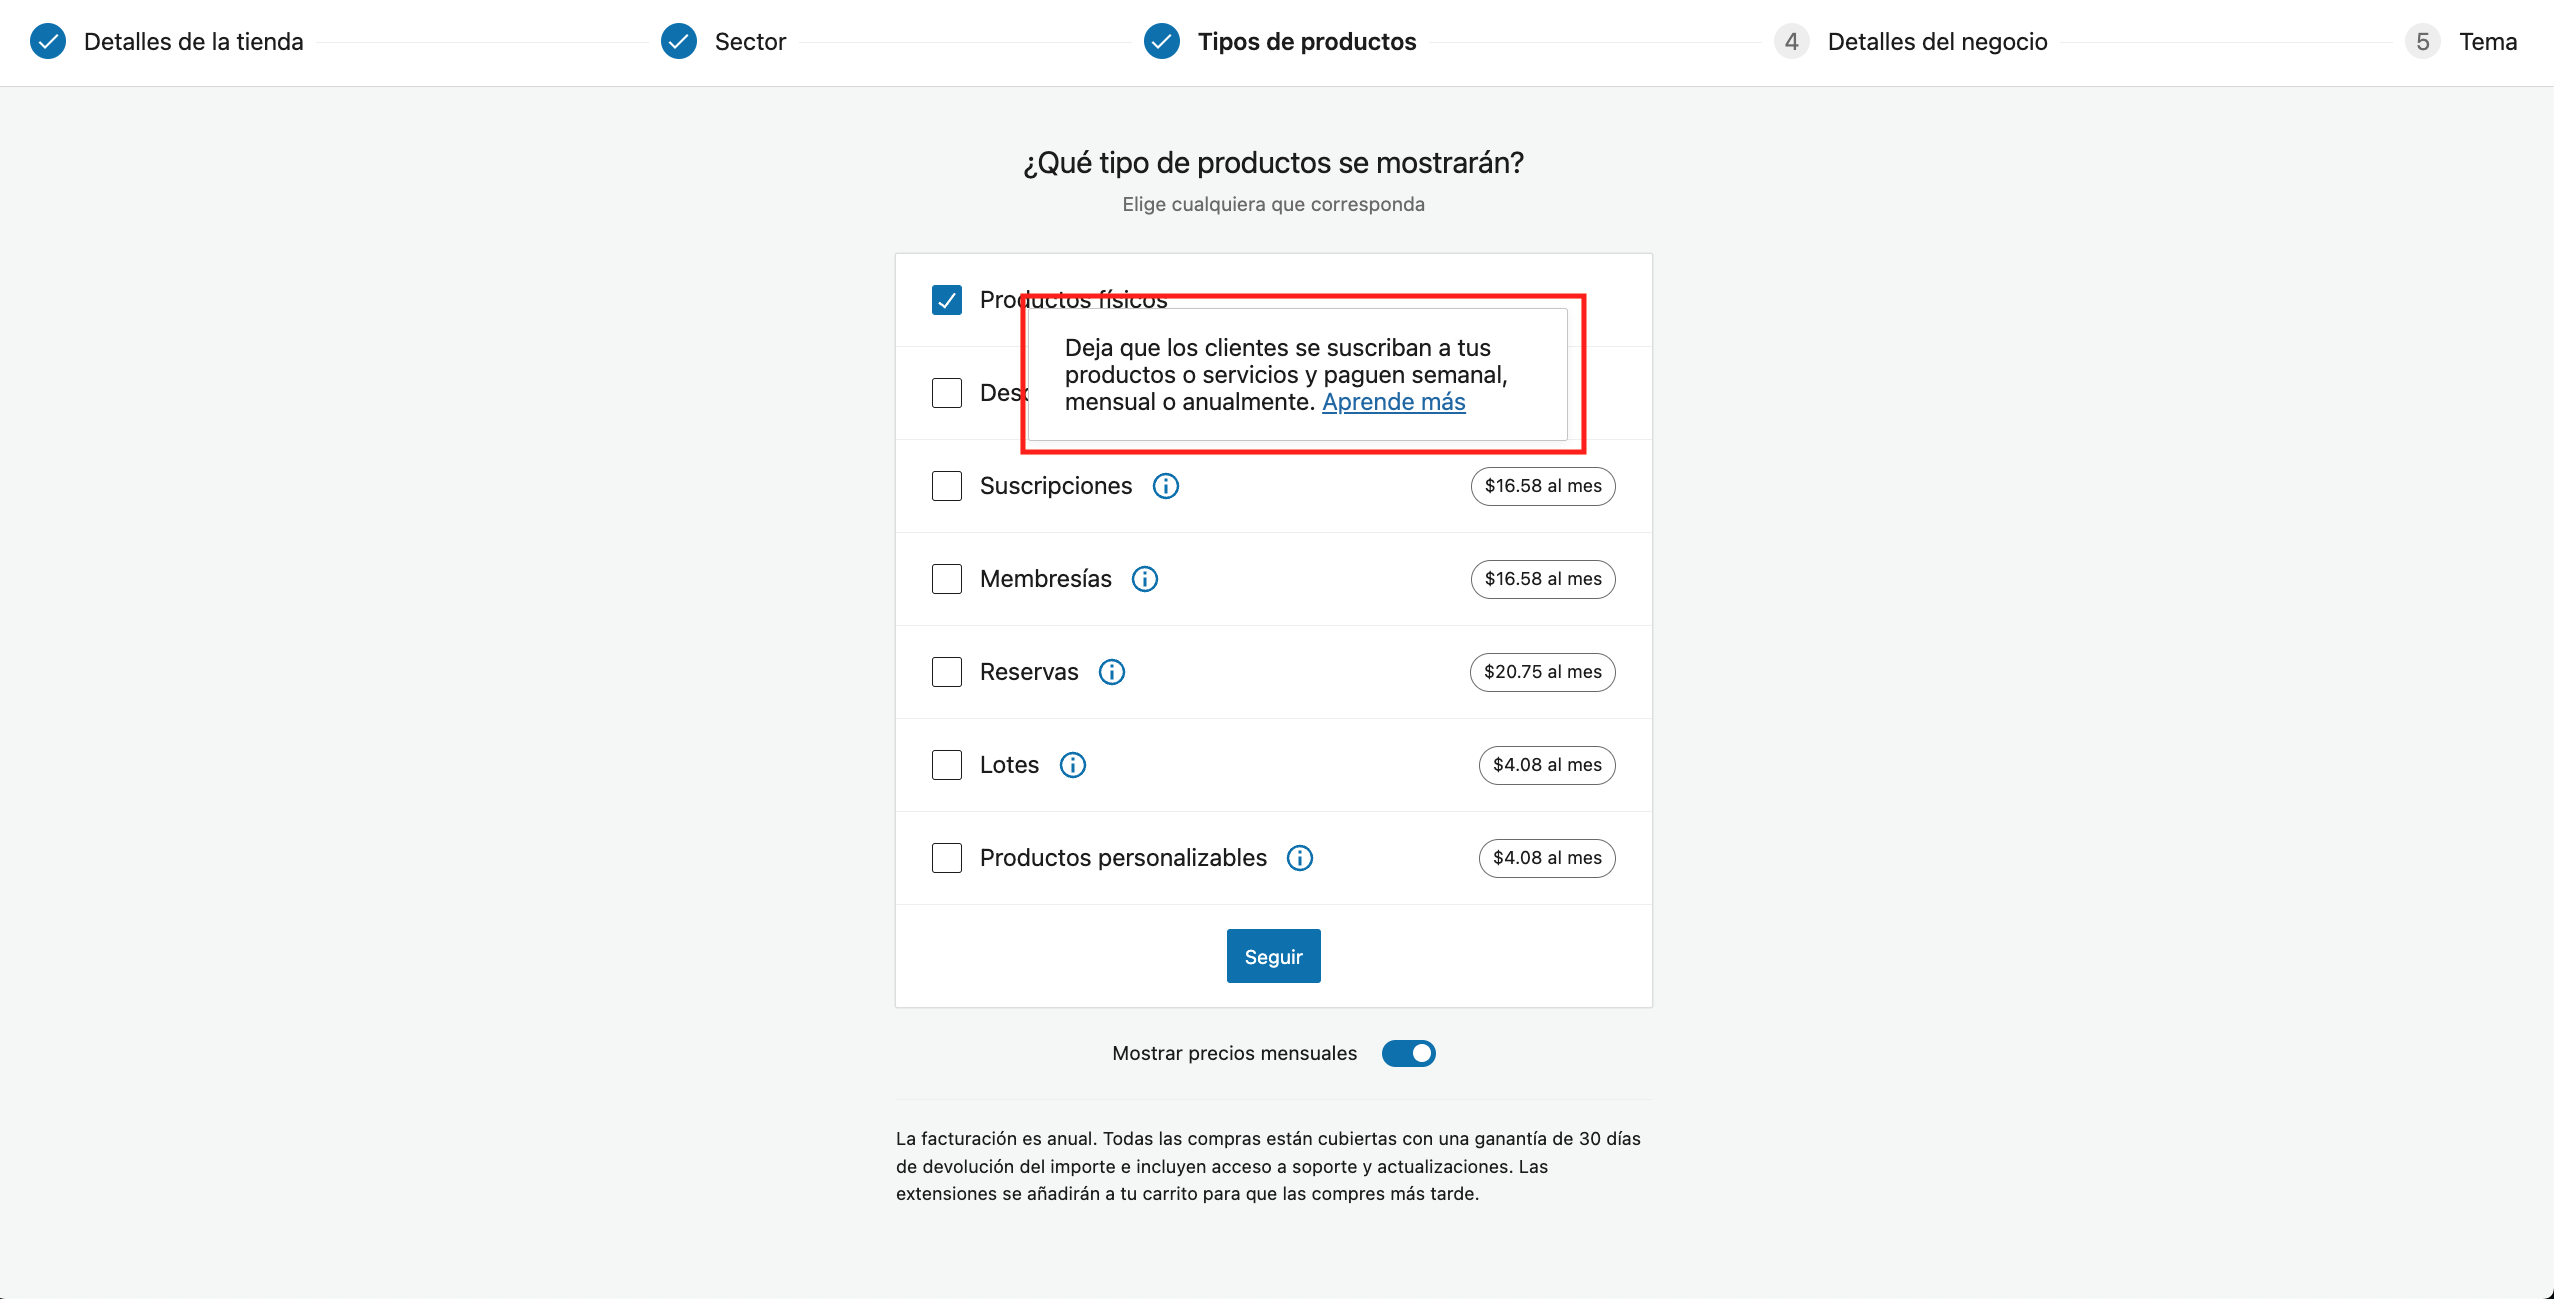
Add Pricing section #34382
Slack Workflow: WooCommerce Admin Start Manage

- Go to
Products>Add New (MVP)and create a product. - Verify that it's possible to add a
List price, and that the price list is correctly formatted after the input loses focus. - Add multiple decimal points and verify that the data is being saved in the DB correctly and that the amount is being shown as it should after leaving the input.
- The amount should stay the same after refreshing the page.
- Verify that it's possible to add negative numbers.
- Go to
WooCommerce>Settings>General(URL: /wp-admin/admin.php?page=wc-settings) and change the currency options, verify that the currency reflects the changes that you have made. - Taxes
- If tax is included in the price, the helper text reads: Per your store settings, tax is included in the price.
- If tax is excluded from the price, the helper text reads: Per your store settings, tax is not included in the price.
Slack Workflow: WooCommerce Admin Start Manage
- Go to Products> Add New (MVP and create a product.
- Verify that settings the regular and sale price works properly still, including sanitizing of any input value
Add product link field #34313
Slack Workflow: WooCommerce Admin Start Manage https://user-images.githubusercontent.com/2240960/184427098-11d5ab38-c4ba-4a58-b397-fc6e48e2f652.mp4
- Click the Products > Add New (MVP) button and fill in the name field and hit Save draft
- This should show the product link text underneath the name field with a button that say's
Edit - Click
edit, this should popup a modal allowing you to edit the slug. - Update the slug field and hit Save, it should save and close the modal, it will show a notice emphasizing that the product link has been successfully saved.
- The field should have updated with the new product slug.
- Click
editagain and make sure the close and cancel buttons work as expected. - Now edit the product name field and click the
editbutton again and update the slug. - Once the modal closes the product link should of updated, and the name field should still contain your previous changes with the Update button enabled to save these.
- You can also publish the product and follow the same steps.
Slack Workflow: WooCommerce Admin Start Manage
- Go to
Products>Add New (MVP)and create a product. - Verify that the
Feature this producttooltip looks and works correctly.

- Verify that the prices look correct.
- Create a new product without
List pricebut with aSale priceand verify that the error messageSale price cannot be equal to or higher than list price.is being shown after theSale priceloses the focus. - Set a
Sale priceequal to or higher than theList priceand verify that the warningSale price cannot be equal to or higher than list price.is visible under theSale price.
Slack Workflow: WooCommerce Admin Start Manage
- Go to
Products>Add New (MVP)and create a product. - If tax is included in the price, the helper text reads: "Per your store settings, tax is included in the price."
- If tax is excluded from the price, the helper text reads: "Per your store settings, tax is not included in the price."
- Verify that clicking "store settings" in the label below the list price takes you to
wp-admin/admin.php?page=wc-settings&tab=tax - Verify that clicking "store settings" fires the
wcadmin_product_pricing_list_price_help_tax_settings_clickTracks event
Slack Workflow: WooCommerce Core
Test update industries
- Using Atomic site (or site with PHP 8).
- Start OBW.
- Fill the Store address and click on Continue.
- Select any options from Industry tab.
- Click on Continue.
- Observe that "There was a problem updating your industries" notification should NOT displayed.
Test shipping task
- Using Atomic site (or site with PHP 8).
- Complete the Onboarding setup wizard.
- Go to Woocommerce > Home
- Observe that "Shipping task" is displayed on Woocommerce > Home page after completing OBW.
Test saving the store address
- Using Atomic site (or site with PHP 8).
- Complete the Onboarding setup wizard.
- Start OBW.
- Fill Store address and Email Address.
- Click on Contiune.
- Click on Store details header.
- Observe that "Country/ Region" and "Email address" are saved properly
Slack Workflow: WooCommerce Core Setup List
- Setup a new WooCommerce store.
- Skip the Setup Wizard.
- Navigate to WooCommerce > Home
- Header above "Add store details" task should look like thishttps://user-images.githubusercontent.com/4344253/191882600-9d40c30b-6ffe-4126-a02c-a24415a15311.png
- Go to customers page or any other page with Finish Setup icon.
- Click Finish Setup and check Header above "Add store details" task should look like https://user-images.githubusercontent.com/4344253/191882596-a2ec1f37-54f0-4831-8bca-92de857f552d.png
Slack Workflow: WooCommerce Core Setup List
- Go to OBW
- Choose US as store country in the step 1
- Complete OBW with WCPay installed.
- Go to
WooCommerce > Home - Complete
Set up WooCommerce Paymentstask - Complete the remaining tasks on task list
- When task list is completed, please enable the task list again
- Observe that
Set up WooCommerce Paymentstask is still displayed and marked as completed whileSet up paymentstask is not shown.
Slack Workflow: WooCommerce Core
- Try to place an order from the shop with
Saint Martin (French part)as the country in the billing or shipping address. - Try to also create an order in wp-admin > Orders for
Saint Martin (French part)as the country
Slack Workflow: WooCommerce Core
- In wp-admin Add New Product
- Enter information into "Product short description"
- Save the product
- Make sure the short description was saved
- Check the product as displayed in the shop also contains the short product description
- Repeat the above steps for an existing product and make sure an updated short product description is saved and updated.
- Exploratory test the other product fields.